tensorflow下识别手写数字基于MLP网络
# coding: utf-8 # In[1]: import tensorflow as tf
import tensorflow.examples.tutorials.mnist.input_data as input_data # In[2]: mnist = input_data.read_data_sets("MNIST_data/", one_hot=True) # In[3]: print('train',mnist.train.num_examples,
',validation',mnist.validation.num_examples,
',test',mnist.test.num_examples) # In[4]: print('train images :', mnist.train.images.shape,
'labels:' , mnist.train.labels.shape) # In[5]: import matplotlib.pyplot as plt
def plot_image(image):
plt.imshow(image.reshape(28,28),cmap='binary')
plt.gcf().set_size_inches(2, 4)
plt.show() # In[6]: plot_image(mnist.train.images[0]) # In[7]: import numpy as np
np.argmax(mnist.train.labels[0]) # In[8]: import matplotlib.pyplot as plt
def plot_images_labels_prediction(images,labels,
prediction,idx,num=10):
fig = plt.gcf()
fig.set_size_inches(12, 14)
if num>25: num=25
for i in range(0, num):
ax=plt.subplot(5,5, 1+i) ax.imshow(np.reshape(images[idx],(28, 28)),
cmap='binary') title= "label=" +str(np.argmax(labels[idx]))
if len(prediction)>0:
title+=",predict="+str(prediction[idx]) ax.set_title(title,fontsize=10)
ax.set_xticks([]);ax.set_yticks([])
idx+=1
plt.show() # In[9]: plot_images_labels_prediction(mnist.train.images,
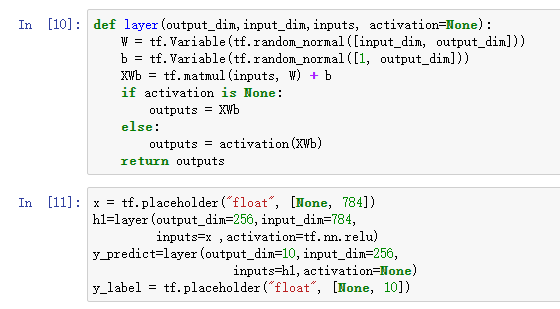
mnist.train.labels,[],0) # In[10]: def layer(output_dim,input_dim,inputs, activation=None):
W = tf.Variable(tf.random_normal([input_dim, output_dim]))
b = tf.Variable(tf.random_normal([1, output_dim]))
XWb = tf.matmul(inputs, W) + b
if activation is None:
outputs = XWb
else:
outputs = activation(XWb)
return outputs # In[11]: x = tf.placeholder("float", [None, 784])
h1=layer(output_dim=256,input_dim=784,
inputs=x ,activation=tf.nn.relu)
y_predict=layer(output_dim=10,input_dim=256,
inputs=h1,activation=None)
y_label = tf.placeholder("float", [None, 10]) # In[12]: loss_function = tf.reduce_mean(
tf.nn.softmax_cross_entropy_with_logits
(logits=y_predict ,
labels=y_label))
optimizer = tf.train.AdamOptimizer(learning_rate=0.001).minimize(loss_function) # In[13]: correct_prediction = tf.equal(tf.argmax(y_label , 1),
tf.argmax(y_predict, 1))
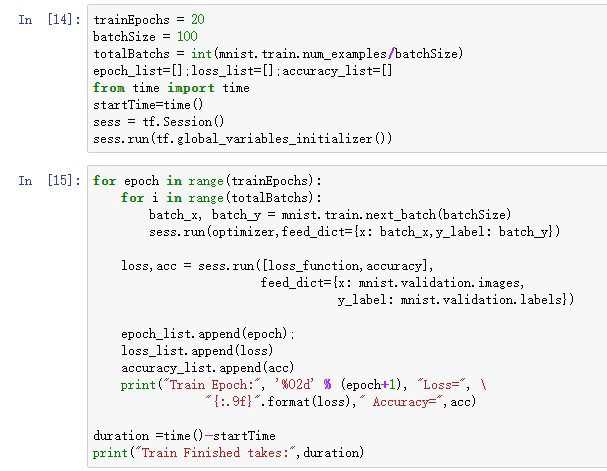
accuracy = tf.reduce_mean(tf.cast(correct_prediction, "float")) # In[14]: trainEpochs = 20
batchSize = 100
totalBatchs = int(mnist.train.num_examples/batchSize)
epoch_list=[];loss_list=[];accuracy_list=[]
from time import time
startTime=time()
sess = tf.Session()
sess.run(tf.global_variables_initializer()) # In[15]: for epoch in range(trainEpochs):
for i in range(totalBatchs):
batch_x, batch_y = mnist.train.next_batch(batchSize)
sess.run(optimizer,feed_dict={x: batch_x,y_label: batch_y}) loss,acc = sess.run([loss_function,accuracy],
feed_dict={x: mnist.validation.images,
y_label: mnist.validation.labels}) epoch_list.append(epoch);
loss_list.append(loss)
accuracy_list.append(acc)
print("Train Epoch:", '%02d' % (epoch+1), "Loss=", "{:.9f}".format(loss)," Accuracy=",acc) duration =time()-startTime
print("Train Finished takes:",duration) # In[16]: get_ipython().magic('matplotlib inline')
import matplotlib.pyplot as plt
fig = plt.gcf()
fig.set_size_inches(4,2)
plt.plot(epoch_list, loss_list, label = 'loss')
plt.ylabel('loss')
plt.xlabel('epoch')
plt.legend(['loss'], loc='upper left') # In[17]: plt.plot(epoch_list, accuracy_list,label="accuracy" )
fig = plt.gcf()
fig.set_size_inches(4,2)
plt.ylim(0.8,1)
plt.ylabel('accuracy')
plt.xlabel('epoch')
plt.legend()
plt.show() # In[18]: print("Accuracy:", sess.run(accuracy,
feed_dict={x: mnist.test.images,
y_label: mnist.test.labels})) # In[19]: prediction_result=sess.run(tf.argmax(y_predict,1),
feed_dict={x: mnist.test.images })
prediction_result[:10] # In[20]: plot_images_labels_prediction(mnist.test.images,
mnist.test.labels,
prediction_result,0) # In[21]: y_predict_Onehot=sess.run(y_predict,
feed_dict={x: mnist.test.images })
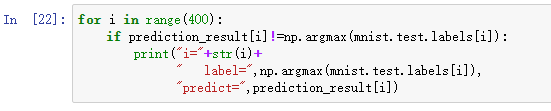
y_predict_Onehot[8] # In[22]: for i in range(400):
if prediction_result[i]!=np.argmax(mnist.test.labels[i]):
print("i="+str(i)+
" label=",np.argmax(mnist.test.labels[i]),
"predict=",prediction_result[i]) # In[ ]:
代码如上。
手动建立好输入层,隐层,输出层。
设置损失函数,优化器:

评估方式与准确率:

开始分批次训练:
训练完成后的准确率:

查看某项中的预测概率:

筛选出预测失败的数据:
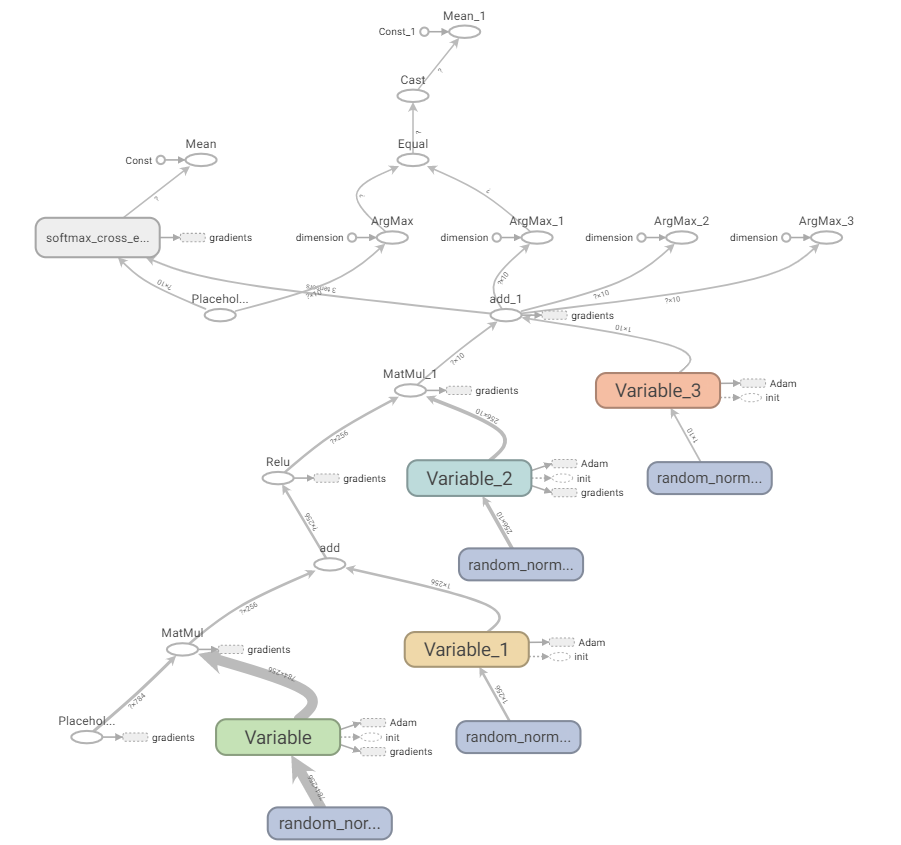
可以通过:
tf.summary.merge_all()
train_writer = tf.summary.FileWriter('log/area',sess.graph)
保存图。
通过tensorboard --logdir="路径",打开服务,通过输入localhost:6006之类打开网站。
查看生成的图:
tensorflow下识别手写数字基于MLP网络的更多相关文章
- 基于tensorflow的MNIST手写数字识别(二)--入门篇
http://www.jianshu.com/p/4195577585e6 基于tensorflow的MNIST手写字识别(一)--白话卷积神经网络模型 基于tensorflow的MNIST手写数字识 ...
- 基于TensorFlow的MNIST手写数字识别-初级
一:MNIST数据集 下载地址 MNIST是一个包含很多手写数字图片的数据集,一共4个二进制压缩文件 分别是test set images,test set labels,training se ...
- 3 TensorFlow入门之识别手写数字
------------------------------------ 写在开头:此文参照莫烦python教程(墙裂推荐!!!) ---------------------------------- ...
- Android+TensorFlow+CNN+MNIST 手写数字识别实现
Android+TensorFlow+CNN+MNIST 手写数字识别实现 SkySeraph 2018 Email:skyseraph00#163.com 更多精彩请直接访问SkySeraph个人站 ...
- TensorFlow实现Softmax Regression识别手写数字中"TimeoutError: [WinError 10060] 由于连接方在一段时间后没有正确答复或连接的主机没有反应,连接尝试失败”问题
出现问题: 在使用TensorFlow实现MNIST手写数字识别时,出现"TimeoutError: [WinError 10060] 由于连接方在一段时间后没有正确答复或连接的主机没有反应 ...
- 一文全解:利用谷歌深度学习框架Tensorflow识别手写数字图片(初学者篇)
笔记整理者:王小草 笔记整理时间2017年2月24日 原文地址 http://blog.csdn.net/sinat_33761963/article/details/56837466?fps=1&a ...
- 6 TensorFlow实现cnn识别手写数字
------------------------------------ 写在开头:此文参照莫烦python教程(墙裂推荐!!!) ---------------------------------- ...
- 学习笔记TF024:TensorFlow实现Softmax Regression(回归)识别手写数字
TensorFlow实现Softmax Regression(回归)识别手写数字.MNIST(Mixed National Institute of Standards and Technology ...
- TensorFlow实战之Softmax Regression识别手写数字
关于本文说明,本人原博客地址位于http://blog.csdn.net/qq_37608890,本文来自笔者于2018年02月21日 23:10:04所撰写内容(http://blog.c ...
随机推荐
- javascript基础:函数参数与闭包问题
今天在写东西的时候,对函数参数的概念有些模糊,查阅相关资料后,在博客上记点笔记,方便日后复习. 首先,在js中函数参数并没有强语言中那么要求严格,他不介意传递进来多少个参数,也不在乎传进来的参数是什么 ...
- codeblocks17.12 不能启动调试器
调试器需要手动指定. settings->debugger->default->executable path.这里默认空的,需要指定.路径在安装目录下的CodeBlocks\Min ...
- LibreOJ 6280 . 数列分块入门 4
题目链接:https://loj.ac/problem/6280 加一个数组保存块的和. 代码: #include<iostream> #include<cstring> #i ...
- javascript实现留言功能
原理: 1.用户在留言框输入留言 2.利用textarea的value属性获取到用户输入的留言 3.动态创建一个li 4.将获取的留言打包成html存到li中 5.根据需要添加删除留言.统计留言数量等 ...
- TZOJ 2725 See you~(二维树状数组单点更新区间查询)
描述 Now I am leaving hust acm. In the past two and half years, I learned so many knowledge about Algo ...
- javaweb导出excel
百度找了半天也没找到一个提供有效思路的,全都告诉我此路不通 html表格数据粘贴到txt,然后改后缀为xsl,打开,发现二者无缝对接 @参考文章.@参考前任项目 /** * @todo * @para ...
- eclipse Mars4.5.2安装fatjar
试了在eclipse下添加plugins的方法,但是并没有生效 最后看了一篇博客@参考博客 原文转载: 首先声明,eclipse luna 和mars 楼主亲测可用. .安装Eclipse2.0版本的 ...
- [leetcode]123. Best Time to Buy and Sell Stock III 最佳炒股时机之三
Say you have an array for which the ith element is the price of a given stock on day i. Design an al ...
- Java_5 数组
1.数组的概念与作用 数组:一组数据的集合,数组中的每个数据被称作元素.在数组中可以存放任意类型的元素,但同一个数组里存放的元素类型必须一致. 作用:可以存贮多个数据. 2.数组的使用方式 数据类型[ ...
- 微信小程序基础架构
一个微信小程序界面由一个页面描述文件,一个页面逻辑文件,一个样式表文件来进行描述 在主目录中的三个以app开头的文件就是微信小程序的主描述文件 app.js :主逻辑文件,用来注册小程序 app.js ...