Django的rest_framework的视图之基于ModelViewSet视图源码解析
前言
今天一直在整理Django的rest_framework的序列化组件,前面一共写了2篇博客,前面的博客给的方案都是一个中间的状态的博客,其中有很多的冗余的代码,如果有朋友不清楚,可以先看下我前面的博客
第一篇,使用minix类来实现序列化和反序列化
https://www.cnblogs.com/bainianminguo/p/10463741.html
第二篇,使用通用的类的方法实现序列化和反序列化
https://www.cnblogs.com/bainianminguo/p/10463784.html
这篇我给大家介绍一个终极方案,基于ModelViewSet的序列化和反序列化的方案和源码解析
正文
终极方案之需要一个类就可以分别处理model对象的删改查操作,和queryset对象的增和查操作
先把具体的代码贴上来,让大家有一个整体的概念,然后我一一给大家分析
一、代码
1、首先urls文件
- from django.conf.urls import url
- from django.contrib import admin
- from django.conf.urls import include
- from app1 import views
- app_name = "app1"
- urlpatterns = [
- url(r'^test/', views.test),
- url(r'^test_cbv/', views.test_cbv.as_view(),name="test1"),
- url(r'^test_rest/', views.Rest_view.as_view(),name="test2"),
- url(r'^book_cbv/', views.Book_cbv.as_view(),name="test3"),
- url(r'^publish_detail_cbv/(?P<id>\d+)', views.Pub_detail_cbv.as_view(),name="publish_url_name"),
- url(r'^book_detail_cbv/(?P<id>\d+)', views.Book_detail_cbv.as_view(),name="test4"),
- # url(r'^autherdetail/(?P<id>\d+)', views.Book_detail_cbv.as_view(), name="autherdetail"),
- # url(r'^auther/', views.Book_cbv.as_view(),name="auther"),
- url(r'^autherdetail/(?P<pk>\d+)/', views.AutherModelCBV.as_view({"get":"retrieve","delete":"destroy","put":"update"}), name="autherdetail"),
- url(r'^auther/', views.AutherModelCBV.as_view({"get":"list","post":"create"}),name="auther"),
- ]
我们用的url是最后两条

我们仔细观察一下,这里的url和之前有3个地方不一样,我一一给大家指出来
a、两个url对应的类是相同的类

b、as_view这个方法有参数,这个参数是一个字典

c、对于model对象的url的url中的变量的名称是pk,之前我们用的id

2、序列化类的代码
- class authermodelserializer(serializers.ModelSerializer):
- class Meta:
- model = models.Auther
- fields = "__all__"
序列化的类的代码和之前的保持一致,没有任何改变
3、视图类的代码
- from rest_framework import viewsets
- class AutherModelCBV(viewsets.ModelViewSet):
- queryset = models.Auther.objects.all()
- serializer_class = authermodelserializer
我们可以看到这个类非常的简单,这个类继承了一个新的类,我们之前没有用过这个类:viewsets.ModelViewSet
二、流程和源码解析
1、从url的as_view方法开始解读
as_view的源码
- @classonlymethod
- def as_view(cls, actions=None, **initkwargs):
- """
- Because of the way class based views create a closure around the
- instantiated view, we need to totally reimplement `.as_view`,
- and slightly modify the view function that is created and returned.
- """
- # The name and description initkwargs may be explicitly overridden for
- # certain route confiugurations. eg, names of extra actions.
- cls.name = None
- cls.description = None
- # The suffix initkwarg is reserved for displaying the viewset type.
- # This initkwarg should have no effect if the name is provided.
- # eg. 'List' or 'Instance'.
- cls.suffix = None
- # The detail initkwarg is reserved for introspecting the viewset type.
- cls.detail = None
- # Setting a basename allows a view to reverse its action urls. This
- # value is provided by the router through the initkwargs.
- cls.basename = None
- # actions must not be empty
- if not actions:
- raise TypeError("The `actions` argument must be provided when "
- "calling `.as_view()` on a ViewSet. For example "
- "`.as_view({'get': 'list'})`")
- # sanitize keyword arguments
- for key in initkwargs:
- if key in cls.http_method_names:
- raise TypeError("You tried to pass in the %s method name as a "
- "keyword argument to %s(). Don't do that."
- % (key, cls.__name__))
- if not hasattr(cls, key):
- raise TypeError("%s() received an invalid keyword %r" % (
- cls.__name__, key))
- # name and suffix are mutually exclusive
- if 'name' in initkwargs and 'suffix' in initkwargs:
- raise TypeError("%s() received both `name` and `suffix`, which are "
- "mutually exclusive arguments." % (cls.__name__))
- def view(request, *args, **kwargs):
- self = cls(**initkwargs)
- # We also store the mapping of request methods to actions,
- # so that we can later set the action attribute.
- # eg. `self.action = 'list'` on an incoming GET request.
- self.action_map = actions
- # Bind methods to actions
- # This is the bit that's different to a standard view
- for method, action in actions.items():
- handler = getattr(self, action)
- setattr(self, method, handler)
- if hasattr(self, 'get') and not hasattr(self, 'head'):
- self.head = self.get
- self.request = request
- self.args = args
- self.kwargs = kwargs
- # And continue as usual
- return self.dispatch(request, *args, **kwargs)
- # take name and docstring from class
- update_wrapper(view, cls, updated=())
- # and possible attributes set by decorators
- # like csrf_exempt from dispatch
- update_wrapper(view, cls.dispatch, assigned=())
- # We need to set these on the view function, so that breadcrumb
- # generation can pick out these bits of information from a
- # resolved URL.
- view.cls = cls
- view.initkwargs = initkwargs
- view.actions = actions
- return csrf_exempt(view)
函数的代码很长,我们只关注需要我们关注的代码
首先,确定as_view的函数中action的值就是我们的urls中as_view方法中的字典

action的值就是as_view方法中的字典,不信你可以实际测试一下

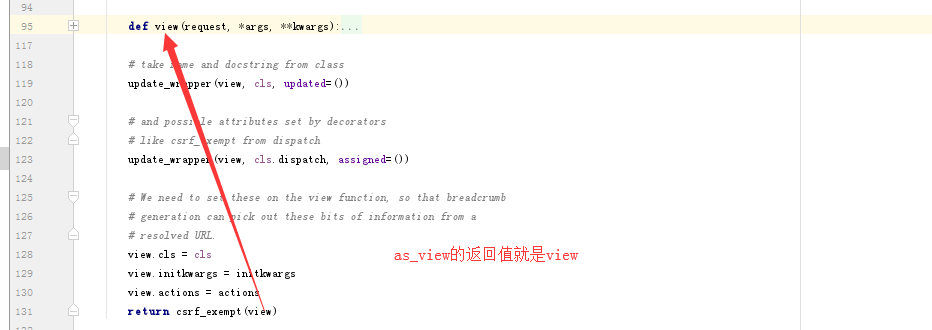
然后我们看下as_view这个方法的返回值

然后我们在看下as_view中的view方法
- def view(request, *args, **kwargs):
- self = cls(**initkwargs)
- # We also store the mapping of request methods to actions,
- # so that we can later set the action attribute.
- # eg. `self.action = 'list'` on an incoming GET request.
- self.action_map = actions
- # Bind methods to actions
- # This is the bit that's different to a standard view
- for method, action in actions.items():
- handler = getattr(self, action)
- setattr(self, method, handler)
- if hasattr(self, 'get') and not hasattr(self, 'head'):
- self.head = self.get
- self.request = request
- self.args = args
- self.kwargs = kwargs
- # And continue as usual
- return self.dispatch(request, *args, **kwargs)
这里很重要,我们要慢慢来分析

然后在看下view这个方法的返回值
- self.request = request
- self.args = args
- self.kwargs = kwargs
- # And continue as usual
- return self.dispatch(request, *args, **kwargs)
我们可以看到这个函数的返回值是self.dispatch

我们注意到self.dispatch这个方法,在as_view和view均找不到,这个self是什么呢?这个self就是视图函数的类,所以我们来我们的视图函数的类中找下

明显我们自定义的AuhterModelCBV这个类没有dispatch这个方法,所以我们要去这个类的父类中查找,也就是viewsets.ModelViewSet类中查找
- class ModelViewSet(mixins.CreateModelMixin,
- mixins.RetrieveModelMixin,
- mixins.UpdateModelMixin,
- mixins.DestroyModelMixin,
- mixins.ListModelMixin,
- GenericViewSet):
- """
- A viewset that provides default `create()`, `retrieve()`, `update()`,
- `partial_update()`, `destroy()` and `list()` actions.
- """
- pass
这个类中也没有dispatch方法,但是这个类又继承了6个类,由于继承是从左到右继承,我们从最左边的类开始查找,最终在GeneriViewSet中找到dispatch的方法
- class GenericViewSet(ViewSetMixin, generics.GenericAPIView):
- """
- The GenericViewSet class does not provide any actions by default,
- but does include the base set of generic view behavior, such as
- the `get_object` and `get_queryset` methods.
- """
- pass
GeneriViewSet的类中也没有dispatch方法,但是这个类有2个父类,所以我们继续往上找
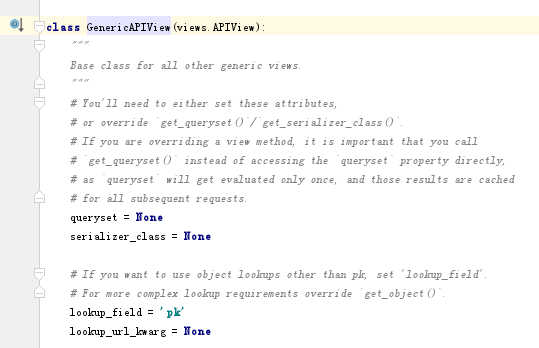
最终在GenericAPIView类中找到了dispatch方法

这个类中也没有dispatch方法,我们在往他的父类中查找
最后,我们终于在APIView类中找到我们需要的dispatch方法
- class APIView(View):
- def dispatch(self, request, *args, **kwargs):
- """
- `.dispatch()` is pretty much the same as Django's regular dispatch,
- but with extra hooks for startup, finalize, and exception handling.
- """
- self.args = args
- self.kwargs = kwargs
- request = self.initialize_request(request, *args, **kwargs)
- self.request = request
- self.headers = self.default_response_headers # deprecate?
- try:
- self.initial(request, *args, **kwargs)
- # Get the appropriate handler method
- if request.method.lower() in self.http_method_names:
- handler = getattr(self, request.method.lower(),
- self.http_method_not_allowed)
- else:
- handler = self.http_method_not_allowed
- response = handler(request, *args, **kwargs)
- except Exception as exc:
- response = self.handle_exception(exc)
- self.response = self.finalize_response(request, response, *args, **kwargs)
- return self.response
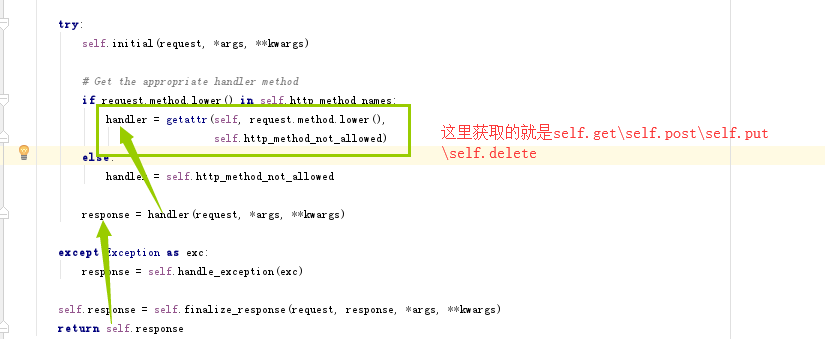
下面在看下dispatch方法干了什么

所以执行self.create等方法就会调用我们前面已经对应的self.list。self.update等方法
至此,终极方案我们也完成了!谢谢大家的查阅!
Django的rest_framework的视图之基于ModelViewSet视图源码解析的更多相关文章
- Django的rest_framework的权限组件和频率组件源码分析
前言: Django的rest_framework一共有三大组件,分别为认证组件:perform_authentication,权限组件:check_permissions,频率组件:check_th ...
- Django生命周期 URL ----> CBV 源码解析-------------- 及rest_framework APIView 源码流程解析
一.一个请求来到Django 的生命周期 FBV 不讨论 CBV: 请求被代理转发到uwsgi: 开始Django的流程: 首先经过中间件process_request (session等) 然后 ...
- 源码解析Django CBV的本质
Django CBV模式的源码解析 通常来说,http请求的本质就是基于Socket Django的视图函数,可以基于FBV模式,也可以基于CBV模式. 基于FBV的模式就是在Django的路由映射表 ...
- 2.CBV和类视图as_view源码解析
一.FBV和CBV # 视图基于函数开发 FBV: function.base.views # 视图基于类开发 CBV: class .base .views #Python是一个面向对象的编程语言, ...
- django之admin源码解析
解析admin的源码 第一步:项目启动,加载settings文件中的 INSTALLED_APPS 里边有几个app就加载几个,按照注册顺序来执行. 第二步:其中加载的是admin.py,加载每一个a ...
- Django 之 admin组件使用&源码解析
admin组件使用 Django 提供了基于 web 的管理工具. Django 自动管理工具是 django.contrib 的一部分.可以在项目的 settings.py 中的 INSTALLED ...
- String,StringBuffer和StringBuilder源码解析[基于JDK6]
最近指导几位新人,学习了一下String,StringBuffer和StringBuilder类,从反馈的结果来看,总体感觉学习的深度不够,没有读出东西.其实,JDK的源码是越读越有味的.下面总结一下 ...
- springMVC源码解析--ViewResolver视图解析器执行(三)
之前两篇博客springMVC源码分析--ViewResolver视图解析器(一)和springMVC源码解析--ViewResolverComposite视图解析器集合(二)中我们已经简单介绍了一些 ...
- WmS简介(三)之Activity窗口是如何创建的?基于Android7.0源码
OK,在前面两篇博客中我们分别介绍了WmS中的token,同时也向小伙伴们区分了Window和窗口的区别,并且按照type值的不同将Android系统中的窗口分为了三大类,那么本篇博客我们就来看看应用 ...
随机推荐
- 使用swig工具为go语言与c++进行交互
环境: centos_7_x86_x64,gcc_4.8.5 一.安装swig 1. 安装pcre yum install -y pcre pcre-tools pcre-devel 2. 安装yac ...
- cannot find package "context"
导入 github.com/go-sql-driver/mysql 和 database/sql 时,报cannot find package "context"的错误因为go1 ...
- torchvision里densenet代码分析
#densenet原文地址 https://arxiv.org/abs/1608.06993 #densenet介绍 https://blog.csdn.net/zchang81/article/de ...
- Go语言开发Windows应用
Go语言开发Windows应用 当第一次看到Go程序在windows平台生成可执行的exe文件,就宣告了windows应用也一定是Go语言的战场.Go不是脚本语言,但却有着脚本语言的轻便简单的特性.相 ...
- 解决 windows下安装Anaconda后python pip不可用的情况
在windows系统下通过安装Anaconda的方式安装的python使用中发现不能再通过pip安装python包.只能通过conda install packname 的方法,导致很多conda不支 ...
- 一 Struts框架(上)
Struts2 是基于MVC的WEB框架 经过六年多的发展,Struts1已经成为了一个高度成熟的框架,不管是稳定性还是可靠性都得到了广泛的证明.市场占有率超过20%,拥有丰富的开发人群,几乎已经成为 ...
- python selenium 定制启动Chrome的选项注意事项(十九)
自动化测试的时候为了避免每个case均需要登录的操作,所以把登录后的cookie信息保存下来,在有效期内使用cookie的方式实现登录操作,为了避免展现太多的登录操作,需要通过设置浏览器的option ...
- sublime text 3 vue 语法高亮
1.下载文件 链接 https://github.com/vuejs/vue-syntax-highlight 2.sublime菜单栏->Preferences->Browse Pack ...
- Azure CosmosDB (2) CosmosDB中的数据一致性
<Windows Azure Platform 系列文章目录> 为了保证分布式数据库的高可用性和低延迟性,我们需要在可用性.延迟和吞吐量之间进行权衡. 绝大部分的商业分布式数据库,要求开发 ...
- 8、sort排序中比较函数的几种应用方式
1.待排序中的元素作数组的下标或map的键值 例题:PAT甲级_1141 PAT Ranking of Institutions #include<bits/stdc++.h> using ...
