Angular2 富文本编辑器 ng2-ckeditor 的使用
import { Component, OnInit, ViewChild } from '@angular/core';
@Component({
selector: 'my-ckeditor',
templateUrl: './ckeditor.component.html'
})
export class MyCKEditorComponent implements OnInit {
name = 'ng2-ckeditor';
ckeConfig: any;
mycontent: string;
log: string = '';
@ViewChild("myckeditor") ckeditor: any;
constructor() {
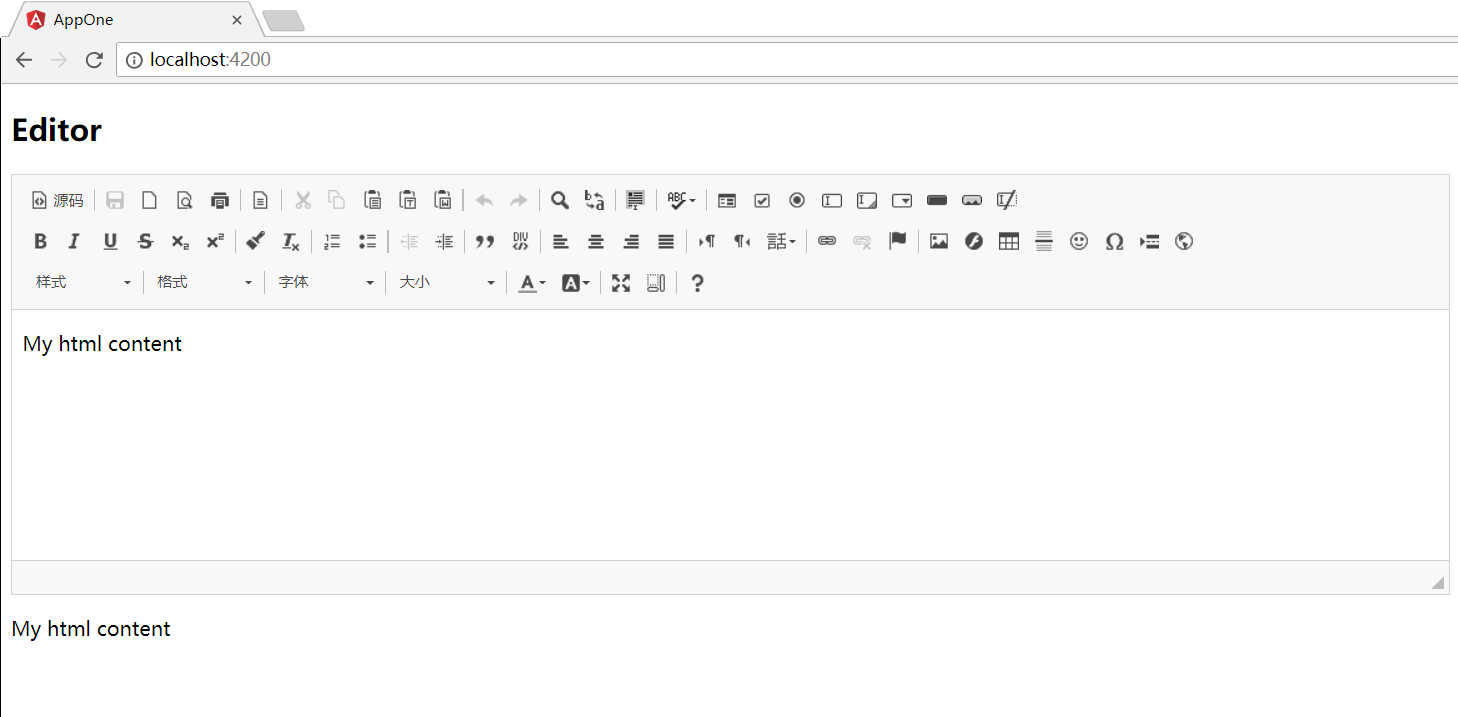
this.mycontent = `<p>My html content</p>`;
}
ngOnInit() {
this.ckeConfig = {
allowedContent: true,
extraPlugins: 'divarea'
};
}
onChange($event: any): void {
console.log("onChange");
//this.log += new Date() + "<br />";
}
}
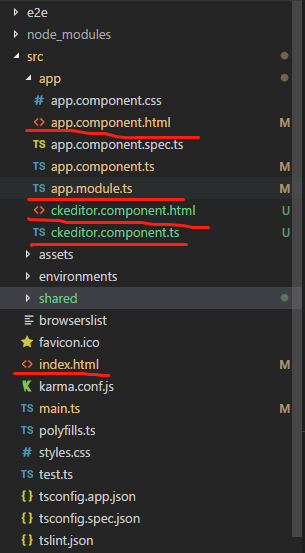
3. 创建 ckeditor.component.html
<div>

    <ckeditor [(ngModel)]="mycontent" #myckeditor [config]="ckeConfig" debounce="500" (change)="onChange($event)">

    </ckeditor>

</div>

<div [innerHTML]="mycontent"></div>
import { NgModule } from '@angular/core';

import { BrowserModule } from '@angular/platform-browser';

import { FormsModule } from '@angular/forms';

import { AppComponent } from './app.component';

import { CKEditorModule, CKEditorComponent } from 'ng2-ckeditor';

import { MyCKEditorComponent } from './ckeditor.component';

@NgModule({

  imports:      [ BrowserModule, FormsModule, CKEditorModule ],

  declarations: [ AppComponent, MyCKEditorComponent ],

  bootstrap:    [ AppComponent ]

})

export class AppModule { }
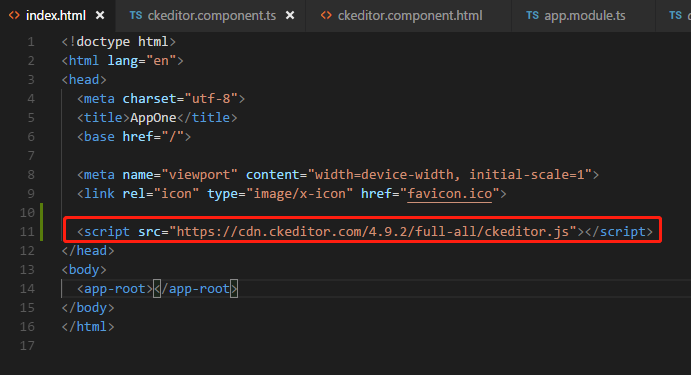
5. 在 index.html 文件头部标签 <head> 中加入 <script src="https://cdn.ckeditor.com/4.9.2/full-all/ckeditor.js"></script>, 其中 URL中 4.9.2 是你安装的 ckeditor 版本号,根据自己的实际情况修改

.png)
.png)
.png)
Angular2 富文本编辑器 ng2-ckeditor 的使用的更多相关文章
- Django配置富文本编辑器kindeditor
一.简介 django是一个容易快速上手的web框架,用它来创建内容驱动型的网站(比如独立博客)十分方便.遗憾的是,django并没有提供官方的富文本编辑器,而后者恰好是内容型网站后台管理中不可或缺的 ...
- 富文本编辑器CKEDITOR的使用配置(问题注解)
CKEDITOR是一款非常轻便的富文本编辑器,如上图:参考网上的使用方法,我以.net为例,在aspx页面使用, 准备工作:首先要下载控件包,将解压后的整个文件夹添加到项目根目录. 第一步:引用js, ...
- MVC5富文本编辑器CKEditor配置CKFinder
富文本编辑器CKEditor的使用 *:first-child { margin-top: 0 !important; } body>*:last-child { margin-bottom: ...
- 富文本编辑器CKEditor的使用
由于最近在架构一个pc端b/s结构的项目,项目中有个论坛模块,当用户发帖时,需要用到富文本编辑器,考虑了一下,决定使用CKEditor富文本编辑器,虽然现在问世的富文本编辑器很丰富,比如还有百度的UE ...
- 富文本编辑器 CKeditor 配置使用 (带附件)
Ckeditor下载地址:http://ckeditor.com/download 1.CKeditor的基本配置 var textval=CKEDITOR.instances.TextArea1.g ...
- CKEditor富文本编辑器
CKEditor 富文本即具备丰富样式格式的文本.在运营后台,运营人员需要录入课程的相关描述,可以是包含了HTML语法格式的字符串.为了快速简单的让用户能够在页面中编辑带格式的文本,我们引入富文本编辑 ...
- bootstrap-wysihtml5 ckeditor 修改富文本编辑器可以上传图片
bootstrap-wysihtml5 ckeditor 修改富文本编辑器可以上传图片 bootstrap-wysihtml5实际使用内核为ckeditor 故这里修改ckeditor即可 ...
- 搭建自己的博客(十三):为博客后台添加ckeditor富文本编辑器
使用django默认的编辑器感觉功能太少了,所以集成一下富文本编辑器. 1.安装和使用 (1).安装 pip install django-ckeditor (2).注册应用 在django的sett ...
- ckeditor富文本编辑器的使用和图片上传,复制粘贴图片上传
自动导入Word图片,或者粘贴Word内容时自动上传所有的图片,并且最终保留Word样式,这应该是Web编辑器里面最基本的一个需求功能了.一般情况下我们将Word内容粘贴到Web编辑器(富文本编辑器) ...
随机推荐
- struts2框架学习笔记3:获取servletAPI
Struts2存在一个对象ActionContext(本质是Map),可以获得原生的request,response,ServletContext 还可以获得四大域对象(Map),以及param参数( ...
- Java基本数据类型总结、类型转换、常量的声明规范,final关键字的用法
1 Java 基本数据类型 变量就是申请内存来存储值.也就是说,当创建变量的时候,需要在内存中申请空间. 内存管理系统根据变量的类型为变量分配存储空间,分配的空间只能用来储存该类型数据. 因此,通过 ...
- vue 自学笔记(5) 列表渲染
列表渲染 一:v-for 指令 当我们涉及到列表渲染数据的时候,不可能做一个重复的工作去不停的一个一个的渲染每一项列表.并且列表数据的表现,比如从后端请求过来的数据,不可能是一个一个的单独的 JSON ...
- .NET手记-Autofac进阶(传递注册参数 Passing Parameters to Register)
当你注册组件时,可以为组件服务传入一系列参数,用于服务解析时使用. 可使用的参数类型 Available Parameter Types Autofac提供了集中参数匹配类别: NamedParame ...
- ArrayList源码解读笔记
简介: ArrayList是我们开发中非常常用的数据存储容器之一,其底层是数组实现的,我们可以在集合中存储任意类型的数据,ArrayList是线程不安全的,非常适合用于对元素进行查找,效率非常高. 线 ...
- ajax接口和后台交互
//定义一个公众处理ajax的方法 function handelAjax(url,method,parm,callback) { $.ajax({ url:url, type:method, dat ...
- python numpy安装
一.python下的numpy安装方法 第一步:安装python,这里不做介绍. 第二步:打开cmd看python是否安装成功. 第三步:输入 python -m pip install -U pip ...
- Spring Boot 集成 Swagger2 与配置 OAuth2.0 授权
Spring Boot 集成 Swagger2 很简单,由于接口采用了OAuth2.0 & JWT 协议做了安全验证,使用过程中也遇到了很多小的问题,多次尝试下述配置可以正常使用. Maven ...
- Xcode 8.X Command Line Tools
Summary Step 1. Upgrade Your System to macOS Sierra Step 2. Open the Terminal Application Step 3. Is ...
- 从零开始学 Web 之 DOM(七)事件冒泡
大家好,这里是「 从零开始学 Web 系列教程 」,并在下列地址同步更新...... +-------------------------------------------------------- ...