spring-cloud-square开发实战(三种类型全覆盖)
欢迎访问我的GitHub
这里分类和汇总了欣宸的全部原创(含配套源码):https://github.com/zq2599/blog_demos
本篇概览
前文《五分钟搞懂spring-cloud-square》详细介绍了什么是spring-cloud-square,以及三种实现类型的详细概念,爱动手的您已迫不及待想编码体验spring-cloud-square了,本篇咱们就来畅快实战,体验这个spring官方带给我们的smart client
如标题所述,接下里咱们会将spring-cloud-square提供的三种client都编码体验,总的来说本篇由以下内容构成:
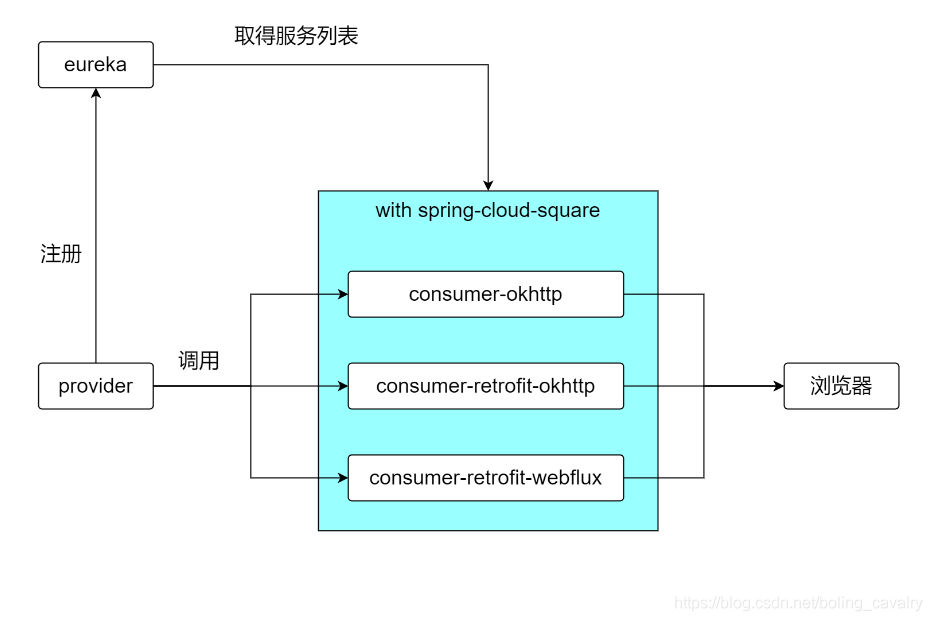
- 新建maven工程,名为spring-cloud-square-tutorials,这是本篇所有应用的父工程,库版本在此工程中统一管理;
- 创建子工程eureka,作为注册中心
- 创建子工程client,放一些公用的数据结构
- 创建子工程provider,身份是服务提供者,接下来的三个用到spring-cloud-square的子工程,都调用provider的服务
- 创建子工程consumer-okhttp,基于spring-cloud-square的okhttp能力做远程调用
- 创建子工程consumer-retrofit-okhttp,基于spring-cloud-square的retrofit + okhttp能力做远程调用
- 创建子工程consumer-retrofit-webflux,基于spring-cloud-square的retrofit + webflux能力做远程调用
- 上述几个服务的关系如下图:
如何验证
- 代码写完之后,如何验证功能是否符合预期呢?本篇采用单元测试的方式,consumer-okhttp、consumer-retrofit-okhttp、consumer-retrofit-webflux这三个子工程都有自己的单元测试代码,执行通过就意味着代码功能符合预期了
源码下载
- 本篇实战中的完整源码可在GitHub下载到,地址和链接信息如下表所示(https://github.com/zq2599/blog_demos):
| 名称 | 链接 | 备注 |
|---|---|---|
| 项目主页 | https://github.com/zq2599/blog_demos | 该项目在GitHub上的主页 |
| git仓库地址(https) | https://github.com/zq2599/blog_demos.git | 该项目源码的仓库地址,https协议 |
| git仓库地址(ssh) | git@github.com:zq2599/blog_demos.git | 该项目源码的仓库地址,ssh协议 |
- 这个git项目中有多个文件夹,本篇的源码在spring-cloud-square-tutorials文件夹下,如下图红框所示:

版本信息
- 本篇实战涉及到的主要版本情况如下:
- JDK:1.8.0_291
- IDEA:2021.1.3 (Ultimate Edition)
- maven:3.8.1
- 操作系统:win10 64位
- springboot:2.4.4
- spring-cloud:2020.0.2
- spring-cloud-square:0.4.0-SNAPSHOT
父工程spring-cloud-square-tutorials
- 父工程名为spring-cloud-square-tutorials,其pom.xml如下,除了依赖库的版本在此统一管理,还要注意的是两个仓库的引入(https://repo.spring.io/snapshot和https://repo.spring.io/milestone),引入它们是因为spring-cloud-square还在孵化阶段,没有发布到maven中央仓库:
<?xml version="1.0" encoding="UTF-8"?>

<project xmlns="http://maven.apache.org/POM/4.0.0"

         xmlns:xsi="http://www.w3.org/2001/XMLSchema-instance"

         xsi:schemaLocation="http://maven.apache.org/POM/4.0.0 http://maven.apache.org/xsd/maven-4.0.0.xsd">

    <modelVersion>4.0.0</modelVersion>

    <parent>

        <groupId>org.springframework.boot</groupId>

        <artifactId>spring-boot-starter-parent</artifactId>

        <version>2.4.4</version>

        <relativePath/> <!-- lookup parent from repository -->

    </parent>

    <groupId>com.bolingcavalry</groupId>

    <artifactId>spring-cloud-square-tutorials</artifactId>

    <version>1.0-SNAPSHOT</version>

    <properties>

        <maven.compiler.source>8</maven.compiler.source>

        <maven.compiler.target>8</maven.compiler.target>

        <java.version>1.8</java.version>

        <spring-cloud.version>2020.0.2</spring-cloud.version>

        <square.dependency.version>0.4.0-SNAPSHOT</square.dependency.version>

    </properties>

    <packaging>pom</packaging>

    <description>Demo project for Spring Cloud Square Retrofit Web</description>

    <modules>

        <module>provider</module>

        <module>eureka</module>

        <module>consumer-okhttp</module>

        <module>client</module>

        <module>consumer-retrofit-okhttp</module>

        <module>consumer-retrofit-webflux</module>

    </modules>

    <dependencyManagement>

        <dependencies>

            <dependency>

                <groupId>org.springframework.cloud</groupId>

                <artifactId>spring-cloud-dependencies</artifactId>

                <version>${spring-cloud.version}</version>

                <type>pom</type>

                <scope>import</scope>

            </dependency>

            <dependency>

                <groupId>com.squareup.okhttp3</groupId>

                <artifactId>okhttp</artifactId>

                <version>3.14.9</version>

                <scope>compile</scope>

            </dependency>

            <dependency>

                <groupId>ch.qos.logback</groupId>

                <artifactId>logback-classic</artifactId>

                <version>1.1.7</version>

            </dependency>

            <dependency>

                <groupId>org.projectlombok</groupId>

                <artifactId>lombok</artifactId>

                <version>1.16.16</version>

            </dependency>

            <dependency>

                <groupId>org.springframework.cloud</groupId>

                <artifactId>spring-cloud-square-okhttp</artifactId>

                <version>${square.dependency.version}</version>

            </dependency>

            <dependency>

                <groupId>org.springframework.cloud</groupId>

                <artifactId>spring-cloud-square-retrofit</artifactId>

                <version>${square.dependency.version}</version>

            </dependency>

            <dependency>

                <groupId>org.springframework.cloud</groupId>

                <artifactId>spring-boot-starter-webflux</artifactId>

                <version>${square.dependency.version}</version>

            </dependency>

            <dependency>

                <groupId>org.springframework.cloud</groupId>

                <artifactId>spring-cloud-square-retrofit-webclient</artifactId>

                <version>${square.dependency.version}</version>

            </dependency>

        </dependencies>

    </dependencyManagement>

    <build>

        <plugins>

            <plugin>

                <!--skip deploy (this is just a test module) -->

                <artifactId>maven-deploy-plugin</artifactId>

                <configuration>

                    <skip>true</skip>

                </configuration>

            </plugin>

            <plugin>

                <groupId>org.springframework.boot</groupId>

                <artifactId>spring-boot-maven-plugin</artifactId>

            </plugin>

        </plugins>

    </build>

    <repositories>

        <repository>

            <id>spring-snapshots</id>

            <name>Spring Snapshots</name>

            <url>https://repo.spring.io/snapshot</url>

            <snapshots>

                <enabled>true</enabled>

            </snapshots>

        </repository>

        <repository>

            <id>spring-milestones</id>

            <name>Spring Milestones</name>

            <url>https://repo.spring.io/milestone</url>

            <snapshots>

                <enabled>false</enabled>

            </snapshots>

        </repository>

    </repositories>

    <pluginRepositories>

        <pluginRepository>

            <id>spring-snapshots</id>

            <name>Spring Snapshots</name>

            <url>https://repo.spring.io/snapshot</url>

            <snapshots>

                <enabled>true</enabled>

            </snapshots>

        </pluginRepository>

        <pluginRepository>

            <id>spring-milestones</id>

            <name>Spring Milestones</name>

            <url>https://repo.spring.io/milestone</url>

            <snapshots>

                <enabled>false</enabled>

            </snapshots>

        </pluginRepository>

    </pluginRepositories>

</project>
注册中心eureka
- eureka应用并没有什么特别之处,pom.xml如下:
<?xml version="1.0" encoding="UTF-8"?>

<project xmlns="http://maven.apache.org/POM/4.0.0"

         xmlns:xsi="http://www.w3.org/2001/XMLSchema-instance"

         xsi:schemaLocation="http://maven.apache.org/POM/4.0.0 http://maven.apache.org/xsd/maven-4.0.0.xsd">

    <parent>

        <artifactId>spring-cloud-square-tutorials</artifactId>

        <groupId>com.bolingcavalry</groupId>

        <version>1.0-SNAPSHOT</version>

    </parent>

    <modelVersion>4.0.0</modelVersion>

    <artifactId>eureka</artifactId>

    <properties>

        <project.build.sourceEncoding>UTF-8</project.build.sourceEncoding>

        <start-class>com.bolingcavalry.eureka.EurekaApplication</start-class>

    </properties>

    <dependencies>

        <dependency>

            <groupId>org.springframework.cloud</groupId>

            <artifactId>spring-cloud-starter-netflix-eureka-server</artifactId>

        </dependency>

    </dependencies>

    <dependencyManagement>

        <dependencies>

            <dependency>

                <groupId>org.springframework.cloud</groupId>

                <artifactId>spring-cloud-dependencies</artifactId>

<!--                <version>Finchley.BUILD-SNAPSHOT</version>-->

                <version>${spring-cloud.version}</version>

                <type>pom</type>

                <scope>import</scope>

            </dependency>

        </dependencies>

    </dependencyManagement>

    <build>

        <plugins>

            <plugin>

                <groupId>org.springframework.boot</groupId>

                <artifactId>spring-boot-maven-plugin</artifactId>

                <!-- defined in spring-cloud-starter-parent pom (as documentation hint),

                    but needs to be repeated here -->

                <configuration>

                    <requiresUnpack>

                        <dependency>

                            <groupId>com.netflix.eureka</groupId>

                            <artifactId>eureka-core</artifactId>

                        </dependency>

                        <dependency>

                            <groupId>com.netflix.eureka</groupId>

                            <artifactId>eureka-client</artifactId>

                        </dependency>

                    </requiresUnpack>

                </configuration>

            </plugin>

            <plugin>

                <!--skip deploy (this is just a test module) -->

                <artifactId>maven-deploy-plugin</artifactId>

                <configuration>

                    <skip>true</skip>

                </configuration>

            </plugin>

        </plugins>

    </build>

</project>
- 中规中矩的配置文件application.yml,端口是8761,后面的应用也要保持一致:
server:

  port: 8761

spring:

  application:

    name: eureka

eureka:

  client:

    registerWithEureka: false

    fetchRegistry: false

  server:

    waitTimeInMsWhenSyncEmpty: 0
- 启动类EurekaApplication.java,记得用注解EnableEurekaServer开启eureka服务:
package com.bolingcavalry.eureka;

import org.springframework.boot.SpringApplication;

import org.springframework.boot.autoconfigure.SpringBootApplication;

import org.springframework.cloud.netflix.eureka.server.EnableEurekaServer;

@SpringBootApplication

@EnableEurekaServer

public class EurekaApplication {

    public static void main(String[] args) throws Exception {

        SpringApplication.run(EurekaApplication.class, args);

    }

}
- eureka应用已经完成,接下来是服务提供者了
服务提供者provider
- -新建名为provider的应用,pom.xml如下,可见是个普通的web工程,会将自己注册到eureka上去:
<?xml version="1.0" encoding="UTF-8"?>

<project xmlns="http://maven.apache.org/POM/4.0.0"

         xmlns:xsi="http://www.w3.org/2001/XMLSchema-instance"

         xsi:schemaLocation="http://maven.apache.org/POM/4.0.0 http://maven.apache.org/xsd/maven-4.0.0.xsd">

    <parent>

        <artifactId>spring-cloud-square-tutorials</artifactId>

        <groupId>com.bolingcavalry</groupId>

        <version>1.0-SNAPSHOT</version>

    </parent>

    <modelVersion>4.0.0</modelVersion>

    <artifactId>provider</artifactId>

    <packaging>jar</packaging>

    <dependencies>

        <dependency>

            <groupId>com.bolingcavalry</groupId>

            <artifactId>client</artifactId>

            <version>${project.version}</version>

        </dependency>

        <dependency>

            <groupId>org.springframework.boot</groupId>

            <artifactId>spring-boot-starter-web</artifactId>

        </dependency>

        <dependency>

            <groupId>org.springframework.cloud</groupId>

            <artifactId>spring-cloud-context</artifactId>

        </dependency>

        <dependency>

            <groupId>org.springframework.cloud</groupId>

            <artifactId>spring-cloud-starter-netflix-eureka-client</artifactId>

        </dependency>

        <dependency>

            <groupId>org.springframework.boot</groupId>

            <artifactId>spring-boot-starter-test</artifactId>

            <scope>test</scope>

        </dependency>

    </dependencies>

    <build>

        <plugins>

            <!-- 如果父工程不是springboot,就要用以下方式使用插件,才能生成正常的jar -->

            <plugin>

                <groupId>org.springframework.boot</groupId>

                <artifactId>spring-boot-maven-plugin</artifactId>

                <configuration>

                    <mainClass>com.bolingcavalry.provider.ProviderApplication</mainClass>

                </configuration>

                <executions>

                    <execution>

                        <goals>

                            <goal>repackage</goal>

                        </goals>

                    </execution>

                </executions>

            </plugin>

        </plugins>

    </build>

</project>
- 配置文件application.yml:
spring:

  application:

    name: provider

server:

  port: 18080

eureka:

  client:

    serviceUrl:

      defaultZone: http://localhost:8761/eureka/
- 启动类ProviderApplication .java:
package com.bolingcavalry.provider;

import org.springframework.boot.SpringApplication;

import org.springframework.boot.autoconfigure.SpringBootApplication;

@SpringBootApplication

public class ProviderApplication {

    public static void main(String[] args) {

        SpringApplication.run(ProviderApplication.class, args);

    }

}
- web服务类,可见对外提供了两个接口hello-str和hello-obj,前者返回字符串,或者返回对象:
package com.bolingcavalry.provider.controller;

import com.bolingcavalry.client.HelloResponse;

import org.springframework.beans.factory.annotation.Autowired;

import org.springframework.cloud.client.ServiceInstance;

import org.springframework.cloud.client.discovery.DiscoveryClient;

import org.springframework.web.bind.annotation.GetMapping;

import org.springframework.web.bind.annotation.RequestParam;

import org.springframework.web.bind.annotation.RestController;

import java.text.SimpleDateFormat;

import java.util.Date;

import java.util.List;

import java.util.Random;

@RestController

public class Hello {

    public static final String HELLO_PREFIX = "Hello World";

    @Autowired

    DiscoveryClient client;

    /**

     * 随机取一个provider实例,返回其描述信息,

     * 如果只有一个provider实例时,返回的就是当前服务信息

     * @return

     */

    private String providerDescription() {

        List<ServiceInstance> instances = client.getInstances("provider");

        ServiceInstance selectedInstance = instances

                .get(new Random().nextInt(instances.size()));

        return String.format("serviceId [%s], host [%s], port [%d]",

                selectedInstance.getServiceId(),

                selectedInstance.getHost(),

                selectedInstance.getPort());

    }

    private String dateStr(){

        return new SimpleDateFormat("yyyy-MM-dd hh:mm:ss").format(new Date());

    }

    @GetMapping("/hello-str")

    public String helloStr() {

        List<ServiceInstance> instances = client.getInstances("provider");

        ServiceInstance selectedInstance = instances

                .get(new Random().nextInt(instances.size()));

        return HELLO_PREFIX

                + " : "

                + providerDescription()

                + ", "

                + dateStr();

    }

    @GetMapping("/hello-obj")

    public HelloResponse helloObj(@RequestParam("name") String name) {

        return new HelloResponse(name, dateStr(), providerDescription());

    }

}
- 这个provider应用算是个最朴实无华的web服务了
启动服务
- 现在可以将eureka和provider服务先后启动,这样后面的应用编码完成后可以直接测试
consumer-okhttp,基于spring-cloud-square的okhttp能力
接下来要创建的应用consumer-okhttp,使用的是spring-cloud-square三种能力的第一种:okhttp
pom.xml内容如下,重点是spring-cloud-square-okhttp和spring-cloud-starter-loadbalancer这两个库的引入:
<?xml version="1.0" encoding="UTF-8"?>

<project xmlns="http://maven.apache.org/POM/4.0.0"

         xmlns:xsi="http://www.w3.org/2001/XMLSchema-instance"

         xsi:schemaLocation="http://maven.apache.org/POM/4.0.0 http://maven.apache.org/xsd/maven-4.0.0.xsd">

    <parent>

        <artifactId>spring-cloud-square-tutorials</artifactId>

        <groupId>com.bolingcavalry</groupId>

        <version>1.0-SNAPSHOT</version>

    </parent>

    <modelVersion>4.0.0</modelVersion>

    <artifactId>consumer-okhttp</artifactId>

    <packaging>jar</packaging>

    <dependencies>

        <dependency>

            <groupId>com.bolingcavalry</groupId>

            <artifactId>client</artifactId>

            <version>${project.version}</version>

        </dependency>

        <dependency>

            <groupId>org.springframework.boot</groupId>

            <artifactId>spring-boot-starter-web</artifactId>

        </dependency>

        <dependency>

            <groupId>org.springframework.boot</groupId>

            <artifactId>spring-boot-starter-test</artifactId>

            <scope>test</scope>

        </dependency>

        <dependency>

            <groupId>org.springframework.boot</groupId>

            <artifactId>spring-boot-starter-webflux</artifactId>

            <scope>test</scope>

        </dependency>

        <dependency>

            <groupId>org.projectlombok</groupId>

            <artifactId>lombok</artifactId>

        </dependency>

        <dependency>

            <groupId>com.squareup.okhttp3</groupId>

            <artifactId>okhttp</artifactId>

            <scope>compile</scope>

        </dependency>

        <dependency>

            <groupId>org.springframework.cloud</groupId>

            <artifactId>spring-cloud-starter-netflix-eureka-client</artifactId>

        </dependency>

        <dependency>

            <groupId>org.springframework.cloud</groupId>

            <artifactId>spring-cloud-square-okhttp</artifactId>

            <version>0.4.0-SNAPSHOT</version>

            <scope>compile</scope>

        </dependency>

        <dependency>

            <groupId>org.springframework.cloud</groupId>

            <artifactId>spring-cloud-starter-loadbalancer</artifactId>

        </dependency>

    </dependencies>

    <build>

        <plugins>

            <!-- 如果父工程不是springboot,就要用以下方式使用插件,才能生成正常的jar -->

            <plugin>

                <groupId>org.springframework.boot</groupId>

                <artifactId>spring-boot-maven-plugin</artifactId>

                <configuration>

                    <mainClass>com.bolingcavalry.ConsumerApplication</mainClass>

                </configuration>

                <executions>

                    <execution>

                        <goals>

                            <goal>repackage</goal>

                        </goals>

                    </execution>

                </executions>

            </plugin>

        </plugins>

    </build>

</project>
- 配置文件application.yml,还是常见的那几个配置:应用名、端口、eureka:
spring:

  application:

    name: consumer-okhttp

server:

  port: 18081

eureka:

  client:

    serviceUrl:

      defaultZone: http://localhost:8761/eureka/
- 启动类:
package com.bolingcavalry.consumer;

import org.springframework.boot.SpringApplication;

import org.springframework.boot.autoconfigure.SpringBootApplication;

@SpringBootApplication

public class OkhttpApplication {

    public static void main(String[] args) {

        SpringApplication.run(OkhttpApplication.class, args);

    }

}
- 接下来是重要的配置类OkHttpClientConfig.java,用于实例化OkHttpClient.Builder对象并注册到spring环境:
package com.bolingcavalry.consumer;

import okhttp3.OkHttpClient;

import org.springframework.cloud.client.loadbalancer.LoadBalanced;

import org.springframework.context.annotation.Bean;

import org.springframework.context.annotation.Configuration;

@Configuration

class OkHttpClientConfig{

    @Bean

    @LoadBalanced

    public OkHttpClient.Builder okHttpClientBuilder() {

        return new OkHttpClient.Builder();

    }

}
- 然后就可以使用这个Builder来创建OkHttpClient实例了,如下所示,可见入参request的url字段里使用了服务名provider,相当于OkHttpClient内如也能通过服务名取得具体的服务地址,至于是如何获取的,会在后面的文章详细分析,整段代码除了url使用服务名,并没有什么值得关注的地方了,普通的OkHttpClient使用而已:
package com.bolingcavalry.consumer.controller;

import okhttp3.OkHttpClient;

import okhttp3.Request;

import okhttp3.Response;

import org.springframework.beans.factory.annotation.Autowired;

import org.springframework.web.bind.annotation.GetMapping;

import org.springframework.web.bind.annotation.RestController;

import java.io.IOException;

@RestController

public class RemoteHello {

    @Autowired

    private OkHttpClient.Builder builder;

    @GetMapping("/remote-str")

    public String hello() throws IOException {

        // 直接使用服务名

        Request request = new Request.Builder().url("http://provider/hello-str").build();

        // 远程访问

        Response response = builder.build().newCall(request).execute();

        return "get remote response : " + response.body().string();

    }

}
- 接下来看看单元测试代码,使用MockMvcRequestBuilders构造http请求,检查返回码和返回内容:
package com.bolingcavalry.consumer.controller;

import com.bolingcavalry.client.Constants;

import lombok.extern.slf4j.Slf4j;

import org.junit.jupiter.api.Test;

import org.springframework.beans.factory.annotation.Autowired;

import org.springframework.boot.test.autoconfigure.web.servlet.AutoConfigureMockMvc;

import org.springframework.boot.test.context.SpringBootTest;

import org.springframework.http.MediaType;

import org.springframework.test.web.servlet.MockMvc;

import org.springframework.test.web.servlet.request.MockMvcRequestBuilders;

import static org.hamcrest.Matchers.containsString;

import static org.springframework.test.web.servlet.result.MockMvcResultHandlers.print;

import static org.springframework.test.web.servlet.result.MockMvcResultMatchers.content;

import static org.springframework.test.web.servlet.result.MockMvcResultMatchers.status;

@SpringBootTest

@AutoConfigureMockMvc

@Slf4j

class RemoteHelloTest {

    @Autowired

    private MockMvc mvc;

    @Test

    void hello() throws Exception {

        String responseString = mvc.perform(MockMvcRequestBuilders.get("/remote-str").accept(MediaType.APPLICATION_JSON))

                .andExpect(status().isOk())

                .andExpect(content().string(containsString(Constants.HELLO_PREFIX)))

                .andDo(print())

                .andReturn()

                .getResponse()

                .getContentAsString();

        log.info("response in junit test :\n" + responseString);

    }

}
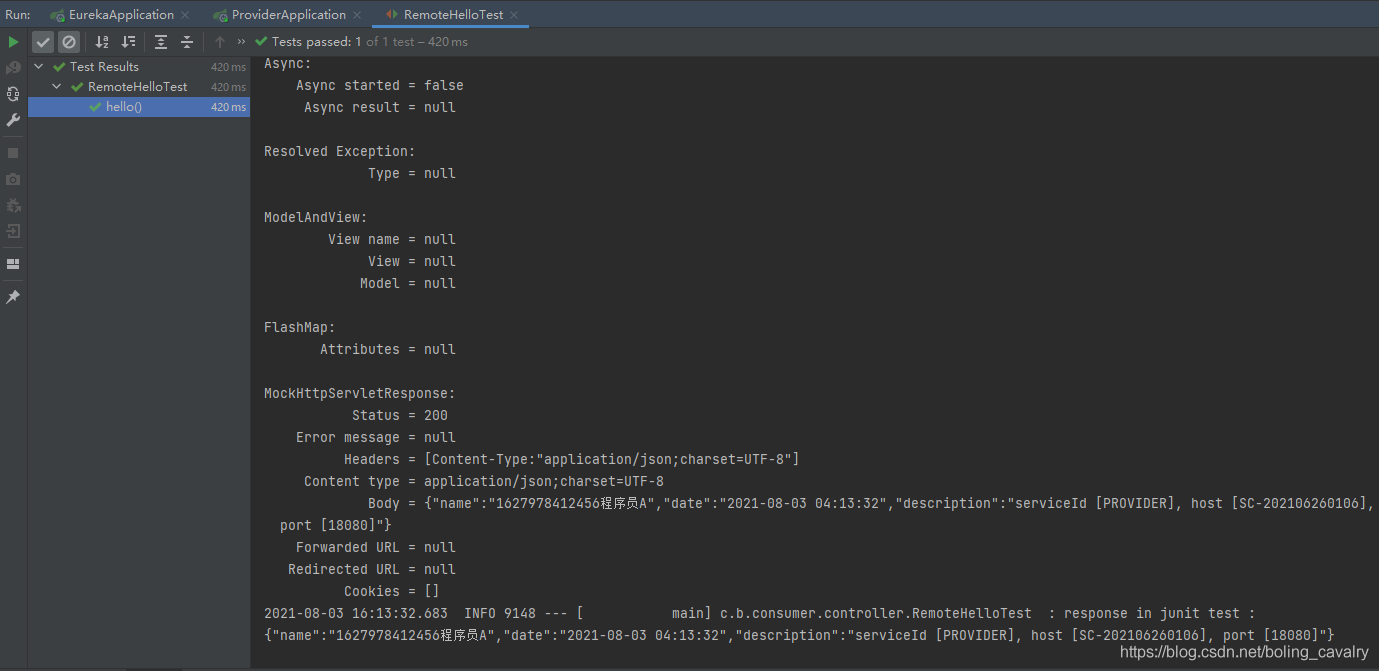
- 如果eureka和provider都运行起来了,那么此时可以直接运行单元测试类,顺利通过测试,如下图:

consumer-retrofit-okhttp,基于spring-cloud-square的okhttp能力
接下来的两个应用都使用了当下热门的retrofit,再搭配Spring Cloud LoadBalance实现服务注册发现,当然了retrofit自身无法完成网络请求处理,要依赖其他库,先看okhttp库的
新建应用consumer-retrofit-okhttp,其pom.xml如下,要注意的必须依赖spring-cloud-square-retrofit和spring-cloud-square-okhttp,另外,为了:
<?xml version="1.0" encoding="UTF-8"?>

<project xmlns="http://maven.apache.org/POM/4.0.0"

         xmlns:xsi="http://www.w3.org/2001/XMLSchema-instance"

         xsi:schemaLocation="http://maven.apache.org/POM/4.0.0 http://maven.apache.org/xsd/maven-4.0.0.xsd">

    <parent>

        <artifactId>spring-cloud-square-tutorials</artifactId>

        <groupId>com.bolingcavalry</groupId>

        <version>1.0-SNAPSHOT</version>

    </parent>

    <modelVersion>4.0.0</modelVersion>

    <artifactId>consumer-retrofit-okhttp</artifactId>

    <dependencies>

        <dependency>

            <groupId>com.bolingcavalry</groupId>

            <artifactId>client</artifactId>

            <version>${project.version}</version>

        </dependency>

        <dependency>

            <groupId>org.springframework.boot</groupId>

            <artifactId>spring-boot-starter-actuator</artifactId>

        </dependency>

        <dependency>

            <groupId>org.springframework.boot</groupId>

            <artifactId>spring-boot-starter-web</artifactId>

        </dependency>

        <dependency>

            <groupId>org.springframework.cloud</groupId>

            <artifactId>spring-cloud-starter-netflix-eureka-client</artifactId>

        </dependency>

        <dependency>

            <groupId>org.springframework.cloud</groupId>

            <artifactId>spring-cloud-square-retrofit</artifactId>

            <version>0.4.0-SNAPSHOT</version>

        </dependency>

        <dependency>

            <groupId>org.springframework.cloud</groupId>

            <artifactId>spring-cloud-square-okhttp</artifactId>

            <version>0.4.0-SNAPSHOT</version>

        </dependency>

        <dependency>

            <groupId>org.springframework.boot</groupId>

            <artifactId>spring-boot-starter-test</artifactId>

            <scope>test</scope>

        </dependency>

    </dependencies>

    <build>

        <plugins>

            <plugin>

                <!--skip deploy (this is just a test module) -->

                <artifactId>maven-deploy-plugin</artifactId>

                <configuration>

                    <skip>true</skip>

                </configuration>

            </plugin>

            <plugin>

                <groupId>org.springframework.boot</groupId>

                <artifactId>spring-boot-maven-plugin</artifactId>

            </plugin>

        </plugins>

    </build>

</project>
- 配置文件:
spring:

  application:

    name: consumer-retrofit-okhttp

server:

  port: 18082

eureka:

  client:

    serviceUrl:

      defaultZone: http://localhost:8761/eureka/
- 启动类:
package com.bolingcavalry.consumer;

import org.springframework.boot.SpringApplication;

import org.springframework.boot.autoconfigure.SpringBootApplication;

@SpringBootApplication

public class RetrofitOkhttpApplication {

    public static void main(String[] args) {

        SpringApplication.run(RetrofitOkhttpApplication.class, args);

    }

}
- 配置类,和前一个应用的没啥区别,想想也是,底层可不都是okhttp么:
package com.bolingcavalry.consumer;

import okhttp3.OkHttpClient;

import org.springframework.cloud.client.loadbalancer.LoadBalanced;

import org.springframework.cloud.square.retrofit.EnableRetrofitClients;

import org.springframework.context.annotation.Bean;

import org.springframework.context.annotation.Configuration;

@Configuration

@EnableRetrofitClients

class OkHttpClientConfig{

    @Bean

    @LoadBalanced

    public OkHttpClient.Builder okHttpClientBuilder() {

        return new OkHttpClient.Builder();

    }

}
- 接下来,有趣的部分出现了,先定义HelloService.java,里面的注解RetrofitClient指定了对应的服务名provider,在hello方法生,用GET注解指定了provider提供的web接口,而且hello方法的返回值Call,和provider服务中hello-obj的返回值HelloResponse也是对应的,还有就是hello的入参对应着provider服务中hello-obj的入参,很熟悉吧,确实,和feign太像了:
package com.bolingcavalry.consumer.service;

import com.bolingcavalry.client.HelloResponse;

import org.springframework.cloud.square.retrofit.core.RetrofitClient;

import retrofit2.Call;

import retrofit2.http.GET;

import retrofit2.http.Query;

@RetrofitClient("provider")

public interface HelloService {

    @GET("/hello-obj")

    Call<HelloResponse> hello(@Query("name") String name);

}
- 接下来是调用provider服务中hello-obj接口的代码RemoteHello.java,如下所示,神奇的一幕出现了,刚才咱们只写了HelloService接口,并没有写它的实现,但是通过Autowired注解却能 从spring环境拿到实例直接使用,在hello方法中,并没有见到远程调用的代码,而是执行helloService.hello,就能发起远程调用,拿到provider返回的结果:
package com.bolingcavalry.consumer.controller;

import com.bolingcavalry.client.HelloResponse;

import com.bolingcavalry.consumer.service.HelloService;

import org.springframework.beans.factory.annotation.Autowired;

import org.springframework.web.bind.annotation.GetMapping;

import org.springframework.web.bind.annotation.RequestParam;

import org.springframework.web.bind.annotation.RestController;

import java.io.IOException;

@RestController

public class RemoteHello {

    @Autowired(required = false)

    HelloService helloService;

    @GetMapping("/remote-obj")

    public HelloResponse hello(@RequestParam("name") String name) throws IOException {

        return helloService.hello(name).execute().body();

    }

}
看到这里,聪明的您一定会觉得欣宸就是个没见过世面的乡巴佬:定义HelloService 接口,无需开发实现类,这玩意在mybatis不就有了嘛,居然敢说"神奇",我觉得您说得对,欣宸确实没见识,大惊小怪的...
单元测试类如下,由于返回的是json对象,因此可以用andExpect方法再配合MockMvcResultMatchers,对json进行检查:
package com.bolingcavalry.consumer.controller;

import lombok.extern.slf4j.Slf4j;

import org.junit.jupiter.api.BeforeEach;

import org.junit.jupiter.api.Test;

import org.springframework.beans.factory.annotation.Autowired;

import org.springframework.boot.test.autoconfigure.web.servlet.AutoConfigureMockMvc;

import org.springframework.boot.test.context.SpringBootTest;

import org.springframework.http.MediaType;

import org.springframework.test.web.servlet.MockMvc;

import org.springframework.test.web.servlet.request.MockMvcRequestBuilders;

import org.springframework.test.web.servlet.setup.MockMvcBuilders;

import org.springframework.web.context.WebApplicationContext;

import static org.hamcrest.Matchers.is;

import static org.springframework.test.web.servlet.result.MockMvcResultHandlers.print;

import static org.springframework.test.web.servlet.result.MockMvcResultMatchers.jsonPath;

import static org.springframework.test.web.servlet.result.MockMvcResultMatchers.status;

@SpringBootTest

@AutoConfigureMockMvc

@Slf4j

class RemoteHelloTest {

    private MockMvc mvc;

    @Autowired

    private WebApplicationContext webApplicationContext;

    @BeforeEach

    public void setUp() {

        // 在单元测试的时候,MockHttpServletResponse实例的characterEncoding默认是ISO-8859-1,

        // 得到的字符串打印出来也是乱码,

        // 下面的设置可以解决此问题

        if (null==mvc) {

            mvc = MockMvcBuilders

                    .webAppContextSetup(webApplicationContext)

                    .addFilter((request, response, chain) -> {

                        response.setCharacterEncoding("UTF-8"); // this is crucial

                        chain.doFilter(request, response);

                    }, "/*")

                    .build();

        }

    }

    @Test

    void hello() throws Exception {

        // 请求参数是用户名,实时生成一个

        String name = System.currentTimeMillis() + "程序员A";

        // 请求

        String responseString = mvc.perform(

                MockMvcRequestBuilders

                        .get("/remote-obj")

                        .param("name", name)

                        .accept(MediaType.APPLICATION_JSON)

        )

                .andExpect(status().isOk())                           // 验证状态

                .andExpect(jsonPath("$.name", is(name)))    // 验证json中返回的字段是否含有name

                .andDo(print())

                .andReturn()

                .getResponse()

                .getContentAsString();

        log.info("response in junit test :\n" + responseString);

    }

}
- 执行单元测试,如下图,顺利通过:
consumer-retrofit-webflux,基于spring-cloud-square的retrofit + webflux
- 最后登场的是consumer-retrofit-webflux,pom.xml如下,依赖库是spring-cloud-square-retrofit + spring-boot-starter-webflux的组合:
<?xml version="1.0" encoding="UTF-8"?>

<project xmlns="http://maven.apache.org/POM/4.0.0"

         xmlns:xsi="http://www.w3.org/2001/XMLSchema-instance"

         xsi:schemaLocation="http://maven.apache.org/POM/4.0.0 http://maven.apache.org/xsd/maven-4.0.0.xsd">

    <parent>

        <artifactId>spring-cloud-square-tutorials</artifactId>

        <groupId>com.bolingcavalry</groupId>

        <version>1.0-SNAPSHOT</version>

    </parent>

    <modelVersion>4.0.0</modelVersion>

    <artifactId>consumer-retrofit-webflux</artifactId>

    <dependencies>

        <dependency>

            <groupId>com.bolingcavalry</groupId>

            <artifactId>client</artifactId>

            <version>${project.version}</version>

        </dependency>

        <dependency>

            <groupId>org.springframework.boot</groupId>

            <artifactId>spring-boot-starter-actuator</artifactId>

        </dependency>

        <dependency>

            <groupId>org.springframework.boot</groupId>

            <artifactId>spring-boot-starter-web</artifactId>

        </dependency>

        <dependency>

            <groupId>org.springframework.cloud</groupId>

            <artifactId>spring-cloud-starter-netflix-eureka-client</artifactId>

        </dependency>

        <dependency>

            <groupId>org.springframework.cloud</groupId>

            <artifactId>spring-cloud-square-retrofit</artifactId>

            <version>0.4.0-SNAPSHOT</version>

        </dependency>

        <dependency>

            <groupId>org.springframework.cloud</groupId>

            <artifactId>spring-cloud-square-retrofit-webclient</artifactId>

        </dependency>

        <dependency>

            <groupId>org.springframework.boot</groupId>

            <artifactId>spring-boot-starter-webflux</artifactId>

        </dependency>

        <dependency>

            <groupId>org.springframework.boot</groupId>

            <artifactId>spring-boot-starter-test</artifactId>

            <scope>test</scope>

        </dependency>

    </dependencies>

    <build>

        <plugins>

            <plugin>

                <!--skip deploy (this is just a test module) -->

                <artifactId>maven-deploy-plugin</artifactId>

                <configuration>

                    <skip>true</skip>

                </configuration>

            </plugin>

            <plugin>

                <groupId>org.springframework.boot</groupId>

                <artifactId>spring-boot-maven-plugin</artifactId>

            </plugin>

        </plugins>

    </build>

</project>
- 配置文件application.yml:
spring:

  application:

    name: consumer-retrofit-webflux

server:

  port: 18083

eureka:

  client:

    serviceUrl:

      defaultZone: http://localhost:8761/eureka/
- 启动类RetrofitWebfluxApplication.java
package com.bolingcavalry.consumer;

import org.springframework.boot.SpringApplication;

import org.springframework.boot.autoconfigure.SpringBootApplication;

@SpringBootApplication

public class RetrofitWebfluxApplication {

    public static void main(String[] args) {

        SpringApplication.run(RetrofitWebfluxApplication.class, args);

    }

}
- 配置类AppConfiguration.java,使用的注解是EnableRetrofitClients,实例化的Buider对象是WebClient.Builder,和前面的不一样,要格外注意:
package com.bolingcavalry.consumer;

import okhttp3.OkHttpClient;

import org.springframework.cloud.client.loadbalancer.LoadBalanced;

import org.springframework.cloud.square.retrofit.webclient.EnableRetrofitClients;

import org.springframework.context.annotation.Bean;

import org.springframework.context.annotation.Configuration;

import org.springframework.web.reactive.function.client.WebClient;

@Configuration

@EnableRetrofitClients

class AppConfiguration {

    @Bean

    @LoadBalanced

    public WebClient.Builder builder() {

        return WebClient.builder();

    }

}
- 接下来是接口定义,注意hello方法的返回值是Mono,这是weflux风格的返回值,代表异步的0个或一个元素:
package com.bolingcavalry.consumer.service;

import com.bolingcavalry.client.HelloResponse;

import org.springframework.cloud.square.retrofit.core.RetrofitClient;

import reactor.core.publisher.Mono;

import retrofit2.http.GET;

import retrofit2.http.Query;

@RetrofitClient("provider")

public interface HelloService {

    @GET("/hello-obj")

    Mono<HelloResponse> hello(@Query("name") String name);

}
- 最后是单元测试类,和前面的没啥区别:
package com.bolingcavalry.consumer.controller;

import lombok.extern.slf4j.Slf4j;

import org.junit.jupiter.api.BeforeEach;

import org.junit.jupiter.api.Test;

import org.springframework.beans.factory.annotation.Autowired;

import org.springframework.boot.test.autoconfigure.web.servlet.AutoConfigureMockMvc;

import org.springframework.boot.test.context.SpringBootTest;

import org.springframework.http.MediaType;

import org.springframework.test.web.servlet.MockMvc;

import org.springframework.test.web.servlet.request.MockMvcRequestBuilders;

import org.springframework.test.web.servlet.setup.MockMvcBuilders;

import org.springframework.web.context.WebApplicationContext;

import static org.hamcrest.Matchers.is;

import static org.springframework.test.web.servlet.result.MockMvcResultHandlers.print;

import static org.springframework.test.web.servlet.result.MockMvcResultMatchers.jsonPath;

import static org.springframework.test.web.servlet.result.MockMvcResultMatchers.status;

@SpringBootTest

@AutoConfigureMockMvc

@Slf4j

class RemoteHelloTest {

    private MockMvc mvc;

    @Autowired

    private WebApplicationContext webApplicationContext;

    @BeforeEach

    public void setUp() {

        // 在单元测试的时候,MockHttpServletResponse实例的characterEncoding默认是ISO-8859-1,

        // 得到的字符串打印出来也是乱码,

        // 下面的设置可以解决此问题

        if (null==mvc) {

            mvc = MockMvcBuilders

                    .webAppContextSetup(webApplicationContext)

                    .addFilter((request, response, chain) -> {

                        response.setCharacterEncoding("UTF-8"); // this is crucial

                        chain.doFilter(request, response);

                    }, "/*")

                    .build();

        }

    }

    @Test

    void hello() throws Exception {

        // 请求参数是用户名,实时生成一个

        String name = System.currentTimeMillis() + "程序员B";

        // 请求

        String responseString = mvc.perform(

                MockMvcRequestBuilders

                        .get("/remote-obj")

                        .param("name", name)

                        .accept(MediaType.APPLICATION_JSON)

        )

                .andExpect(status().isOk())                           // 验证状态

                .andExpect(jsonPath("$.name", is(name)))    // 验证json中返回的字段是否含有name

                .andDo(print())

                .andReturn()

                .getResponse()

                .getContentAsString();

        log.info("response in junit test :\n" + responseString);

    }

}
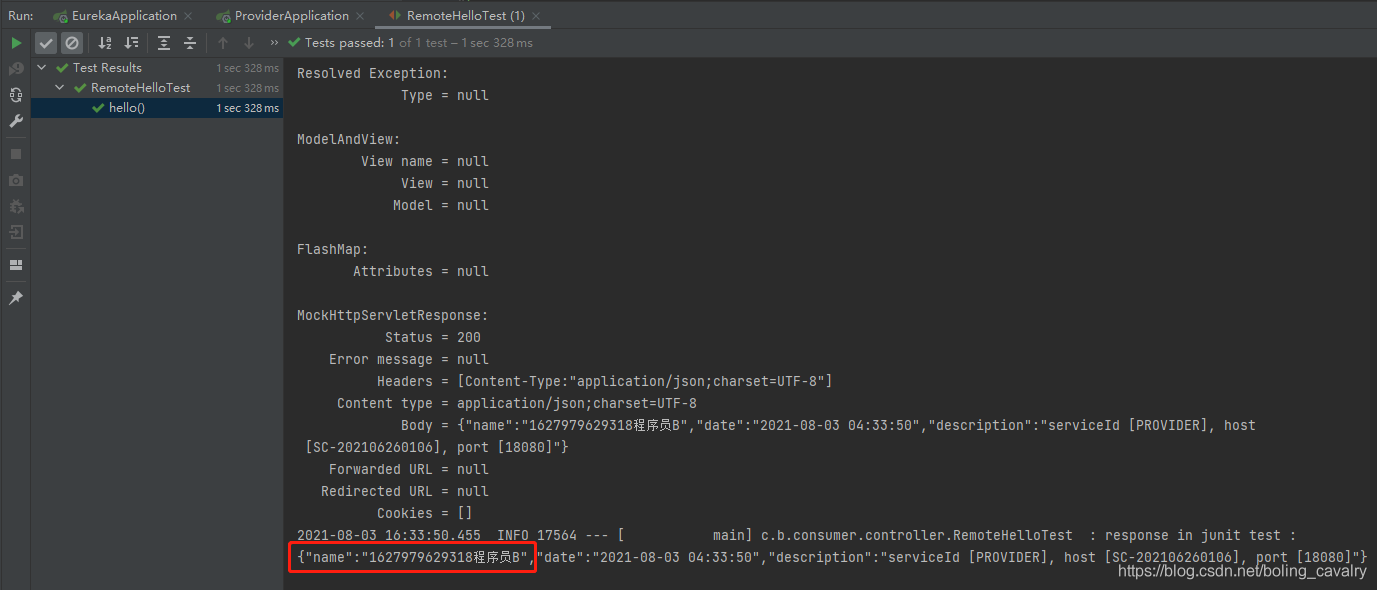
- 运行单元测试,如下图,顺利通过,并且红框中所示的中文也没有乱码:
- 至此,spring-cloud-square的三种类型,咱们全部编码体验了一遍,聪明的您当然不会只满足于使用它们,接下来文章,咱们就去深入spring-cloud-square源码,研究其实现的细节,欣宸原创,必不会辜负您的期待!
你不孤单,欣宸原创一路相伴
欢迎关注公众号:程序员欣宸
微信搜索「程序员欣宸」,我是欣宸,期待与您一同畅游Java世界...
https://github.com/zq2599/blog_demos
spring-cloud-square开发实战(三种类型全覆盖)的更多相关文章
- 【转】Spring学习---Bean配置的三种方式(XML、注解、Java类)介绍与对比
[原文]https://www.toutiao.com/i6594205115605844493/ Spring学习Bean配置的三种方式(XML.注解.Java类)介绍与对比 本文将详细介绍Spri ...
- 云计算服务的三种类型(SaaS、PaaS、IaaS)
云计算可以帮助企业降低IT方面的成本和复杂性,并获得他们蓬勃发展所需的灵活性与敏捷性.但是,规划出通往云的明确路径并非易事.毕竟用户需要看透与云相关的市场大肆宣传,然后理解并分析不同种类的云计算模式的 ...
- 《Spring Cloud》学习(三) 容错保护!
在微服务架构中,我们将系统拆分成了很多服务单元,各单元的应用间互相依赖.由于每个单元都在不同的进程中运行,依赖通过远程调用的方式执行,这样就有可能因为网络原因或是依赖服务自身间题出现调用故障或延迟,而 ...
- Spring线程池开发实战
Spring线程池开发实战 作者:chszs,转载需注明. 作者博客主页:http://blog.csdn.net/chszs 本文提供了三个Spring多线程开发的例子,由浅入深,由于例子一目了然, ...
- 缓慢变化维 (Slowly Changing Dimension) 常见的三种类型及原型设计(转)
开篇介绍 在从 OLTP 业务数据库向 DW 数据仓库抽取数据的过程中,特别是第一次导入之后的每一次增量抽取往往会遇到这样的问题:业务数据库中的一些数据发生了更改,到底要不要将这些变化也反映到数据仓库 ...
- Kubernetes service 三种类型/NodePort端口固定
Kubernetes service 三种类型 • ClusterIP:默认,分配一个集群内部可以访问的虚拟IP(VIP)• NodePort:在每个Node上分配一个端口作为外部访问入口• Load ...
- 留学英文论文写作Abstract三种类型
所谓Abstract,就是对所写论文主要内容的精炼概括.Abstract是美国人的说法,英国的科技期刊喜欢称之为Summary.在英文中,有资料是这么对其定义的:Abstract is a sketc ...
- Spring Cloud Alibaba入门实战之nacos(一)
Spring Cloud Alibaba入门实战之nacos(一) 前情介绍 Spring Cloud Alibaba 是阿里巴巴提供的新一代的微服务解决方案,相信会有越来越多采用微服务架构的公司 ...
- iOS开发UI篇—iOS开发中三种简单的动画设置
iOS开发UI篇—iOS开发中三种简单的动画设置 [在ios开发中,动画是廉价的] 一.首尾式动画 代码示例: // beginAnimations表示此后的代码要“参与到”动画中 [UIView b ...
随机推荐
- React Native踩坑日记 —— tailwind-rn
项目背景 在项目的初始阶段,我们需要建立自己的design system,我们spike了一些方案,tailwind-rn就是其中一种,如果有用到或者即将用到tailwind-rn的,可以进来看一看, ...
- Devexpress 饼状图
<dxc:ChartControl Name="chart" BorderThickness="0&q ...
- 5UCMS判断当前栏目高亮(用于当前所在栏目加背景图片或颜色)
5UCMS判断当前栏目高亮标签 比较简单的是频道页(channel.html): 大类代码: <!--menu:{ $row=10 $table=channel }--> <li { ...
- Jmeter系列(12)- 上传接口压测
step-1上传接口分析 上传接口源码分析:分析上传文件类型.有无大小限制.存放上传文件服务器 没有源码通过抓包工具,或者Chrome查看框架源代码 接口路径/uploadfile,接口请求POST, ...
- Shell系列(25)- 条件判断之文件权限
按照文件权限进行判断 读.写.执行等选项权限,只要有,就返回真 不会按照所属者,所属用户组,其他用户进行区分 先判断文件是否存在,再去判断选项权限 测试选项 作用(标红熟记) -r 文件 判断该文件是 ...
- ☕【Java技术指南】「JPA编程专题」让你不再对JPA技术中的“持久化型注解”感到陌生了!
JPA的介绍分析 Java持久化API (JPA) 显著简化了Java Bean的持久性并提供了一个对象关系映射方法,该方法使您可以采用声明方式定义如何通过一种标准的可移植方式,将Java 对象映射到 ...
- ubuntu安装git并配置SSH Key
安装git apt-get install git 配置git的用户名和邮箱: ssh-keygen -trsa -C "youremail@example.com" ssh-ke ...
- CF708E-Student‘s Camp【数学期望,dp】
正题 题目链接:https://www.luogu.com.cn/problem/CF708E 题目大意 有\(n*m\)的矩形网格,然后每次每行最左边和最右边的格子各有\(p=\frac{c}{d} ...
- NOIP 模拟六 考试总结
T1辣鸡 T1就搞得这莫不愉快.. 大致题意是给你几个矩形,矩形覆盖的点都标记上,每个矩形无重复部分,求满足(x,y) (x+1,y+1)都标记过的点对数,范围1e9. 看起来很牛的样子,我确实也被1 ...
- k8s deployment controller源码分析
deployment controller简介 deployment controller是kube-controller-manager组件中众多控制器中的一个,是 deployment 资源对象的 ...