Python3机器学习—Tensorflow数字识别实践
[本文出自天外归云的博客园]
Windows下Anaconda+Tensorflow环境部署
1. 安装Anaconda。
2. 开始菜单 > 所有程序 > Anaconda 3 (64-bit) > Anaconda Prompt > 执行命令:
conda create -n tensorflow python=3.5
至此创建了一个名字叫做tensorflow的虚拟环境,并指定了这个虚拟环境的python为3.5版本。
3. 激活虚拟环境,执行命令:
activate tensorflow
4. 安装CPU版本的tensorflow,执行命令:
pip install --ignore-installed --upgrade https://storage.googleapis.com/tensorflow/windows/cpu/tensorflow-1.2.1-cp35-cp35m-win_amd64.whl
必须用这个whl结尾的https地址,用其他地址安装一会儿在python环境中import tensorflow都会报错。
至此环境部署完成。
使用方法
要运行一个tensorflow机器学习脚本,首先创建一个test.py文件,包含以下内容:
import numpy as np

import tensorflow as tf

# Model parameters

W = tf.Variable([.3], dtype=tf.float32)

b = tf.Variable([-.3], dtype=tf.float32)

# Model input and output

x = tf.placeholder(tf.float32)

linear_model = W * x + b

y = tf.placeholder(tf.float32)

# loss

loss = tf.reduce_sum(tf.square(linear_model - y))  # sum of the squares

# optimizer

optimizer = tf.train.GradientDescentOptimizer(0.01)

train = optimizer.minimize(loss)

# training data

x_train = [1, 2, 3, 4]

y_train = [0, -1, -2, -3]

# training loop

init = tf.global_variables_initializer()

sess = tf.Session()

sess.run(init)  # reset values to wrong

for i in range(1000):

    sess.run(train, {x: x_train, y: y_train})

# evaluate training accuracy

curr_W, curr_b, curr_loss = sess.run([W, b, loss], {x: x_train, y: y_train})

print("W: %s b: %s loss: %s" % (curr_W, curr_b, curr_loss))
然后打开Anaconda Prompt,激活在我们刚才创建的tensorflow虚拟环境,并在其中执行上面的test.py文件,得到下面的运行结果:
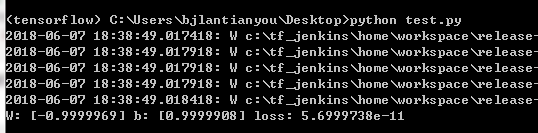
这就是tensorflow机器学习脚本在Anaconda Prompt中的使用方法。
数字识别实践
接下来详细解释下官方的HelloWord用例:
import tensorflow as tf

from tensorflow.examples.tutorials.mnist import input_data

# 加载数据集,Label(标签)在one-hot编码后变成向量,所以在此读取数据集中的数据时指定了one_hot参数为true

mnist = input_data.read_data_sets("MNIST_data/", one_hot=True)

# 创建一个tensorflow的交互环境

sess = tf.InteractiveSession()

# [None, 784]是shape,None代表不限条数的输入,784代表每条输入都是一个784维的向量

x = tf.placeholder(tf.float32, [None, 784])

# W的shape是[784, 10],784是特征的维数,10是类别数,每个特征都对应有10个类别

W = tf.Variable(tf.zeros([784, 10]))

# b的shape是[10],是个10维向量

b = tf.Variable(tf.zeros([10]))

# 计算公式,其中matmul是tf.nn下面的矩阵乘法函数

y = tf.nn.softmax(tf.matmul(x, W) + b)

# y_是真实的概率分布,即Label的one-hot编码,shape为[None, 10],None代表样本数不限,10代表每个样本对应的概率分布是一个10维向量

y_ = tf.placeholder(tf.float32, [None, 10])

# 损失函数(loss function)coss_entropy,reduce_sum求和,reduce_mean对每个batch数据结果求均值

cross_entropy = tf.reduce_mean(-tf.reduce_sum(y_ * tf.log(y), reduction_indices=[1]))

# 优化目标设定为cross_entropy,学习速率为0.5

train_step = tf.train.GradientDescentOptimizer(0.5).minimize(cross_entropy)

# 运行全局参数初始化器

tf.global_variables_initializer().run()

# 迭代

for i in range(1000):

    # 每次从训练集中随机抽取100条样本构成一个mini-batch,他们的特征和标签分别存到batch_xs和batch_ys里

    batch_xs, batch_ys = mnist.train.next_batch(100)

    # 调用train_step对mini-batch中的样本进行训练

    train_step.run({x: batch_xs, y_: batch_ys})

# tf.equal对预测类别tf.argmax(y, 1)和实际类别tf.argmax(y_, 1)进行比较判断是否相等,tf.argmax函数从一个tensor中寻找最大值序号

correct_prediction = tf.equal(tf.argmax(y, 1), tf.argmax(y_, 1))

# tf.cast()函数的作用是执行tensorflow 中张量数据类型转换

accuracy = tf.reduce_mean(tf.cast(correct_prediction, tf.float32))

# 调用此方法将执行所有前面的操作,这些操作会生成产生此张量的操作所需的输入,这里是x和y_,分别是读取的图像特征和标签

print(accuracy.eval({x: mnist.test.images, y_: mnist.test.labels}))
运行结果如下:
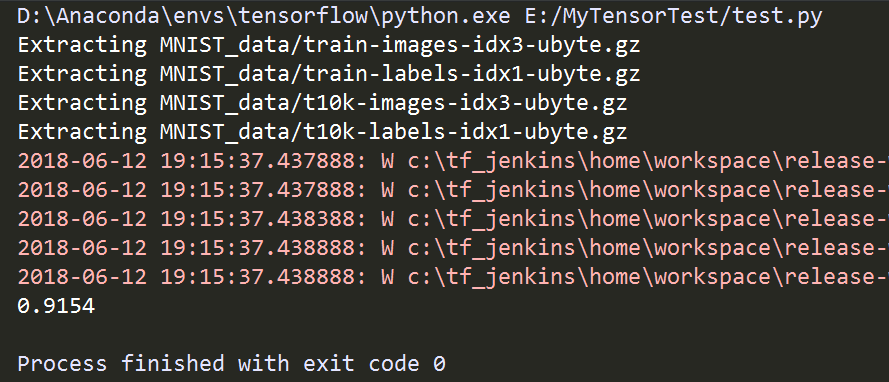
至此完成了训练,并求出了精准度。如果要用我们这次训练的模型来对数字进行识别,首先要保存本次训练的模型,然后再在本地读取数字图片数据并转化为模型可以接收的ndarray类型数据,用模型进行训练。那就要对上面的代码稍加改动。第一步,训练并保存模型,修改上面代码(number_recognition_train.py)如下,添加保存模型的过程:
import tensorflow as tf

from tensorflow.examples.tutorials.mnist import input_data

import os

# 加载数据集,Label(标签)在one-hot编码后变成向量,所以在此读取数据集中的数据时指定了one_hot参数为true

mnist = input_data.read_data_sets("MNIST_data/", one_hot=True)

# 创建一个tensorflow的交互环境

sess = tf.InteractiveSession()

# [None, 784]是shape,None代表不限条数的输入,784代表每条输入都是一个784维的向量

x = tf.placeholder(tf.float32, [None, 784])

# W的shape是[784, 10],784是特征的维数,10是类别数,每个特征都对应有10个类别

W = tf.Variable(tf.zeros([784, 10]))

# b的shape是[10],是个10维向量

b = tf.Variable(tf.zeros([10]))

# 计算公式,其中matmul是tf.nn下面的矩阵乘法函数

y = tf.nn.softmax(tf.matmul(x, W) + b)

# y_是真实的概率分布,即Label的one-hot编码,shape为[None, 10],None代表样本数不限,10代表每个样本对应的概率分布是一个10维向量

y_ = tf.placeholder(tf.float32, [None, 10])

# 损失函数(loss function)coss_entropy,reduce_sum求和,reduce_mean对每个batch数据结果求均值

cross_entropy = tf.reduce_mean(-tf.reduce_sum(y_ * tf.log(y), reduction_indices=[1]))

# 优化目标设定为cross_entropy,学习速率为0.5

train_step = tf.train.GradientDescentOptimizer(0.5).minimize(cross_entropy)

# 运行全局参数初始化器

tf.global_variables_initializer().run()

# 迭代

for i in range(1000):

    # 每次从训练集中随机抽取100条样本构成一个mini-batch,他们的特征和标签分别存到batch_xs和batch_ys里

    batch_xs, batch_ys = mnist.train.next_batch(100)

    # 调用train_step对mini-batch中的样本进行训练

    train_step.run({x: batch_xs, y_: batch_ys})

print("训练完成!")

# 创建模型保存目录

model_dir = "models"

model_name = "number_recognition"

if not os.path.exists(model_dir):

    os.mkdir(model_dir)

# 定义模型保存对象

saver = tf.train.Saver()

# 保存模型

saver.save(sess, os.path.join(model_dir, model_name))

print("保存模型成功!")

# tf.equal对预测类别tf.argmax(y, 1)和实际类别tf.argmax(y_, 1)进行比较判断是否相等,tf.argmax函数从一个tensor中寻找最大值序号

correct_prediction = tf.equal(tf.argmax(y, 1), tf.argmax(y_, 1))

# tf.cast()函数的作用是执行tensorflow 中张量数据类型转换

accuracy = tf.reduce_mean(tf.cast(correct_prediction, tf.float32))

# 调用此方法将执行所有前面的操作,这些操作会生成产生此张量的操作所需的输入,这里是x和y_,分别是读取的图像特征和标签

print("精准度:{}".format(accuracy.eval({x: mnist.test.images, y_: mnist.test.labels})))
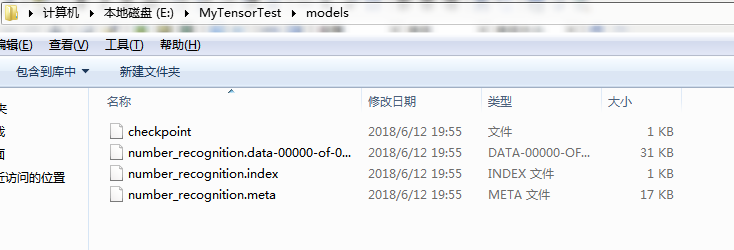
运行之后,在当前目录下就会出现一个叫models的文件夹,其下会生成我们的模型文件:
之后再写一个number_recognition_test.py文件,用我们已经保存到本地的模型对其他图片内容进行数字识别,内容如下:
#!/usr/bin/env python

# 导入mnist数据库

from tensorflow.examples.tutorials.mnist import input_data

mnist = input_data.read_data_sets("MNIST_data", one_hot=True)

import tensorflow as tf

from PIL import Image

import numpy as np

# 读取mnist中的数据进行测试

def img_recognition_from_mnist(sess, y):

    # 从mnist中读取出一个测试图片

    idx = 0

    img = mnist.test.images[idx]

    print("type:{}".format(type(img)))

    print("img:{}".format(img))

    print(list(img))

    print(len(list(img)))

    # 根据模型计算结果

    ret = sess.run(y, feed_dict={x: img.reshape(1, 784)})

    # 显示测试结果

    print("预测结果:{} 实际结果:{}".format((ret.argmax()), (mnist.test.labels[idx].argmax())))

# 读取本地图片转化为数据进行测试

def img_recognition_from_custom(image_path, sess, y):

    # 读取图片转成灰度格式

    img = Image.open(image_path).convert('L')

    # resize的过程

    img = img.resize((28, 28))

    # 像素存入一维数组

    arr = [1.0 - float(img.getpixel((j, i))) / 255.0 for i in range(28) for j in range(28)]

    # 转为ndarray类型并reshape

    np_arr = np.array(arr).reshape(1, 784)

    # 根据模型计算结果

    ret = sess.run(y, feed_dict={x: np_arr})

    # 显示预测结果

    print("预测结果:{}".format((ret.argmax())))

if __name__ == '__main__':

    # 创建会话

    sess = tf.Session()

    # 定义输入变量

    x = tf.placeholder(tf.float32, [None, 784])

    # 定义参数

    W = tf.Variable(tf.zeros([784, 10]))

    b = tf.Variable(tf.zeros([10]))

    # 定义模型和激励函数

    y = tf.nn.softmax(tf.matmul(x, W) + b)

    # 定义模型保存对象

    saver = tf.train.Saver([W, b])

    # 恢复模型

    saver.restore(sess, "models/number_recognition")

    print("恢复模型成功!")

    # img_recognition_from_mnist(sess, y)

    img_path = '7.jpg'

    img_recognition_from_custom(img_path, sess, y)
运行后发现预测结果是3,而实际图片中的数字是7:
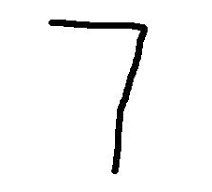
看来这个训练集并不适合我的图片,需要自己来搞训练数据,再做一个训练集进行专门的训练。这个之后再说。
Python3机器学习—Tensorflow数字识别实践的更多相关文章
- 机器学习框架Tensorflow数字识别MNIST
SoftMax回归 http://ufldl.stanford.edu/wiki/index.php/Softmax%E5%9B%9E%E5%BD%92 我们的训练集由 个已标记的样本构成: ,其 ...
- 监督学习——K邻近算法及数字识别实践
1. KNN 算法 K-近邻(k-Nearest Neighbor,KNN)是分类算法,是一个理论上比较成熟的方法,也是最简单的机器学习算法之一.该方法的思路是:如果一个样本在特征空间中的k个最相似( ...
- TensorFlow车牌识别实践(1)
本文对公开的文章进行验证,从环境搭建到运行到结果分析. 1,文章:基于TensorFlow的车牌号识别系统 文章(译文) http://www.cnblogs.com/Jsmile2017/p/680 ...
- TensorFlow车牌识别实践(2)
http://www.cnblogs.com/jackkwok/p/7228021.html 1,运行准备 按照https://github.com/matthewearl/deep-anpr说明的用 ...
- 【转】机器学习教程 十四-利用tensorflow做手写数字识别
模式识别领域应用机器学习的场景非常多,手写识别就是其中一种,最简单的数字识别是一个多类分类问题,我们借这个多类分类问题来介绍一下google最新开源的tensorflow框架,后面深度学习的内容都会基 ...
- TensorFlow.NET机器学习入门【5】采用神经网络实现手写数字识别(MNIST)
从这篇文章开始,终于要干点正儿八经的工作了,前面都是准备工作.这次我们要解决机器学习的经典问题,MNIST手写数字识别. 首先介绍一下数据集.请首先解压:TF_Net\Asset\mnist_png. ...
- Android+TensorFlow+CNN+MNIST 手写数字识别实现
Android+TensorFlow+CNN+MNIST 手写数字识别实现 SkySeraph 2018 Email:skyseraph00#163.com 更多精彩请直接访问SkySeraph个人站 ...
- Tensorflow之MNIST手写数字识别:分类问题(1)
一.MNIST数据集读取 one hot 独热编码独热编码是一种稀疏向量,其中:一个向量设为1,其他元素均设为0.独热编码常用于表示拥有有限个可能值的字符串或标识符优点: 1.将离散特征的取值扩展 ...
- mnist手写数字识别——深度学习入门项目(tensorflow+keras+Sequential模型)
前言 今天记录一下深度学习的另外一个入门项目——<mnist数据集手写数字识别>,这是一个入门必备的学习案例,主要使用了tensorflow下的keras网络结构的Sequential模型 ...
随机推荐
- 转:一篇很全面的freemarker教程
最近在使用freemarker,于是在网上找了一些教程学习,如下: 以下内容全部是网上收集: FreeMarker的模板文件并不比HTML页面复杂多少,FreeMarker模板文件主要由如下4个部分组 ...
- block(四)揭开神秘面纱(下)-b
看此篇时,请大家同时打开两个网址(或者下载它们到本地然后打开): http://llvm.org/svn/llvm-project/compiler-rt/trunk/lib/BlocksRuntim ...
- 安卓7.0遇到 android.os.FileUriExposedException: file:///storage/emulated.. exposed beyond app through Intent.getData()
1.在AndroidManifest.xml中添加如下代码 <?xml version="1.0" encoding="utf-8"?> <m ...
- df -h和du -sh显示结果不一样的原因及解决
一.背景:一台2T硬盘的mysql服务器,保存电话的CDR信息.按照历史数据的水平,一个月能生成20+GB的文件.然而短短的半年时间,满了?! 登录服务器看谁占了这么大的空间?好吧,slow-quer ...
- 外部线程停止Java子线程的方法
一.Thread.stop()官方不推荐,Because it is inherently unsafe. 二.方式一1. 线程类示例 public class ThreadT1 implements ...
- PostgreSQL创建数据库用户
注:版本不同,命令的执行路径可能有些不同. 一. 创建数据库用户freeswitch sudo -u postgres /usr/pgsql-9.5/bin/createuser -s -e free ...
- 解决tomcat服务器下,只能通过localhost,而不能通过127.0.0.1或者本地ip地址访问的问题
今天在tomcat上部署了一个web应用以后,发现用localhost的方式来访问应用是正常的,但是换成127.0.0.1或者是本地的ip地址来访问,确出现访问不了的情况.之前想是不是防火墙的问题,于 ...
- [转]Github 简明教程
如果你是一枚Coder,但是你不知道Github,那么我觉的你就不是一个菜鸟级别的Coder,因为你压根不是真正Coder,你只是一个Code搬运工. 但是你如果已经在读这篇文章了,我觉的你已经知道G ...
- LICEcap 录制Gif动画
使用 能录制Gif动画
- extjs4学习-02-导入相关文件
在WebContent下创建extjs4目录. 将extjs项目文件中的resource文件夹和ext-all.js.ext-all.js.ext-all-debug.js文件拷贝进去.