20170908工作日记--Volley源码详解
Volley没有jar包,需要从官网上下载源码自己编译出来,或者做成相关moudle引入项目中。我们先从最简单的使用方法入手进行分析:
 //创建一个网络请求队列

         RequestQueue requestQueue = Volley.newRequestQueue(this);

         String url = "http://news-at.zhihu.com/api/4/news/latest";

         //创建一个网络请求

         StringRequest request = new StringRequest(Request.Method.GET, url, new Response.Listener<String>() {

             @Override

             public void onResponse(String response) {

                 Log.e("SourceAnalysis", response);

             }

         }, new Response.ErrorListener() {

             @Override

             public void onErrorResponse(VolleyError error) {

                 Log.e("SourceAnalysis", "  error:" + error.toString());

             }

         });

         //网络请求添加到请求队列

         requestQueue.add(request);
具体使用就下面三步:
1. 创建一个RequestQueue对象。
2. 创建一个StringRequest对象。
3. 将StringRequest对象添加到RequestQueue里面。
首先从第一句开始利用Volley这个类创建了一个请求队列,Volley这个类也非常简单,只有两个构造函数,返回一个创建好的请求队列。
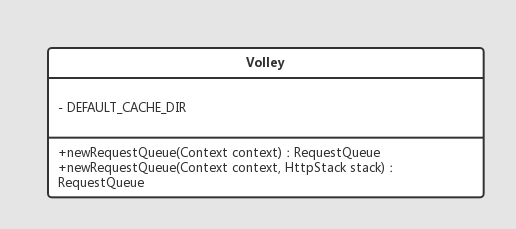
- 创建一个默认的缓冲目录,在User-Agent中存入包名和应用版本信息
- 这里有一个HttpStack的接口,下面有两个实现类分别是HurlStack和HttpClientStack,后面我们会具体分析整两个类
- 然后将上面的Stack作为参数传入网络工作线程中
- 利用RequestQueue的构造函数,创造出一个请求队列,并返回,其中还有一个重要方法start(),启动线程。
Volley类的构造函数就是我们接下来进行分析的主要枝干:
 public static RequestQueue newRequestQueue(Context context, HttpStack stack) {

         File cacheDir = new File(context.getCacheDir(), DEFAULT_CACHE_DIR);

         String userAgent = "volley/0";

         try {

             String packageName = context.getPackageName();

             PackageInfo info = context.getPackageManager().getPackageInfo(packageName, 0);

             userAgent = packageName + "/" + info.versionCode;

         } catch (NameNotFoundException e) {

         }

         if (stack == null) {

             if (Build.VERSION.SDK_INT >= 9) {

                 stack = new HurlStack();

             } else {

                 // Prior to Gingerbread, HttpUrlConnection was unreliable.

                 // See: http://android-developers.blogspot.com/2011/09/androids-http-clients.html

                 stack = new HttpClientStack(AndroidHttpClient.newInstance(userAgent));

             }

         }

         Network network = new BasicNetwork(stack);

         RequestQueue queue = new RequestQueue(new DiskBasedCache(cacheDir), network);

         queue.start();

         return queue;

     }
接下来我们按照构造方法中的创建顺序,对源码进行解析。首先对Stack是否为空进行了判断,如果版本号大于9则创建HurlStack的实例,如果小于9则创建HttpClientStack的实例。分别对接口HttpStack、HurlStack、HttpClientStack进行分析。
HttpStack类图:
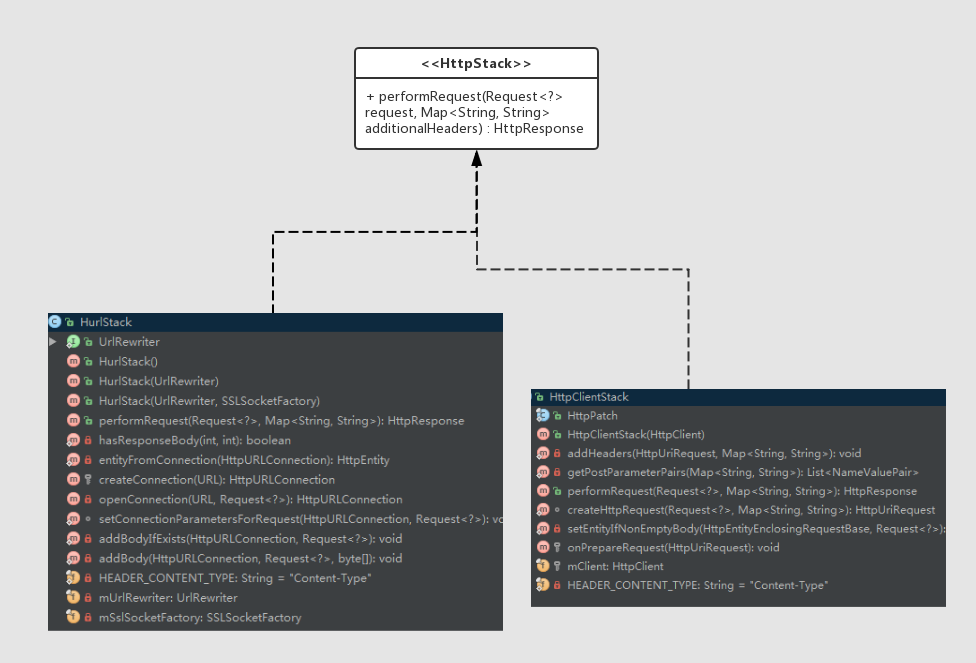
HttpStack 是一个接口并且只有一个 performRequest 方法,而 HurlStack 和 HttpClientStack 分别是基于 HttpUrlConnection 和 HttpClient 对HttpStack 的实现,是真正用来访问网络的类。
首先学习下 HurlStack类的内部方法:
 public HurlStack() {

         this(null);

     }

     /**

      * @param urlRewriter Rewriter to use for request URLs

      */

     public HurlStack(UrlRewriter urlRewriter) {

         this(urlRewriter, null);

     }

     /**

      * @param urlRewriter Rewriter to use for request URLs

      * @param sslSocketFactory SSL factory to use for HTTPS connections

      */

     public HurlStack(UrlRewriter urlRewriter, SSLSocketFactory sslSocketFactory) {

         mUrlRewriter = urlRewriter;

         mSslSocketFactory = sslSocketFactory;

     }
可以看到,这里 Volley 默认调用的是最上面那个构造器,但其实最上面的构造函数会调用有一个参数的也就是第二个构造函数,并将参数值设为 null,同样第二个会调用最后一个有两个参数的构造函数,并将参数设为 null。也就是将 urlRewriter 和 sslSocketFactory 都初始化为 null。
当然我们如果有拦截 URL 需求或者安全需求需要用到 HTTPS 的话,可以自己写 HttpStack 实现需求,然后传给 Volley 的 newRequestQueue 方法。 Volley 基于接口编程。
最后再来看核心方法 performRequest,其余的方法都是为它服务的,注释写的比较清晰了:
 /**

      * 需要实现父类的接口方法,发送网络请求

      *

      * @param request the request to perform  将要执行的请求

      * @param additionalHeaders additional headers to be sent together with

      *         {@link Request#getHeaders()}  将附加的头信息添加到获取到的头信息中

      * @return

      * @throws IOException

      * @throws AuthFailureError

      */

     @Override

     public HttpResponse performRequest(Request<?> request, Map<String, String> additionalHeaders)

             throws IOException, AuthFailureError {

         //从请求消息中获取需要访问的URL地址

         String url = request.getUrl();

         //创建一个map存放请求消息头和附加的消息头

         HashMap<String, String> map = new HashMap<String, String>();

         map.putAll(request.getHeaders());

         map.putAll(additionalHeaders);

         //看个人的需求,如果需要重新构造请求的URL,则在此重写URL地址并返回

         if (mUrlRewriter != null) {

             String rewritten = mUrlRewriter.rewriteUrl(url);

             if (rewritten == null) {

                 throw new IOException("URL blocked by rewriter: " + url);

             }

             url = rewritten;

         }

         //根据上面的URL构建网络连接

         URL parsedUrl = new URL(url);

         HttpURLConnection connection = openConnection(parsedUrl, request);//创建连接、SSL

         for (String headerName : map.keySet()) {//将刚刚获取到的键值存放到connection中

             connection.addRequestProperty(headerName, map.get(headerName));

         }

         setConnectionParametersForRequest(connection, request);//设置返回数据的请求方式

         // Initialize HttpResponse with data from the HttpURLConnection. 构建HTTP协议

         ProtocolVersion protocolVersion = new ProtocolVersion("HTTP", 1, 1);

         int responseCode = connection.getResponseCode();//获取响应返回码

         if (responseCode == -1) {

             // -1 is returned by getResponseCode() if the response code could not be retrieved.

             // Signal to the caller that something was wrong with the connection.

             throw new IOException("Could not retrieve response code from HttpUrlConnection.");

         }

         //构建响应消息头,并返回响应消息头的信息

         StatusLine responseStatus = new BasicStatusLine(protocolVersion,

                 connection.getResponseCode(), connection.getResponseMessage());

         BasicHttpResponse response = new BasicHttpResponse(responseStatus);

         if (hasResponseBody(request.getMethod(), responseStatus.getStatusCode())) {

             response.setEntity(entityFromConnection(connection));

         }

         for (Entry<String, List<String>> header : connection.getHeaderFields().entrySet()) {

             if (header.getKey() != null) {

                 Header h = new BasicHeader(header.getKey(), header.getValue().get(0));

                 response.addHeader(h);

             }

         }

         return response;

     }
最终返回的是响应消息头。下面是这个方法的流程图:
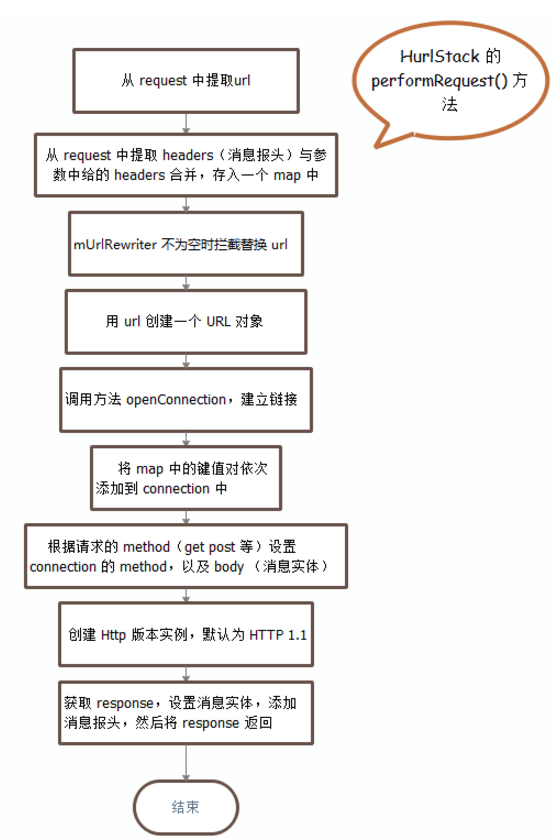
至此,HttpStack这个接口以及实现类已经分析完了,这个类实现了从请求消息中设置网络访问。
现在我们回到Volley主枝干中,下面就是利用stack进行了BasicNetwork的初始化工作。下面我们将要分析NetWork接口和它的实现类BasicNetWork。他们的类图:
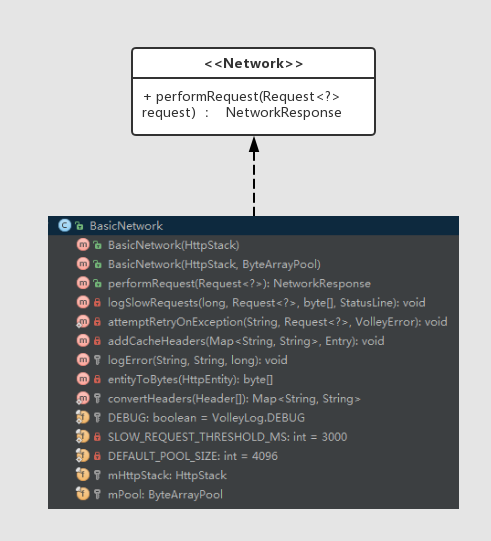
BasicNetwork的构造函数:
 /**

      * @param httpStack HTTP stack to be used

      */

     public BasicNetwork(HttpStack httpStack) {

         // If a pool isn't passed in, then build a small default pool that will give us a lot of

         // benefit and not use too much memory.

         //如果没有线程池传入,那么需要建立一个小容量的线程池,这将有利于我们的程序执行

         this(httpStack, new ByteArrayPool(DEFAULT_POOL_SIZE));

     }

     /**

      * @param httpStack HTTP stack to be used

      * @param pool a buffer pool that improves GC performance in copy operations

      */

     public BasicNetwork(HttpStack httpStack, ByteArrayPool pool) {

         mHttpStack = httpStack;

         mPool = pool;

     }
在Volley类创建Network的实例时默认使用的是只有一个参数的构造函数,但是他会调用下面的两个参数的构造函数。
这类的成员变量:
 protected static final boolean DEBUG = VolleyLog.DEBUG;

     //最长请求时间

     private static final int SLOW_REQUEST_THRESHOLD_MS = 3000;

     //线程池的内存容量大小

     private static final int DEFAULT_POOL_SIZE = 4096;

     //真正执行网络请求的类

     protected final HttpStack mHttpStack;

     protected final ByteArrayPool mPool;
- 两个常量,分别表示最长请求时间和线程池大小
- 个HttpStack 接口,真正执行网络请求的类
- 二进制数组池,一个工具类
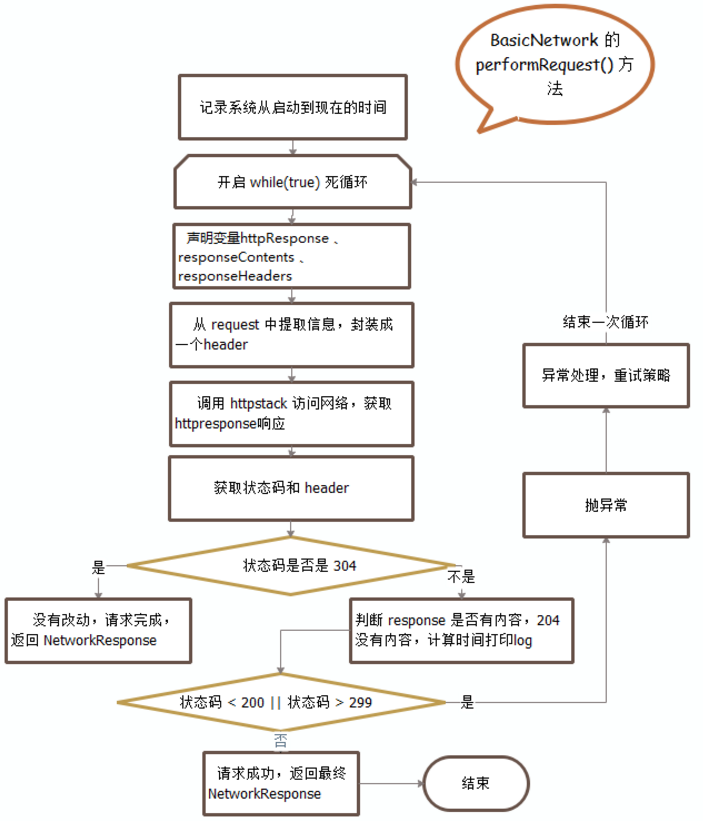
performRequest 是这个类的主要方法,其他函数都是围绕这个函数展开的,具体解析请看相关注释:
 @Override

     public NetworkResponse performRequest(Request<?> request) throws VolleyError {

         long requestStart = SystemClock.elapsedRealtime();

         while (true) {

             HttpResponse httpResponse = null;

             byte[] responseContents = null;

             Map<String, String> responseHeaders = Collections.emptyMap();

             try {

                 // Gather headers.

                 //收集请求消息头信息

                 Map<String, String> headers = new HashMap<String, String>();

                 addCacheHeaders(headers, request.getCacheEntry());

                 //调用HttpStack进行网络访问,获取返回响应值

                 httpResponse = mHttpStack.performRequest(request, headers);

                 //获取返回响应状态以及响应返回码

                 StatusLine statusLine = httpResponse.getStatusLine();

                 int statusCode = statusLine.getStatusCode();

                 //返回消息头信息

                 responseHeaders = convertHeaders(httpResponse.getAllHeaders());

                 //SC_NOT_MODIFIED就是304请求响应

                 //对304响应请求的处理流程

                 if (statusCode == HttpStatus.SC_NOT_MODIFIED) {

                     Entry entry = request.getCacheEntry();

                     if (entry == null) {

                         //如果是304请求,且没有改动,则返回304状态码,响应消息头,以及从请求到响应的时间

                         return new NetworkResponse(HttpStatus.SC_NOT_MODIFIED, null,

                                 responseHeaders, true,

                                 SystemClock.elapsedRealtime() - requestStart);

                     }

                     // A HTTP 304 response does not have all header fields. We

                     // have to use the header fields from the cache entry plus

                     // the new ones from the response.

                     // http://www.w3.org/Protocols/rfc2616/rfc2616-sec10.html#sec10.3.5

                     //304的返回消息头信息如果不为空,我们需要从缓存消息中获取完整的消息去填充完整响应消息头

                     //最后返回完整的响应消息头

                     entry.responseHeaders.putAll(responseHeaders);

                     return new NetworkResponse(HttpStatus.SC_NOT_MODIFIED, entry.data,

                             entry.responseHeaders, true,

                             SystemClock.elapsedRealtime() - requestStart);

                 }

                 // Some responses such as 204s do not have content.  We must check.

                 //对204返回码的验证

                 if (httpResponse.getEntity() != null) {

                   responseContents = entityToBytes(httpResponse.getEntity());   //将HTTP中返回的内容转换成字节数组

                 } else {

                   // Add 0 byte response as a way of honestly representing a

                   // no-content request.

                   responseContents = new byte[0];

                 }

                 // if the request is slow, log it.

                 //如果请求时间过长则产生日志进行记录

                 long requestLifetime = SystemClock.elapsedRealtime() - requestStart;

                 logSlowRequests(requestLifetime, request, responseContents, statusLine);

                 //其他请求返回码的处理,抛出IO异常

                 if (statusCode < 200 || statusCode > 299) {

                     throw new IOException();

                 }

                 //返回响应消息头

                 return new NetworkResponse(statusCode, responseContents, responseHeaders, false,

                         SystemClock.elapsedRealtime() - requestStart);

             } catch (SocketTimeoutException e) {

                 attemptRetryOnException("socket", request, new TimeoutError());

             } catch (ConnectTimeoutException e) {

                 attemptRetryOnException("connection", request, new TimeoutError());

             } catch (MalformedURLException e) {

                 throw new RuntimeException("Bad URL " + request.getUrl(), e);

             } catch (IOException e) {

                 int statusCode;

                 if (httpResponse != null) {

                     statusCode = httpResponse.getStatusLine().getStatusCode();

                 } else {

                     throw new NoConnectionError(e);

                 }

                 VolleyLog.e("Unexpected response code %d for %s", statusCode, request.getUrl());

                 //对网络返回的数据进行验证,对错误的响应进行处理

                 NetworkResponse networkResponse;

                 if (responseContents != null) {

                     networkResponse = new NetworkResponse(statusCode, responseContents,

                             responseHeaders, false, SystemClock.elapsedRealtime() - requestStart);

                     if (statusCode == HttpStatus.SC_UNAUTHORIZED ||    //401以及403响应消息

                             statusCode == HttpStatus.SC_FORBIDDEN) {

                         attemptRetryOnException("auth",

                                 request, new AuthFailureError(networkResponse));

                     } else if (statusCode >= 400 && statusCode <= 499) {

                         // Don't retry other client errors.

                         //编号为400—499范围的状态码表用户的请求未完成并需要用户提供更多的信息来实现对所需资源的访问

                         throw new ClientError(networkResponse);

                     } else if (statusCode >= 500 && statusCode <= 599) {

                         //由于内部服务器错误造成的

                         if (request.shouldRetryServerErrors()) {

                             attemptRetryOnException("server",

                                     request, new ServerError(networkResponse));

                         } else {

                             throw new ServerError(networkResponse);

                         }

                     } else {

                         // 3xx? No reason to retry.

                         throw new ServerError(networkResponse);

                     }

                 } else {

                     attemptRetryOnException("network", request, new NetworkError());

                 }

             }

         }

     }
需要注意的一点是:
Map<String, String> responseHeaders = Collections.emptyMap();这个函数的使用。Collections接口中有这样三个方法
Collections.emptySet()

Collections.emptyList()

Collections.emptyMap()
会生成指定类型的空List Set Map,而且是不可变的,如进行add()操作会报java.lang.UnsupportedOperationException。
它的优点和好处是:
方法内部会返回static final成员,创建后相当于常量可重复引用- 防止空指针出现,当你的代码需要一个集合而这个集合可能不存在,此时尽量使用空集合而不是null,因为集合一个常用
的操作就是遍历,你不知道你返回的结果在后续会不会被遍历。比如一个查询步骤返回一个集合,当返回一个空集合是就
可以用这类方法,还可以防止后续对这个空集合再做add操作,参考Effactive JAVA 43条:返回0长度的数组或者集合,而不是null
- 对于泛型集合无需指定其类型参数,
如Map<Foo, Comparable<? extends Bar>> fooBarMap = new HashMap<Foo, Comparable<? extends Bar>>();
只要Map<Foo, Comparable<? extends Bar>> fooBarMap = Collections.emptyMap();即可,起到简化代码作用
- 使用集合的一个好习惯就是使用 immutable collection,参考 http://stackoverflow.com/questions/214714/mutable-vs-immutable-objects/214718#214718
有些场景没有遇见过,还不太能够理解。
流程图如下:
接下来走到了Volley主干的构造消息队列的函数中,构造一个请求消息队列RequestQueue queue = new RequestQueue(new DiskBasedCache(cacheDir), network);传进去一个磁盘缓存的东西,因此在学习构建消息队列前我们先把这个磁盘缓存的东西搞明白。请看下篇博客。
20170908工作日记--Volley源码详解的更多相关文章
- 201709011工作日记--Volley源码详解(二)
1.Cache接口和DiskBasedCache实现类 首先,DiskBasedCache类是Cache接口的实现类,因此我们需要先把Cache接口中的方法搞明白. 首先分析下Cache接口中的东西, ...
- 201709021工作日记--Volley源码详解(五)
学习完了CacheDispatcher这个类,下面我们看下NetworkDispatcher这个类的具体细节,先上代码: /** * 提供一个线程执行网络调度的请求分发 * Provides a th ...
- 201709011工作日记--Volley源码详解(三)
1. RequestQueue类 我们使用 Volley 的时候创建一个 request 然后把它丢到 RequestQueue 中就可以了.那么来看 RequestQueue 的构造方法,含有四个参 ...
- 201709021工作日记--Volley源码解读(四)
接着volley源码(三)继续,本来是准备写在(三)后面的,但是博客园太垃圾了,写了半天居然没保存上,要不是公司这个博客还没被限制登陆,鬼才用这个...真是垃圾 继续解读RequestQueue的源码 ...
- 20170906工作日记--volley源码的相关方法细节学习
1. 在StringRequest类中的75行--new String();使用方法 /** * 工作线程将会调用这个方法 * @param response Response from the ne ...
- Activiti架构分析及源码详解
目录 Activiti架构分析及源码详解 引言 一.Activiti设计解析-架构&领域模型 1.1 架构 1.2 领域模型 二.Activiti设计解析-PVM执行树 2.1 核心理念 2. ...
- 源码详解系列(六) ------ 全面讲解druid的使用和源码
简介 druid是用于创建和管理连接,利用"池"的方式复用连接减少资源开销,和其他数据源一样,也具有连接数控制.连接可靠性测试.连接泄露控制.缓存语句等功能,另外,druid还扩展 ...
- [转]【视觉 SLAM-2】 视觉SLAM- ORB 源码详解 2
转载地址:https://blog.csdn.net/kyjl888/article/details/72942209 1 ORB-SLAM2源码详解 by 吴博 2 https://github.c ...
- vue 源码详解(一):原型对象和全局 `API`的设计
vue 源码详解(一):原型对象和全局 API的设计 1. 从 new Vue() 开始 我们在实际的项目中使用 Vue 的时候 , 一般都是在 main.js 中通过 new Vue({el : ' ...
随机推荐
- 批量部署ssh私钥认证
vim batch_sshkey.sh #!/bin/bashcd /rootcat /root/.ssh/id_rsa.pub > /root/.ssh/authorized_keysfor ...
- deb软件包安装和卸载
deb包是debian,ubuntu等LINUX发行版的软件安装包,是类似于rpm的软件包,而非debian,ubuntu系统不推荐使用deb软件包,因为要解决软件包依赖问题,安装也比较麻烦. 1.一 ...
- 基元线程同步构造之信号量(Semaphore)
信号量(semaphore)不过是由内核维护的 int32变量而已,(说通俗点就是好比一个线程容器里面允许执行的线程数,0计数就是允许执行的0个线程数,1就是允许执行的1个线程数,2就是允许执行的2个 ...
- 导出 java.io.IOException: 权限不够
项目原先都是开发使用root账号登陆服务器,人肉部署. 今天改成了自动部署,部署之后发现导出用不了了,查看服务器日志提示: 查看项目启动用户是app,推断是app用户的权限不够,导致导出无法在服务器创 ...
- linux下挂载磁盘操作
重启服务器,查看是否挂载上去了 CentOS云服务器数据盘分区和格式化 腾迅云: http://wiki.qcloud.com/wiki/CentOS%E4%BA%91%E6%9C%8D%E5%8 ...
- Java.sql.SQLException: 无效的列类型: 1111
org.mybatis.spring.MyBatisSystemException: nested exception is org.apache.ibatis.type.TypeException: ...
- MySql频繁查询、插入数据
当我们需要频繁地从数据库查询.插入数据时,可以将这些数据库操作汇集写到同一个类里,作为工具类直接调用. 将数据库的具体信息保存在.properties文件中,用log4j作为日志记录 MySql.ja ...
- 西南交通大学结构服役安全及力学基础创新团队在Wiley出版英文专著(转载)
近日,西南交通大学力学与工程学院康国政教授与阚前华副教授受邀由John Wiley & Sons Ltd公司出版了英文专著 “Cyclic plasticity of Engineering ...
- compression
compression - 必应词典 美[kəmˈpreʃ(ə)n]英[kəm'preʃ(ə)n] n.压缩:加压:压紧:浓缩 网络压迫:压力:加压包扎
- UVa 1595 Symmetry(set)
We call a figure made of points is left-right symmetric as it is possible to fold the sheet of paper ...
