WPF 动态添加控件以及样式字典的引用(Style introduction)
原文:WPF 动态添加控件以及样式字典的引用(Style introduction)
我们想要达到的结果是,绑定多个Checkbox然后我们还可以获取它是否被选中,其实很简单,我们只要找到那几个关键的对象就可以了。
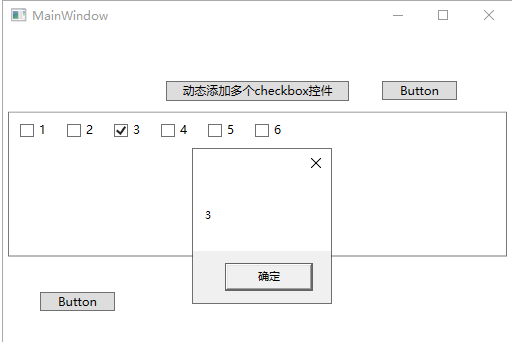
下面是Ui,其中定义了一个WrapPanel来存放CheckBox,还有两个按钮,用于测试相关功能。
<Window x:Class="WpfApplication1.MainWindow"

        xmlns="http://schemas.microsoft.com/winfx/2006/xaml/presentation"

        xmlns:x="http://schemas.microsoft.com/winfx/2006/xaml"

        xmlns:d="http://schemas.microsoft.com/expression/blend/2008"

        xmlns:mc="http://schemas.openxmlformats.org/markup-compatibility/2006"

        xmlns:local="clr-namespace:WpfApplication1"

        mc:Ignorable="d"

        Title="MainWindow" Height="" Width="">

    <Grid  Name="div" >

        <StackPanel Margin="0,50,0,0" Orientation="Horizontal"  HorizontalAlignment="Center">

            <StackPanel>

                <Button Content="动态添加多个checkbox控件" Height="" Padding="15,1,15,2" x:Name="btnAdd" Click="btnAdd_Click"></Button>

            </StackPanel>

        </StackPanel>

        <ScrollViewer ScrollViewer.VerticalScrollBarVisibility="Auto" Height="">

            <Border   BorderBrush="#797979" BorderThickness="" Margin="5,0,5,5">

                <WrapPanel x:Name="addCheckbox"/>

            </Border>

        </ScrollViewer>

        <Button x:Name="button" Content="Button" HorizontalAlignment="Left" Margin="37,261,0,0" VerticalAlignment="Top" Width="" Click="button_Click"/>

        <Button x:Name="button1" Content="Button" HorizontalAlignment="Left" Margin="379,50,0,0" VerticalAlignment="Top" Width="" Click="button1_Click"/>

    </Grid>

</Window>
在动态添加Checkbox中我们定义了一个CheckBox数组,此后又实例化了ThickNess对象,它是用于描述矩形周围的粗细,然后我们又循环了数组的长度来进行添加(对其中name为addCheckbox的控件),至此,checkbox已动态添加。
那如何删除呢?我们依旧需要获取那个名为addCheckbox的控件的儿子们(Children)来进行remove。请看以下代码片段。
private void button1_Click(object sender, RoutedEventArgs e)

        {

            for (int i = ; i < addCheckbox.Children.Count;)

            {

                this.addCheckbox.Children.Remove(addCheckbox.Children[i]);

            }

        }
循环其中的值也是非常的简单,因为我们在上面绑定的时候,已经给它的Content或者是DataContext都赋值了,所以我们只要获取就ok了。
private void button_Click(object sender, RoutedEventArgs e)

        {

            foreach (UIElement item in addCheckbox.Children)

            {

                if (item is CheckBox)

                {

                    CheckBox checkbox = (item as CheckBox);

                    if (checkbox.IsChecked == true)

                    {

                        MessageBox.Show(checkbox.Content.ToString());

                    }

                }

            }

        }
最后生成出来的效果是这样的,是不是非常丑,那我教你如何进行简单的美化。
在我们添加checkbox的时候有两种引入方式,一种是 checkbox.Style = Resources["NoticeBox"] as Style; 另一种的话是 Style style = (Style)this.FindResource("NoticeButton"); 那两者有什么区别呢?
第一个是必须将资源文件引用到当前页面,第二种的是在App.xaml进行查找不包括app.xaml中引入的(外部的资源文件)。下面我们写一个CheckBox样式在app,xaml中。
<Application x:Class="WpfApplication1.App"

             xmlns="http://schemas.microsoft.com/winfx/2006/xaml/presentation"

             xmlns:x="http://schemas.microsoft.com/winfx/2006/xaml"

             xmlns:local="clr-namespace:WpfApplication1"

             StartupUri="MainWindow.xaml">

    <Application.Resources>

        <Style x:Key="CheckBoxSwitchStyle" TargetType="CheckBox">

            <Setter Property="IsChecked" Value="False"/>

            <Setter Property="Cursor" Value="Hand"/>

            <Setter Property="FontFamily" Value="/MESToolIntegration;component/Fonts/#iconfont"/>

            <Setter Property="Background" Value="#FFFFFF"/>

            <Setter Property="Template">

                <Setter.Value>

                    <ControlTemplate TargetType="CheckBox">

                        <Border Width="" Name="CheckTrueBG" Height="" BorderThickness="" Background="#FFFFFF"  CornerRadius="" BorderBrush="#ACACAC" >

                            <Grid>

                                <Border BorderThickness="" Background="#ACACAC" x:Name="border" Width="" Height="" CornerRadius="" VerticalAlignment="Center" HorizontalAlignment="Left" Margin=""  >

                                    <Border.RenderTransform>

                                        <TranslateTransform  X=""/>

                                    </Border.RenderTransform>

                                </Border>

                                <TextBlock x:Name="txt" Text="{TemplateBinding Content}" FontFamily="iconfont"  FontSize="{TemplateBinding FontSize}" Margin="6.996,2.798,0,2.798" VerticalAlignment="Stretch" Foreground="#ACACAC" HorizontalAlignment="Left" >

                                    <TextBlock.RenderTransform>

                                        <TranslateTransform   X=""></TranslateTransform>

                                    </TextBlock.RenderTransform>

                                </TextBlock>

                            </Grid>

                        </Border>

                        <ControlTemplate.Triggers>

                            <Trigger Property="IsChecked" Value="true">

                                <Setter Property="Background" TargetName="CheckTrueBG"  Value="#5FB878"/>

                                <Setter Property="Foreground" TargetName="txt"  Value="#FFFFFF"/>

                                <Setter Property="Background" TargetName="border"  Value="#FFFFFF"/>

                                <Setter Property="Text" TargetName="txt" Value="{Binding Tag,RelativeSource={RelativeSource TemplatedParent}}"/>

                                <Trigger.EnterActions>

                                    <BeginStoryboard>

                                        <Storyboard>

                                            <DoubleAnimation Storyboard.TargetName="border" Storyboard.TargetProperty="(UIElement.RenderTransform).(TranslateTransform.X)" To="" Duration="00:00:0.2"/>

                                            <DoubleAnimation Storyboard.TargetName="txt" Storyboard.TargetProperty="(UIElement.RenderTransform).(TranslateTransform.X)" To="" Duration="00:00:0.2"/>

                                        </Storyboard>

                                    </BeginStoryboard>

                                </Trigger.EnterActions>

                                <Trigger.ExitActions>

                                    <BeginStoryboard>

                                        <Storyboard>

                                            <DoubleAnimation Storyboard.TargetName="border" Storyboard.TargetProperty="(UIElement.RenderTransform).(TranslateTransform.X)" To="" Duration="00:00:0.2"/>

                                            <DoubleAnimation Storyboard.TargetName="txt" Storyboard.TargetProperty="(UIElement.RenderTransform).(TranslateTransform.X)" To="" Duration="00:00:0.2"/>

                                        </Storyboard>

                                    </BeginStoryboard>

                                </Trigger.ExitActions>

                            </Trigger>

                            <Trigger Property="IsChecked" Value="False">

                                <Setter Property="Text" TargetName="txt" Value="{Binding Content,RelativeSource={RelativeSource TemplatedParent}}"/>

                            </Trigger>

                        </ControlTemplate.Triggers>

                    </ControlTemplate>

                </Setter.Value>

            </Setter>

        </Style>

    </Application.Resources>

</Application>
就这样我们在生成CheckBox中进行配置,代码如下。
private void btnAdd_Click(object sender, RoutedEventArgs e)

        {

            int num = ;

            CheckBox[] check = new CheckBox[num];

            Thickness th = new Thickness();

            th.Bottom = ;

            th.Left = ;

            th.Right = ;

            th.Top = ;

            for (int i = ; i < check.Length; i++)

            {

                check[i] = new CheckBox();

                //设置checkbox属性

                check[i].Margin = th;

                check[i].Content = i + ;

                check[i].Name = "heheda";

                check[i].DataContext = "asdas";

                check[i].Style = (Style)this.FindResource("CheckBoxSwitchStyle");

          this.addCheckbox.Children.Add(check[i]);

            }

        }
启动页面我们可以发现引入成功了。
不难发现,看一下代码,我们如何还想写别的样式,这个时候应该怎么办?难道还要往app.xaml里写?这就非常恶心了,所以我们采用引入的方式,这和css有点像!新建一个资源字典。
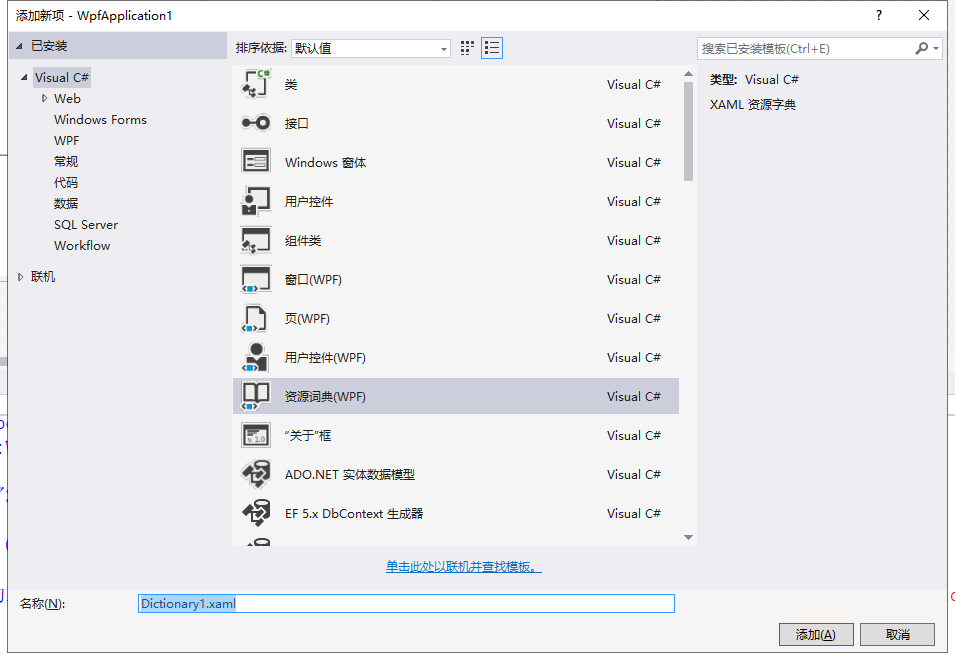
在其中写入写入以下样式。
<ResourceDictionary xmlns="http://schemas.microsoft.com/winfx/2006/xaml/presentation"

                    xmlns:x="http://schemas.microsoft.com/winfx/2006/xaml"

                    xmlns:local="clr-namespace:WpfApplication1">

    <Style x:Key="BtnInfoStyle" TargetType="Button">

        <Setter Property="Width" Value=""/>

        <Setter Property="Height" Value=""/>

        <Setter Property="Foreground" Value="White"/>

        <Setter Property="BorderThickness" Value=""/>

        <Setter Property="Background" Value="#43a9c7"/>

        <Setter Property="Template">

            <Setter.Value>

                <ControlTemplate TargetType="Button">

                    <Border x:Name="border" Background="{TemplateBinding Background}" BorderBrush="{TemplateBinding BorderBrush}" BorderThickness="{TemplateBinding BorderThickness}" SnapsToDevicePixels="True">

                        <TextBlock Text="{TemplateBinding Content}" Foreground="{TemplateBinding Foreground}" VerticalAlignment="Center" HorizontalAlignment="Center"/>

                    </Border>

                    <ControlTemplate.Triggers>

                        <Trigger Property="IsMouseOver" Value="True">

                            <Setter TargetName="border" Property="Background" Value="#2f96b4"/>

                        </Trigger>

                        <Trigger Property="IsPressed" Value="True">

                            <Setter TargetName="border" Property="Background" Value="#2a89a4"/>

                        </Trigger>

                    </ControlTemplate.Triggers>

                </ControlTemplate>

            </Setter.Value>

        </Setter>

    </Style>

</ResourceDictionary>
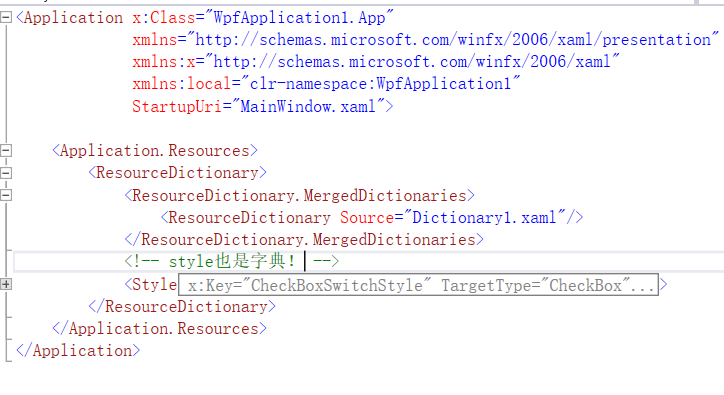
然后在app.xaml中进行引用,这里需要注意是,有可能我们的style和外部字典都放进去了,它们的关系是style其实也是一个字典,然后就变成了这样。
<Application.Resources>

        <ResourceDictionary>

            <ResourceDictionary.MergedDictionaries>

                <ResourceDictionary Source="Dictionary1.xaml"/>

            </ResourceDictionary.MergedDictionaries>

            <Style x:Key="CheckBoxSwitchStyle" TargetType="CheckBox">

                <Setter Property="IsChecked" Value="False"/>

                <Setter Property="Cursor" Value="Hand"/>

                <Setter Property="FontFamily" Value="/MESToolIntegration;component/Fonts/#iconfont"/>

                <Setter Property="Background" Value="#FFFFFF"/>

                <Setter Property="Template">

                    <Setter.Value>

                        <ControlTemplate TargetType="CheckBox">

                            <Border Width="" Name="CheckTrueBG" Height="" BorderThickness="" Background="#FFFFFF"  CornerRadius="" BorderBrush="#ACACAC" >

                                <Grid>

                                    <Border BorderThickness="" Background="#ACACAC" x:Name="border" Width="" Height="" CornerRadius="" VerticalAlignment="Center" HorizontalAlignment="Left" Margin=""  >

                                        <Border.RenderTransform>

                                            <TranslateTransform  X=""/>

                                        </Border.RenderTransform>

                                    </Border>

                                    <TextBlock x:Name="txt" Text="{TemplateBinding Content}" FontFamily="iconfont"  FontSize="{TemplateBinding FontSize}" Margin="6.996,2.798,0,2.798" VerticalAlignment="Stretch" Foreground="#ACACAC" HorizontalAlignment="Left" >

                                        <TextBlock.RenderTransform>

                                            <TranslateTransform   X=""></TranslateTransform>

                                        </TextBlock.RenderTransform>

                                    </TextBlock>

                                </Grid>

                            </Border>

                            <ControlTemplate.Triggers>

                                <Trigger Property="IsChecked" Value="true">

                                    <Setter Property="Background" TargetName="CheckTrueBG"  Value="#5FB878"/>

                                    <Setter Property="Foreground" TargetName="txt"  Value="#FFFFFF"/>

                                    <Setter Property="Background" TargetName="border"  Value="#FFFFFF"/>

                                    <Setter Property="Text" TargetName="txt" Value="{Binding Tag,RelativeSource={RelativeSource TemplatedParent}}"/>

                                    <Trigger.EnterActions>

                                        <BeginStoryboard>

                                            <Storyboard>

                                                <DoubleAnimation Storyboard.TargetName="border" Storyboard.TargetProperty="(UIElement.RenderTransform).(TranslateTransform.X)" To="" Duration="00:00:0.2"/>

                                                <DoubleAnimation Storyboard.TargetName="txt" Storyboard.TargetProperty="(UIElement.RenderTransform).(TranslateTransform.X)" To="" Duration="00:00:0.2"/>

                                            </Storyboard>

                                        </BeginStoryboard>

                                    </Trigger.EnterActions>

                                    <Trigger.ExitActions>

                                        <BeginStoryboard>

                                            <Storyboard>

                                                <DoubleAnimation Storyboard.TargetName="border" Storyboard.TargetProperty="(UIElement.RenderTransform).(TranslateTransform.X)" To="" Duration="00:00:0.2"/>

                                                <DoubleAnimation Storyboard.TargetName="txt" Storyboard.TargetProperty="(UIElement.RenderTransform).(TranslateTransform.X)" To="" Duration="00:00:0.2"/>

                                            </Storyboard>

                                        </BeginStoryboard>

                                    </Trigger.ExitActions>

                                </Trigger>

                                <Trigger Property="IsChecked" Value="False">

                                    <Setter Property="Text" TargetName="txt" Value="{Binding Content,RelativeSource={RelativeSource TemplatedParent}}"/>

                                </Trigger>

                            </ControlTemplate.Triggers>

                        </ControlTemplate>

                    </Setter.Value>

                </Setter>

            </Style>

        </ResourceDictionary>

    </Application.Resources>
我把缩进的截图发上来,更直观。
在其中还有内嵌的样式,可以这么写,如果是page的话你就 <Page.Resources> ,如果是windows的话那就Wndows,当然如果需要页面引入字典的话你可以这么做。
<Window.Resources>

        <ResourceDictionary>

            <ResourceDictionary.MergedDictionaries>

                <ResourceDictionary Source="Style/test.xaml"/>

            </ResourceDictionary.MergedDictionaries>

        </ResourceDictionary>

    </Window.Resources>
那么今天就这样~
WPF 动态添加控件以及样式字典的引用(Style introduction)的更多相关文章
- WPF 动态添加按钮以及样式字典的引用(Style introduction)
我们想要达到的结果是,绑定多个Checkbox然后我们还可以获取它是否被选中,其实很简单,我们只要找到那几个关键的对象就可以了. 下面是Ui,其中定义了一个WrapPanel来存放CheckBox,还 ...
- WPF:理解ContentControl——动态添加控件和查找控件
WPF:理解ContentControl--动态添加控件和查找控件 我认为WPF的核心改变之一就是控件模型发生了重要的变化,大的方面说,现在窗口中的控件(大部分)都没有独立的Hwnd了.而且控件可以通 ...
- jQuery EasyUI动态添加控件或者ajax加载页面后不能自动渲染问题的解决方法
博客分类: jquery-easyui jQueryAjax框架HTML 现象: AJAX返回的html无法做到自动渲染为EasyUI的样式.比如:class="easyui-layout ...
- JQuery动态添加控件并取值
<!doctype html> <html> <head> <meta charset="utf-8"> <title> ...
- winform导入导出excel,后台动态添加控件
思路: 导入: 1,初始化一个OpenFileDialog类 (OpenFileDialog fileDialog = new OpenFileDialog();) 2, 获取用户选择文件的后缀名(s ...
- Android 在布局容器中动态添加控件
这里,通过一个小demo,就可以掌握在布局容器中动态添加控件,以动态添加Button控件为例,添加其他控件同样道理. 1.addView 添加控件到布局容器 2.removeView 在布局容器中删掉 ...
- VC中动态添加控件
VC中动态添加控件 动态控件是指在需要时由Create()创建的控件,这与预先在对话框中放置的控件是不同的. 一.创建动态控件: 为了对照,我们先来看一下静态控件的创建. 放置静态控件时必须先建立一个 ...
- asp.net动态添加控件学习
看了老师的教程后,自己一点感悟记录下来: 1.在页面提交后,动态生成的控件会丢失, 但如果生成控件的代码在pageload中,就可以,原理是每次生成页面都执行生成. 2.动态按件或页面原来控件, 在页 ...
- 怎样在不对控件类型进行硬编码的情况下在 C#vs 中动态添加控件
文章ID: 815780 最近更新: 2004-1-12 这篇文章中的信息适用于: Microsoft Visual C# .NET 2003 标准版 Microsoft Visual C# .NET ...
随机推荐
- C++中的函数重载分析(二)
1,重载与指针: 1,下面的函数指针将保存哪个函数的地址? int func(int x) { return x; } int func(int a, int b) { return a + b; } ...
- POJ 3020:Antenna Placement(无向二分图的最小路径覆盖)
Antenna Placement Time Limit: 1000MS Memory Limit: 65536K Total Submissions: 6334 Accepted: 3125 ...
- 对象和数据库的天然阻抗 转摘于:http://www.jdon.com/mda/oo-reltaion2.html
在“面向对象建模与数据库建模两种分析设计方法的比较”一文中我们比较了在对需求分析时两种方法的不同,所谓数据库建模分析,就是项目一开始就根据需求建立数据库模型,如数据表结构和字段等,这种错误现象大量普遍 ...
- Java 编写过滤手机号码或者固定电话的工具类
以下是分享自己编写的用于过滤手机号码.固定电话.黑名单的工具类TelCheckUtils, import java.util.HashSet; import java.util.Set; import ...
- jsonp详细原理之一
/*script标签是不存在跨域请求的,类似的还有img,background:url,link 你可以想象一下,平时的这些标签都是可以直接引入外部资源的,所以是不存在跨域问题的*/ function ...
- Angular的一些常用命令
Angular的一些常用命令 cmd中创建项目: ng new taskmgr -si --style=scss //先不安装依赖,si 为skip install material需要scss样式的 ...
- 三、Json方式函数
一.Json方式函数 // 4. 查看对象信息 console.dir(obj) =>可以显示一个对象所有的属性和方法. var info = { blog: "http://cllg ...
- SurfaceView的基本使用(转)
转自:https://www.cnblogs.com/zhangyingai/p/7087371.html SurfaceView的基本使用 一.引入: Android提供了View来进行绘图处理 ...
- 【串线篇】spring泛型依赖注入原理
spring泛型依赖注入原理 不管三七二十一 servlet :加注解@servlet service:加注解@service dao:加注解@Repository 这相当于在容器中注册这些个类
- 利用Python语言Appium启动ios app
首先配置好电脑环境,主要是appium太难配了,不多说 然后,分两步 第一步:启动appium服务器 有三种方法,1.下载appium-desk-top(桌面客户端),启动 2.终端启动:appium ...