LNMP架构二
Nginx默认虚拟主机
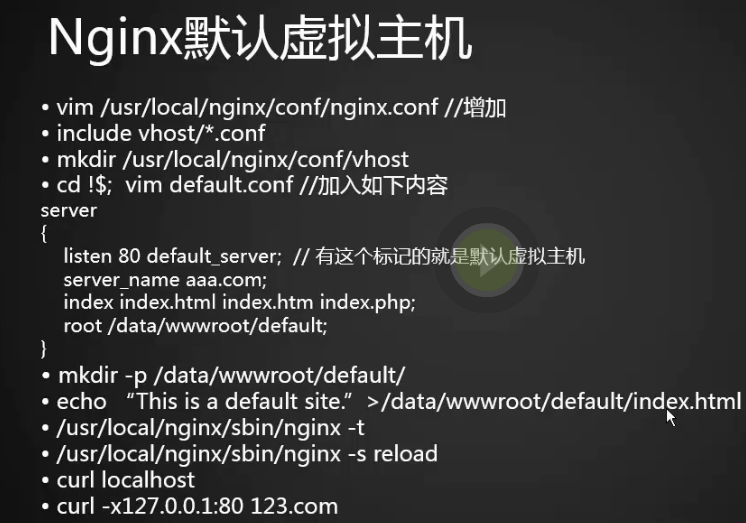
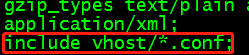
1.首先修改nginx.conf文件,删除server及下面的,在http最后添加include vhost/*.conf; (指定虚拟主机目录,并读取以.conf结尾的文件)
删除
添加
[root@bogon conf]# vim nginx.conf

[root@bogon conf]# pwd

/usr/local/nginx/conf

[root@bogon conf]# mkdir vhost

[root@bogon conf]# cd vhost/

[root@bogon vhost]# ls

[root@bogon vhost]# vim aaa.com.conf
2.编辑配置文件aaa.com.conf
server

{

    listen 80 default_server;                 (红色的字表示设置这个虚拟主机为默认虚拟主机)

    server_name aaa.com;

    index index.html index.htm index.php;

    root /data/wwwroot/default;

}
3.创建default目录并新建index.html文件写入this
[root@bogon vhost]# mkdir /data/wwwroot/default

[root@bogon vhost]# cd /data/wwwroot/default/

[root@bogon default]# ls

[root@bogon default]# vim index.html

[root@bogon default]#
4.检查配置是否有错用户
[root@bogon default]# /usr/local/nginx/sbin/nginx -t

nginx: the configuration file /usr/local/nginx/conf/nginx.conf syntax is ok

nginx: configuration file /usr/local/nginx/conf/nginx.conf test is successful

[root@bogon default]# /usr/local/nginx/sbin/nginx -s reload  或  /etc/init.d/nginx restart

[root@bogon default]#
5.测试是否成功,不管啥域名只要解析过来指向当前服务器都能访问到default站点
[root@bogon default]# curl localhost

this

[root@bogon default]# curl -x127.0.0.1:80 aaa.com

this

[root@bogon default]# curl -x127.0.0.1:80 bb.com

this

[root@bogon default]#
6.!!:还有一个需要注意的是,如果不加红色字体的字段,再找server时会根据文件名排序,比如:aaa.com.cnf和bbb.com.cnf,aaa肯定是在前,所以aaa.com.cnf是默认虚拟主机
Nginx用户认证
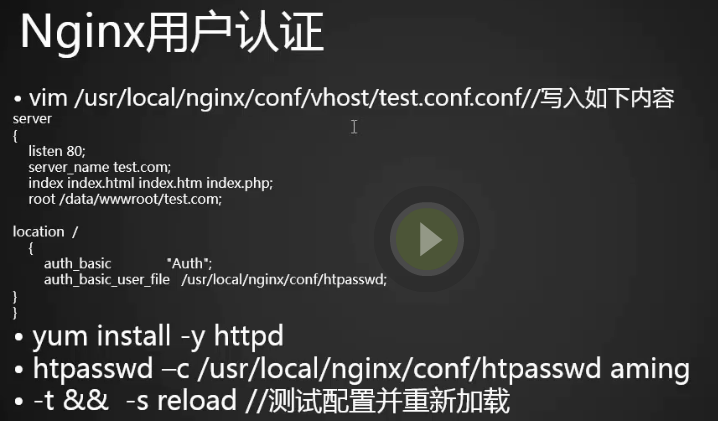
1.nginx用户认证,用到了之前httpd的htpasswd功能。
2.创建一个虚拟主机 test.com.conf
[root@bogon conf]# cd vhost/

[root@bogon vhost]# ls

aaa.com.conf

[root@bogon vhost]# vim test.com.conf

[root@bogon vhost]#
server

{

    listen 80;

    server_name test.com;

    index index.html index.htm index.php;

    root /data/wwwroot/test.com;

location  /

    {

        auth_basic              "Auth";                   (定义用户认证的名字)

        auth_basic_user_file   /usr/local/nginx/conf/htpasswd;         (定义用户名密码文件)

    }

}
3.因为要使用到httpd的htpasswd功能,则需要安装httpd,可以直接yum安装,直接敲htpasswd命令,
4.c是生成用户文件,若要添加则不需要,否则会覆盖原文件
[root@bogon vhost]# /usr/local/apache2.4/bin/htpasswd -c /usr/local/nginx/conf/htpasswd user1

New password:

Re-type new password:

Adding password for user user1

[root@bogon vhost]# cat /usr/local/nginx/conf/htpasswd

user1:$apr1$FTaFXOGV$T92wNqOEk.1kiCUTm0HPn/

[root@bogon vhost]# /usr/local/apache2.4/bin/htpasswd /usr/local/nginx/conf/htpasswd user2

New password:

Re-type new password:

Adding password for user user2

[root@bogon vhost]#
5.查看htpasswd文件,测试配置文件语法
[root@bogon vhost]# !cat

cat /usr/local/nginx/conf/htpasswd

user1:$apr1$FTaFXOGV$T92wNqOEk.1kiCUTm0HPn/

user2:$apr1$oNyABDKG$oLzE8MbjvtgC7TmuXDlUO0

[root@bogon vhost]# /usr/local/nginx/sbin/nginx -t
nginx: the configuration file /usr/local/nginx/conf/nginx.conf syntax is ok
nginx: configuration file /usr/local/nginx/conf/nginx.conf test is successful
6.重新加载配置文件,不加用户发现401,需要用户认证
[root@bogon vhost]# /usr/local/nginx/sbin/nginx -s reload

[root@bogon vhost]# curl -x127.0.0.1 test.com

curl: (7) Failed connect to 127.0.0.1:1080; 拒绝连接

[root@bogon vhost]# curl -x127.0.0.1:80 test.com

<html>

<head><title>401 Authorization Required</title></head>

<body bgcolor="white">

<center><h1>401 Authorization Required</h1></center>

<hr><center>nginx/1.12.2</center>

</body>

</html>

[root@bogon vhost]#
7.-u指定用户和密码后,返回值
[root@bogon vhost]# curl -x127.0.0.1:80 test.com -I

HTTP/1.1 401 Unauthorized

Server: nginx/1.12.2

Date: Fri, 09 Feb 2018 06:48:21 GMT

Content-Type: text/html

Content-Length: 195

Connection: keep-alive

WWW-Authenticate: Basic realm="Auth"

[root@bogon vhost]# man curl

[root@bogon vhost]# curl -uuser1:user1 -x127.0.0.1:80 test.com

<html>

<head><title>404 Not Found</title></head>

<body bgcolor="white">

<center><h1>404 Not Found</h1></center>

<hr><center>nginx/1.12.2</center>

</body>

</html>

[root@bogon vhost]#
8.没有创建test.com目录,测试成功
[root@bogon vhost]# mkdir /data/wwwroot/test.com

[root@bogon vhost]# echo "test.com" > /data/wwwroot/test.com/index.html

[root@bogon vhost]# curl -uuser1:user1 -x127.0.0.1:80 test.com

test.com

[root@bogon vhost]#
9.需求;访问一个目录(admin)或者文件时,才需要用户认证。
[root@bogon vhost]# vim /usr/local/nginx/conf/vhost/test.com.conf

[root@bogon vhost]#
10.用户认证时加上admin目录
server

{

    listen 80;

    server_name test.com;

    index index.html index.htm index.php;

    root /data/wwwroot/test.com;

location  /admin

    {

        auth_basic              "Auth";

        auth_basic_user_file   /usr/local/nginx/conf/htpasswd;

    }

}
11.重新加载配置文件 访问test.com 正常,访问test.com/admin/提示401
[root@bogon vhost]# /usr/local/nginx/sbin/nginx -t

nginx: the configuration file /usr/local/nginx/conf/nginx.conf syntax is ok

nginx: configuration file /usr/local/nginx/conf/nginx.conf test is successful

[root@bogon vhost]# /usr/local/nginx/sbin/nginx -s reload

[root@bogon vhost]# curl -x127.0.0.1:80 test.com

test.com

[root@bogon vhost]# curl -x127.0.0.1:80 test.com/admin/

<html>

<head><title>401 Authorization Required</title></head>

<body bgcolor="white">

<center><h1>401 Authorization Required</h1></center>

<hr><center>nginx/1.12.2</center>

</body>

</html>

[root@bogon vhost]#
12.针对一个访问的url(admin.php)做权限验证
[root@bogon vhost]# !vi

vim /usr/local/nginx/conf/vhost/test.com.conf

[root@bogon vhost]# /usr/local/nginx/sbin/nginx -t

nginx: the configuration file /usr/local/nginx/conf/nginx.conf syntax is ok

nginx: configuration file /usr/local/nginx/conf/nginx.conf test is successful

[root@bogon vhost]# /usr/local/nginx/sbin/nginx -s reload

[root@bogon vhost]# curl -x127.0.0.1:80 test.com/admin/

<html>

<head><title>404 Not Found</title></head>

<body bgcolor="white">

<center><h1>404 Not Found</h1></center>

<hr><center>nginx/1.12.2</center>

</body>

</html>

[root@bogon vhost]# curl -x127.0.0.1:80 test.com/admin.php

<html>

<head><title>401 Authorization Required</title></head>

<body bgcolor="white">

<center><h1>401 Authorization Required</h1></center>

<hr><center>nginx/1.12.2</center>

</body>

</html>

[root@bogon vhost]#
修改的配置文件
server

{

    listen 80;

    server_name test.com;

    index index.html index.htm index.php;

    root /data/wwwroot/test.com;

location  ~ admin.php

    {

        auth_basic              "Auth";

        auth_basic_user_file   /usr/local/nginx/conf/htpasswd;

    }

}
Nginx域名重定向

1.httpd配置文件里server_name后面不支持写多个域名,就算写了多个,也默认识别第一个,nginx的配置文件server_name后面则支持写多个域名。
[root@bogon vhost]# vim /usr/local/nginx/conf/vhost/test.com.conf

server

{

    listen 80;

    server_name test.com test2.com;

    index index.html index.htm index.php;

    root /data/wwwroot/test.com;

      if ($host != 'test.com' ) {

         rewrite  ^/(.*)$  http://test.com/$1  permanent; (rewrite到test.com,permanent301报错  redirect302报错)

      }

location  ~ admin.php

    {

        auth_basic              "Auth";

        auth_basic_user_file   /usr/local/nginx/conf/htpasswd;

    }

}
2.测试提示301
[root@bogon vhost]# /usr/local/nginx/sbin/nginx -t

nginx: the configuration file /usr/local/nginx/conf/nginx.conf syntax is ok

nginx: configuration file /usr/local/nginx/conf/nginx.conf test is successful

[root@bogon vhost]# /usr/local/nginx/sbin/nginx -s reload

[root@bogon vhost]# curl -x127.0.0.1:80 test2.com/index.html -I

HTTP/1.1 301 Moved Permanently

Server: nginx/1.12.2

Date: Fri, 09 Feb 2018 07:49:08 GMT

Content-Type: text/html

Content-Length: 185

Connection: keep-alive

Location: http://test.com/index.html

[root@bogon vhost]#
Nginx访问日志

1.修改Nginx的配置文件,搜索/log_format (log_format后面跟的combined_realip是一个自定义名字,用来定义整个日志格式,这里写什么,虚拟配置文件后面就可以加上什么,我这里不做修改)
[root@bogon vhost]# vim /usr/local/nginx/conf/nginx.conf
log_format combined_realip '$remote_addr $http_x_forwarded_for [$time_local]'

    ' $host "$request_uri" $status'

    ' "$http_referer" "$http_user_agent"';
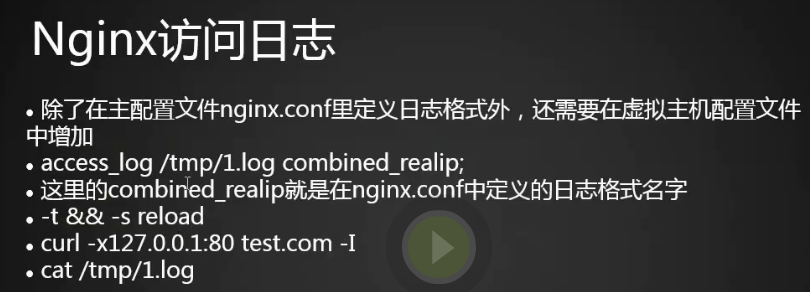
2.编辑添加access_log配置
[root@bogon vhost]# vim /usr/local/nginx/conf/vhost/test.com.conf
[root@bogon vhost]#
server

{

    listen 80;

    server_name test.com test2.com;

    index index.html index.htm index.php;

    root /data/wwwroot/test.com;

      if ($host != 'test.com' ) {

         rewrite  ^/(.*)$  http://test.com/$1  permanent;

      }

    access_log /tmp/test.com.log combined_realip;

location  ~ admin.php

    {

        auth_basic              "Auth";

        auth_basic_user_file   /usr/local/nginx/conf/htpasswd;

    }

}
3.检查语法错误并且重新加载配置文件
[root@bogon vhost]# /usr/local/nginx/sbin/nginx -t

nginx: the configuration file /usr/local/nginx/conf/nginx.conf syntax is ok

nginx: configuration file /usr/local/nginx/conf/nginx.conf test is successful

[root@bogon vhost]# /usr/local/nginx/sbin/nginx -s reload

[root@bogon vhost]# !curl

curl -x127.0.0.1:80 test2.com/index.html -I

HTTP/1.1 301 Moved Permanently

Server: nginx/1.12.2

Date: Fri, 09 Feb 2018 08:22:43 GMT

Content-Type: text/html

Content-Length: 185

Connection: keep-alive

Location: http://test.com/index.html

[root@bogon vhost]# curl -x127.0.0.1:80 test.com/index.html -I

HTTP/1.1 200 OK

Server: nginx/1.12.2

Date: Fri, 09 Feb 2018 08:23:02 GMT

Content-Type: text/html

Content-Length: 9

Last-Modified: Fri, 09 Feb 2018 06:56:11 GMT

Connection: keep-alive

ETag: "5a7d460b-9"

Accept-Ranges: bytes

[root@bogon vhost]#
4.查看日志
[root@bogon vhost]# cat /tmp/test.com.log

127.0.0.1 - [09/Feb/2018:16:22:43 +0800] test2.com "/index.html" 301 "-" "curl/7.29.0"

127.0.0.1 - [09/Feb/2018:16:23:02 +0800] test.com "/index.html" 200 "-" "curl/7.29.0"

[root@bogon vhost]#
Nginx日志切割
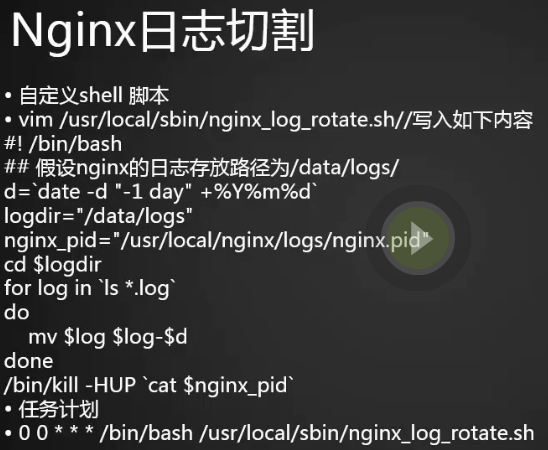
1.nginx没有像httpd一样,自己带有切割工具,则需要借助系统的切割工具或者自己写一个切割的脚本
#!/bin/bash

#假设nginx的日志存放路径为/data/logs/

d=`date -d "-1 day" +%Y%m%d`                   (生成一个年月日day -1的日期,(昨天的日期))

logdir="/tmp/"                          (定义logdir为/tmp)

nginx_pid="/usr/local/nginx/logs/nginx.pid"        (给Nginx.pid定义一个变量,为下面命令做准备)

cd $logdir                               (进入到logdir中)

for log in `ls *.log`                        (做一个for循环,ls当前目录下所有以.log文件为结尾的文件)

do

    mv $log $log-$d                         (把以log为结尾的日志名都改成log---日期)

done

/bin/kill -HUP `cat $nginx_pid`                 (重新启动nginx_pid进程,重新生成一个test.com.log文件)
2.f是变量的名字 in在哪个序列里循环 $f 就是 aaa.com.conf和test.com.conf
[root@bogon vhost]# for f in `ls `;do ls -l $f; done

-rw-r--r--. 1 root root 141 2月   9 13:23 aaa.com.conf

-rw-r--r--. 1 root root 457 2月   9 16:19 test.com.conf

[root@bogon vhost]#
3.执行脚本
[root@bogon vhost]# sh -x /usr/local/sbin/nginx_logrotate.sh

++ date -d '-1 day' +%Y%m%d

+ d=20180210

+ logdir=/tmp/

+ nginx_pid=/usr/local/nginx/logs/nginx.pid

+ cd /tmp/

++ ls php_errors.log test.com.log

+ for log in '`ls *.log`'

+ mv php_errors.log php_errors.log-20180210

+ for log in '`ls *.log`'

+ mv test.com.log test.com.log-20180210

++ cat /usr/local/nginx/logs/nginx.pid

+ /bin/kill -HUP 1726
[root@bogon vhost]# ls /tmp/

hogsuspend

mongodb-27017.sock

mysql.sock

pear

php_errors.log-20180210

php-fcgi.sock

ssh-VkkK9OKJsW89

systemd-private-b091a55929414513a9b7db2f688afef6-colord.service-B5wa5w

systemd-private-b091a55929414513a9b7db2f688afef6-cups.service-RpVATe

systemd-private-b091a55929414513a9b7db2f688afef6-rtkit-daemon.service-gDlUSL

systemd-private-b091a55929414513a9b7db2f688afef6-vmtoolsd.service-TLnArm

test.com.log

test.com.log-20180210

tracker-extract-files.0

yum_save_tx.2018-02-11.10-01.d_miLu.yumtx

[root@bogon vhost]#
4.需要定时清理(30天以前的文件)
[root@bogon vhost]# find /tmp/ -name *.log-* -type f -mtime +30 |xargs rm -rf {} ;
5.加入任务计划
[root@bogon vhost]# crontab -e
0 0 * * * /bin/bash /usr/local/sbin/nginx_logrotate.sh
静态文件不记录日志和过期时间
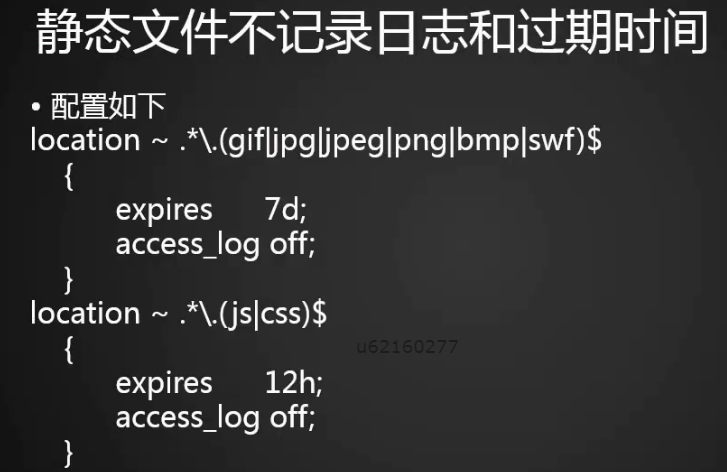
1.编辑配置文件
[root@bogon vhost]# vim test.com.conf
2.添加配置
location ~ .*\.(gif|jpg|jpeg|png|bmp|swf)$    (以gif,jpg,jpeg,png,bmp,swf结尾的文件保存7天,并且不记录日志)

    {

          expires      7d;

          access_log off;

    }

location ~ .*\.(js|css)$

    {

          expires      12h;   (以js,css结尾的文件保存12小时,并且不记录日志)

          access_log off;

    }
3.检查语法,重新加载配置文件
[root@bogon vhost]# /usr/local/nginx/sbin/nginx -t

nginx: the configuration file /usr/local/nginx/conf/nginx.conf syntax is ok

nginx: configuration file /usr/local/nginx/conf/nginx.conf test is successful

[root@bogon vhost]# /usr/local/nginx/sbin/nginx -s reload

[root@bogon vhost]#
4.进入网站根目录创建两个文件,分别输入内容11111111和2222222
[root@bogon vhost]# cd /data/wwwroot/test.com/

[root@bogon test.com]# ls

index.html

[root@bogon test.com]# vim 1.gif

[root@bogon test.com]# vim 2.js

[root@bogon test.com]#
5.分别访问了以gif,js,html为结尾的3个文件,发现日志里只记录了html为结尾的访问信息。
[root@bogon test.com]# curl -x127.0.0.1:80 test.com/1.gif

11111111111111

[root@bogon test.com]# curl -x127.0.0.1:80 test.com/2.js

222222222222222222222222222222

[root@bogon test.com]# curl -x127.0.0.1:80 test.com/index.html

test.com

[root@bogon test.com]# cat /tmp/test.com.log

127.0.0.1 - [11/Feb/2018:19:24:29 +0800] test.com "/index.html" 200 "-" "curl/7.29.0"

[root@bogon test.com]#
6.加上-I 查看过期时间,过期时间已经加上
[root@bogon test.com]# curl -x127.0.0.1:80 -I test.com/2.js

HTTP/1.1 200 OK

Server: nginx/1.12.2

Date: Sun, 11 Feb 2018 11:28:36 GMT

Content-Type: application/javascript

Content-Length: 31

Last-Modified: Sun, 11 Feb 2018 11:07:18 GMT

Connection: keep-alive

ETag: "5a8023e6-1f"

Expires: Sun, 11 Feb 2018 23:28:36 GMT

Cache-Control: max-age=

Accept-Ranges: bytes

[root@bogon test.com]#
Nginx防盗链
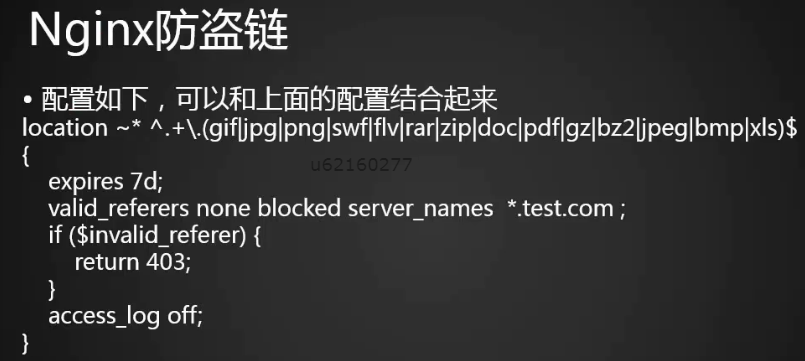
1.增加配置文件 ~* 指小括号内的扩展名不区分大小写
server

{

    listen 80;

    server_name test.com test2.com;

    index index.html index.htm index.php;

    root /data/wwwroot/test.com;

      if ($host != 'test.com' ) {

         rewrite  ^/(.*)$  http://test.com/$1  permanent;

      }

location ~* ^.+\.(gif|jpg|png|swf|flv|rar|zip|doc|pdf|gz|bz2|jpeg|bmp|xls)$

{

    expires 7d;

    valid_referers none blocked server_names  *.test.com ;

    if ($invalid_referer) {

        return 403;

    }

    access_log off;

}

#location ~ .*\.(gif|jpg|jpeg|png|bmp|swf)$

#    {

#          expires      7d;

#          access_log off;

#    }

location ~ .*\.(js|css)$

    {

#          expires      12h;

          access_log off;

    }

    access_log /tmp/test.com.log combined_realip;

}
2.-e选项模仿refer请求,第一次模仿百度访问返回403,第二次test域名访问返回200,防盗链成功
[root@bogon test.com]# /usr/local/nginx/sbin/nginx -t

nginx: the configuration file /usr/local/nginx/conf/nginx.conf syntax is ok

nginx: configuration file /usr/local/nginx/conf/nginx.conf test is successful

[root@bogon test.com]# /usr/local/nginx/sbin/nginx -s reload

[root@bogon test.com]# curl -e "http://www.baidu.com/1.txt" -x127.0.0.1:80 -I test.com/1.gif

HTTP/1.1 403 Forbidden

Server: nginx/1.12.2

Date: Sun, 11 Feb 2018 11:48:56 GMT

Content-Type: text/html

Content-Length: 169

Connection: keep-alive

[root@bogon test.com]# curl -e "http://www.test.com/1.txt" -x127.0.0.1:80 -I test.com/1.gif

HTTP/1.1 200 OK

Server: nginx/1.12.2

Date: Sun, 11 Feb 2018 11:49:26 GMT

Content-Type: image/gif

Content-Length: 15

Last-Modified: Sun, 11 Feb 2018 11:07:06 GMT

Connection: keep-alive

ETag: "5a8023da-f"

Expires: Sun, 18 Feb 2018 11:49:26 GMT

Cache-Control: max-age=604800

Accept-Ranges: bytes

[root@bogon test.com]#
Nginx访问控制
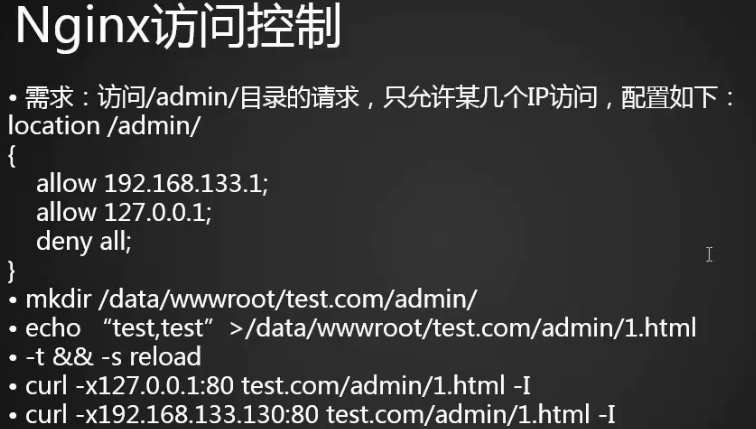
1.编辑配置文件,添加配置访问只允许127.0.0.1和10.21.95.218可以访问admin目录
server

    listen 80;

    index index.html index.htm index.php;

    root /data/wwwroot/test.com;

         rewrite  ^/(.*)$  http://test.com/$1  permanent;

      }

location ~* ^.+\.(gif|jpg|png|swf|flv|rar|zip|doc|pdf|gz|bz2|jpeg|bmp|xls)$

{

    expires 7d;

    if ($invalid_referer) {

        return 403;

    access_log off;

}

#location ~ .*\.(gif|jpg|jpeg|png|bmp|swf)$

#    {

#          expires      7d;

#          access_log off;

#    }

location ~ .*\.(js|css)$

    {

#          expires      12h;

          access_log off;

    }

    location /admin/

    {

        allow 127.0.0.1;

        allow 10.21.95.122;

        deny all;

    }

    access_log /tmp/test.com.log combined_realip;

}
2.测试
[root@bogon admin]# vim /usr/local/nginx/conf/vhost/test.com.conf

[root@bogon admin]# /usr/local/nginx/sbin/nginx -t

nginx: the configuration file /usr/local/nginx/conf/nginx.conf syntax is ok

nginx: configuration file /usr/local/nginx/conf/nginx.conf test is successful

[root@bogon admin]# /usr/local/nginx/sbin/nginx -s reload

[root@bogon admin]# curl -e "http://www.baidu.com/1.txt" -x127.0.0.1:80 -I test.com/admin/

HTTP/1.1 200 OK

Server: nginx/1.12.2

Date: Sun, 11 Feb 2018 12:30:39 GMT

Content-Type: application/octet-stream

Content-Length: 6

Last-Modified: Sun, 11 Feb 2018 12:29:33 GMT

Connection: keep-alive

ETag: "5a80372d-6"

Accept-Ranges: bytes
[root@bogon admin]# curl -x10.21.95.122:80 -I test.com/admin/

HTTP/1.1 200 OK

Server: nginx/1.12.2

Date: Sun, 11 Feb 2018 12:42:02 GMT

Content-Type: application/octet-stream

Content-Length: 6

Last-Modified: Sun, 11 Feb 2018 12:29:33 GMT

Connection: keep-alive

ETag: "5a80372d-6"

Accept-Ranges: bytes

[root@bogon admin]#
3.查看日志
[root@bogon admin]# cat /tmp/test.com.log

127.0.0.1 - [11/Feb/2018:20:30:39 +0800] test.com "/admin/" 200 "http://www.baidu.com/1.txt" "curl/7.29.0"

10.21.95.122 - [11/Feb/2018:20:42:02 +0800] test.com "/admin/" 200 "-" "curl/7.29.0"
4.配置文件中添加
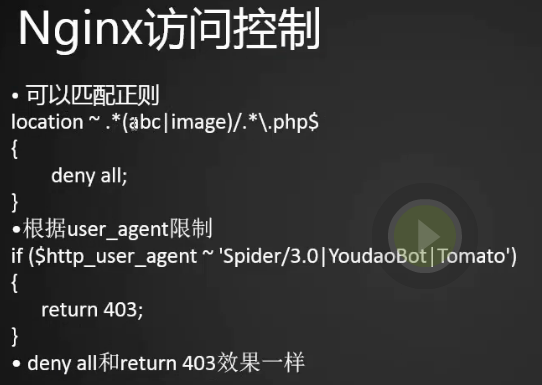
location ~ .*(upload|image)/.*\.php$

    {

        deny all;

    }
5.创建upload目录
[root@bogon admin]# vim /usr/local/nginx/conf/vhost/test.com.conf

[root@bogon admin]# /usr/local/nginx/sbin/nginx -t

nginx: the configuration file /usr/local/nginx/conf/nginx.conf syntax is ok

nginx: configuration file /usr/local/nginx/conf/nginx.conf test is successful

[root@bogon admin]# /usr/local/nginx/sbin/nginx -s reload

[root@bogon admin]# mkdir /data/wwwroot/test.com/upload

[root@bogon admin]# echo "upload" > /data/wwwroot/test.com/upload/1.php

[root@bogon admin]#
6.测试被拒绝
[root@bogon admin]# curl -x127.0.0.1:80 test.com/upload/1.php

<html>

<head><title>403 Forbidden</title></head>

<body bgcolor="white">

<center><h1>403 Forbidden</h1></center>

<hr><center>nginx/1.12.2</center>

</body>

</html>

[root@bogon admin]#
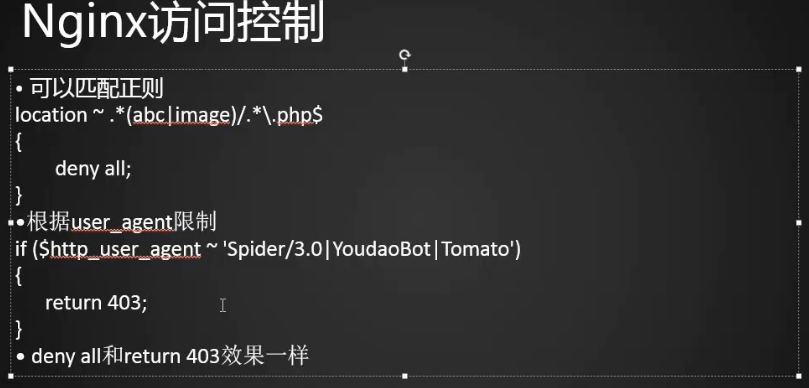
7.限制蜘蛛,添加配置
1、变量的完整比较可以使用=或!=操作符
2、 部分匹配可以使用正则表达式来表示,~或~*
3、~表示区分大小写
4、~*表示不区分大小写(firefox与FireFox是一样的)
5、!~与!~* 是取反操作,也就是不匹配的意思
6、检查文件是否存在使用 -f 或 !-f 操作符
7、检查目录是否存在使用-d或!-d操作符
8、检查文件,目录或符号连接是否存在使用-e或!-e操作符
9、检查文件是否可执行使用-x或!-x操作符
10、正则表达式的部分匹配可以使用括号,匹配的部分在后面可以用$1~$9变量代替,这些和apache一致。
 if( $http_user_agent ~ 'YoudaoBot|Baidu' )

    {

        return 403;

    }
8.测试,用百度蜘蛛访问403 -A 设置用户代理发送给服务器
[root@bogon admin]# /usr/local/nginx/sbin/nginx -t

nginx: the configuration file /usr/local/nginx/conf/nginx.conf syntax is ok

nginx: configuration file /usr/local/nginx/conf/nginx.conf test is successful

[root@bogon admin]# /usr/local/nginx/sbin/nginx -s reload

[root@bogon admin]# echo 1111 > /data/wwwroot/test.com/upload/1.txt

[root@bogon admin]# curl -x127.0.0.1:80 test.com/upload/1.txt -I

HTTP/1.1 200 OK

Server: nginx/1.12.2

Date: Mon, 12 Feb 2018 01:39:30 GMT

Content-Type: text/plain

Content-Length: 5

Last-Modified: Mon, 12 Feb 2018 01:39:05 GMT

Connection: keep-alive

ETag: "5a80f039-5"

Accept-Ranges: bytes

[root@bogon admin]#
[root@bogon admin]# curl -A "Baidu" -x127.0.0.1:80 test.com/upload/1.txt -I

HTTP/1.1 403 Forbidden

Server: nginx/1.12.2

Date: Mon, 12 Feb 2018 01:40:51 GMT

Content-Type: text/html

Content-Length: 169

Connection: keep-alive

[root@bogon admin]#
Nginx解析php相关配置
1.外网访问nginx失败很有可能是防火墙没有开启80端口,开启方法
命令含义:
–zone #作用域
–add-port=80/tcp #添加端口,格式为:端口/通讯协议
–permanent #永久生效,没有此参数重启后失效
2.重启防火墙
[root@bogon conf]# firewall-cmd --zone=public --add-port=80/tcp --permanent

success

[root@bogon conf]#
[root@bogon conf]# systemctl restart firewalld.service
3.将解析php的配置文件添加到nginx配置文件中
[root@bogon /]# vim /usr/local/nginx/conf/vhost/test.com.conf
server
{
listen 80;
server_name test.com test2.com;
index index.html index.htm index.php;
root /data/wwwroot/test.com;
if ($host != 'test.com' ) {
rewrite ^/(.*)$ http://test.com/$1 permanent;
} location ~* ^.+\.(gif|jpg|png|swf|flv|rar|zip|doc|pdf|gz|bz2|jpeg|bmp|xls)$
{
expires 7d;
valid_referers none blocked server_names *.test.com ;
if ($invalid_referer) {
return 403;
}
access_log off;
} #location ~ .*\.(gif|jpg|jpeg|png|bmp|swf)$
# {
# expires 7d;
# access_log off;
# }
location ~ .*\.(js|css)$
{
access_log off;
} location /admin/
{
server
{
listen 80;
server_name test.com test2.com;
index index.html index.htm index.php;
root /data/wwwroot/test.com;
if ($host != 'test.com' ) {
rewrite ^/(.*)$ http://test.com/$1 permanent;
} location ~* ^.+\.(gif|jpg|png|swf|flv|rar|zip|doc|pdf|gz|bz2|jpeg|bmp|xls)$
{
expires 7d;
valid_referers none blocked server_names *.test.com ;
if ($invalid_referer) {
return 403;
}
access_log off;
} #location ~ .*\.(gif|jpg|jpeg|png|bmp|swf)$
# {
# expires 7d;
# access_log off;
# }
location ~ .*\.(js|css)$
{
# expires 12h;
access_log off;
} location /admin/
{
allow 127.0.0.1;
allow 10.21.95.122;
deny all;
} location ~ .*(upload|image)/.*\.php$
{
deny all;
} if ( $http_user_agent ~ 'YoudaoBot|Baidu' )
{
return 403;
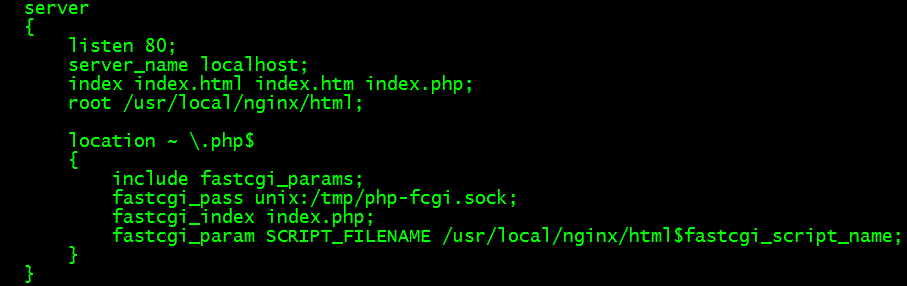
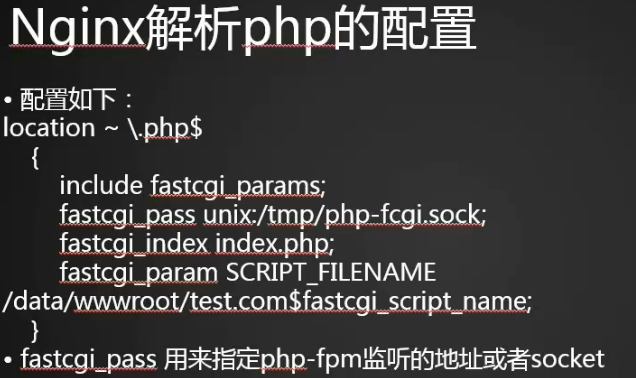
} location ~ \.php$
{
include fastcgi_params;
fastcgi_pass unix:/tmp/php-fcgi.sock; (用来监听php-fpm的地址或者socket,这里怎么写取决于/usr/local/php-fpm/etc/php-fpm.conf里的listen怎么写,如果不一样,则curl会报502错误,)
fastcgi_index index.php;
fastcgi_param SCRIPT_FILENAME /data/wwwroot/test.com$fastcgi_script_name; (这个路径要写对,对应上面的root路径)
} access_log /tmp/test.com.log combined_realip;
}
4.创建文件3.php,写入phpinfo(),重新加载配置文件,curl访问可以正确解析php文件
[root@bogon /]# vim /data/wwwroot/test.com/3.php

[root@bogon /]# /usr/local/nginx/sbin/nginx -s reload

[root@bogon /]# curl -x127.0.0.1:80 test.com/3.php
5.这里可以对比一下php-ftm的配置文件
[global]

pid = /usr/local/php-fpm/var/run/php-fpm.pid

error_log = /usr/local/php-fpm/var/log/php-fpm.log

[www]

listen = /tmp/php-fcgi.sock(这里也可以写成监听端口,例如)
#listen = 127.0.0.1:9000             (如果这里写成端口,则虚拟配置文件里也要写成:fastcgi_pass 127.0.0.1:9000)

listen.mode = 666 (如果用的sock,定义php-fcgi.sock的权限必须是666(默认是440只用root用户能读,其它用户将提示to unix:/tmp/php-fcgi.sock failed(13:Permission denied)),否则nginx解析不了)
user = php-fpm

group = php-fpm

pm = dynamic

pm.max_children = 50

pm.start_servers = 20

pm.min_spare_servers = 5

pm.max_spare_servers = 35

pm.max_requests = 500

rlimit_files = 1024
6.php读sock文件是以nobody用户的身份读的,如果用的是默认权限,需要将文件php-fcgi.sock的属组改为nobody ,再访问php文件就可以解析了,因为nobody用户有读sock文件的权限了
[root@bogon /]# ps aux|grep nginx

root       1726  0.0  0.1  21276  1484 ?        Ss   2月11   0:00 nginx: master process /usr/local/nginx/sbin/nginx -c /usr/local/nginx/conf/nginx.conf

nobody    51088  0.0  0.3  25240  3432 ?        S    11:45   0:00 nginx: worker process

nobody    51089  0.0  0.3  25240  3940 ?        S    11:45   0:00 nginx: worker process

root      69197  0.0  0.0 112684   976 pts/1    S+   16:04   0:00 grep --color=auto nginx

[root@bogon /]#
[root@bogon /]# chown nobody /tmp/php-fcgi.sock
LNMP架构二的更多相关文章
- nginx模块lnmp架构
目录 一:关于lnmp架构 二:目录索引模块 1.目录索引模块内容 1.开启目录索引(创建模块文件) 2.测试 3.重启nginx 4.配置域名解析DNS 5.网址测试 二:目录索引(格式化文件大小) ...
- 第十二章 LNMP架构之分离数据库
一.课程回顾 1.搭建LNMP环境 1.配置官方源2.yum安装依赖3.yum安装nginx4.配置nginx5.创建用户6.启动并加入开机自启7.上传安装包8.解压安装包9.卸载旧版本PHP10. ...
- LNMP架构部署
第1章 部署LNMP架构步骤 1.1 ①部署Linux系统(OK) 基本优化完成(ip地址设置 yum源更新 字符集设置) 安全优化完成(iptables关闭 selinux关闭 /tmp/ 1777 ...
- 企业级LNMP架构搭建实例(基于Centos6.x)
1.1 部署LNMP架构说明 1.1.1 LNMP架构内容 01.部署linux系统 02.部署nginx网站服务 03.部署mysql数据库服务 04.部署php动态解析服务 1.1.2 配置LNM ...
- nginx详解反向代理、负载均衡、LNMP架构上线动态网站(week4_day1_part1)-技术流ken
nginx介绍 Nginx是俄罗斯人编写的十分轻量级的HTTP服务器,Nginx,它的发音为“engine X”,是一个高性能的HTTP和反向代理服务器,同时也是一个IMAP/POP3/SMTP 代理 ...
- 高性能Web服务之lnmp架构应用
传统上基于进程或线程模型架构的web服务通过每进程或每线程处理并发连接请求,这势必会在网络和I/O操作时产生阻塞,其另一个必然结果则是对内存或CPU的利用率低下.生成一个新的进程/线程需要事先备好其运 ...
- LNMP架构下Discuz论坛的搭建
在上一节中,我们对lnmp架构下的mysql.php.nginx进行源码的安装,并设置了相关的安装参数.现在我们将在上一节的基础上,把三者联系起来进行一个论坛的部署. 一.首先进行Discuz(社区论 ...
- 部署LNMP架构及其应用
部署企业LNMP架构 (一)首先安装nginx服务,具体请见另一篇关于nginx的博文. (二)安装MySQL数据库 .安装前准备 [root@localhost ~]# rpm -e mysql-s ...
- Linux(12):期中架构(4)--- 前端部分:HTTP & Nginx & LNMP架构
HTTP协议概念原理说明 1. 当用户访问一个网站时经历的过程 # ①. 利用DNS服务,将输入的域名解析为相应的IP地址 a 本地主机输入域名后,会查询本地缓存信息和本地hosts b 本地主机会向 ...
随机推荐
- 消除Xcode 5中JosnKit类库的bit masking for introspection of objective-c 警告
Xcode 5中苹果对多个系统框架及相关类库进行了改进.之前建立的项目在Xcode 5中重新编译会产生一些新问题. JosnKit是常用的轻量级Josn解析类,在Xcode 5中: BOOL work ...
- MYSQL复习笔记8-数据完整性
Date: 20140207Auth: Jin 一.数据完整性的分类数据完整性是指数据库中数据在逻辑上的一致性和准确性.包括三种1.实体完整性又称行的完成性,要求表中有一个主键,其值不能为空且唯一地标 ...
- Express极简实例
假设已创建一个Express工程,否则请参考express工程环境准备 修改app.js var express = require('express'); var app = express(); ...
- eclipse 性能调优之内存分配
转自:http://blog.csdn.net/defonds/article/details/6289236 如果觉得自己的 eclipse 比较慢,可以通过修改 %eclipse_home%/ec ...
- activiti源码笔记对标的博客
http://blog.csdn.net/bluejoe2000/article/category/2812511/2 白乔专栏 http://blog.csdn.net/bluejoe2000/ar ...
- Hibernate3的jar包
一.hibernate3包说明 说明: Hibernate 软件包中的Hibernate3.jar 是我们需要使用的Hibernate 工具,其他引用的 Jar 文件位于lib 子目录下,Hibern ...
- Binary Tree Preorder Traversal -- leetcode
Given a binary tree, return the preorder traversal of its nodes' values. For example: Given binary t ...
- 第七章:JAVA引用ESWCF及部分方法说明
WCF搭建地址: http://127.0.0.1:8081/Search.svc?wsdl 操作如下: 引用webservice 2.输入webservice访问地址,点击下一步 3.点击Finis ...
- ESP8266学习笔记6:ESP8266规范wifi连接操作
一.前言 我整理了从2015年至今关于ESP8266的学习笔记,梳理出来了开发环境.基础功能.进阶学习三大部分.方便自己和他人.可点此查看,欢迎交流. 之前在笔记4<ESP8266的SmartC ...
- MyEclipse 集成 Gradle开发环境
一.上Grandle官网下载Gradle,地址:http://www.gradle.org/downloads 如果只是运行只下载gradle-2.6-bin.zip 就可以了,如果为了扩展开发的话就 ...