Python3 Selenium自动化web测试 ==> 第一节 起始点之Python单元测试框架 unittest
前置步骤
Python版本:3.6.4
selenium版本:3.11.0
>>> import selenium

>>> help(selenium)
IDE:Pycharm
学习目的
- 掌握Python版本的selenium自动化技能,对所学的知识总结,可以作为日后工作的参考;
- 对学习的Python脚本编码能力再磨练,实战中学习;
- 为后续的跳槽作准备,说难听点,不会编码的测试,去哪都没啥竞争力
正式步骤
Step1:unittest框架中最核心的4个概念:test fixture(测试固件)、test case(测试用例)、test suite(测试套件)、test runner(测试运行器)
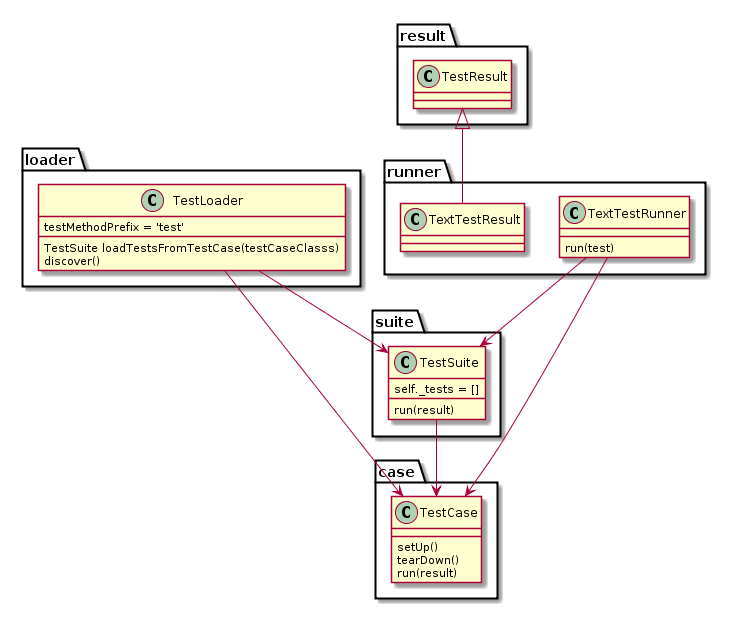
运行工作图:

运行数据流:
- 一个TestCase的实例就是一个测试用例。什么是测试用例呢?就是一个完整的测试流程,包括测试前准备环境的搭建(setUp),执行测试代码(run),以及测试后环境的还原(tearDown)。元测试(unit test)的本质也就在这里,一个测试用例是一个完整的测试单元,通过运行这个测试单元,可以对某一个问题进行验证。
- 而多个测试用例集合在一起,就是TestSuite,而且TestSuite也可以嵌套TestSuite。
- TestLoader是用来加载TestCase到TestSuite中的,其中有几个loadTestsFrom__()方法,就是从各个地方寻找TestCase,创建它们的实例,然后add到TestSuite中,再返回一个TestSuite实例。
- TextTestRunner是来执行测试用例的,其中的run(test)会执行TestSuite/TestCase中的run(result)方法。测试的结果会保存到TextTestResult实例中,包括运行了多少测试用例,成功了多少,失败了多少等信息。
- 而对一个测试用例环境的搭建和销毁,是一个fixture。
简单示例:
import unittest

class TestStringMethods(unittest.TestCase):

    def test_upper(self):

        self.assertEqual('foo'.upper(), 'FOO')

    def test_isupper(self):

        self.assertTrue('FOO'.isupper())

        self.assertFalse('FFF'.isupper(),msg='wrong flag')

    def test_split(self):

        s = 'hello world'

        self.assertEqual(s.split(), ['hello', 'world'])

        # check that s.split fails when the separator is not a string

        with self.assertRaises(TypeError):

            s.split(2)

if __name__ == '__main__':

    unittest.main()
运行结果:
F..

======================================================================

FAIL: test_isupper (__main__.TestStringMethods)

----------------------------------------------------------------------

Traceback (most recent call last):

  File "F:/python_stack/python_autotest/demo.py", line 10, in test_isupper

    self.assertFalse('FFF'.isupper(),msg='wrong flag')

AssertionError: True is not false : wrong flag

----------------------------------------------------------------------

Ran 3 tests in 0.001s

FAILED (failures=1)
运行结果告诉我们:
1.测试用例执行后,结果顺序是随机排序;
2.测试用例以test为前缀;
3.如果想单独运行一个用例,点击相应的测试用例代码区域,右键点击运行相应的方法
4,运行测试套件可以点击run(alt+shift+F10)
Step2:test fixture之setUp() + tearDown() 和 setUpClass() 与 tearDownClass()
setUp() + tearDown() :在每个测试方法执行前以及执行后执行一次,setUp用来为测试准备环境,tearDown用来清理环境,准备之后的测试
setUpClass() 与 tearDownClass():在所有case执行之前准备一次环境,并在所有case执行结束之后再清理环境
实例代码:
import unittest

class TestStringMethods(unittest.TestCase):

    @classmethod

    def setUpClass(cls):

        #只执行一次,在所有用例开始前执行,一般用来预制数据,也可以为下发自动化task初始化

        print('setUpClass'+'\n')

    @classmethod

    def tearDownClass(cls):

        #只执行一次,在所用测试用例执行完毕后运行,一般用来清理测试环境

        print('tearDownClass'+'\n')

    def setUp(self):

        # 每个用例都执行,在单个用例运行前执行

        print('准备开始执行用例'+'\n')

    def tearDown(self):

        #每个用例都执行,在单个用例运行后执行

        print('清理此用例的初始化'+'\n')

    def test_upper(self):

        self.assertEqual('foo'.upper(), 'FOO')

        print('test_upper'+'\n')

    def test_isupper(self):

        self.assertTrue('FOO'.isupper())

        self.assertFalse('Foo'.isupper(),msg='wrong flag')

        print('test_isupper'+'\n')

    def test_split(self):

        s = 'hello world'

        self.assertEqual(s.split(), ['hello', 'world'])

        # check that s.split fails when the separator is not a string

        with self.assertRaises(TypeError):

            s.split(2)

        print('test_split'+'\n')

if __name__ == '__main__':

    unittest.main()
运行结果:
...

----------------------------------------------------------------------

Ran 3 tests in 0.000s

OK

setUpClass

准备开始执行用例

test_isupper

清理此用例的初始化

准备开始执行用例

test_split

清理此用例的初始化

准备开始执行用例

test_upper

清理此用例的初始化

tearDownClass
Step3:test suite 的使用方法
test suite(测试套件)的作用是批量运行多个测试用例,此外还可以做的操作是:
- 调整测试用例执行顺序
- 多个test suite中的test case执行
- (暂留)
实例1: 同一个文件中不同测试类中的测试用例加载到测试套件中
import unittest

class TestStringMethods(unittest.TestCase):

    def test_upper(self):

        self.assertEqual('foo'.upper(), 'FOO')

    def test_isupper(self):

        self.assertTrue('FOO'.isupper())

        self.assertFalse('Foo'.isupper())

    def test_split(self):

        s = 'hello world'

        self.assertEqual(s.split(), ['hello', 'world'])

        # check that s.split fails when the separator is not a string

        with self.assertRaises(TypeError):

            s.split(2)

class MathMethods(unittest.TestCase):

    def test_sum(self):

        s = 'Python'

        self.assertNotEquals('python',s.islower())

if __name__ == '__main__':

    testcase1 = unittest.TestLoader().loadTestsFromTestCase(MathMethods)

    testcase2 = unittest.TestLoader().loadTestsFromTestCase(TestStringMethods)

    suite = unittest.TestSuite([testcase1,testcase2])

    #verbosity的参数为0/1/2,2的回显结果最详细

    unittest.TextTestRunner(verbosity=2).run(suite)
运行结果:
test_sum (__main__.MathMethods) ... ok

test_isupper (__main__.TestStringMethods) ... ok

test_split (__main__.TestStringMethods) ... ok

test_upper (__main__.TestStringMethods) ... ok

----------------------------------------------------------------------

Ran 4 tests in 0.001s

OK
实例2:按照特定顺序执行用例
import unittest

class TestStringMethods(unittest.TestCase):

    def test_upper(self):

        self.assertEqual('foo'.upper(), 'FOO')

        print('test_upper')

    def test_isupper(self):

        self.assertTrue('FOO'.isupper())

        self.assertFalse('Foo'.isupper())

        print('test_isupper')

    def test_split(self):

        s = 'hello world'

        self.assertEqual(s.split(), ['hello', 'world'])

        # check that s.split fails when the separator is not a string

        with self.assertRaises(TypeError):

            s.split(2)

        print('test_split')

if __name__ == '__main__':

    print('单个单个添加测试用例')

    suite = unittest.TestSuite()

    suite.addTest(TestStringMethods('test_upper'))

    suite.addTest(TestStringMethods('test_split'))

    suite.addTest(TestStringMethods('test_isupper'))

    runner = unittest.TextTestRunner()

    runner.run(suite)

    print('同时添加多个测试用例')

    suite1 = unittest.TestSuite()

    suite1.addTests([TestStringMethods('test_split'),TestStringMethods('test_isupper'),TestStringMethods('test_upper')])

    runner2 = unittest.TextTestRunner()

    runner2.run(suite1)
Step4: 忽略某个测试用例不执行,也就是跳过某个用例不执行
import unittest

import sys

class TestStringMethods(unittest.TestCase):

    @unittest.skipIf('F'=='f','不满足判断条件就执行')

    def test_upper2(self):

        self.assertEqual('foo'.upper(), 'FOO')

        print('test_upper2')

    @unittest.skipIf('F'=='f'.upper(),'满足判断条件就不执行')

    def test_upper(self):

        self.assertEqual('foo'.upper(), 'FOO')

        print('test_upper')

    @unittest.skip('忽略此用例不执行')

    def test_isupper(self):

        self.assertTrue('FOO'.isupper())

        self.assertFalse('Foo'.isupper())

        print('test_isupper')

#skipUnless表示如果系统名称是linux,用例就忽略执行,提示用户使用win,sys.platform返回操作系统平台名称

#Python startswith() 方法用于检查字符串是否是以指定子字符串开头

    @unittest.skipUnless(sys.platform.startswith('linux'),'we need windows')

    def test_split(self):

        s = 'hello world'

        self.assertEqual(s.split(), ['hello', 'world'])

        # check that s.split fails when the separator is not a string

        with self.assertRaises(TypeError):

            s.split(2)

        print('test_split')

if __name__ == '__main__':

    suite1 = unittest.TestSuite()

    suite1.addTests([TestStringMethods('test_upper2'),TestStringMethods('test_split'),TestStringMethods('test_isupper'),TestStringMethods('test_upper')])

    runner2 = unittest.TextTestRunner(verbosity=2)

    runner2.run(suite1)
运行结果:
test_upper2 (__main__.TestStringMethods) ... ok

test_upper2

test_split (__main__.TestStringMethods) ... skipped 'we need windows'

test_isupper (__main__.TestStringMethods) ... skipped '忽略此用例不执行'

test_upper (__main__.TestStringMethods) ... skipped '满足判断条件就不执行'

----------------------------------------------------------------------

Ran 4 tests in 0.001s

OK (skipped=3)
Step5:将运行结果保存到文件中
import unittest

import sys

class TestStringMethods(unittest.TestCase):

    @unittest.skipIf('F'=='f','不满足判断条件就执行')

    def test_upper2(self):

        self.assertEqual('foo'.upper(), 'FOO')

        print('test_upper2')

    @unittest.skipIf('F'=='f'.upper(),'满足判断条件就不执行')

    def test_upper(self):

        self.assertEqual('foo'.upper(), 'FOO')

        print('test_upper')

    @unittest.skip('忽略此用例不执行')

    def test_isupper(self):

        self.assertTrue('FOO'.isupper())

        self.assertFalse('Foo'.isupper())

        print('test_isupper')

#skipUnless表示如果系统名称是linux,用例就忽略执行,提示用户使用win,sys.platform返回操作系统平台名称

#Python startswith() 方法用于检查字符串是否是以指定子字符串开头

    @unittest.skipUnless(sys.platform.startswith('linux'),'we need windows')

    def test_split(self):

        s = 'hello world'

        self.assertEqual(s.split(), ['hello', 'world'])

        # check that s.split fails when the separator is not a string

        with self.assertRaises(TypeError):

            s.split(2)

        print('test_split')

if __name__ == '__main__':

    suite1 = unittest.TestSuite()

    suite1.addTests([TestStringMethods('test_upper2'),TestStringMethods('test_split'),TestStringMethods('test_isupper'),TestStringMethods('test_upper')])

    with open('result.txt','a+',encoding='utf-8') as f:

        runner2 = unittest.TextTestRunner(stream=f,verbosity=2)

        runner2.run(suite1)
方法就是上述代码所示
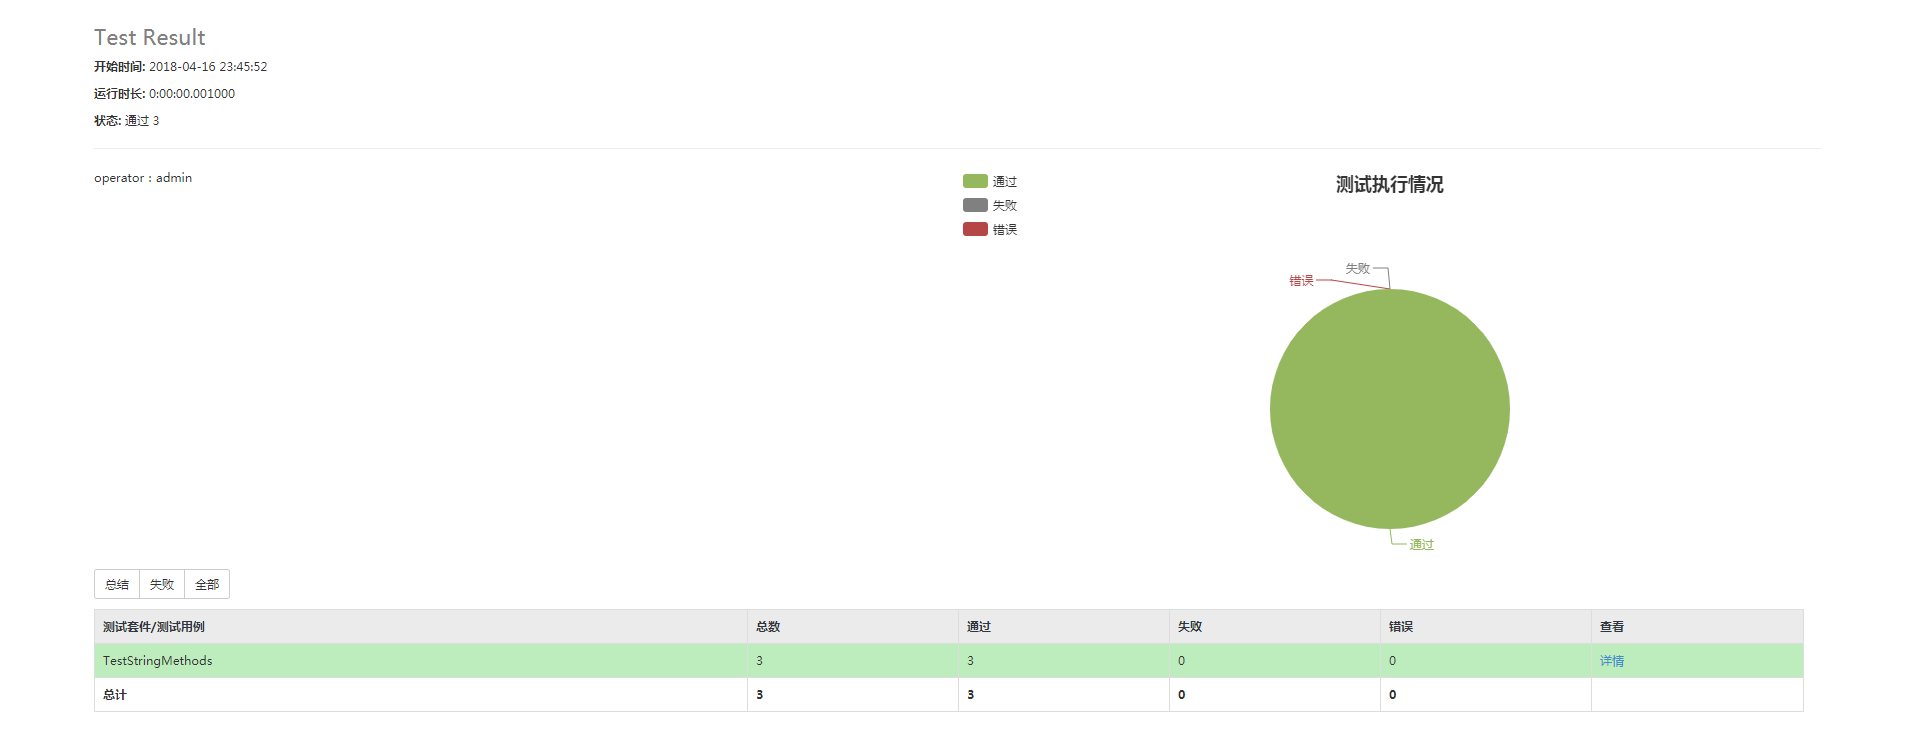
Step6: 使用HTMLTestRunner生成HTML格式测试报告
测试脚本:
import unittest

import os

from HTMLTestRunner import HTMLTestRunner

class TestStringMethods(unittest.TestCase):

    def test_upper(self):

        self.assertEqual('foo'.upper(), 'FOO')

        print('test_upper')

    def test_isupper(self):

        self.assertTrue('FOO'.isupper())

        self.assertFalse('Foo'.isupper())

        print('test_isupper')

    def test_split(self):

        s = 'hello world'

        self.assertEqual(s.split(), ['hello', 'world'])

        # check that s.split fails when the separator is not a string

        with self.assertRaises(TypeError):

            s.split(2)

        print('test_split')

if __name__ == '__main__':

    report = os.path.join('D:/Python36/report/report.html')

    suite1 = unittest.TestSuite()

    suite1.addTests([TestStringMethods('test_split'),TestStringMethods('test_isupper'),TestStringMethods('test_upper')])

    with open(report,'wb') as f:

        runner2 = HTMLTestRunner(stream=f,title='Test Result',description='operator:admin',verbosity=2)

        runner2.run(suite1)
测试结果:

HTMLTestRunner脚本来自:https://blog.csdn.net/huilan_same/article/details/77944829
难点分析:
1. Python3很多测试类不支持,没有Python2那么好找解决办法
2. 效率太慢,明天继续
学习总结:
磨磨蹭蹭终于开始做自己想做的事情了,希望半个月到一个月内,可以输出stepbystep的测试步骤,而且是Python3脚本,挺有意思的,就是公司没有外网,坑啊
参考资料:
https://docs.python.org/3.6/library/unittest.html#
https://blog.csdn.net/huilan_same/article/details/52944782
Python3 Selenium自动化web测试 ==> 第一节 起始点之Python单元测试框架 unittest的更多相关文章
- Python3 Selenium自动化web测试 ==> 第二节 页面元素的定位方法 <上>
前置步骤: 上一篇的Python单元测试框架unittest,我认为相当于功能测试测试用例设计中的用例模板,在自动化用例的设计过程中,可以封装一个模板,在新建用例的时候,把需要测试的步骤添加上去即可: ...
- Python3 Selenium自动化web测试 ==> 第九节 WebDriver高级应用 -- 操作select 和 alert
学习目的: 掌握页面常规元素的定位方法 场景: 网页正常的select元素下拉框常规方法和select专属方法 正式步骤: step1:常规思路select页面元素定位 处理HTML代码截图 # -* ...
- Python3 Selenium自动化web测试 ==> 第二节 页面元素的定位方法 -- iframe专题 <下>
学习目的: 掌握iframe矿建的定位,因为前端的iframe框架页面元素信息,大多时候都会带有动态ID,无法重复定位. 场景: 1. iframe切换 查看iframe 切换iframe 多个ifr ...
- Python3 Selenium自动化web测试 ==> 第七节 WebDriver高级应用 -- 浮动框中,单击选择某个关键字选项
学习目的: 了解WebDriver的高级应用 正式步骤: 测试Python3代码 # -*- coding:utf-8 -*- from selenium import webdriver from ...
- Python3 Selenium自动化web测试 ==> 第六节 WebDriver高级应用 -- 操作web页面的滚动条
学习目的: 掌握页面元素定位以外的其他重要知识点. 正式步骤: 测试Python3代码 # -*- coding:utf-8 -*- from selenium import webdriver fr ...
- Python3 Selenium自动化web测试 ==> 第五节 WebDriver高级应用 -- 使用JavaScript操作页面元素
学习目的: 中级水平技术提升 在WebDriver脚本代码中执行JS代码,可以解决某些 .click()方法无法生效等问题 正式步骤: Python3代码如下 # -*- coding:utf-8 - ...
- Python3 Selenium自动化web测试 ==> 第十一节 WebDriver高级应用 -- 显示等待 + 二次封装
学习目的: 掌握显示等待 掌握二次封装 正式步骤: step1:显示等待的代码示例 # -*- coding:utf-8 -*- from selenium import webdriver from ...
- Python3 Selenium自动化web测试 ==> 第十节 WebDriver高级应用 -- xpath语法
学习目的: xpath定位是针对常规定位方法中,最有效的定位方式. 场景: 页面元素的定位. 正式步骤: step1:常规属性 示例UI 示例UI相关HTML代码 相关代码示例: #通过id定位 dr ...
- Python3 Selenium自动化web测试 ==> 第三节 常用WebDriver API使用示例上(24个API)
前置步骤: 安装selenium,chrome驱动,Python3.6 学习目的: 常见API的使用 涉及的API: step1: 访问一个网址 step2: 网页的前进和后退 step3: 刷新当前 ...
随机推荐
- virtualBox+centOS的一些报错
step1: 安装系统后进入命令行模式 安装virtualBox:https://www.virtualbox.org/wiki/Downloads 下载centOS7镜像:https://www.c ...
- C# Parallel 使用
ParallelLoopResult result = Parallel.For(, , i => { Console.WriteLine("{0}, task: {1}, threa ...
- [2019牛客多校第三场][G. Removing Stones]
题目链接:https://ac.nowcoder.com/acm/contest/883/G 题目大意:有\(n\)堆石头,每堆有\(a_i\)个,每次可以选其中两堆非零的石堆,各取走一个石子,当所有 ...
- 002_FreeRTOS临界段代码
(一)临界段代码也叫做临界区,是指那些必须完整运行,不能被打断的代码段 (二)FreeRTOS 与 临 界 段 代 码 保 护 有 关 的 函 数 有 4 个,两个是任务级的临界段代码保护,两个是中断 ...
- pyecharts v1 版本 学习笔记 柱状图
柱状图 bar 基本演示例子 from pyecharts import options as opts from pyecharts.charts import Bar c =( Bar().add ...
- 一些有用的dll
1.生成excel工具- EPPlus EPPlus.dll 2.生成word工具 - OpenXml DocumentFormat.OpenXml.dll 3.生成条形码工具 - ZXing zx ...
- CF1140F Extending Set of Points 【按时间分治,并查集】
题目链接:洛谷 首先我们考虑没有撤回操作的情况,就是将每一行和每一列看做一个点(代表行的称为白点,代表列的称为黑点),每个点$(x,y)$看做一条边. Extend操作实际上就是$x_1$行与$y_1 ...
- http接口测试工具 REST Client
以下几个工具为常用rest测试工具 1.Postman, 可以下载客户端或者安装浏览器插件 2.Insomnia,window客户端 3.Apizza,在线极客专属的api协作管理工具 ...
- AGC023C Painting Machines
题意 有一排\(n\)个格子,\(i\)操作会使\(i\)和\(i+1\)都变黑. 一个操作序列的得分为染黑所有格子时所用的步数 问所有排列的得分和. \(n\le 10^6\) 传送门 思路 有一个 ...
- 【java】Java.math.BigDecimal.subtract()方法实例
java.math.BigDecimal.subtract(BigDecimal subtrahend) 返回一个BigDecimal,其值为 (this - subtrahend), 精度为 max ...
