Windows上使用iverilog+gtkwave仿真
主要参考了:
https://www.cnblogs.com/lsgxeva/p/8280662.html
谢谢!
--------------------------------------------------------------------------------------------------------------------
使用Verilog编写好了功能模块以及对应的testbench之后,一般需要对其功能进行仿真测试。由于工作场合、必须使用正版软件,然而ModelSim的license又非常有限、经常出现的状况是一方在使用其进行仿真、另一方就不能够进行仿真了。
在这个情况下,可以有的选择包括:
1、继续等待别人用完,然后再使用ModelSim进行仿真;
2、使用集成在VIVADO里的simulation工具(ISE下自带的是ISim),基本可以胜任绝大多数的功能仿真任务;操作也很简单,直接Run Simulation就可以了;
3、使用开源的工具:iverilog+gtkwave工具。
下面对第三种方式的操作流程进行记录。系统环境为Windows7
从官网下载包含iverilog+GTKWave的安装包,地址为http://bleyer.org/icarus/ 。安装好之后开始逐步执行命令。(或者也可以将命令编写在一个脚本文件中。)
本文所仿真的verilog小实例如下,是一个简单的loadable四位加一计数器:(代码来自在学习testbench期间在网上找到的Lattice公司的“A Verilog HDL Test Bench Primer”手册中的示例代码)
//-------------------------------------------------

// File: count16.v

// Purpose: Verilog Simulation Example

//-------------------------------------------------

`timescale  ns /  ps

module count16 (count, count_tri, clk, rst_l, load_l, enable_l, cnt_in,

oe_l);

output [:] count;

output [:] count_tri;

input clk;

input rst_l;

input load_l;

input enable_l;

input [:] cnt_in;

input oe_l;

reg [:] count;

// tri-state buffers

assign count_tri = (!oe_l) ? count : 'bZZZZ;

// synchronous 4 bit counter

always @ (posedge clk or negedge rst_l)

    begin

        if (!rst_l) begin

            count <= # 'b0000;

        end

        else if (!load_l) begin

            count <= # cnt_in;

        end

        else if (!enable_l) begin

            count <= # count + ;

        end

    end

endmodule //of count16
为其编写的testbench文件如下:
//-------------------------------------------------

// File: cnt16_tb.v

// Purpose: Verilog Simulation Example

// Test Bench

//-----------------------------------------------------------

`timescale  ns /  ps

module cnt16_tb ();

//---------------------------------------------------------

// inputs to the DUT are reg type

reg clk_50;

reg rst_l, load_l, enable_l;

reg [:] count_in;

reg oe_l;

//--------------------------------------------------------

// outputs from the DUT are wire type

wire [:] cnt_out;

wire [:] count_tri;

//---------------------------------------------------------

// instantiate the Device Under Test (DUT)

// using named instantiation

count16 U1 ( .count(cnt_out),

.count_tri(count_tri),

.clk(clk_50),

.rst_l(rst_l),

.load_l(load_l),

.cnt_in(count_in),

.enable_l(enable_l),

.oe_l(oe_l)

);

//----------------------------------------------------------

// create a 50Mhz clock

always

# clk_50 = ~clk_50; // every ten nanoseconds invert

//-----------------------------------------------------------

// initial blocks are sequential and start at time 0

initial

        begin

            $dumpfile("cnt16_tb.vcd");

            $dumpvars(,cnt16_tb);

        end

initial

begin

$display($time, " << Starting the Simulation >>");

clk_50 = 'b0;

// at time 0

rst_l = ;

// reset is active

enable_l = 'b1;

// disabled

load_l = 'b1;

// disabled

count_in = 'h0;

oe_l = 'b0;

// enabled

# rst_l = 'b1;

// at time 20 release reset

$display($time, " << Coming out of reset >>");

@(negedge clk_50); // wait till the negedge of

// clk_50 then continue

load_count('hA);

// call the load_count task

// and pass 4'hA

@(negedge clk_50);

$display($time, " << Turning ON the count enable >>");

enable_l = 'b0;

// turn ON enable

// let the simulation run,

// the counter should roll

wait (cnt_out == 'b0001); // wait until the count

// equals 1 then continue

$display($time, " << count = %d - Turning OFF the count enable >>",

cnt_out);

enable_l = 'b1;

#;

// let the simulation run for 40ns

// the counter shouldn't count

$display($time, " << Turning OFF the OE >>");

oe_l = 'b1;

// disable OE, the outputs of

// count_tri should go high Z.

#;

$display($time, " << Simulation Complete >>");

$stop;

// stop the simulation

end

//--------------------------------------------------------------

// This initial block runs concurrently with the other

// blocks in the design and starts at time 0

/*initial

begin

// $monitor will print whenever a signal changes

// in the design

$monitor($time, " clk_50=%b, rst_l=%b, enable_l=%b, load_l=%b,

count_in=%h, cnt_out=%h, oe_l=%b, count_tri=%h", clk_50, rst_l,

enable_l, load_l, count_in, cnt_out, oe_l, count_tri);

end*/

//--------------------------------------------------------------

// The load_count task loads the counter with the value passed

task load_count;

    input [:] load_value;

    begin

        @(negedge clk_50);

        $display($time, " << Loading the counter with %h >>", load_value);

        load_l = 'b0;

        count_in = load_value;

        @(negedge clk_50);

        load_l = 'b1;

    end

endtask //of load_count

endmodule //of cnt16_tb
为了方便执行,编写了批处理脚本,如下:
set iverilog_path=C:\iverilog\bin;

set gtkwave_path=C:\iverilog\gtkwave\bin;

set path=%iverilog_path%%gtkwave_path%%path%

set source_module=count16

set testbentch_module=cnt16_tb

iverilog -o "%testbentch_module%.vvp" %testbentch_module%.v %source_module%.v

vvp -n "%testbentch_module%.vvp"

set gtkw_file="%testbentch_module%.gtkw"

if exist %gtkw_file% (gtkwave %gtkw_file%) else (gtkwave "%testbentch_module%.vcd")

pause
首先,设置iverilog和GTKWave可执行文件路径到PATH。由于工作场合下、本人只是所使用电脑系统的普通用户权限、而不是管理员权限,所以不方便为本机系统添加环境变量,所以需要在开始执行上述操作。
然后设置两个变量,后面会使用
testbentch_module设置为testbench文件的模块名
source_module设置为DUT模块名
然后使用iverilog编译verilog
-o指定输出文件名,这里使用模块名+.vvp
之后指定源文件
在制定源文件的时候可以用通配符*,如本人用的批处理中通常使用这种方式指定RTL文件:set rtl_file="../rtl/*.v"。
然后使用vvp开始仿真,参数为上面iverilog的输出文件
之后开始仿真数据波形显示
设置了一个变量,为GTKWave保存文件的文件名,这里使用模块名+.gtkw
然后判断GTKWave保存文件是否存在,若存在则直接使用GTKWave打开该.gtkw文件,否则打开刚仿真生成的.vcd文件。
这里有两点需要注意:
1、vvp命令使用了-n选项是为了让testbench在执行完测试流程之后自动结束,也可以不在执行命令这里使用-n、而通过在testbench文件的initial块中添加"$finish"命令来结束。(testbentch中结束仿真推荐用$finish而不用$stop;因为$finish可以直接结束仿真并退出,而不需要手动退出,这样运行类似以上例子批处理后可以直接打开GTKWave窗口)
2、为了让vvp命令有输出,需要在testbench文件中额外添加一个initial块,在上面的代码中为:
initial

        begin

            $dumpfile("cnt16_tb.vcd");

            $dumpvars(,cnt16_tb);

        end
dumpfile的内容为输出的vcd文件名,可以随意指定,这里指定为testbench模块名;
dumpvar的参数需要为testbench的模块名。
添加了这两个命令之后就可以将生成的波性文件保存在本地。
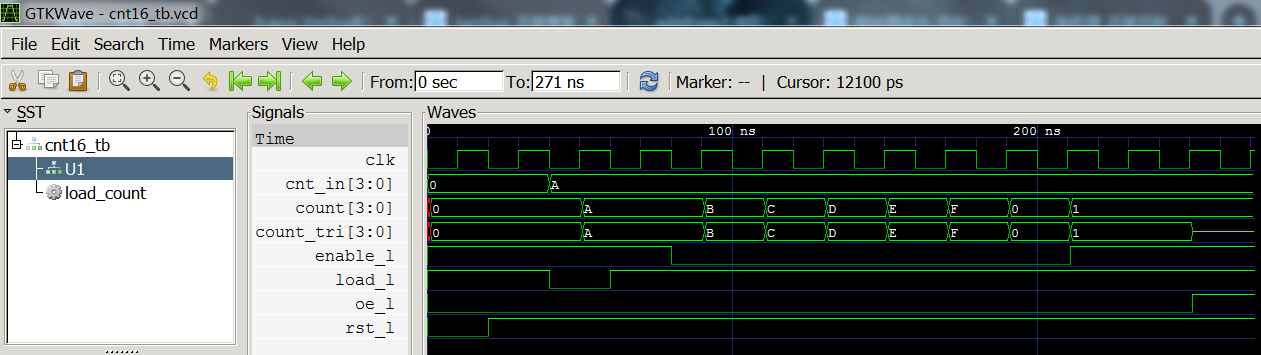
在GTKWave中打开的仿真波形结果如下图所示:
直接运行iverilog -help或iverilog则会显示以下帮助信息,显示了iverilog支持的参数
Usage: iverilog [-ESvV] [-B base] [-c cmdfile|-f cmdfile]

                [-g1995|-g2001|-g2005|-g2005-sv|-g2009|-g2012] [-g<feature>]

                [-D macro[=defn]] [-I includedir]

                [-M [mode=]depfile] [-m module]

                [-N file] [-o filename] [-p flag=value]

                [-s topmodule] [-t target] [-T min|typ|max]

                [-W class] [-y dir] [-Y suf] source_file(s)
详细参数列表请查看http://iverilog.wikia.com/wiki/Iverilog_Flags
此外,如果运行批处理需要在DOS窗口查看verilog中$display的打印,有时iverilog编译打印的信息较多时会导致部分信息无法查看,所以需要加大DOS窗口的高度:在DOS窗口标题栏右键->默认值->布局中设置屏幕缓冲区中高度为较大的值(如1000)即可。
最后是可能会用到的网址:
iverilog 官网:http://iverilog.icarus.com/
iverilog windows版本:http://bleyer.org/icarus/
iverilog User Guide:http://iverilog.wikia.com/wiki/User_Guide
iverilog GitHub:https://github.com/steveicarus/iverilog
GTKWave 官网:http://gtkwave.sourceforge.net/
GTKWave 手册:http://gtkwave.sourceforge.net/gtkwave.pdf
Windows上使用iverilog+gtkwave仿真的更多相关文章
- verilog之四位全加器的编译及仿真(用开源免费的软件——iverilog+GTKWave)
verilog之四位全加器的编译及仿真(用开源免费的软件——iverilog+GTKWave) 四位全加器的verilog的代码比比皆是,这里上一个比较简单的: /* 4位全加器全加器需要有输入输出, ...
- 全平台轻量开源verilog仿真工具iverilog+GTKWave使用教程
前言 如果你只是想检查Verilog文件的语法是否有错误,然后进行一些基本的时序仿真,那么Icarus Verilog 就是一个不错的选择.相比于各大FPGA厂商的IDE几个G的大小,Icarus V ...
- 普通键盘Windows上虚拟Cherry机械键盘效果的方法
草台班子--普通键盘Windows上虚拟Cherry机械键盘效果的方法 机械键盘以其独特的手感.绚丽的外形,还有那人神共愤的音效吸引着大批爱好者.最近iQQO 3的机械键盘效果更是吸引了更多 ...
- Windows 上安装 Jekyll.
Jekyll是一个静态网站生成工具.它允许用户使用HTML.Markdown或Textile来建立静态页面,然后通过模板引擎Liquid(Liquid Templating Engine)来运行. 原 ...
- 在Windows上安装Elasticsearch 5.0
在windows上安装Elasticsearch Elasticsearch可以使用.zip软件包安装在Windows上. elasticsearch-service.bat命令,它将设置Elasti ...
- 使用Gitblit 在windows 上部署你的Git Server
Gitblit: 在windows 上部署你的Git Server 前言 之前在dudu的文章里看到过用bonobogit 部署在 IIS 7.5 上的Window 平台的git 服务器.学着部署使用 ...
- 在 Windows 上安装Rabbit MQ 指南
rabbitMQ是一个在AMQP协议标准基础上完整的,可服用的企业消息系统.他遵循Mozilla Public License开源协议.采用 Erlang 实现的工业级的消息队列(MQ)服务器. Ra ...
- 在Windows上安装虚拟机详细图文教程
用虚拟机来安装最新的软件,安装最新的系统等等比较保险,可以避免安装不顺利影响自己原来的系统和应用,想尝鲜又担心自己完全更换系统不适应的朋友可以尝试. 虚拟机下载:https://yunpan.cn/c ...
- flask在windows上用mod_wsgi部署
flask在windows上用mod_wsgi部署也是折腾了不少时间,下面就总结下. 首先下载Apache httpd,我认为Apache Hans比较好: 一般这种情况下,你的python环境已经安 ...
随机推荐
- svn重新定位或checkout,提示输入用户名密码,输入后报错
在MyEclipse中,source——>clean up.然后重新定位或checkout
- SVN:通过命令行只提交目录,并忽略其中的文件
通过SVN命令行,我们可以只提交项目的目录结构,从而绕开一开始就将我们不想要上传的文件给提交到服务器上.命令如下:svn add -N [directory] 之后可以进入此目录,执行以下命令:svn ...
- .Net程序猿玩转Android开发---(6)线性布局LinearLayout
LinearLayout控件是Android中重要的布局控件,是一个线性控件,所谓线性控件的意思是指该控件里面的内容仅仅能水平或垂直排列.也就 ...
- Flash-制作空心文字
常常看到站点上用很多空心文字作为站点的名称或者特色项目的名称等等,那这些空心文字是怎么做出来的呢? 用Flash事实上非常快就能做出来.过程例如以下: (1)新建空白文件.工具箱中选择"文本 ...
- 开源 免费 java CMS - FreeCMS1.8 留言管理
项目地址:http://code.google.com/p/freecms/ 留言管理 管理当前管理网站的留言数据. 1. 回复留言 选择须要回复的留言.然后点击"回复". 注意: ...
- objective-c中@class和#import
objective-c中@class和#import #import "B.h" @interface A :NSObject { B *b; } @end @class 通常引入 ...
- .m文件导入C++头文件带来的错误
这几天的工作挖了不少的坑.遇到了各种千奇百怪的错误,如今好好总结一下. 新建一个project,然后新建HelloCPP.h,HelloCPP.cpp文件.HelloCPP.h文件内容例如以下: #i ...
- 文字过长 用 ... 表示 CSS实现单行、多行文本溢出显示省略号
单行文本溢出显示省略号 max-width: 200px; overflow: hidden; text-overflow: ellipsis; white-space: nowrap; 多行文本 ...
- 2017全面JAVA面试经历总结
https://wenku.baidu.com/view/05e8f71afbd6195f312b3169a45177232f60e474.html?from=search JAVA常见面试题及解答2 ...
- (转)dp动态规划分类详解
dp动态规划分类详解 转自:http://blog.csdn.NET/cc_again/article/details/25866971 动态规划一直是ACM竞赛中的重点,同时又是难点,因为该算法时间 ...