Block Manager
在Spark中,将数据抽象为Block(不论是shuffle数据,还是节点本身存储的数据),而每个driver/executor中的block都是由`BlockManager`这个类来负责管理的。对于block实际的读取,`BlockManager`根据block存储位置的不同是交由`ShuffleManager`, `MemoryStore`或`DiskStore`来实际处理的。`BlockManager`管理的block可能是shuffle后的文件,也可能是缓存的数据。对于shuffle文件中的block是通过`ShuffleManager`来管理的。对于节点缓存的数据,对于保存在内存中的block,由`MemoryStore`来管理,对于保存在磁盘的block,由`DiskStore`来管理。Spark在不开启`spark.shuffle.service.enabled`(设为false)配置的情况下,结构如下:

在开启`spark.shuffle.service.enabled`(设为true)配置的情况下,结构如下:
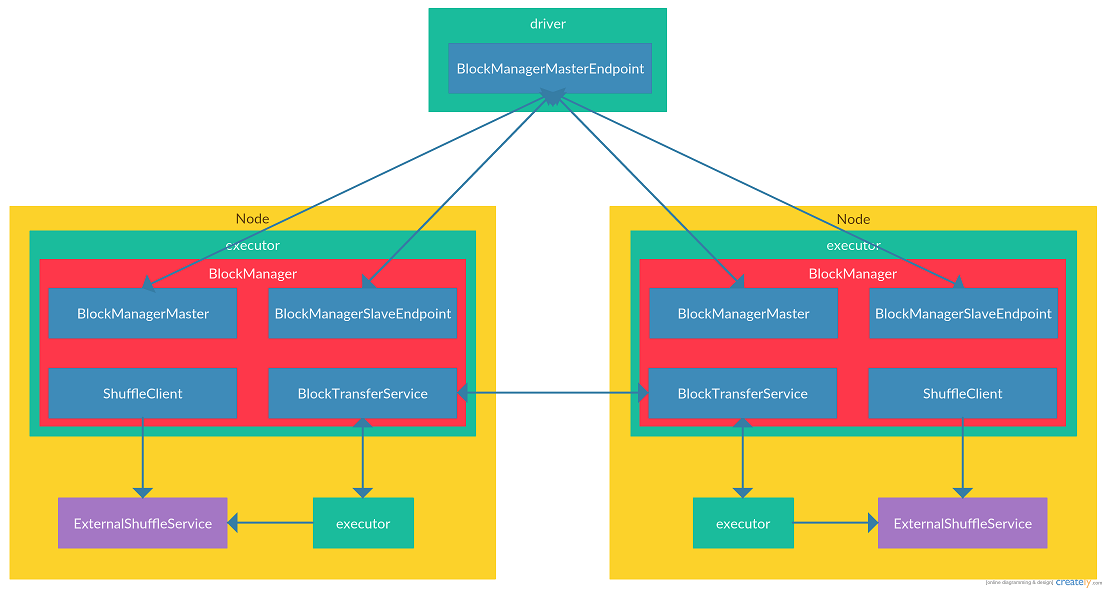
可见在Spark中,每一个driver/executor节点都有一个`BlockManager`与之对应,用来管理节点数据以及向其他节点请求/返回数据。`BlockManager`中主要与两类节点进行通信:一种是executor中的`BlockManager`需要与driver节点通信,来上报executor中`BlockManager`管理的block,同时接受来自driver节点操作executor上block的指令(图中与executor与driver之间的连线)。另一种是executor节点之间的`BlockManager`需要相互通信,来从彼此获取需要的block(图中executor之间,以及executor与`ExternalShuffleService`之间的连线)。
数据结构
在正式介绍Spark的存储结构之前,先来了解一下Spark存储结构中的数据结构,为下文的介绍打下基础。
BlockManagerId
在Spark中,每个`BlockManager`都有一个唯一的id与之对应,而这个id不是一个普通的string或者long型,而是一个特殊的数据结构`BlockManagerId`:
class BlockManagerId private (

    private var executorId_ : String,

    private var host_ : String,

    private var port_ : Int)
可见`BlockManagerId`中保存了executorId(executor节点的唯一标识),host(executor节点的地址),port(`NettyBlockTransferService`的端口(`NettyBlockTransferService`在`BlockManager`中称为ShuffleClient,是用来向其他节点请求/提供Block数据的server,关于`NettyBlockTransferService`的分析见下文))
BlockManagerInfo
`BlockManagerInfo`用来记录`BlockManager`的元数据:
class BlockManagerInfo(

    val blockManagerId: BlockManagerId,

    timeMs: Long,

    val maxMem: Long,

    val slaveEndpoint: RpcEndpointRef)
其中blockManagerId为上文介绍的`BlockManagerId`类型,timeMs为`BlockManager`注册到driver的时间,maxMem为`BlockManager`中`MemoryManager`管理的最大可用的堆内Storage内存大小(关于`MemoryManager`的分析见【Spark内存管理】),slaveEndpoint为`BlockManager`的`BlockManagerSlaveEndpoint`对应的句柄`RpcEndpointRef`(`BlockManagerSlaveEndpoint`分析见下文)。
BlockId
`BlockId`用来唯一标识Spark中的一个Block:
sealed abstract class BlockId {

  // 全局唯一的块标识符,用来序列化/反序列化块

  def name: String

  // convenience methods

  def asRDDId: Option[RDDBlockId] = if (isRDD) Some(asInstanceOf[RDDBlockId]) else None

  def isRDD: Boolean = isInstanceOf[RDDBlockId]

  def isShuffle: Boolean = isInstanceOf[ShuffleBlockId]

  def isBroadcast: Boolean = isInstanceOf[BroadcastBlockId]

  override def toString: String = name

  override def hashCode: Int = name.hashCode

  override def equals(other: Any): Boolean = other match {

    case o: BlockId => getClass == o.getClass && name.equals(o.name)

    case _ => false

  }

}
这个类是一个抽象类,在Spark中有10种类型的BlockId,如`RDDBlockId`,`ShuffleBlockId`,`TaskResultBlockId`等。这些子类都继承了`BlockId`并重写了name字段。在Spark中实际就是靠name字段的不同来区分不同类型的`BlockId`。
BlockInfo
`BlockInfo`用来保存Block的元数据:
class BlockInfo(

    val level: StorageLevel,

    val classTag: ClassTag[_],

    val tellMaster: Boolean)
其中level保存了Block的存储级别(存储级别见[rdd-persistence](http://spark.apache.org/docs/latest/programming-guide.html\#rdd-persistence\)),classTag保存了Block用来序列化/反序列化的类型,tellMaster用来标示在Block状态发生变化时是否要上报给driver。
Block数据管理
Block数据管理,包括executor向driver上报`BlockManager`所管理的Block元数据,executor向driver请求获取/更新Block元数据,driver向executor发送指令来删除某个Block,driver向executor返回Block元数据信息等。可见Block数据管理是executor与driver间的相互通信。还记得我们在【Spark Rpc分析】中的介绍,Spark中应用程序要实现节点间的通信只需要实现`RpcEndpoint`类型即可,在这里也不例外。其中在driver节点负责通信的类为`BlockManagerMasterEndpoint`。而在executor节点负责通信的类为`BlockManagerSlaveEndpoint`。这两个类都是在driver/executor启动时注册到各自的`RpcEnv`中,并向其他节点暴露`RpcEndpointRef`句柄。这样executor就可以使用`BlockManagerMasterEndpoint`的`RpcEndpointRef`向driver发送请求,driver可以使用executor `BlockManagerSlaveEndpoint`的`RpcEndpointRef`向executor发送响应。需要注意的是,由于Spark只在driver节点才会建立`TransportServer`,而不会在executor建立`TransportServer`,所以driver是不会主动向executor建立连接发送请求。而只会executor主动向driver建立连接发送请求,driver在收到请求后利用建立的连接向executor发送请求/响应。下面详细分析一下Block数据管理中这两个核心的`RpcEndpoint`类型:
BlockManagerMasterEndpoint
`BlockManagerMasterEndpoint`类型是注册在driver节点上的。在`BlockManagerMasterEndpoint`中维护了几个map用来管理与Block相关的映射关系:
// 保存BlockManagerId到BlockManager的映射

private val blockManagerInfo = new mutable.HashMap[BlockManagerId, BlockManagerInfo]

// 保存executorId到BlockManagerId的映射

private val blockManagerIdByExecutor = new mutable.HashMap[String, BlockManagerId]

// 保存BlockId到BlockManagerId set的映射

private val blockLocations = new JHashMap[BlockId, mutable.HashSet[BlockManagerId]]
通过blockMangerInfo,driver可以根据`BlockManagerId`找到对应`BlockManager`的元数据`BlockManagerInfo`,而我们知道`BlockManagerInfo`中包含了`BlockManager`与driver通信的`RpcEndpointRef`句柄,driver就可以通过这个与executor的`BlockManager`进行通信。通过blockManagerIdByExecutor,driver可以根据executorId找到对应的`BlockManagerId`。通过blockLocations,driver维护了一个`BlockId`所有副本在集群中的位置,这样在executor发现自身没有某个Block时,可以从driver获取到集群中保存了这个缺少的Block的节点列表,之后executor就可以向保存了Block的节点发送请求来获取Block数据。
BlockManagerSlaveEndpoint
`BlockManagerSlaveEndpoint`类是executor或driver上的`BlockManager`用来接收来自driver `BlockManagerMasterEndpoint`发来的指令的类。主要用来删除`BlockManager`管理的Block,以及返回Block状态等,`BlockManagerSlaveEndpoint`可以处理的消息类型很多,这里我们以`RemoveBlock`消息为例:
override def receiveAndReply(context: RpcCallContext): PartialFunction[Any, Unit] = {

  case RemoveBlock(blockId) =>

    doAsync[Boolean]("removing block " + blockId, context) {

    blockManager.removeBlock(blockId)

    true

  }

}

private def doAsync[T](actionMessage: String, context: RpcCallContext)(body: => T) {

  val future = Future {

    logDebug(actionMessage)

    body

  }

  future.onSuccess { case response =>

    logDebug("Done " + actionMessage + ", response is " + response)

    context.reply(response)

    logDebug("Sent response: " + response + " to " + context.senderAddress)

  }

  future.onFailure { case t: Throwable =>

    logError("Error in " + actionMessage, t)

    context.sendFailure(t)

  }

}
可见其中的很多方法都调用了`BlockManagerSlaveEndpoint.doAsync`方法,用来实现异步调用,在处理完成时,调用对应的`Future.onSuccess`或`Future.onFailure`方法向driver上报处理结果。
BlockManagerMaster
在Spark中,executor/driver的`BlockManager`在向driver的`BlockManagerMasterEndpoint`发送请求时,不是直接使用`BlockManagerMasterEndpoint`的句柄`RpcEndpointRef`来发送,而是调用了`BlockManagerMaster`这个类来发送请求。`BlockManagerMaster`可以看做是对发送方法做了一层封装,其中的方法绝大部分是阻塞请求,即在发送请求后需要等待driver返回响应才会返回。
总结一下Block数据管理,Block数据管理是executor/driver中的`BlockManager`需要将管理的Block信息上报给driver,在driver中维护了集群中所有Block与executor对应关系,Block所在位置等信息。集群中节点都是通过driver保存的Block信息来实现集群Block相互发现的。Block数据管理主要是网络通信,其中`BlockManager`使用`BlockManagerMaster`来向driver发送请求。driver使用`BlockManagerMasterEndpoint`来接收来自`BlockManager`的请求,以及向`BlockManager`发送响应/指令。`BlockManager`使用`BlockManagerSlaveEndpoint`来接收来自driver的指令。他们的关系如下图所示:
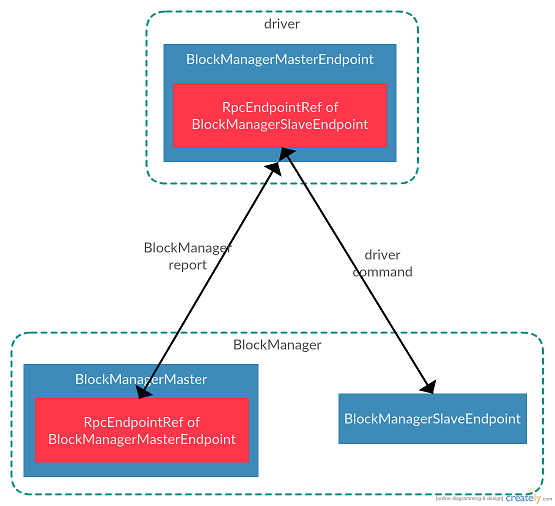
`BlockManager`通过`BlockManagerMaster`将Block元数据上报给driver的`BlockManagerMasterEndpoint`,driver使用`BlockManagerSlaveEndpoint`的句柄向`BlockManager`发送指令。需要注意的是driver不会主动与executor的`BlockManager`建立连接,只有当executor的`BlockManager`主动与driver建立连接发送请求后,driver才可以使用这个建立的连接向executor的`BlockManager`发送指令。
Block数据传输
`BlockManager`管理的Block按照产生来源可以分为两大类:一类是缓存类型的数据(不论是存在内存中还是磁盘上),一类是在进行map-reduce操作时,map阶段生成的shuffle数据。对于缓存类型的Block,可以保存在内存中,也可以保存在磁盘上。而对于shuffle类型的Block,都是保存在磁盘上。Spark使用`MemoryStore`来管理保存在内存的数据(数据的增删改查),使用`DiskStore`来管理保存在磁盘的数据(数据的增删改查)。`BlockManager`针对Block的在内存或磁盘的管理实质上都是委托给`MemoryStore`和`DiskStore`来实现的。
ShuffleClient
在Spark的`BlockManager`中`ShuffleClient`是executor用来从其他executor获取shuffle后的map文件。
`ShuffleClient`是一个抽象类,在Spark中有两种实现:`NettyBlockTransferService`和`ExternalShuffleClient`。还记得我们之前所说,`BlockManager`管理了两类数据:缓存数据和shuffle数据。其中`NettyBlockTransferService`不仅是可以请求/返回shuffle数据,还用来请求/返回缓存数据(如果整个action都没有进行缓存,则最终会触发从数据源获取数据)。而`ExternalShuffleClient`是与`ExternalShuffleService`搭配使用的。 `ExternalShuffleClient`只用来向`ExternalShuffleService`请求shuffle数据。而`ExternalShuffleService`是每台机器在启动时启动的server,用来管理这台机器上所有executor产生的shuffle数据。
那么Spark中为何要实现这两种`ShuffleClient`呢,都是用`NettyBlockTransferService`不就好了?这里我们要说明一下,`NettyBlockTransferService`的生命周期与其所在的executor的生命周期相同,也就是说当executor退出时,`NettyBlockTransferService`也就退出了,不能再向其他节点返回其所管理的shuffle数据或缓存数据。而`ExternalShuffleClient`只是用来向`ExternalShuffleService`请求数据的客户端,虽然`ExternalShuffleClient`随着executor的退出而退出,但是由于shuffle数据是单独由独立于executor的`ExternalShuffleService`管理的,所以其他节点的`ExternalShuffleClient`还可以向`ExternalShuffleService`来获取数据。也就是说`NettyBlockTransferService`可以看做是内嵌在executor中的一个服务器,而`ExternalShuffleClient`配套使用的`ExternalShuffleService`可以看做是独立于executor的服务器,可以在executor退出后依旧提供服务。这里可能读者会有疑问了,executor难道不都是在整个job执行完成后退出的吗,executor退出了,job不也执行完成了吗,使用独立于executor的服务器的意义何在呢?
我们知道Spark的几种集群部署方式(standalone,yarn,mesos)都是支持资源的动态调整的(可以根据集群情况动态的增加或减少executor数量),也就是说在job没有执行完之前,之前使用的executor就可能退出了。这样就会遇到当集群资源充足需要回收executor时,导致executor上的数据丢失。对于executor的`BlockManager`中缓存的数据还好,可以在下次计算时从上游计算出来再次保存到新的executor上。而对于shuffle类型的数据,executor的退出导致shuffle数据的丢失对性能的影响就比较大了。我们知道map-reduce操作是一个极其耗时间的操作,如果有shuffle的文件丢失,会导致shuffle到这个退出节点的executor的操作重算。为了避免这种情况,Spark提供了独立于executor的外部shuffle管理器`ExternalShuffleService`(这个管理器在每个机器上启动一个,而不是每一个executor上,详见[dynamic-resource-allocation](http://spark.apache.org/docs/latest/job-scheduling.html\#dynamic-resource-allocation\))。如果配置了\`spark.shuffle.service.enabled=true\`,则在\`BlockManager\`创建时,会将\`BlockManager\`的\`DiskStore\`管理的目录相关信息上报给机器上的\`ExternalShuffleService\`,目录信息最终会保存在\`ExternalShuffleBlockResolver\`的map中。调用链路如下:
BlockManager.registerWithExternalShuffleService -> ExternalShuffleClient.registerWithShuffleServer -> 向ExternalShuffleService发送RegisterExecutor消息 -> ExternalShuffleBlockHandler.receive -> ExternalShuffleBlockResovler.registerExecutor
最终消息是保存在`ExternalShuffleBlockResovler`中的executors这个map中:
final ConcurrentMap<AppExecId, ExecutorShuffleInfo> executors;

public static class AppExecId {

  public final String appId;

  public final String execId;

}

public class ExecutorShuffleInfo implements Encodable {

  /** The base set of local directories that the executor stores its shuffle files in. */

  public final String[] localDirs;

  /** Number of subdirectories created within each localDir. */

  public final int subDirsPerLocalDir;

  /** Shuffle manager (SortShuffleManager) that the executor is using. */

  public final String shuffleManager;

}
而在shuffle阶段,在执行reduce任务的executor会调用`BlockManager.shuffleClient`来向执行map任务的executor获取shuffle文件,这时就会根据`ShuffleClient`的不同,来决定是调用`NettyBlockTransferService`中的方法还是`ExternalShuffleClient`中的方法来从其他executor还是机器单独的`ExternalShuffleService`获取shuffle文件。
Block保存
在`BlockManager`中提供了序列化数据的保存方法:`putBytes`,非序列化数据的保存方法:`putIterator`以及Block数据的保存方法:`putBlockData`三种方法,其中`putBlockData`实际就是调用`putBytes`方法。
上文我们提到,Spark可以通过配置来设置数据的保存级别(详见[rdd-persistence](http://spark.apache.org/docs/latest/programming-guide.html\#rdd-persistence\))
在保存序列化数据的方法`putBytes`方法中,直接调用了`doPutBytes`,所以让我们直接看一下`doPutBytes`方法:
private def doPutBytes[T](

      blockId: BlockId,

      bytes: ChunkedByteBuffer,

      level: StorageLevel,

      classTag: ClassTag[T],

      tellMaster: Boolean = true,

      keepReadLock: Boolean = false): Boolean = {

  // 省略非关键代码和异常检查

  doPut(blockId, level, classTag, tellMaster = tellMaster, keepReadLock = keepReadLock) { info =>

    // 由于存储的是bytes(序列化的数据),这里在将数据存储到本地之前就将副本写出

    // 由于数据已经是序列化的,所以发送数据会很快

    val replicationFuture = if (level.replication > 1) {

      Future {

        replicate(blockId, bytes, level, classTag)

      }(futureExecutionContext)

    } else {

      null

    }

    val size = bytes.size

    // 存储级别使用内存存储

    if (level.useMemory) {

      // Put it in memory first, even if it also has useDisk set to true;

      // We will drop it to disk later if the memory store can't hold it.

      // 如果存储时需要反序列化,则首先反序列化数据,并调用memoryStore的putIteratorAsValues方法

      val putSucceeded = if (level.deserialized) {

        val values = serializerManager.dataDeserializeStream(blockId, bytes.toInputStream())(classTag)

        memoryStore.putIteratorAsValues(blockId, values, classTag) match {

          case Right(_) => true

          case Left(iter) =>

            // If putting deserialized values in memory failed, we will put the bytes directly to

            // disk, so we don't need this iterator and can close it to free resources earlier.

            iter.close()

            false

          }

        } else {

          // 不需要反序列化则调用memoryStore的putBytes直接存储

          memoryStore.putBytes(blockId, size, level.memoryMode, () => bytes)

        }

      // 如果保存到内存上失败,并且存储级别包括磁盘,则将数据直接存到磁盘上(序列化的数据)

      if (!putSucceeded && level.useDisk) {

        diskStore.putBytes(blockId, bytes)

      }

    } else if (level.useDisk) {

      // 如果存储级别只包括磁盘,则直接存到磁盘上

      diskStore.putBytes(blockId, bytes)

    }

    // 获取存储状态,如果成功向master会报存储状态

    val putBlockStatus = getCurrentBlockStatus(blockId, info)

    val blockWasSuccessfullyStored = putBlockStatus.storageLevel.isValid

    if (blockWasSuccessfullyStored) {

      info.size = size

      if (tellMaster) {

        reportBlockStatus(blockId, info, putBlockStatus)

      }

    }

    // 如果需要写副本,则在这里等待上文调用方法的回调

    if (level.replication > 1) {

      // Wait for asynchronous replication to finish

        Await.ready(replicationFuture, Duration.Inf)

    }

  }.isEmpty

}
可见`doPutBytes`流程如下:
如果当前配置的存储级别为需要副本,则首先启动一个异步线程在集群中随机选取另一个节点,将数据备份到另一个节点上
如果当前配置的存储级别包含内存存储,则首先尝试将数据保存到内存中。如果数据在内存中需要以非序列化形式保存,则要先将数据反序列化。如果保存到内存失败(如内存空间不足),且存储级别包含磁盘存储,则将数据保存到磁盘上
如果当前配置的存储级别只包含磁盘存储,则直接将数据写到磁盘上
在保存成功后,如果需要向driver节点上报保存结果,则需要将保存的Block信息上报给driver
如果当前配置的存储级别为需要副本,则在方法返回前需要等待数据备份的完成
在保存非序列化的方法`putIterator`中,实际是调用`doPutIterator`方法:
private def doPutIterator[T](

      blockId: BlockId,

      iterator: () => Iterator[T],

      level: StorageLevel,

      classTag: ClassTag[T],

      tellMaster: Boolean = true,

      keepReadLock: Boolean = false): Option[PartiallyUnrolledIterator[T]] = {

  // 省略非关键代码和异常检查

  doPut(blockId, level, classTag, tellMaster = tellMaster, keepReadLock = keepReadLock) { info =>

    var iteratorFromFailedMemoryStorePut: Option[PartiallyUnrolledIterator[T]] = None

    // Size of the block in bytes

    var size = 0L

    if (level.useMemory) {

      // Put it in memory first, even if it also has useDisk set to true;

      // We will drop it to disk later if the memory store can't hold it.

      if (level.deserialized) {

        memoryStore.putIteratorAsValues(blockId, iterator(), classTag) match {

          case Right(s) =>

            size = s

          case Left(iter) =>

            // Not enough space to unroll this block; drop to disk if applicable

            if (level.useDisk) {

              diskStore.put(blockId) { fileOutputStream =>

                  serializerManager.dataSerializeStream(blockId, fileOutputStream, iter)(classTag)

              }

              size = diskStore.getSize(blockId)

            } else {

              iteratorFromFailedMemoryStorePut = Some(iter)

            }

          }

      } else { // !level.deserialized

        // 如果需要序列化存储,则调用memoryStore的putIteratorAsBytes方法

        memoryStore.putIteratorAsBytes(blockId, iterator(), classTag, level.memoryMode) match {

          case Right(s) =>

              size = s

          case Left(partiallySerializedValues) =>

            // Not enough space to unroll this block; drop to disk if applicable

            if (level.useDisk) {

              diskStore.put(blockId) { fileOutputStream =>

                partiallySerializedValues.finishWritingToStream(fileOutputStream)

              }

              size = diskStore.getSize(blockId)

            } else {

              iteratorFromFailedMemoryStorePut = Some(partiallySerializedValues.valuesIterator)

            }

        }

      }

    } else if (level.useDisk) {

      // 首先将数据序列化,然后在存到磁盘上

      diskStore.put(blockId) { fileOutputStream =>

        serializerManager.dataSerializeStream(blockId, fileOutputStream, iterator())(classTag)

    }

      size = diskStore.getSize(blockId)

    }

    val putBlockStatus = getCurrentBlockStatus(blockId, info)

    val blockWasSuccessfullyStored = putBlockStatus.storageLevel.isValid

    if (blockWasSuccessfullyStored) {

      // Now that the block is in either the memory, externalBlockStore, or disk store,

      // tell the master about it.

      info.size = size

      if (tellMaster) {

        reportBlockStatus(blockId, info, putBlockStatus)

      }

      if (level.replication > 1) {

        val remoteStartTime = System.currentTimeMillis

        val bytesToReplicate = doGetLocalBytes(blockId, info)

        try {

          replicate(blockId, bytesToReplicate, level, classTag)

        } finally {

          bytesToReplicate.dispose()

        }

      }

    }

    iteratorFromFailedMemoryStorePut

  }

}
可见`doPutIterator`的流程如下:
如果当前配置的存储级别包含内存存储,则首先尝试将数据保存到内存中。如果内存中数据需要序列化存储,则首先将数据序列化,否则直接尝试将数据保存到内存。如果保存失败(说明内存空间不足),且当前配置的存储级别包含磁盘存储,则首先将数据序列化后,再保存到磁盘
如果当前存储级别只包含内存存储,则将数据序列化后保存到磁盘
在数据保存成功后,如果需要将结果上报给driver,则将保存的Block信息上报给driver
在数据保存成功后,如果配置的存储级别需要备份,则需要在集群中随机选择另一个节点,将数据备份到另一个节点上
无论是`doPutBytes`还是`doPutIterator`方法中,我们看到实际都是调用了`MemoryStore`或`DiskStore`类来保存数据。对于这两个类以及对应的内存存储/磁盘存储分析见文章【内存存储】和【磁盘存储】。存储级别详见[rdd-persistence](http://spark.apache.org/docs/latest/programming-guide.html\#rdd-persistence\)
Block读取
`BlockManager`提供了五种获取Block的方法:`getBlockData`(获取本地的Block数据),`getLocalValues`(获取本地的非序列化数据),`getLocalBytes`(获取本地的序列化数据),`getRemoteValues`(获取远端的非序列化数据),`getRemoteBytes`(获取远端的序列化数据)。其中`getBlockData`实际是调用了`getLocalBytes`方法,而`getRemoteValues`方法实际是在调用`getRemoteBytes`方法获取序列化数据后,进行反序列化并返回。所以下面我们主要看一下`getLocalValues`,`getLocalBytes`和`getRemoteBytes`这三个方法。
首先我们看一下`getLocalValues`方法:
def getLocalValues(blockId: BlockId): Option[BlockResult] = {

  // 省略非关键代码和异常检查

  val level = info.level

  if (level.useMemory && memoryStore.contains(blockId)) {

    val iter: Iterator[Any] = if (level.deserialized) {

      memoryStore.getValues(blockId).get

    } else {

      serializerManager.dataDeserializeStream(

          blockId, memoryStore.getBytes(blockId).get.toInputStream())(info.classTag)

    }

    val ci = CompletionIterator[Any, Iterator[Any]](iter, releaseLock(blockId))

    Some(new BlockResult(ci, DataReadMethod.Memory, info.size))

  } else if (level.useDisk && diskStore.contains(blockId)) {

    val iterToReturn: Iterator[Any] = {

      val diskBytes = diskStore.getBytes(blockId)

      if (level.deserialized) {

        val diskValues = serializerManager.dataDeserializeStream(

          blockId,

          diskBytes.toInputStream(dispose = true))(info.classTag)

        maybeCacheDiskValuesInMemory(info, blockId, level, diskValues)

      } else {

        val stream = maybeCacheDiskBytesInMemory(info, blockId, level, diskBytes)

          .map {_.toInputStream(dispose = false)}

          .getOrElse { diskBytes.toInputStream(dispose = true) }

        serializerManager.dataDeserializeStream(blockId, stream)(info.classTag)

      }

    }

    val ci = CompletionIterator[Any, Iterator[Any]](iterToReturn, releaseLock(blockId))

    Some(new BlockResult(ci, DataReadMethod.Disk, info.size))

  } else {

    handleLocalReadFailure(blockId)

  }

}
可见`getLocalValues`流程如下:
如果配置的存储级别包含内存存储,且内存中存在查询的Block,则直接从内存查询。如果内存中的数据是以序列化方式保存的,则在返回之前需要反序列化数据,否则直接返回
如果配置的存储级别只包含磁盘存储,且磁盘中存在查询的Block,则直接从磁盘查询。在查出数据后,需要将数据缓存到内存中。如果内存中的数据以非序列化的方式保存,则首先需要将查出的数据序列化,否则直接保存到内存中。最后将查出的数据反序列化后返回
让我们在看一下`getLocalBytes`方法:
def getLocalBytes(blockId: BlockId): Option[ChunkedByteBuffer] = {

  // 省略非关键代码和异常检查

  // As an optimization for map output fetches, if the block is for a shuffle, return it

  // without acquiring a lock; the disk store never deletes (recent) items so this should work

  if (blockId.isShuffle) {

    val shuffleBlockResolver = shuffleManager.shuffleBlockResolver

    // TODO: This should gracefully handle case where local block is not available. Currently

    // downstream code will throw an exception.

    Option(new ChunkedByteBuffer(

      shuffleBlockResolver.getBlockData(blockId.asInstanceOf[ShuffleBlockId]).nioByteBuffer()))

  } else {

    blockInfoManager.lockForReading(blockId).map { info => doGetLocalBytes(blockId, info) }

  }

}

private def doGetLocalBytes(blockId: BlockId, info: BlockInfo): ChunkedByteBuffer = {

  val level = info.level

  // In order, try to read the serialized bytes from memory, then from disk, then fall back to

  // serializing in-memory objects, and, finally, throw an exception if the block does not exist.

  if (level.deserialized) {

    // Try to avoid expensive serialization by reading a pre-serialized copy from disk:

    if (level.useDisk && diskStore.contains(blockId)) {

      // Note: we purposely do not try to put the block back into memory here. Since this branch

      // handles deserialized blocks, this block may only be cached in memory as objects, not

      // serialized bytes. Because the caller only requested bytes, it doesn't make sense to

      // cache the block's deserialized objects since that caching may not have a payoff.

      diskStore.getBytes(blockId)

    } else if (level.useMemory && memoryStore.contains(blockId)) {

      // The block was not found on disk, so serialize an in-memory copy:

      serializerManager.dataSerialize(blockId, memoryStore.getValues(blockId).get)

    } else {

      handleLocalReadFailure(blockId)

    }

  } else {  // storage level is serialized

    if (level.useMemory && memoryStore.contains(blockId)) {

      memoryStore.getBytes(blockId).get

    } else if (level.useDisk && diskStore.contains(blockId)) {

      val diskBytes = diskStore.getBytes(blockId)

      maybeCacheDiskBytesInMemory(info, blockId, level, diskBytes).getOrElse(diskBytes)

    } else {

      handleLocalReadFailure(blockId)

    }

  }

}
在`getLocalBytes`方法中首先会判断查询的Block是否是shuffle类型的Block。如果是shuffle类型的Block,则直接调用`IndexShuffleBlockResolver`来查询(关于`IndexShuffleBlockResolver`的详细介绍见文章【Shuffle详解】)。如果不是shuffle类型的Block,则调用`doGetLocalBytes`方法。`doGetLocalBytes`方法流程如下:
如果内存中的存储级别为非序列化,且如果当前配置的存储级别包含磁盘存储,且磁盘中包含查询的Block,则直接从磁盘查询并返回(这里直接查磁盘,而不是内存是为了减少从内存读取时序列化数据的时间)
如果内存中存储的级别为非序列化,且只有内存中包含查询的Block,则从内存中查询数据,并进行序列化后返回
如果内存中的存储级别为序列化,且在内存中包含查询的Block,则直接读取内存中的数据并返回。否则如果存储级别包含磁盘存储,且磁盘中包含Block,则从磁盘中读取数据,并将数据缓存到内存中,并返回
最后让我们看一下`getRemoteBytes`方法:
def getRemoteBytes(blockId: BlockId): Option[ChunkedByteBuffer] = {

  // 省略非关键代码和异常检查

  var runningFailureCount = 0

  var totalFailureCount = 0

  val locations = getLocations(blockId)

  val maxFetchFailures = locations.size

  var locationIterator = locations.iterator

  while (locationIterator.hasNext) {

    val loc = locationIterator.next()

    // 直接通过一次网络请求获取到需要的blockId的数据

    val data = try {

      blockTransferService.fetchBlockSync(

        loc.host, loc.port, loc.executorId, blockId.toString).nioByteBuffer()

    } catch {

      case NonFatal(e) =>

        runningFailureCount += 1

        totalFailureCount += 1

        // 如果失败次数超过了含有块的地址数量,则直接抛出异常

        if (totalFailureCount >= maxFetchFailures) {

          // Give up trying anymore locations. Either we've tried all of the original locations,

          // or we've refreshed the list of locations from the master, and have still

          // hit failures after trying locations from the refreshed list.

          throw new BlockFetchException(s"Failed to fetch block after" +

            s" ${totalFailureCount} fetch failures. Most recent failure cause:", e)

        }

        // If there is a large number of executors then locations list can contain a

        // large number of stale entries causing a large number of retries that may

        // take a significant amount of time. To get rid of these stale entries

        // we refresh the block locations after a certain number of fetch failures

        // 如果失败次数超过了规定的最大尝试次数,则重新获取块的位置信息

        if (runningFailureCount >= maxFailuresBeforeLocationRefresh) {

          locationIterator = getLocations(blockId).iterator

          runningFailureCount = 0

        }

        // This location failed, so we retry fetch from a different one by returning null here

        null

      }

      if (data != null) {

        return Some(new ChunkedByteBuffer(data))

      }

    }

    None

  }
可见`getRemoteBytes`的执行流程如下:
首先调用`getLocations`方法,从driver节点获取保存了查询的Block的节点列表,之后选择第一个节点调用`BlockTransferService.fetchBlockSync`方法向这个节点请求数据,如果请求成功则直接返回
如果请求失败,重新向driver请求保存了查询的Block的节点列表,然后执行`BlockTransferService.fetchBlockSync`方法,请求数据
如果重试次数超过重试上限,则直接返回空数据
总结一下Block数据传输:在Spark中,`BlockManager`管理两类的数据,即shuffle数据和缓存数据。其中shuffle数据来自Spark的shuffle操作(也称为map-reduce操作)中map阶段产生的shuffle文件,缓存数据来自用户程序中调用cache或checkpoint方法时将来自上游RDD计算出的数据缓存到本地内存或磁盘,以便在之后迭代时,无需再执行上游RDD生成数据的计算过程。由于`BlockManager`随着所在的executor退出而终止,所以在可以动态分配资源的集群中(如standalone,yarn,mesos),Spark可以在每台机器上启动一个专门管理shuffle数据的服务`ExternalShuffleService`,这样所有读取shuffle文件的操作实际都通过向`ExternalShuffleService`请求来获取的。在`BlockManager`中提供了对于非序列化数据/序列化数据的读写接口,并通过底层的`MemoryStore`和`DiskStore`来实际保存和读取数据。在`BlockManager`中如果设置了需要副本的存储级别,则在保存数据到本节点的同时,需要向集群的另外一个节点备份写入的数据。
Block Manager的更多相关文章
- Cloudera Manager 5.9 和 CDH 5.9 离线安装指南及个人采坑填坑记
公司的CDH早就装好了,一直想自己装一个玩玩,最近组了台电脑,笔记本就淘汰下来了,加上之前的,一共3台,就在X宝上买了CPU和内存升级了下笔记本,就自己组了个集群. 话说,好想去捡垃圾,捡台8核16线 ...
- INFO JobScheduler: Added jobs for time 1524468752000 ms/INFO MemoryStore: Block input-0-1524469143000 stored as bytes in memory/完全分布式 ./bin/run-example streaming.NetworkWordCount localhost 9999无法正常运行
1.完全分布式 ./bin/run-example streaming.NetworkWordCount localhost 9999无法正常运行: 1 [hadoop@slaver1 spark- ...
- CSharpGL(12)用T4模板生成CSSL及其renderer代码
CSharpGL(12)用T4模板生成CSSL及其renderer代码 2016-08-13 由于CSharpGL一直在更新,现在这个教程已经不适用最新的代码了.CSharpGL源码中包含10多个独立 ...
- Spark核心作业调度和任务调度之DAGScheduler源码
前言:本文是我学习Spark 源码与内部原理用,同时也希望能给新手一些帮助,入道不深,如有遗漏或错误的,请在原文评论或者发送至我的邮箱 tongzhenguotongzhenguo@gmail.com ...
- Spark——SparkContext简单分析
本篇文章就要根据源码分析SparkContext所做的一些事情,用过Spark的开发者都知道SparkContext是编写Spark程序用到的第一个类,足以说明SparkContext的重要性:这里先 ...
- 【原】Learning Spark (Python版) 学习笔记(三)----工作原理、调优与Spark SQL
周末的任务是更新Learning Spark系列第三篇,以为自己写不完了,但为了改正拖延症,还是得完成给自己定的任务啊 = =.这三章主要讲Spark的运行过程(本地+集群),性能调优以及Spark ...
- 如何运行Spark程序
[hxsyl@CentOSMaster spark-2.0.2-bin-hadoop2.6]# ./bin/spark-submit --class org.apache.spark.examples ...
- 跟我一起数据挖掘(22)——spark入门
Spark简介 Spark是UC Berkeley AMP lab所开源的类Hadoop MapReduce的通用的并行,Spark,拥有Hadoop MapReduce所具有的优点:但不同于MapR ...
- 【转】Spark常见问题汇总
原文地址:https://my.oschina.net/tearsky/blog/629201 摘要: 1.Operation category READ is not supported in st ...
随机推荐
- salt的grains
grains作用: 1.匹配 minion 2.收集信息 (每次重启minion才会收集) grains 数据存储在minion端. salt '*' grains.ls salt '*' grain ...
- BZOJ 3674: 可持久化并查集模板
Code: #include <cstdio> #include <algorithm> #include <cstring> #include <strin ...
- mongodb 的 curd
增: db.表名.insert({name:'lisi',age:24}); ...
- WSGI和CGI
https://www.zhihu.com/question/19998865 https://segmentfault.com/a/1190000003069785
- 转载 :Linux有问必答:如何在Debian或Ubuntu上安装完整的内核源码
http://linux.cn/article-5015-1.html 问题:我需要为我的Debian或Ubuntu下载并安装完整树结构的内核源码以供编译一个定制的内核.那么在Debian或Ubunt ...
- django-debug-toolbar 使用
https://pypi.org/project/django-debug-toolbar/ https://django-debug-toolbar.readthedocs.io/en/latest ...
- java流1----InputStream、OutputStream、Reader、Writer
字节流和字符流 顾名思义,字节流就是操作的是字节,字符流操作的就是字符.其中字节流又可以分为字节输入流(InputStream)和字节输出流(OutputStream).同样的字符流也可以分为字符输入 ...
- thinkphp里面使用原生php
thinkphp里面使用原生php Php代码可以和标签在模板文件中混合使用,可以在模板文件里面书写任意的PHP语句代码 ,包括下面两种方式: 使用php标签 例如: {php}echo 'Hello ...
- GPT模式下ghost系统 安装方法
GPT模式下ghost系统 安装方法 1.UEFI进入PE 2.使用diskgenius 软件 分区,选择GPT方式分区 3.使用CGI ghost 系统 文件到安装盘 4.UEFI修复:软件为 BC ...
- Python正则表达式初识(一)
首先跟大家简单唠叨两句为什么要学习正则表达式,为什么在网络爬虫的时候离不开正则表达式.正则表达式在处理字符串的时候扮演着非常重要的角色,在网络爬虫的时候也十分常用,大家可以把它学的简单一些,但是不能不 ...