SpringBoot初探之Swagger配置
Swagger是一个用于描述和测试restful接口的工具,只要在定义restful接口时增加一些类和方法的描述注解,通过很简单的配置就可以得到一个展示接口定义页面,也可以在页面上设置参数提交测试接口(替代postman的部分功能)。
接口修改后不需要单独修改描述文档,swagger自动生成接口文档。下面讲一下如果搭建一个最简单swagger测试Demo。
一、创建一个SpringBoot的maven项目
项目创建方式可以参考我这篇博客《Spring Boot初探之restful服务发布》,
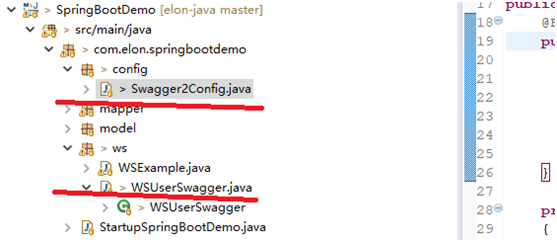
项目创建后的目录;
二、创建好后在pom.xml文件中增加swagger依赖的包
       <dependency>

           <groupId>io.springfox</groupId>

           <artifactId>springfox-swagger2</artifactId>

           <version>2.8.0</version>

         </dependency>

       <dependency>

           <groupId>io.springfox</groupId>

           <artifactId>springfox-swagger-ui</artifactId>

           <version>2.8.0</version>

       </dependency>
直接使用appache的仓库:
         <repository>
             <id>springfox-swagger</id>
             <url>https://mvnrepository.com/artifact/io.springfox/springfox-swagger2</url>
         </repository>
         <repository>
             <id>springfox-swagger-ui</id>
             <url>https://mvnrepository.com/artifact/io.springfox/springfox-swagger-ui</url>
         </repository>
三、添加swagger的配置加载类(Swagger2Config.java)
 package com.elon.springbootdemo.config;

 import org.springframework.context.annotation.Bean;
 import org.springframework.context.annotation.Configuration;
 import org.springframework.web.servlet.config.annotation.WebMvcConfigurerAdapter;

 import springfox.documentation.builders.ApiInfoBuilder;
 import springfox.documentation.builders.PathSelectors;
 import springfox.documentation.builders.RequestHandlerSelectors;
 import springfox.documentation.service.ApiInfo;
 import springfox.documentation.spi.DocumentationType;
 import springfox.documentation.spring.web.plugins.Docket;
 import springfox.documentation.swagger2.annotations.EnableSwagger2;

 @Configuration
 @EnableSwagger2
 public class Swagger2Config extends WebMvcConfigurerAdapter {
     @Bean
     public Docket api() {
         return new Docket(DocumentationType.SWAGGER_2)
                 .select()
                 .apis(RequestHandlerSelectors.basePackage("com.elon.springbootdemo.ws"))
                 .paths(PathSelectors.any())
                 .build()
                 .apiInfo(getApiInfo());
     }

     private ApiInfo getApiInfo()
     {
         ApiInfo apiInfo =  new ApiInfoBuilder().title("用户管理模块")
                 .description("定义用户数据的增加、删除、修改接口")
                 .termsOfServiceUrl("http://www.cnblogs.com/elon")
                 .version("1.0")
                 .build();
         return apiInfo;
     }
 }
四、添加用于测试的restful接口(WSUserSwagger.java)
 package com.elon.springbootdemo.ws;

 import org.springframework.web.bind.annotation.PathVariable;
 import org.springframework.web.bind.annotation.RequestBody;
 import org.springframework.web.bind.annotation.RequestHeader;
 import org.springframework.web.bind.annotation.RequestMapping;
 import org.springframework.web.bind.annotation.RequestMethod;
 import org.springframework.web.bind.annotation.RequestParam;
 import org.springframework.web.bind.annotation.RestController;

 import io.swagger.annotations.Api;
 import io.swagger.annotations.ApiOperation;

 @RestController
 @RequestMapping(value="swagger-demo")
 @Api(value="WSUserSwagger", description="用户信息管理")
 public class WSUserSwagger {

     @ApiOperation(value="添加用户", notes="添加用户")
     @RequestMapping(value="/v1/user", method=RequestMethod.POST)
     public String addUser(@RequestBody String userInfo) {
         return "Add user:" + userInfo;
     }

     @ApiOperation(value = "根据名称查询用户", notes = "根据名称查询用户")
     @RequestMapping(value = "/v1/user", method = RequestMethod.GET)
     public String queryUserByName(@RequestParam("name") String name, @RequestHeader("age") int age) {
         return name + age;
     }

     @ApiOperation(value="删除用户", notes="删除用户")
     @RequestMapping(value="/v1/user/{name}", method=RequestMethod.DELETE)
     public String deleteUser(@PathVariable("name") String name) {
         return "delete " + name;
     }
 }
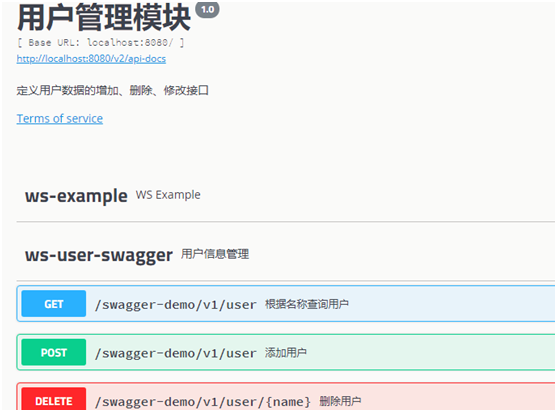
五、启动后测试
在浏览器中输入 http://localhost:8080/swagger-ui.html#/, 打开页面可以看到定义的接口:
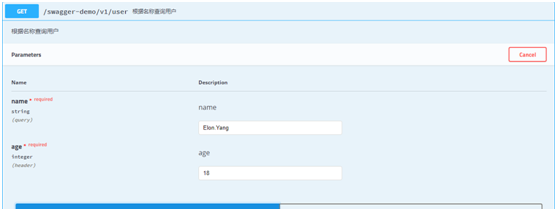
测试GET方法,点”Try it out”后输入参数, 点击”execute”执行可以看到接口执行后的返回结果。
SpringBoot初探之Swagger配置的更多相关文章
- springboot+mybatis-puls利用swagger构建api文档
项目开发常采用前后端分离的方式.前后端通过API进行交互,在Swagger UI中,前后端人员能够直观预览并且测试API,方便前后端人员同步开发. 在SpringBoot中集成swagger,步骤如下 ...
- springboot+jpa+mysql+swagger整合
Springboot+jpa+MySQL+swagger整合 创建一个springboot web项目 <dependencies> <dependency> < ...
- Spring Boot项目简单上手+swagger配置+项目发布(可能是史上最详细的)
Spring Boot项目简单上手+swagger配置 1.项目实践 项目结构图 项目整体分为四部分:1.source code 2.sql-mapper 3.application.properti ...
- SpringBoot集成Swagger2并配置多个包路径扫描
1. 简介 随着现在主流的前后端分离模式开发越来越成熟,接口文档的编写和规范是一件非常重要的事.简单的项目来说,对应的controller在一个包路径下,因此在Swagger配置参数时只需要配置一 ...
- SpringBoot 优雅整合Swagger Api 自动生成文档
前言 一个好的可持续交付的项目,项目说明,和接口文档是必不可少的,swagger api 就可以帮我们很容易自动生成api 文档,不需要单独额外的去写,无侵入式,方便快捷大大减少前后端的沟通方便查找和 ...
- springboot 入门八-自定义配置信息(编码、拦截器、静态资源等)
若想实际自定义相关配置,只需要继承WebMvcConfigurerAdapter.WebMvcConfigurerAdapter定义些空方法用来重写项目需要用到的WebMvcConfigure实现.具 ...
- springboot情操陶冶-web配置(九)
承接前文springboot情操陶冶-web配置(八),本文在前文的基础上深入了解下WebSecurity类的运作逻辑 WebSecurityConfigurerAdapter 在剖析WebSecur ...
- springboot情操陶冶-web配置(七)
参数校验通常是OpenApi必做的操作,其会对不合法的输入做统一的校验以防止恶意的请求.本文则对参数校验这方面作下简单的分析 spring.factories 读者应该对此文件加以深刻的印象,很多sp ...
- springboot情操陶冶-web配置(四)
承接前文springboot情操陶冶-web配置(三),本文将在DispatcherServlet应用的基础上谈下websocket的使用 websocket websocket的简单了解可见维基百科 ...
随机推荐
- object类的equals方法简介 & String类重写equals方法
object类中equals方法源码如下所示 public boolean equals(Object obj) { return this == obj; } Object中的equals方法是直接 ...
- C/C++语言简介之运算符
比较特别的是,比特右移(>>)运算符可以是算术(左端补最高有效位)或是逻辑(左端补 0)位移.例如,将 11100011 右移 3 比特,算术右移后成为 11111100,逻辑右移则为 0 ...
- js内存泄露的原因
1.意外的全局变量 function fun(){ a=19//全局变量 console.log(a) } 2.未及时清理计时器或者回调函数 //记得及时清理定时器 var intervalId=se ...
- 关于c++栈溢出的问题
我自己定义了一个数据类型node,嵌套在另一个数据类型当中时候,用到了delete函数, 在我node的声明当中声明了几个指针 在我的析构函数中却调用了delet函数 结果程序结果是能跑出来 提示我栈 ...
- 微信小程序半周问题总结
新产品要做一个微信小程序,不想吐槽老板没给任何准备就给出了需求和原型图,好像默认小程序闭着眼睛就可以很顺利开发好.现在半周下来(五一结束开始到今天)完成了差不多所有的界面,网络请求部分还跟服务端兄弟耗 ...
- 如何使用 VS2015 进行远程调试?
VisualStudio\Microsoft Visual Studio 14.0\Common7\IDE\Remote Debugger 直接复制 Remote Debugger 文件,里面包含了 ...
- 【BZOJ3309】DZY Loves Math
Time Limit: 5000 ms Memory Limit: 512 MB Description 对于正整数n,定义f(n)为n所含质因子的最大幂指数.例如f(1960)=f(2^3 * ...
- Spring 代理对象,cglib,jdk的问题思考,AOP 配置注解拦截 的一些问题.为什么不要注解在接口,以及抽象方法.
可以被继承 首先注解在类上是可以被继承的 在注解上用@Inherited /** * Created by laizhenwei on 17:49 2017-10-14 */ @Target({Ele ...
- Appium适配Android7.0以上版本
Appium适配Android7.0以上版本 测试机型: 华为荣耀V9 安卓版本: Android7.0 appium版本: 1.65 说明: 公司新采购了一批安卓机器,拿了其中一台华为荣耀V9跑之前 ...
- ThinkPad W500 清灰记录
转载请注明出处:HateMath归来(http://www.cnblogs.com/hatemath/) 看型号就知道,这是一台英雄迟暮型的老电脑.到了夏天,启动后啥事不做,通风口都烫手.心情好,一时 ...