pyspider 初次使用
一 安装
pip install pyspider
请安装PhantomJS:http://phantomjs.org/build.html
二 检验是否启动成功
cmd中输入: pyspider
安装问题解决
python版本:3.6

1、启动报错

    raise ValueError("Invalid configuration:\n  - " + "\n  - ".join(errors))

ValueError: Invalid configuration:

  - Deprecated option 'domaincontroller': use 'http_authenticator.domain_control

ler' instead.

解决方法:

将wsgidav替换为2.4.1

•# python -m pip install wsgidav==2.4.1


2、PhantomJS配置

windows:在官网http://phantomjs.org/download.html下载对应版本的程序,然后放到python安装目录的python.exe同级目录下。
pyspider Web预览界面太小的解决方法
完美css代码:

body{margin:0;padding:0;height:100%;overflow:hidden}.warning{color:#f0ad4e}.error{color:#d9534f}#control{z-index:9999;min-width:760px;width:100%;height:35px;position:fixed;left:0;right:0;box-shadow:0 1px 2px #999}#control div{line-height:35px;margin-left:10px;margin-right:10px}#control .webdav-btn{position:relative;float:right;padding:1px 7px 0;line-height:21px;border-radius:5px;border:1px solid #428bca;background:#fff;color:#428bca;cursor:pointer;margin:6px 0 0 10px}#control .webdav-btn:hover{background:#6aa3d5;color:#fff}#control .webdav-btn.active{background:#428bca;color:#fff}#editarea{width:100%;position:fixed;top:37px}#editarea,.debug-panel{left:0;right:0;bottom:0}.debug-panel{position:absolute;top:0}.resize{ padding: 0px; color: rgb(128, 0, 128); line-height: 1.5 !important;">555;cursor:ew-resize}.resize:hover+.debug-panel{border-left:1px dashed #555!important}.overlay{position:absolute;top:0;bottom:0;left:0;right:0;z-index:9999;background:rgba(0,0,0,.4)}.focus .CodeMirror-activeline-background{background:#e8f2ff!important}.CodeMirror-activeline-background{background:transparent!important}#task-panel{height:100%;overflow-x:auto}#run-task-btn{z-index:99;position:absolute;top:0;right:0;background:#5cb85c;border-radius:0 0 0 5px;color:#fff;margin:0;padding:3px 7px 5px 10px;cursor:pointer;font-weight:700;line-height:15px}#run-task-btn:hover{background:#449d44}#undo-redo-btn-group{z-index:99;position:absolute;top:0;right:0;background:#91cf91;border-radius:0 0 0 5px;color:#fff;margin:0;padding:3px 7px 5px 10px;cursor:pointer;font-weight:700;line-height:15px;top:auto;bottom:0;border-radius:5px 0 0 0;padding:5px 0 3px;overflow:hidden}#undo-redo-btn-group:hover{background:#6ec06e;background:#91cf91}#undo-redo-btn-group a{color:#fff;text-decoration:none;padding:5px 7px 3px 10px}#undo-redo-btn-group a:hover{background:#6ec06e}#save-task-btn{z-index:99;position:absolute;top:0;right:0;background:#428bca;border-radius:0 0 0 5px;color:#fff;margin:0;padding:3px 7px 5px 10px;cursor:pointer;font-weight:700;line-height:15px}#save-task-btn:hover{background:#3071a9}#task-editor{position:relative}#task-editor .CodeMirror{height:auto;padding-bottom:3px;background:#c7e6c7}#task-editor .CodeMirror-scroll{overflow-x:auto;overflow-y:hidden}#task-editor.focus .CodeMirror-activeline-background{background:#eaf6ea!important}#tab-control{list-style-type:none;position:absolute;bottom:0;right:0;margin:8px 20px;padding:0}#tab-control li{position:relative;float:right;padding:1px 7px 0;line-height:21px;margin-left:10px;border-radius:5px;border:1px solid #428bca;background:#fff;color:#428bca;cursor:pointer}#tab-control li:hover{background:#6aa3d5;color:#fff}#tab-control li.active{background:#428bca;color:#fff}#tab-control li span{position:absolute;top:-5px;right:-10px;background:#d9534f;color:#fff;font-size:80%;font-weight:700;padding:2px 5px 0;border-radius:10px}#debug-tabs{margin-bottom:45px}#tab-web.fixed{padding-top:24px}#tab-web iframe{border-width:0;width:100%;height:900px !important}#tab-html{margin:0;padding:7px 5px}#tab-html pre{margin:0;padding:0}#tab-follows .newtask{position:relative;height:30px;line-height:30px;background:#fceedb;border-bottom:1px solid #f0ad4e;border-top:1px solid #f0ad4e;margin-top:-1px;padding-left:5px;padding-right:70px;overflow:hidden;white-space:nowrap;text-overflow:ellipsis;cursor:pointer}#tab-follows .newtask:hover,#tab-follows .newtask:hover .task-more{background:#f8d9ac}#tab-follows .newtask .task-callback{color:#ec971f}#tab-follows .newtask .task-url{font-size:95%;text-decoration:underline;font-weight:lighter;color:#428bca}#tab-follows .newtask .task-more{position:absolute;right:33px;top:0;float:right;color:#f0ad4e;padding:0 10px;background:#fceedb;border-radius:10px}#tab-follows .newtask .task-run{position:absolute;right:0;top:0;font-size:80%;padding:0 10px 0 30px;float:right;border-bottom:1px solid #a3d7a3;border-top:1px solid #a3d7a3;background:#80c780;color:#fff;text-shadow:0 0 10px #fff;font-weight:700}#tab-follows .newtask .task-run:hover{background:#5cb85c}#tab-follows .task-show pre{margin:5px 5px 10px}#python-editor{position:absolute;top:0;width:100%;bottom:0}#python-editor .CodeMirror{height:100%;padding-bottom:20px}#python-log{width:100%;min-height:10px;max-height:40%;background:rgba(0,0,0,.6);overflow:auto}#python-log #python-log-show{z-index:89;width:auto;padding-top:5px;background:#d9534f;box-shadow:0 2px 20px #d9534f;cursor:pointer}#python-log pre{margin:0;padding:10px;color:#fff}#css-selector-helper{padding:0;width:100%;height:24px;text-align:right;white-space:nowrap}#css-selector-helper.fixed{position:absolute;top:0}#css-selector-helper button{line-height:16px;vertical-align:2px}span.element{position:relative;height:24px;display:inline-block;padding:0 .2em;cursor:pointer;color:#afafaf;z-index:99999}span.element.invalid{display:none}span.element.selected{color:#000}span.element:hover{ul{display:block}span.element>ul{display:none;margin:0;padding:0;position:absolute;top:24px;left:0;border:1px solid #000;border-top-width:0;color:#afafaf}span.element>ul>li{display:block;text-align:left;white-space:nowrap;padding:0 4px}span.element>ul>li.selected{color:#000}span.element>ul>li:hover{padding:0;border:0;margin:0;padding-right:.2em;font-size:1em;text-align:right;width:100%;margin-left:-100px;background:#eee}

替换/pyspider/webui/static/debug.min.css文件中所有内容
三 入门简介
你的第一个脚本
from pyspider.libs.base_handler import *

class Handler(BaseHandler):

    crawl_config = {

        #配置信息

    }

    #全局变量,获取数据库句柄...

 client=pymongo.MongoClient(host='106.12.108.236',port=27017)

    db=client['trip']

    @every(minutes=24 * 60)

    def on_start(self):

    #程序请求的入口,start_url

        self.crawl('http://scrapy.org/', callback=self.index_page)

    @config(age=10 * 24 * 60 * 60)

    def index_page(self, response):

    #解析start_url获取详情页的url

        for each in response.doc('a[href^="http"]').items():

            self.crawl(each.attr.href, callback=self.detail_page)

    @config(priority=2)

    def detail_page(self, response):

    #获取详情页的信息

        return {

            "url": response.url,

            "title": response.doc('title').text(),

        }
def on_start(self)是脚本的入口点。单击run仪表板上的按钮时将调用它。self.crawl(url, callback=self.index_page)*是这里最重要的API。它将添加一个要爬网的新任务。大多数选项将通过self.crawl参数进行spicified 。def index_page(self, response)得到一个Response*对象。response.doc*是一个pyquery对象,它具有类似jQuery的API来选择要提取的元素。def detail_page(self, response)返回一个dict对象作为结果。结果将resultdb默认捕获。您可以覆盖on_result(self, result)方法来自行管理结果。
四 页面简介

点击save按钮

接下来执行run
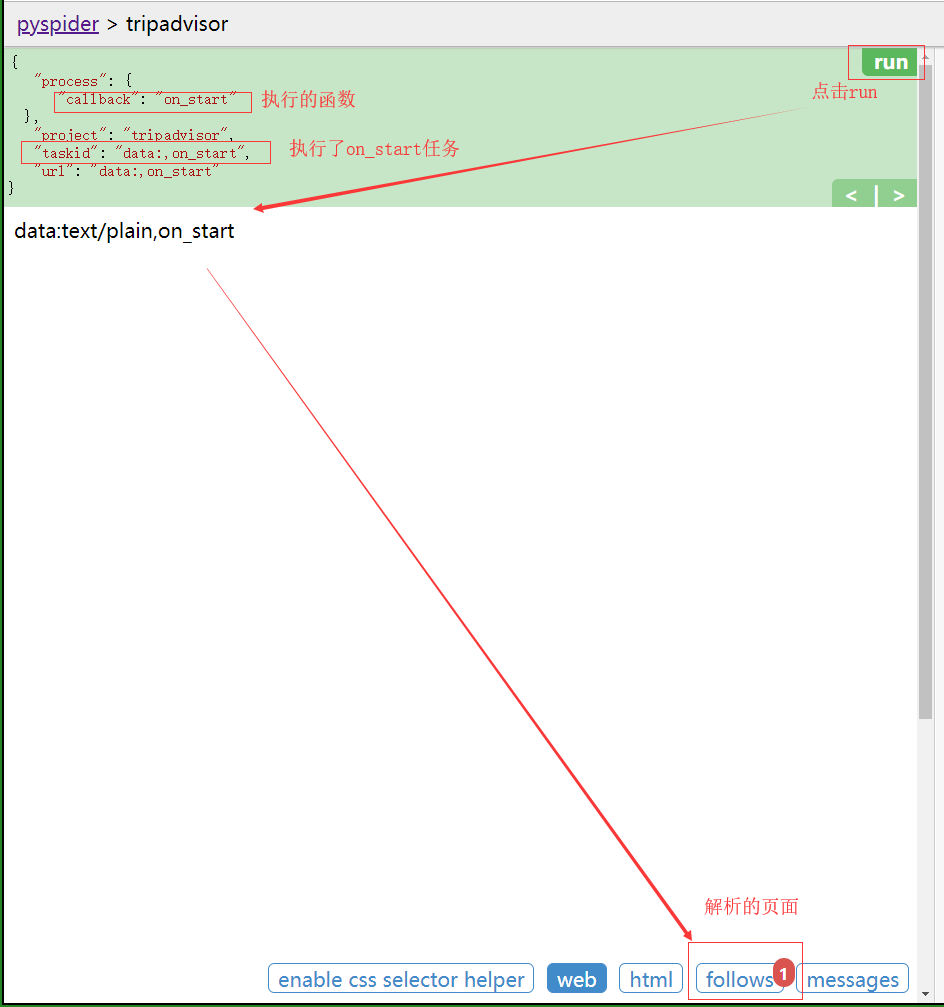
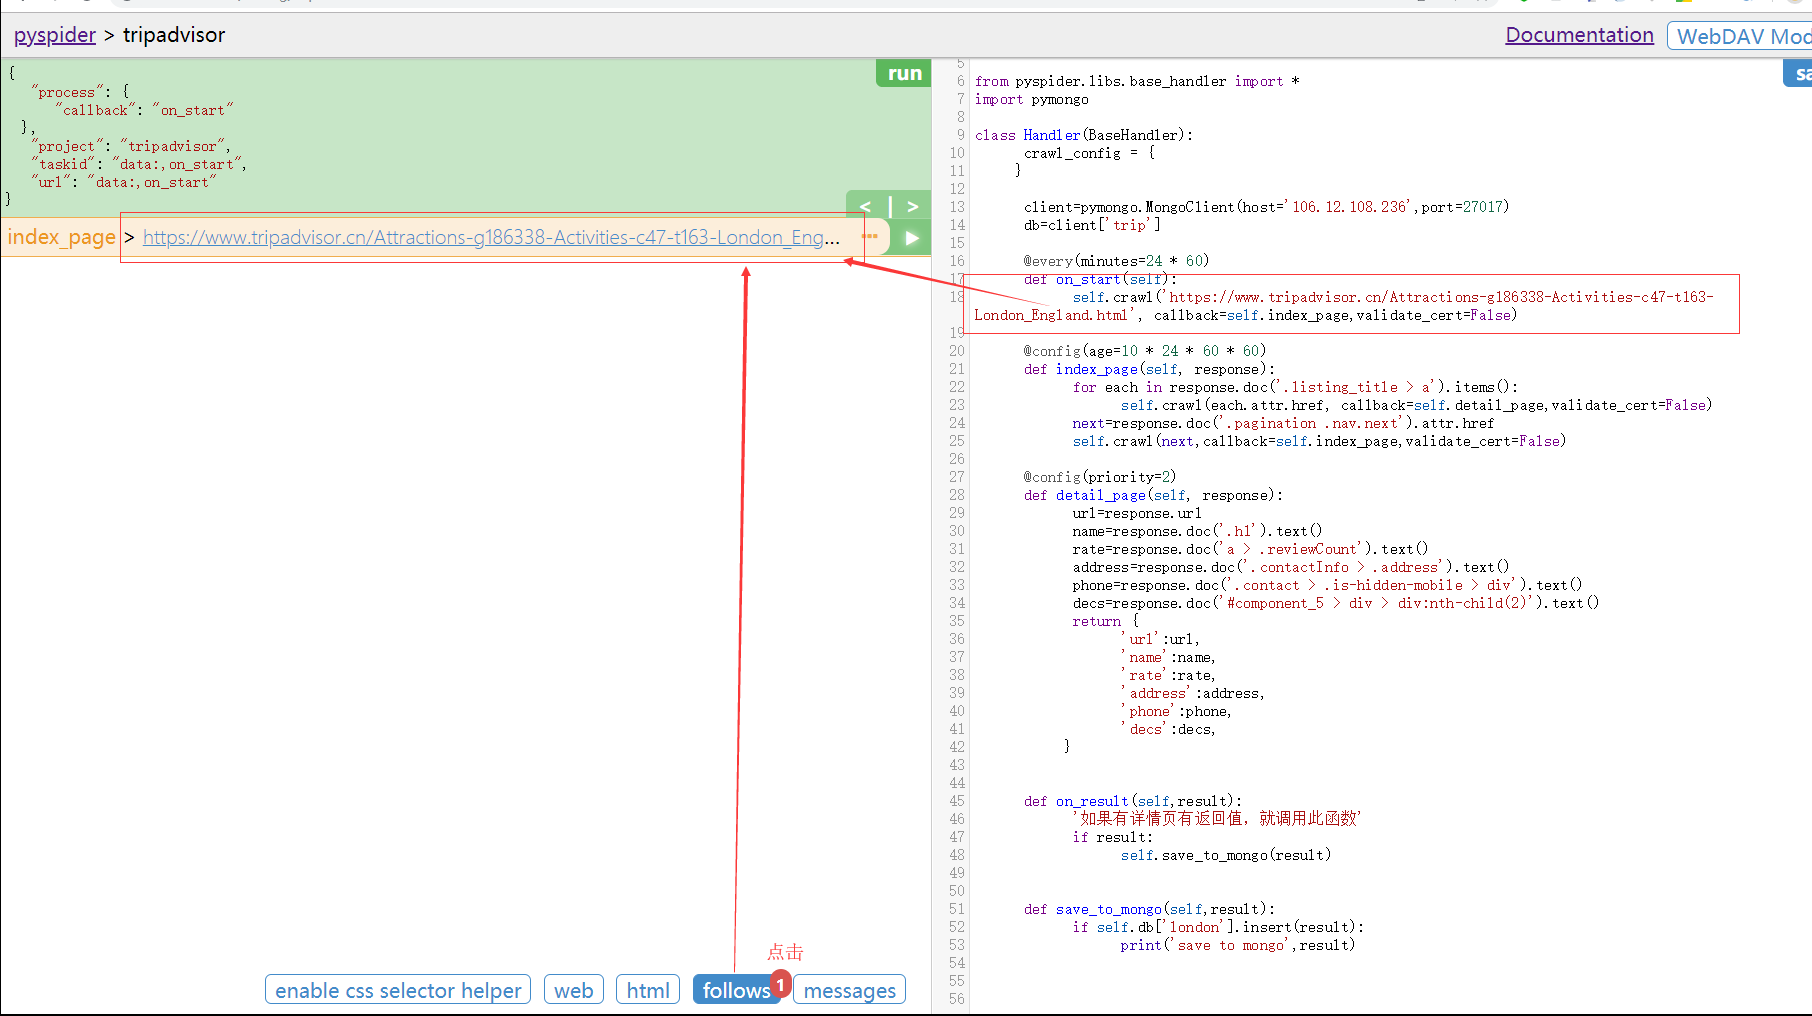
显示当前待解析页面的页面
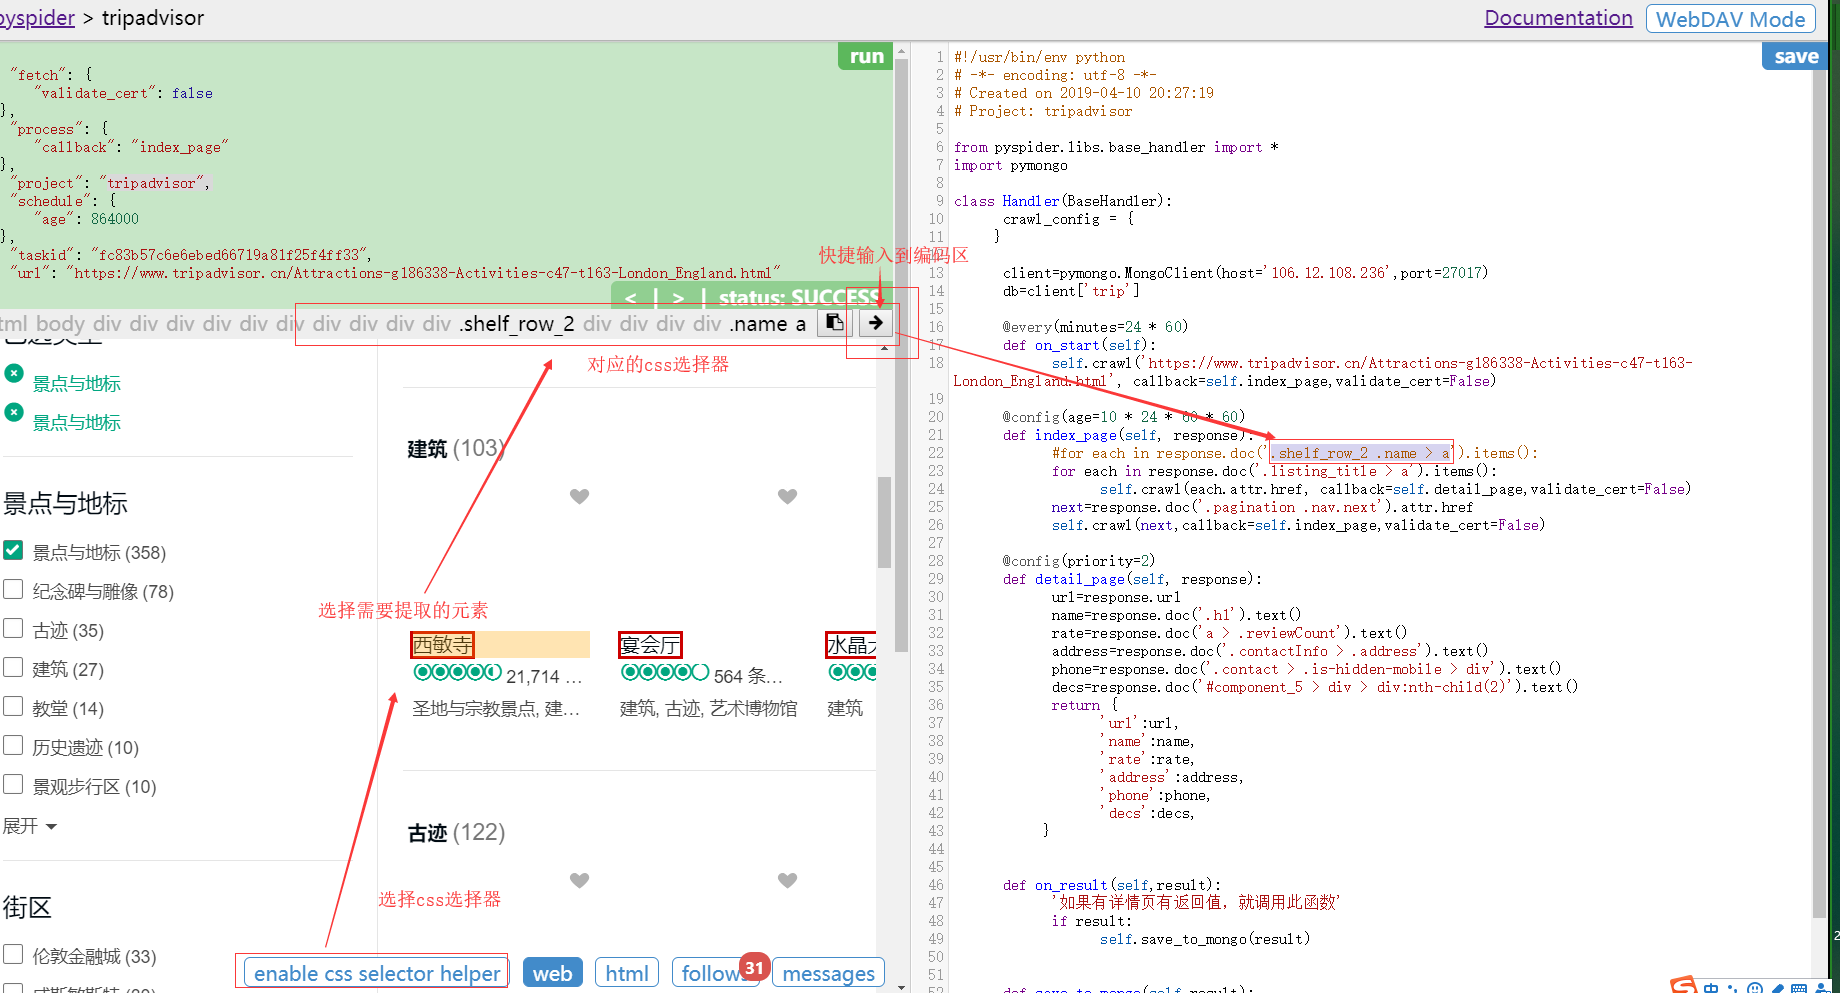
项目启动和删除
五 页面爬取代码
#!/usr/bin/env python
# -*- encoding: utf-8 -*-

# Created on 2019-04-10 20:27:19

# Project: tripadvisor

from pyspider.libs.base_handler import *

import pymongo

class Handler(BaseHandler):

    crawl_config = {

    }

  #连接数据库

    client=pymongo.MongoClient(host='106.12.108.236',port=27017)

    db=client['trip']

    @every(minutes=24 * 60)

    def on_start(self):

        self.crawl('https://www.tripadvisor.cn/Attractions-g186338-Activities-c47-t163-London_England.html', callback=self.index_page,validate_cert=False)

    @config(age=10 * 24 * 60 * 60)

    def index_page(self, response):

        for each in response.doc('.listing_title > a').items():

            self.crawl(each.attr.href, callback=self.detail_page,validate_cert=False)

        next=response.doc('.pagination .nav.next').attr.href

        self.crawl(next,callback=self.index_page,validate_cert=False)

    @config(priority=2)

    def detail_page(self, response):

        url=response.url

        name=response.doc('.h1').text()

        rate=response.doc('a > .reviewCount').text()

        address=response.doc('.contactInfo > .address').text()

        phone=response.doc('.contact > .is-hidden-mobile > div').text()

        decs=response.doc('#component_5 > div > div:nth-child(2)').text()

        return {

            'url':url,

            'name':name,

            'rate':rate,

            'address':address,

            'phone':phone,

            'decs':decs,

        }

    def on_result(self,result):

        '如果有详情页有返回值,就调用此函数'

        if result:

            self.save_to_mongo(result)

    def save_to_mongo(self,result):
     # 保存到数据库

        if self.db['london'].insert(result):

            print('save to mongo',result)
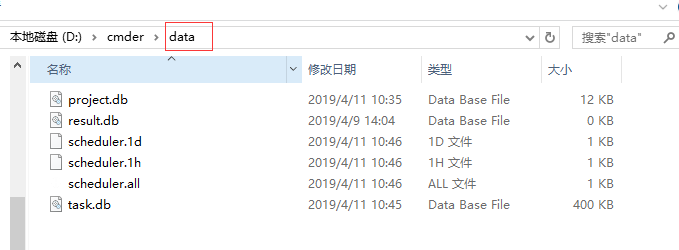
六 查看 pyspider all 执行后产生的本地文件

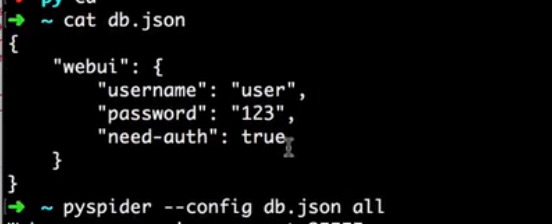
七 设置启动配置
pyspider 初次使用的更多相关文章
- python爬虫框架Pyspider初次接触
pyspider网站地址:http://docs.pyspider.org/en/latest/.文档比较好,安装起来也非常方便.既然是基于python的框架,那么首先得安装python.微软出的一款 ...
- 【pyspider】初次使用pyspider遇到的问题
<python爬虫开发与项目实践>里最后一章介绍了pyspider的使用.然鹅..我刚开始就报错了: Exception: HTTP 599: SSL certificate proble ...
- 用pyspider爬淘宝MM照片
#!/usr/bin/env python # -*- encoding: utf-8 -*- # Created on 2016-12-09 15:24:54 # Project: taobaomm ...
- HashTable初次体验
用惯了数组.ArryList,初次接触到HashTable.Dictionary这种字典储存对于我来说简直就是高大上. 1.到底什么是HashTable HashTable就是哈希表,和数组一样,是一 ...
- 初次启动app校验的活动图和分析
初次启动活动图 version 1 version 2 version 3 根据上图的活动图分析,可能存在较严重的问题: 主线程中如果发现是sdcard的url,则可能进行重命名 FirstEnter ...
- Python爬虫进阶二之PySpider框架安装配置
关于 首先,在此附上项目的地址,以及官方文档 PySpider 官方文档 安装 1. pip 首先确保你已经安装了pip,若没有安装,请参照 pip安装 2. phantomjs PhantomJS ...
- 百度地图API试用--(初次尝试)
2016-03-17: 百度地图API申请key的步骤相对简单,不做过多阐述. 初次使用百度地图API感觉有点神奇,有些功能加进来以后有点问题,注释掉等有空再解决. 代码如下: <%@ page ...
- [masmplus]初次使用报external symbol _start 是配置问题
初次使用masmplus 其中在 codesg segment 使用了 start 标记, 并在end处标明了:end start 但是默认的masmplus 会提示 start 为 不认识的 e ...
- pyspider爬豆瓣电影实例
直接copy官网实例会出现599的错误,百度了很久发现是因为证书的问题 添加这一句忽略证书 validate_cert = False 代码如下: ++++++++++++++++++++++++++ ...
随机推荐
- 【转载】Verilog中的parameter
1. 概述 在Verilog中我们常常会遇到要将一个常量(算法中的某个参数)赋给很多个变量的情况,如: x = 10;y = 10;z = 10;如果此时10要改为9,就需要在代码中修改3个地方,非常 ...
- windows dll的def文件
DLL(testcase_1.dll )源码:myfun.h #pragma once #ifdef TESTCASE_1_EXPORTS #define MY_API __declspec(dlle ...
- Unity项目开发过程中常见的问题,你遇到过吗?
最近看到有朋友问一个unity游戏开发团队,需要掌握哪些知识之类的问题.事实上Unity引擎是一个很灵活的引擎,根据团队开发游戏类型的不同,对人员的要求也有差异,所以不能一概而论.但是,一些在Unit ...
- Yii2 解决2006 MySQL server has gone away问题
Yii2 解决2006 MySQL server has gone away问题 Yii2版本 2.0.15.1 php后台任务经常包含多段sql,如果php脚本执行时间较长,或者sql执行时间较长, ...
- 目标检测 IOU(交并比) 理解笔记
交并比(Intersection-over-Union,IoU): 目标检测中使用的一个概念 是产生的候选框(candidate bound)与原标记框(ground truth bound)的交叠率 ...
- [macOS开发.NET Core] 开篇 & 抉择 & 先利其器
一直以来MacBook是大多数开发者的首选,无论是macOS的便利性,还是MBP的外观,更或者是为了装13,我一直认为一个开发者必须得拥有一部MBP.虽然最后的因素是大多数的. 终于在我的努力下说服下 ...
- springboot项目容器化
创建一个简单的springboot项目,依赖中加入: 编写一个Restfull接口: 编写启动类: 启动项目,浏览器访问该接口,得到想要的结果.下面,就将这个项目进行Docker容器化(applica ...
- 使用 EOLINKER 进行接口测试的最佳路径 (下)
本文为 <使用 EOLINKER 进行接口测试的最佳路径> 下半部分文章,主要介绍测试脚本如何执行和报告生成,以及测试项目人员如何协作.还没看过上篇文章请戳 使用 EOLINKER 进行接 ...
- Tomcat NIO 模型的实现
Tomcat 对 BIO 和 NIO 两种模型都进行了实现,其中 BIO 的实现理解起来比较简单,而 NIO 的实现就比较复杂了,并且它跟常用的 Reactor 模型也略有不同,具体设计如下: 可以看 ...
- 爸爸又给Spring MVC生了个弟弟叫Spring WebFlux
情景引入 很早之前,Java就火起来了,是因为它善于开发和处理网络方面的应用. Java有一个爱好,就是喜欢制定规范标准,但自己又不善于去实现. 反倒是一些服务提供商使用它的规范标准来制造应用服务器而 ...

