flask 电子邮件进阶实践-用模板发送163邮件
电子邮件进阶实践
下面来学习构建邮件的HTML正文,并使用模板组织内容。
一封电子邮件的正文可以是纯文本(text/plain),也可以是HTML格式的文本(text/html)。处于全面的考虑,一封邮件应该既包含纯文本正文又包含HTML格式的正文。HTML格式的正文将被优先读取;加入收信人的邮件系统比较古老,无法读取HTML格式的邮件,则会读取纯文本格式的正文。
下面来学习如何编写HTML邮件正文,以及如何在Flask-Mail中同时提供这两种格式的邮件正文。
如果HTML正文非常简单,比如仅仅在纯文本的基础上添加链接和少量HTML标签,那么不用太在意编写方式。如果想创建更加丰富美观的证件正文,那么会有很多事情需要考虑。出去无法读取HTML正文的古董邮件客户端,大多数主流的邮箱客户端都会HTML邮件有着各种各样的限制。对于HTML邮件正文的编写,下面是一些常见的“最佳实践”:
1) 使用Tabel布局,而不是Div布局
2) 使用行内(inline)样式定义,比如:
<span style = “font-family;Arial, Helvetica, sans-serif; font-size:12px; color:#000000;”>Hello, Email!</span>
3) 尽量使用比较基础的CSS属性,避免使用快捷属性(如background)和定位属性(比如float、position)。
4) 邮件正文的宽度不应超过600px
5) 避免使用JavaScript代码
6) 避免使用背景图片
为了确保邮件显示符合预期,最好提前在各个主流的邮箱客户端以及不同尺寸的设备上进行测试。
在Flask-Mail中,我们使用Message类实例来构建邮件。和纯文本正文类似,HTML正文可以在实例化时传入html参数指定,比如:
message = Message(…, body = ‘纯文本正文’, html=<h1>HTML正文</h1>)
或是通过类属性message.html指定:
message = Message(…)
message.body = ‘纯文本正文’
message.html = ‘<h1>HTML正文</h1>’
使用Jinja2模板组织邮件正文
大多数情况下,我们需要动态构建邮件正文,比如,在周刊订阅程序中,当用户订阅成功后,我们发送一封确认邮件。对于不同的用户来说,邮件的内容基本相同,但同时邮件中又包含用户名称的动态部分,使用模板来组织邮件正文再合适不过。
templates/emails/subscribe.txt: 纯文本邮件模板
Hello {{ name }},

Thank you for subscribing Flask Weekly!

Enjoy the reading :)

Visit this link ro unsubscribe: {{ url_for('unsubscribe', _external = True) }}
为了同时支持纯文本格式和HTML格式的邮件正文,每一类邮件我们都需要分别创建HTML和纯文本格式的模板。对应上面的纯文本模板的HTML格式模板如下:
templates/emails/subscribe.html: HTML邮件模板
<div style="width: 580px; padding: 20px;">

    <h3>Hello {{ name }},</h3>

    <p>Thank you for subscribing Flask Weekly!</p>

    <p>Enjoy the reading :)</p>

    <small style="color: #868e96;">

        Click here to <a href="{{ url_for('unsubscribe', _external=True) }}"></a>.

    </small>

</div>
以通过Flask-Mail创建的发信函数为例,我们在发送邮件的函数中使用render_template()函数渲染邮件正文,并传入相应的变量,如下所示:
from flask import render_template

from flask_mail import Mail, Message

def send_subscribe_mail(subject, to, **kwargs):

    message = Message(subject, recipients = [to], sender = 'Flask Weekly <%s>' % os.getenv('MAIL_USERNAME'))

    message.body = render_template('emails/subscribe.txt', **kwargs)

    message.html = render_template('emails/subscribe.html', **kwargs)

    mail.send(message)
为了支持在调用函数时传入模板中需要的关键字参数,我们在send_mail()中接收可变长关键字参数(**kwargs)并传入render_template()函数。
当邮件中需要加入URL时(比如链接和图片),注意要生成完整的外部URL,而不是内部URL。这可以通过在url_for()函数将关键字参数_external设为True实现。
大多数程序需要发送多种不同类型的邮件,我们可以使用模板继承技术来为所有邮件创建一个包含基本样式的基模板。
在模板中发送163邮件:
app.py:
#encoding=utf-8

from flask import Flask, flash, redirect, url_for, render_template

from wtforms import StringField, TextAreaField, SubmitField

from flask_wtf import FlaskForm

from wtforms.validators import DataRequired, Email

from flask import render_template

from flask_mail import Mail, Message

import os

app = Flask(__name__)

app.jinja_env.trim_blocks = True

app.jinja_env.lstrip_blocks = True

app.config.update(

    SECRET_KEY = "SECRET KEY",

    MAIL_SERVER = os.getenv('MAIL_SERVER'),

    MAIL_PORT = 465,

    #MAIL_PORT = 587,

    #MAIL_USE_TLS = True,

    MAIL_USE_SSL = True,

    MAIL_USERNAME = os.getenv('MAIL_USERNAME'),

    MAIL_PASSWORD = os.getenv('MAIL_PASSWORD'),

    MAIL_DEFAULT_SENDER = (os.getenv('MAIL_USERNAME'))

)

mail = Mail(app)

def send_mail(subject, to, body):

    message = Message(subject, recipients = [to], body = body)

    mail.send(message)

class SubscribeForm(FlaskForm):

    name = StringField('Name', validators=[DataRequired()])

    email = StringField('Email', validators = [DataRequired(),Email()])  #Email(): Validates an email address

    submit = SubmitField('Subscribe')

def send_subscribe_mail(subject, to, **kwargs):

    message = Message(subject, recipients = [to], sender = 'Flask Weekly <%s>' % os.getenv('MAIL_USERNAME'))

    message.body = render_template('emails/subscribe.txt', **kwargs)

    message.html = render_template('emails/subscribe.html', **kwargs)

    mail.send(message)

@app.route('/subscribe', methods = ['GET', 'POST'])

def subscribe():

    form = SubscribeForm()

    if form.validate_on_submit():

        name = form.name.data

        email = form.email.data

        send_subscribe_mail('Subscribe Success!', email, name = name)

        flash('Confirmation email have been sent! Check your inbox.')

        return redirect(url_for('subscribe'))

    return render_template('subscribe.html', form = form)

if __name__ == '__main__':

    print app.config

    app.run(debug = True)
macros.html:
{% macro form_field(field) %}

    {{ field.label }}<br>

    {% if field.flags.required -%}

        {{ field(required = 'required', **kwargs) }}<br>

    {%- else -%}

        {{ field(**kwargs) }}<br>

    {%- endif %}

    {% if field.errors -%}

        {% for error in field.errors -%}

            <small class="error">{{ error }}</small><br>

        {%- endfor %}

    {%- endif %}

{% endmacro %}
base.html:
<!DOCTYPE html>
<html lang="en">
<head>
{% block head %}
{% block metas %}
<meta charset="utf-8">
{% endblock metas %}
<title>{% block title %} Form - HelloFlask {% endblock title %}</title>
<link rel="stylesheet" type="text/css" href="{{ url_for('static', filename='favicon.ico') }}">
{% block styles %}
<link rel="stylesheet" type="text/css" href="{{ url_for('static', filename='style.css') }}">
{% endblock styles %}
{% endblock head %}
</head>
<body>
<nav>
{% block nav %}
<ul>
<li><a href="{{ url_for('basic') }}">Home</a></li>
</ul>
{% endblock %}
</nav> <main>
{% for message in get_flashed_messages() %}
<div class="alert">
{{ message }}
</div>
{% endfor %}
{% block content %}{% endblock %}
</main>
<footer>
{% block footer %}
<small> © 2019 <a href="https://www.cnblogs.com/xiaxiaoxu/" title="xiaxiaoxu's blog">夏晓旭的博客</a> /
<a href="https://github.com/xiaxiaoxu/hybridDrivenTestFramework" title="Contact me on GitHub">GitHub</a> /
<a href="http://helloflask.com" title="A HelloFlask project">Learning from GreyLi's HelloFlask</a>
</small>
{% endblock %}
</footer>
{% block scripts %}{% endblock %}
</body>
</html>
subscribe.html
{% macro form_field(field) %}

    {{ field.label }}<br>

    {% if field.flags.required -%}

        {{ field(required = 'required', **kwargs) }}<br>

    {%- else -%}

        {{ field(**kwargs) }}<br>

    {%- endif %}

    {% if field.errors -%}

        {% for error in field.errors -%}

            <small class="error">{{ error }}</small><br>

        {%- endfor %}

    {%- endif %}

{% endmacro %}
templates/emails/subscribe.html:
<div style="width: 580px; padding: 20px;">

    <h3>Hello {{ name }},</h3>

    <p>Thank you for subscribing Flask Weekly!</p>

    <p>Enjoy the reading :)</p>

    <small style="color: #868e96;">

        Click here to <a href="{{ url_for('subscribe', _external=True) }}"></a>.

    </small>

</div>
templates/emails/subscribe.txt:
Hello {{ name }},
Thank you for subscribing Flask Weekly!
Enjoy the reading :)
Visit this link ro unsubscribe: {{ url_for('subscribe', _external = True) }}
static/style.css:
body {

    margin: auto;

    width: 750px;

}

nav ul {

    list-style-type: none;

    margin:;

    padding:;

    overflow: hidden;

    background-color: #333;

}

nav li {

    float: left;

}

nav li a {

    display: block;

    color: white;

    text-align: center;

    padding: 14px 16px;

    text-decoration: none;

}

nav li a:hover {

    background-color: #111;

}

main {

    padding: 10px 20px;

}

footer {

    font-size: 13px;

    color: #888;

    border-top: 1px solid #eee;

    margin-top: 25px;

    text-align: center;

    padding: 20px;

}

.alert {

    position: relative;

    padding: 0.75rem 1.25rem;

    margin-bottom: 1rem;

    border: 1px solid #b8daff;

    border-radius: 0.25rem;

    color: #004085;

    background-color: #cce5ff;

}

.btn {

    font-size: 14px;

    padding: 5px 10px;

    text-decoration: none;

    cursor: pointer;

    background-color: white;

    color: black;

    border: 2px solid #555555;

}

.btn:hover {

    text-decoration: none;

    background-color: black;

    color: white;

    border: 2px solid black;

}
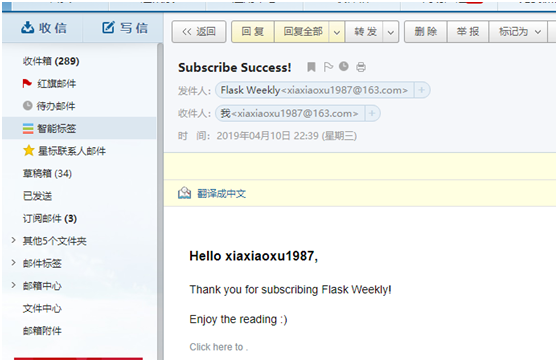
浏览器访问127.0.0.1:5000/subscribe

点击按钮后,稍等几秒钟,会有flash消息提示已经发了邮件了
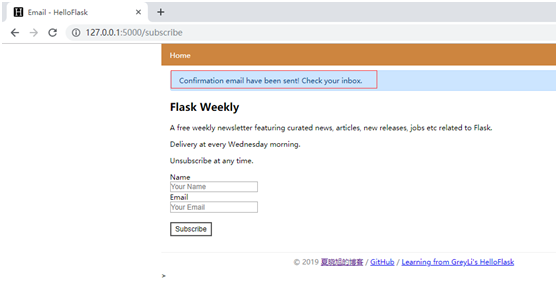
到邮箱中查看,已经收到
flask 电子邮件进阶实践-用模板发送163邮件的更多相关文章
- flask_mail发送163邮件,报553错误的原因
最近在练习用flask_mail发送163邮件时报错: reply: '553 authentication is required,163 smtp9,DcCowAD3eEQZ561caRiaBA- ...
- 使用python发送163邮件 qq邮箱
使用python发送163邮件 def send_email(title, content): import smtplib from email.mime.multipart import MIME ...
- ABP 用SMTP 发送163邮件
/// <summary> /// 发送 /// </summary> /// <param name="Subject">邮件标题</p ...
- python 发送163邮件
可能还需要使用 邮箱第三方客户端的授权码. 网易163免费邮箱相关服务器信息 from email import encoders from email.header import Header fr ...
- java发送163邮件
在服务挂掉后,可以采用发送邮件的方式来通知开发人员进行异常处理 import java.io.IOException; import java.util.Properties; import java ...
- 模板发送java邮件
Creating email content using a templating library The code in the previous examples explicitly creat ...
- flask 电子邮件Flask-Mail
电子邮件 在web程序中,经常会需要发送电子邮件.比如,在用户注册账户时发送确认邮件:定期向用户发送热门内容或是促销信息等等.在Web程序中发送电子邮件并不复杂,借助扩展Flask-Mail或是第三方 ...
- Selenium自动化发送163邮箱
自动化发送163邮件 方法一: import time import datetime from selenium import webdriver from selenium.webdriver.s ...
- SpringBoot集成Thymeleaf发送Html邮件报错
由于业务需求需要使用Thymeleaf作为模板发送Html邮件,开发调试过程中发生以下错误 org.thymeleaf.exceptions.TemplateInputException: Error ...
随机推荐
- python文档测试
def average(values): """ compute average value >>> print(average([20, 30, 10 ...
- WinIo驱动级键盘模拟编程
转自:http://blog.sina.com.cn/s/blog_455d7a320100vr37.html 前天无聊,翻翻自己的兴趣项目文件夹,发现了这个放下很久的项目!那是大三时候的事了.当时是 ...
- nginx r日志中午出现\xE5\x88\x98\xE4\xB8\x96\xE5\xA5\x87
参考文档: https://www.cnblogs.com/hark0623/p/5715726.html https://www.cnblogs.com/fqfanqi/p/7900758.html ...
- [Luogu P1082]同余方程
题目链接 这道题求关于x的同余方程ax≡1(mod b)的最小正整数解.换而言之方程可以转换为ax+by=1,此时有y为负数.此时当且仅当gcd(a,b)|1时,方程有整数解. 于是乎这道题就变成了a ...
- MySql 主从复制 mysql-proxy实现读写分离
1.安装和配置Docker 服务器版本阿里云CentOS7.4 docker版本18.06.0-ce docker安装步骤https://docs.docker.com/install/linux/d ...
- Javascript获取服务器时间
//获取服务器时间 var getServerDate = function () { var xmlHttpRequest = null, serverDate = new Date ...
- [Java]直播方案----[接入环信聊天室]+[腾讯云直播]
辛辛苦苦写的,转载请注明一下,这点信任我想还是有的吧,谢谢了. http://www.cnblogs.com/applerosa/p/7162268.html 之前做了直播,一直没时间写,好不容易闲下 ...
- C# DataTable 转 实体类
C# 中查询结果DataTable转实体类: 比如:List<RtmInterview> rtmList = GetDataById( id); public List<RtmInt ...
- PrimeNG之Input(一)
Input之AutoComplete --自动完成功能是输入组件,提供实时的建议当打字. Import import {AutoCompleteModule} from 'primeng/primen ...
- linux 逆向映射
逆向映射用于建立物理内存页和使用该页的进程的对应页表项之间的联系,在换出页时以便更新所有涉及的进程.得到物理页基址后,根据pfn_to_page可以将页框转换为page实例,page实例中的mappi ...