Kubernetes快速部署
Kubernetes快速部署
kubernetes简介
kubernetes,是一个全新的基于容器技术的分布式架构领先方案,是谷歌严格保密十几年的秘密武器----Borg系统的一个开源版本,于2014年9月发布第一个版本,2015年7月发布第一个正式版本。
kubernetes的本质是一组服务器集群,它可以在集群的每个节点上运行特定的程序,来对节点中的容器进行管理。目的是实现资源管理的自动化,主要提供了如下的主要功能:
- 自我修复:一旦某一个容器崩溃,能够在1秒中左右迅速启动新的容器
- 弹性伸缩:可以根据需要,自动对集群中正在运行的容器数量进行调整
- 服务发现:服务可以通过自动发现的形式找到它所依赖的服务
- 负载均衡:如果一个服务起动了多个容器,能够自动实现请求的负载均衡
- 版本回退:如果发现新发布的程序版本有问题,可以立即回退到原来的版本
- 存储编排:可以根据容器自身的需求自动创建存储卷
kubernetes组件
一个kubernetes集群主要是由控制节点(master)、工作节点(node)构成,每个节点上都会安装不同的组件。
master:集群的控制平面,负责集群的决策 ( 管理 )
ApiServer : 资源操作的唯一入口,接收用户输入的命令,提供认证、授权、API注册和发现等机制
Scheduler : 负责集群资源调度,按照预定的调度策略将Pod调度到相应的node节点上
ControllerManager : 负责维护集群的状态,比如程序部署安排、故障检测、自动扩展、滚动更新等
Etcd :负责存储集群中各种资源对象的信息
node:集群的数据平面,负责为容器提供运行环境 ( 干活 )
Kubelet : 负责维护容器的生命周期,即通过控制docker,来创建、更新、销毁容器
KubeProxy : 负责提供集群内部的服务发现和负载均衡
Docker : 负责节点上容器的各种操作
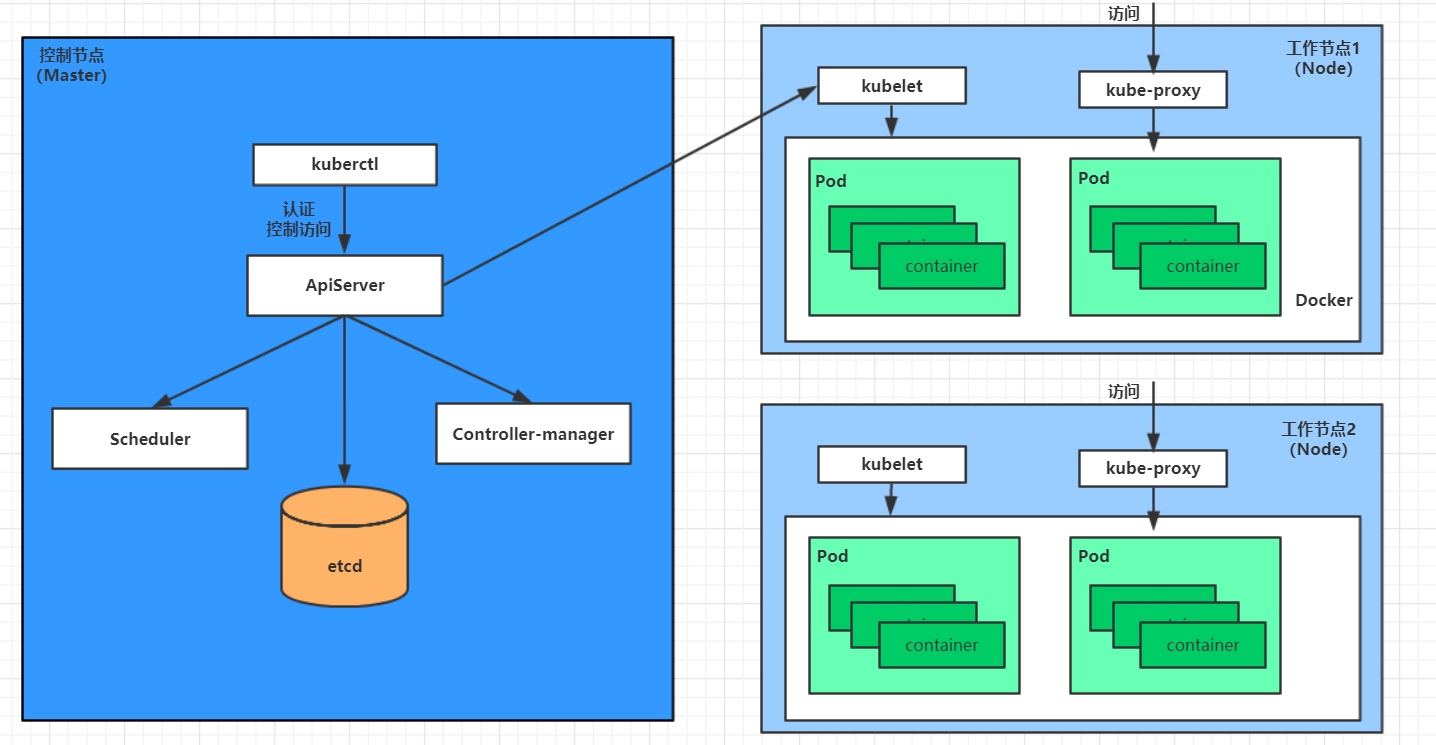
下面,以部署一个nginx服务来说明kubernetes系统各个组件调用关系:
首先要明确,一旦kubernetes环境启动之后,master和node都会将自身的信息存储到etcd数据库中
一个nginx服务的安装请求会首先被发送到master节点的apiServer组件
apiServer组件会调用scheduler组件来决定到底应该把这个服务安装到哪个node节点上
在此时,它会从etcd中读取各个node节点的信息,然后按照一定的算法进行选择,并将结果告知apiServer
apiServer调用controller-manager去调度Node节点安装nginx服务
kubelet接收到指令后,会通知docker,然后由docker来启动一个nginx的pod
pod是kubernetes的最小操作单元,容器必须跑在pod中至此,
一个nginx服务就运行了,如果需要访问nginx,就需要通过kube-proxy来对pod产生访问的代理
这样,外界用户就可以访问集群中的nginx服务了
kubernetes概念
Master:集群控制节点,每个集群需要至少一个master节点负责集群的管控
Node:工作负载节点,由master分配容器到这些node工作节点上,然后node节点上的docker负责容器的运行
Pod:kubernetes的最小控制单元,容器都是运行在pod中的,一个pod中可以有1个或者多个容器
Controller:控制器,通过它来实现对pod的管理,比如启动pod、停止pod、伸缩pod的数量等等
Service:pod对外服务的统一入口,下面可以维护者同一类的多个pod
Label:标签,用于对pod进行分类,同一类pod会拥有相同的标签
NameSpace:命名空间,用来隔离pod的运行环境
Kubernetes快速部署
安装要求
在开始之前,部署Kubernetes集群机器需要满足以下几个条件:
-至少3台机器,操作系统 CentOS7+
- 硬件配置:2GB或更多RAM,2个CPU或更多CPU,硬盘20GB或更多
- 集群中所有机器之间网络互通
- 可以访问外网,需要拉取镜像
- 禁止swap分区
环境
| 名称 | IP | 系统 |
|---|---|---|
| k8s-master | 192.168.78.144 | centos8 |
| k8s-node1 | 192.168.78.145 | centos8 |
| k8s-node2 | 192.168.78.146 | centos8 |
//关闭所有主机的防火墙

[root@k8s-master ~]# systemctl disable --now firewalld

Removed /etc/systemd/system/multi-user.target.wants/firewalld.service.

Removed /etc/systemd/system/dbus-org.fedoraproject.FirewallD1.service.

[root@k8s-master ~]# setenforce 0

[root@k8s-master ~]# vim /etc/selinux/config

[root@k8s-node1 ~]# systemctl disable --now firewalld

Removed /etc/systemd/system/multi-user.target.wants/firewalld.service.

Removed /etc/systemd/system/dbus-org.fedoraproject.FirewallD1.service.

[root@k8s-node1 ~]# setenforce 0

[root@k8s-node1 ~]# vim /etc/selinux/config

[root@k8s-node2 ~]# systemctl disable --now firewalld

Removed /etc/systemd/system/multi-user.target.wants/firewalld.service.

Removed /etc/systemd/system/dbus-org.fedoraproject.FirewallD1.service.

[root@k8s-node2 ~]# setenforce 0

[root@k8s-node2 ~]# vim /etc/selinux/config

//关闭所有主机的swap分区:

# vim /etc/fstab

//注释掉swap分区

[root@k8s-master ~]# free -m

              total        used        free      shared  buff/cache   available

Mem:           3752         556        2656          10         539        2956

Swap:          4051           0        4051

[root@k8s-master ~]# vim /etc/fstab

[root@k8s-node1 ~]# free -m

              total        used        free      shared  buff/cache   available

Mem:           1800         550         728          10         521        1084

Swap:          2047           0        2047

[root@k8s-node1 ~]# vim /etc/fstab

[root@k8s-node2 ~]# free -m

              total        used        free      shared  buff/cache   available

Mem:           1800         559         711          10         529        1072

Swap:          2047           0        2047

[root@k8s-node2 ~]# vim /etc/fstab

//在hosts文件里面添加主机信息

[root@k8s-master ~]# cat >> /etc/hosts << EOF

192.168.78.144 k8s-master

192.168.78.145 k8s-node1

192.168.78.146 k8s-node2

EOF

[root@k8s-node1 ~]# cat >> /etc/hosts << EOF

> 192.168.78.144 k8s-master

> 192.168.78.145 k8s-node1

> 192.168.78.146 k8s-node2

> EOF

[root@k8s-node2 ~]# cat >> /etc/hosts << EOF

> 192.168.78.144 k8s-master

> 192.168.78.145 k8s-node1

> 192.168.78.146 k8s-node2

> EOF

//ping测试

[root@k8s-master ~]# ping k8s-master

PING k8s-master (192.168.78.144) 56(84) bytes of data.

64 bytes from k8s-master (192.168.78.144): icmp_seq=1 ttl=64 time=0.072 ms

64 bytes from k8s-master (192.168.78.144): icmp_seq=2 ttl=64 time=0.080 ms

^C

--- k8s-master ping statistics ---

2 packets transmitted, 2 received, 0% packet loss, time 41ms

rtt min/avg/max/mdev = 0.072/0.076/0.080/0.004 ms

[root@k8s-master ~]# ping k8s-node1

PING k8s-node1 (192.168.78.145) 56(84) bytes of data.

64 bytes from k8s-node1 (192.168.78.145): icmp_seq=1 ttl=64 time=0.512 ms

64 bytes from k8s-node1 (192.168.78.145): icmp_seq=2 ttl=64 time=0.285 ms

^C

[root@k8s-master ~]# ping k8s-node2

PING k8s-node2 (192.168.78.146) 56(84) bytes of data.

64 bytes from k8s-node2 (192.168.78.146): icmp_seq=1 ttl=64 time=1.60 ms

64 bytes from k8s-node2 (192.168.78.146): icmp_seq=2 ttl=64 time=0.782 ms

64 bytes from k8s-node2 (192.168.78.146): icmp_seq=3 ttl=64 time=1.32 ms

[root@k8s-master ~]#  cat > /etc/sysctl.d/k8s.conf << EOF

> net.bridge.bridge-nf-call-ip6tables = 1

> net.bridge.bridge-nf-call-iptables = 1

> EOF

[root@k8s-master ~]# sysctl --system

#省略过程

* Applying /etc/sysctl.d/99-sysctl.conf ...

* Applying /etc/sysctl.d/k8s.conf ...

* Applying /etc/sysctl.conf ...

//时间同步

[root@k8s-master ~]# vim /etc/chrony.conf

# Use public servers from the pool.ntp.org project.

# Please consider joining the pool (http://www.pool.ntp.org/join.html).

pool time1.aliyun.com iburst

[root@k8s-master ~]# systemctl enable chronyd

[root@k8s-master ~]# systemctl restart chronyd

[root@k8s-master ~]# systemctl status chronyd

● chronyd.service - NTP client/server

   Loaded: loaded (/usr/lib/systemd/system/chronyd.service; enabled; vendor preset: enab>

   Active: active (running) since Tue 2022-09-06 15:54:27 CST; 9s ago

[root@k8s-node1 ~]# vim /etc/chrony.conf

[root@k8s-node1 ~]# systemctl enable chronyd

[root@k8s-node1 ~]# systemctl restart chronyd

[root@k8s-node1 ~]# systemctl status chronyd

● chronyd.service - NTP client/server

   Loaded: loaded (/usr/lib/systemd/system/chronyd.service; enabled; vendor preset: enab>

   Active: active (running) since Tue 2022-09-06 15:57:52 CST; 8s ago

[root@k8s-node2 ~]# vim /etc/chrony.conf

[root@k8s-node2 ~]# systemctl enable chronyd

[root@k8s-node2 ~]# systemctl restart chronyd

[root@k8s-node2 ~]# systemctl status chronyd

● chronyd.service - NTP client/server

   Loaded: loaded (/usr/lib/systemd/system/chronyd.service; enabled; vendor preset: enab>

   Active: active (running) since Tue 2022-09-06

//配置免密登录

[root@k8s-master ~]# ssh-keygen -t rsa

Generating public/private rsa key pair.

Enter file in which to save the key (/root/.ssh/id_rsa):

Created directory '/root/.ssh'.

Enter passphrase (empty for no passphrase):

Enter same passphrase again:

Your identification has been saved in /root/.ssh/id_rsa.

Your public key has been saved in /root/.ssh/id_rsa.pub.

The key fingerprint is:

SHA256:LZeVhmrafNhs4eAGG8dNQltVYcGX/sXbKj/dPzR/wNo root@k8s-master

The key's randomart image is:

+---[RSA 3072]----+

|        . ...o=o.|

|       . o . o...|

|        o o + .o |

|       . * +   .o|

|      o S *  .  =|

|       @ O .  o+o|

|      o * *  o.++|

|       . o  o E.=|

|             o..=|

+----[SHA256]-----+

[root@k8s-master ~]# ssh-copy-id k8s-master

/usr/bin/ssh-copy-id: INFO: Source of key(s) to be installed: "/root/.ssh/id_rsa.pub"

The authenticity of host 'k8s-master (192.168.106.16)' can't be established.

ECDSA key fingerprint is SHA256:1x2Tw0BYQrGTk7wpwsIy+TtFN72hWbHYYiU6WtI/Ojk.

Are you sure you want to continue connecting (yes/no/[fingerprint])? yes

/usr/bin/ssh-copy-id: INFO: attempting to log in with the new key(s), to filter out any that are already installed

/usr/bin/ssh-copy-id: INFO: 1 key(s) remain to be installed -- if you are prompted now it is to install the new keys

root@k8s-master's password:

Number of key(s) added: 1

Now try logging into the machine, with:   "ssh 'k8s-master'"

and check to make sure that only the key(s) you wanted were added.

[root@k8s-master ~]# ssh-copy-id k8s-node1

/usr/bin/ssh-copy-id: INFO: Source of key(s) to be installed: "/root/.ssh/id_rsa.pub"

The authenticity of host 'k8s-node1 (192.168.106.20)' can't be established.

ECDSA key fingerprint is SHA256:75svPGZTNSPdFX6K4lCDkoQfG10Y478mu0NzQD7HpnA.

Are you sure you want to continue connecting (yes/no/[fingerprint])? yes

/usr/bin/ssh-copy-id: INFO: attempting to log in with the new key(s), to filter out any that are already installed

/usr/bin/ssh-copy-id: INFO: 1 key(s) remain to be installed -- if you are prompted now it is to install the new keys

root@k8s-node1's password:

Number of key(s) added: 1

Now try logging into the machine, with:   "ssh 'k8s-node1'"

and check to make sure that only the key(s) you wanted were added.

[root@k8s-master ~]# ssh-copy-id k8s-node2

/usr/bin/ssh-copy-id: INFO: Source of key(s) to be installed: "/root/.ssh/id_rsa.pub"

The authenticity of host 'k8s-node2 (192.168.106.21)' can't be established.

ECDSA key fingerprint is SHA256:75svPGZTNSPdFX6K4lCDkoQfG10Y478mu0NzQD7HpnA.

Are you sure you want to continue connecting (yes/no/[fingerprint])? yes

/usr/bin/ssh-copy-id: INFO: attempting to log in with the new key(s), to filter out any that are already installed

/usr/bin/ssh-copy-id: INFO: 1 key(s) remain to be installed -- if you are prompted now it is to install the new keys

root@k8s-node2's password:

Number of key(s) added: 1

Now try logging into the machine, with:   "ssh 'k8s-node2'"

and check to make sure that only the key(s) you wanted were added.

[root@k8s-master ~]# ssh k8s-master

Activate the web console with: systemctl enable --now cockpit.socket

This system is not registered to Red Hat Insights. See https://cloud.redhat.com/

To register this system, run: insights-client --register

Last login: Tue Sep  6 15:10:17 2022 from 192.168.106.1

[root@k8s-master ~]# ssh k8s-node1

Activate the web console with: systemctl enable --now cockpit.socket

This system is not registered to Red Hat Insights. See https://cloud.redhat.com/

To register this system, run: insights-client --register

Last login: Tue Sep  6 15:10:18 2022 from 192.168.106.1

[root@k8s-node1 ~]# exit

注销

Connection to k8s-node1 closed.

[root@k8s-master ~]# ssh k8s-node2

Activate the web console with: systemctl enable --now cockpit.socket

This system is not registered to Red Hat Insights. See https://cloud.redhat.com/

To register this system, run: insights-client --register

Last login: Tue Sep  6 15:10:18 2022 from 192.168.106.1

[root@k8s-node2 ~]# exit

注销

Connection to k8s-node2 closed.

[root@k8s-master ~]# reboot   //重启确保他永久生效
在所有节点安装Docker/kubeadm/kubelet
安装Docker
##注意所有docker的版本要一致,

//所有主机都做下面的操作

[root@k8s-master yum.repos.d]# wget https://mirrors.aliyun.com/docker-ce/linux/centos/docker-ce.repo -O /etc/yum.repos.d/docker-ce.repo

--2022-09-06 16:31:03--  https://mirrors.aliyun.com/docker-ce/linux/centos/docker-ce.repo

正在解析主机 mirrors.aliyun.com (mirrors.aliyun.com)... 45.253.17.211, 45.253.17.216, 45.253.17.213, ...

正在连接 mirrors.aliyun.com (mirrors.aliyun.com)|45.253.17.211|:443... 已连接。

已发出 HTTP 请求,正在等待回应... 200 OK

长度:2081 (2.0K) [application/octet-stream]

正在保存至: “/etc/yum.repos.d/docker-ce.repo”

/etc/yum.repos.d/docke 100%[=========================>]   2.03K  --.-KB/s  用时 0.002s

2022-09-06 16:31:04 (1.05 MB/s) - 已保存 “/etc/yum.repos.d/docker-ce.repo” [2081/2081])

[root@k8s-master ~]# dnf list all|grep docker

containerd.io.x86_64                                              1.6.8-3.1.el8                                          @docker-ce-stable

docker-ce.x86_64     //这个                                             3:20.10.17-3.el8                                       @docker-ce-stable

docker-ce-cli.x86_64                                              1:20.10.17-3.el8                                       @docker-ce-stable

[root@k8s-master ~]# systemctl enable --now docker

Created symlink /etc/systemd/system/multi-user.target.wants/docker.service → /usr/lib/systemd/system/docker.service.

[root@k8s-master ~]# docker version

Client: Docker Engine - Community

 Version:           20.10.17      //版本要统一

 API version:       1.41

 Go version:        go1.17.11

 Git commit:        100c701

 Built:             Mon Jun  6 23:03:11 2022

 OS/Arch:           linux/amd64

 Context:           default

 Experimental:      true

Server: Docker Engine - Community

 Engine:

  Version:          20.10.17

  API version:      1.41 (minimum version 1.12)

  Go version:       go1.17.11

  Git commit:       a89b842

  Built:            Mon Jun  6 23:01:29 2022

  OS/Arch:          linux/amd64

  Experimental:     false

 containerd:

  Version:          1.6.8

  GitCommit:        9cd3357b7fd7218e4aec3eae239db1f68a5a6ec6

 runc:

  Version:          1.1.4

  GitCommit:        v1.1.4-0-g5fd4c4d

 docker-init:

  Version:          0.19.0

  GitCommit:        de40ad0

[root@k8s-master ~]#

//配置加速器

[root@k8s-master ~]# cat > /etc/docker/daemon.json << EOF

> {

>   "registry-mirrors": ["https://b9pmyelo.mirror.aliyuncs.com"],

>   "exec-opts": ["native.cgroupdriver=systemd"],

>   "log-driver": "json-file",

>   "log-opts": {

>     "max-size": "100m"

>   },

>   "storage-driver": "overlay2"

> }

> EOF

[root@k8s-master ~]# cat /etc/docker/daemon.json

{

  "registry-mirrors": ["https://b9pmyelo.mirror.aliyuncs.com"],  //加速器

  "exec-opts": ["native.cgroupdriver=systemd"],   //驱动

  "log-driver": "json-file",   //格式

  "log-opts": {

    "max-size": "100m"    //100m开始运行

  },

  "storage-driver": "overlay2"    //存储驱动

}
添加kubernetes yum软件源
[root@k8s-master ~]#  cat > /etc/yum.repos.d/kubernetes.repo << EOF

[kubernetes]

name=Kubernetes

baseurl=https://mirrors.aliyun.com/kubernetes/yum/repos/kubernetes-el7-x86_64

enabled=1

gpgcheck=0

repo_gpgcheck=0

gpgkey=https://mirrors.aliyun.com/kubernetes/yum/doc/yum-key.gpg https://mirrors.aliyun.com/kubernetes/yum/doc/rpm-package-key.gpg

EOF
安装kubeadm,kubelet和kubectl
//下载版本要一致

[root@k8s-master ~]# dnf list all|grep kubelet

kubelet.x86_64                                                    1.25.0-0                                               kubernetes

[root@k8s-master ~]# dnf list all|grep kubeadm

kubeadm.x86_64                                                    1.25.0-0                                               kubernetes

[root@k8s-master ~]# dnf list all|grep kubectl

kubectl.x86_64                                                    1.25.0-0                                               kubernetes

[root@k8s-master ~]# dnf -y install kubelet kubeadm kubectl

[root@k8s-master ~]# systemctl enable kubelet

Created symlink /etc/systemd/system/multi-user.target.wants/kubelet.service → /usr/lib/systemd/system/kubelet.service.

[root@k8s-master ~]# systemctl status kubelet

● kubelet.service - kubelet: The Kubernetes Node Agent

   Loaded: loaded (/usr/lib/systemd/system/kubelet.service; enabled; vendor>

  Drop-In: /usr/lib/systemd/system/kubelet.service.d
在master部署Kubernetes Master
[root@k8s-master ~]# kubeadm init -h     //看帮助文档

[root@k8s-master ~]# cd /etc/containerd/

[root@k8s-master containerd]# containerd config default > config.toml    //生成

[root@k8s-master containerd]# vim config.toml

sandbox_image = "k8s.gcr.io/pause:3.6"     //改为  sandbox_image = "registry.cn-beijing.aliyuncs.com/abcdocker/pause:3.6"

[root@k8s-master manifests]# systemctl stop kubelet

[root@k8s-master manifests]# systemctl restart containerd

[root@k8s-master manifests]# kubeadm init --apiserver-advertise-address 192.168.70.134 --image-repository registry.aliyuncs.com/google_containers --kubernetes-version v1.25.0 --service-cidr 10.96.0.0/12 --pod-network-cidr 10.244.0.0/1

Your Kubernetes control-plane has initialized successfully!

To start using your cluster, you need to run the following as a regular user:

  mkdir -p $HOME/.kube

  sudo cp -i /etc/kubernetes/admin.conf $HOME/.kube/config

  sudo chown $(id -u):$(id -g) $HOME/.kube/config

Alternatively, if you are the root user, you can run:

  export KUBECONFIG=/etc/kubernetes/admin.conf

You should now deploy a pod network to the cluster.

Run "kubectl apply -f [podnetwork].yaml" with one of the options listed at:        //配置网络插件

  https://kubernetes.io/docs/concepts/cluster-administration/addons/

Then you can join any number of worker nodes by running the following on each as root:

kubeadm join 192.168.70.134:6443 --token h9utko.9esdw3ge9j0urwae \

        --discovery-token-ca-cert-hash sha256:8c36d378e51b8d01f1fe904e51e1b5d7215fc76dcbaf105c798c4cda70e84ca1

//初始化成功

//设置环境变量

[root@k8s-master ~]# vim /etc/profile.d/k8s.sh

[root@k8s-master ~]# cat /etc/profile.d/k8s.sh

export KUBECONFIG=/etc/kubernetes/admin.conf

[root@k8s-master ~]# source /etc/profile.d/k8s.sh

[root@k8s-master ~]# echo $KUBECONFIG

/etc/kubernetes/admin.conf
//指定阿里云镜像仓库地址

 mkdir -p $HOME/.kube

 sudo cp -i /etc/kubernetes/admin.conf $HOME/.kube/config

 sudo chown $(id -u):$(id -g) $HOME/.kube/config

 kubectl get nodes

[root@k8s-master ~]# kubectl get nodes

NAME         STATUS     ROLES           AGE   VERSION

k8s-master   NotReady   control-plane   14m   v1.25.0
复制
//看到说明成功
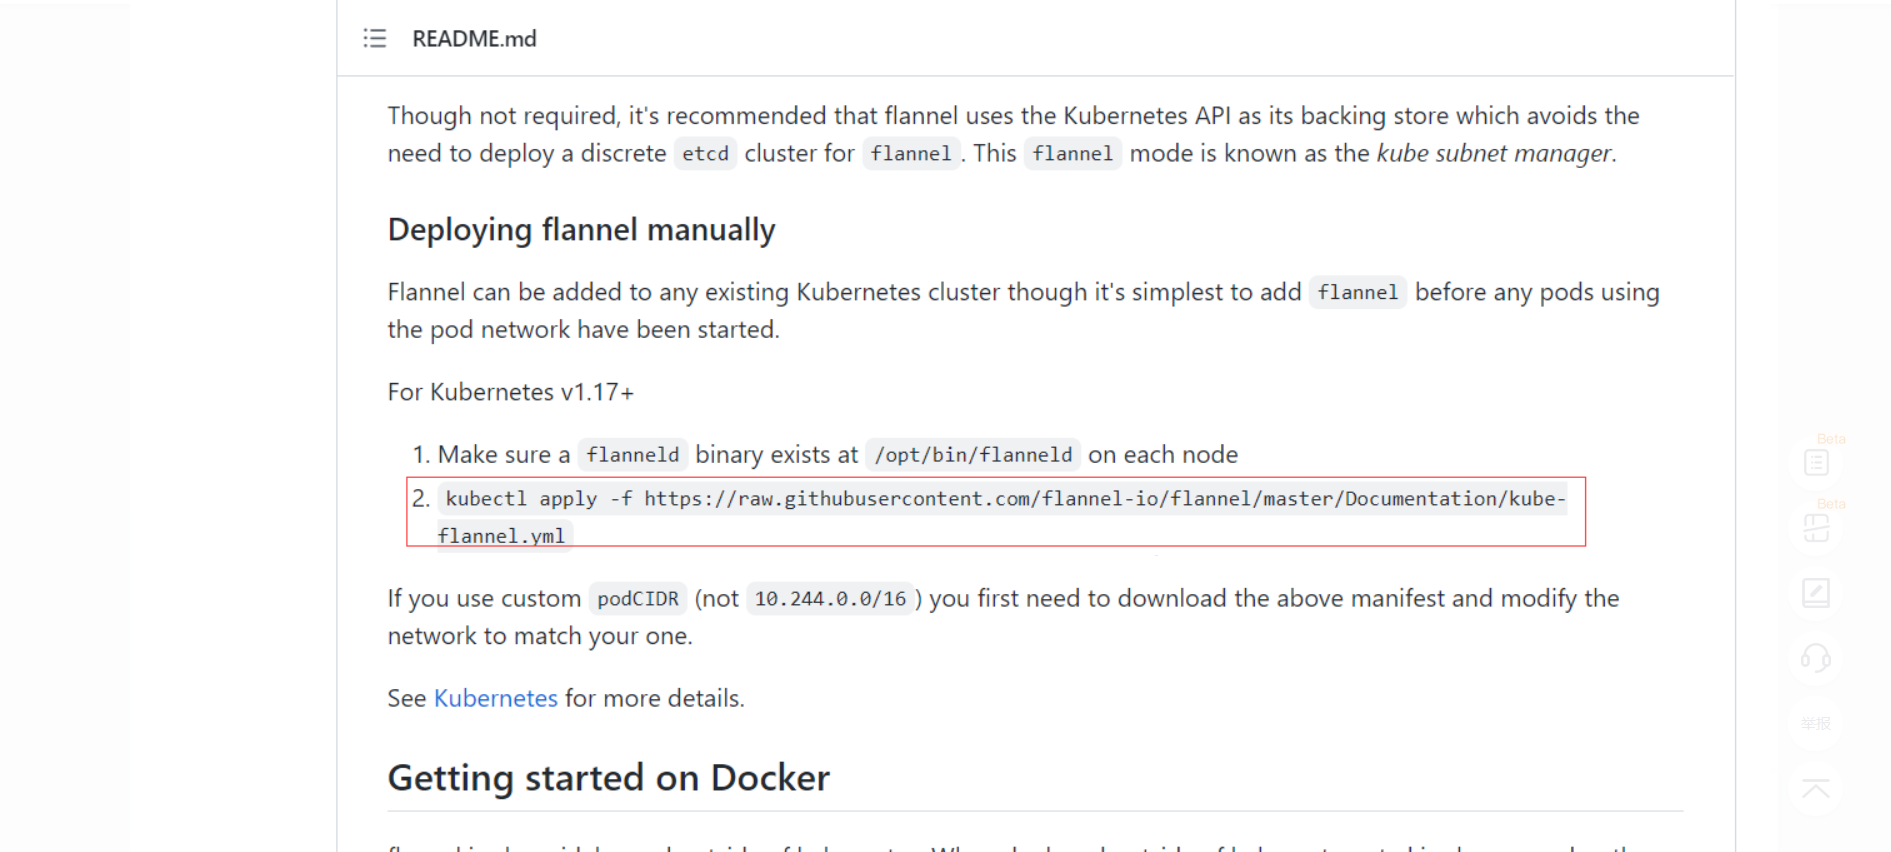
[root@k8s-master ~]# kubectl apply -f https://raw.githubusercontent.com/flannel-io/flannel/master/Documentation/kube-flannel.yml
namespace/kube-flannel created
clusterrole.rbac.authorization.k8s.io/flannel created
clusterrolebinding.rbac.authorization.k8s.io/flannel created
serviceaccount/flannel created
configmap/kube-flannel-cfg created
daemonset.apps/kube-flannel-ds created
加入集群
[root@k8s-master ~]# kubectl get nodes

NAME         STATUS   ROLES           AGE   VERSION

k8s-master   Ready    control-plane   15h   v1.25.0

[root@k8s-node2 containerd]# ls

config.toml

[root@k8s-node2 containerd]# mv config.toml{,.bak}

[root@k8s-node2 containerd]# ls

config.toml.bak

[root@k8s-master ~]# cd /etc/containerd/

[root@k8s-master containerd]# ls

config.toml

 //将文件传过去

[root@k8s-master containerd]# scp /etc/containerd/config.toml k8s-node1:/etc/containerd/

config.toml                        100% 6952     3.4MB/s   00:00

[root@k8s-master containerd]# scp /etc/containerd/config.toml k8s-node2:/etc/containerd/

config.toml                        100% 6952     3.8MB/s   00:00

[root@k8s-node1 containerd]# ls

config.toml

[root@k8s-node1 containerd]# systemctl restart containerd

[root@k8s-node1 containerd]# kubeadm join 192.168.70.134:6443 --token h9utko.9esdw3ge9j0urwae         --discovery-token-ca-cert-hash sha256:8c36d378e51b8d01f1fe904e51e1b5d7215fc76dcbaf105c798c4cda70e84ca1

[preflight] Running pre-flight checks

[preflight] Reading configuration from the cluster...

[preflight] FYI: You can look at this config file with 'kubectl -n kube-system get cm kubeadm-config -o yaml'

[kubelet-start] Writing kubelet configuration to file "/var/lib/kubelet/config.yaml"

[kubelet-start] Writing kubelet environment file with flags to file "/var/lib/kubelet/kubeadm-flags.env"

[kubelet-start] Starting the kubelet

[kubelet-start] Waiting for the kubelet to perform the TLS Bootstrap...

This node has joined the cluster:    //看到下面这几行说明成功

* Certificate signing request was sent to apiserver and a response was received.

* The Kubelet was informed of the new secure connection details.

Run 'kubectl get nodes' on the control-plane to see this node join the cluster.

[root@k8s-node2 containerd]# ls

config.toml  config.toml.bak

[root@k8s-node2 containerd]# systemctl restart containerd

[root@k8s-node2 containerd]# kubeadm join 192.168.70.134:6443 --token h9utko.9esdw3ge9j0urwae         --discovery-token-ca-cert-hash sha256:8c36d378e51b8d01f1fe904e51e1b5d7215fc76dcbaf105c798c4cda70e84ca1

[preflight] Running pre-flight checks

[preflight] Reading configuration from the cluster...

[preflight] FYI: You can look at this config file with 'kubectl -n kube-system get cm kubeadm-config -o yaml'

[kubelet-start] Writing kubelet configuration to file "/var/lib/kubelet/config.yaml"

[kubelet-start] Writing kubelet environment file with flags to file "/var/lib/kubelet/kubeadm-flags.env"

[kubelet-start] Starting the kubelet

[kubelet-start] Waiting for the kubelet to perform the TLS Bootstrap...

This node has joined the cluster:

* Certificate signing request was sent to apiserver and a response was received.

* The Kubelet was informed of the new secure connection details.

Run 'kubectl get nodes' on the control-plane to see this node join the cluster.

[root@k8s-master containerd]# kubectl get nodes       //添加节点

NAME         STATUS   ROLES           AGE     VERSION

k8s-master   Ready    control-plane   15h     v1.25.0

k8s-node1    Ready    <none>          4m35s   v1.25.0

k8s-node2    Ready    <none>          3m17s   v1.25.0
[root@k8s-node1 ~]# kubectl get nodes

The connection to the server localhost:8080 was refused - did you specify the right host or port?

//传变量文件

[root@k8s-master ~]# scp /etc/kubernetes/admin.conf k8s-node1:/etc/kubernetes/admin.conf

admin.conf                         100% 5638     2.7MB/s   00:00

[root@k8s-master ~]# scp /etc/kubernetes/admin.conf k8s-node2:/etc/kubernetes/admin.conf

admin.conf                         100% 5638     2.9MB/s   00:00

[root@k8s-master ~]# scp /etc/profile.d/k8s.sh k8s-node2:/etc/profile.d/k8s.sh

k8s.sh                             100%   45    23.6KB/s   00:00

[root@k8s-master ~]# scp /etc/profile.d/k8s.sh k8s-node1:/etc/profile.d/k8s.sh

k8s.sh                             100%   45     3.8KB/s   00:00

//在node节点查看

[root@k8s-node1 ~]# bash   //让变量生效

[root@k8s-node1 ~]# echo $KUBECONFIG

/etc/kubernetes/admin.conf

[root@k8s-node1 ~]# kubectl get nodes     //查看节点

NAME         STATUS   ROLES           AGE   VERSION

k8s-master   Ready    control-plane   16h   v1.25.0

k8s-node1    Ready    <none>          21m   v1.25.0

k8s-node2    Ready    <none>          20m   v1.25.0

[root@k8s-node2 ~]# bash

[root@k8s-node2 ~]#  echo $KUBECONFIG

/etc/kubernetes/admin.conf

[root@k8s-node2 ~]# kubectl get nodes

NAME         STATUS   ROLES           AGE   VERSION

k8s-master   Ready    control-plane   16h   v1.25.0

k8s-node1    Ready    <none>          21m   v1.25.0

k8s-node2    Ready    <none>          20m   v1.25.0
在Kubernetes集群中创建一个pod,验证是否正常运行
//deployment:类型 ngimx:pod名称 nginx:镜像
[root@k8s-master ~]# kubectl create deployment nginx --image=nginx
deployment.apps/nginx created
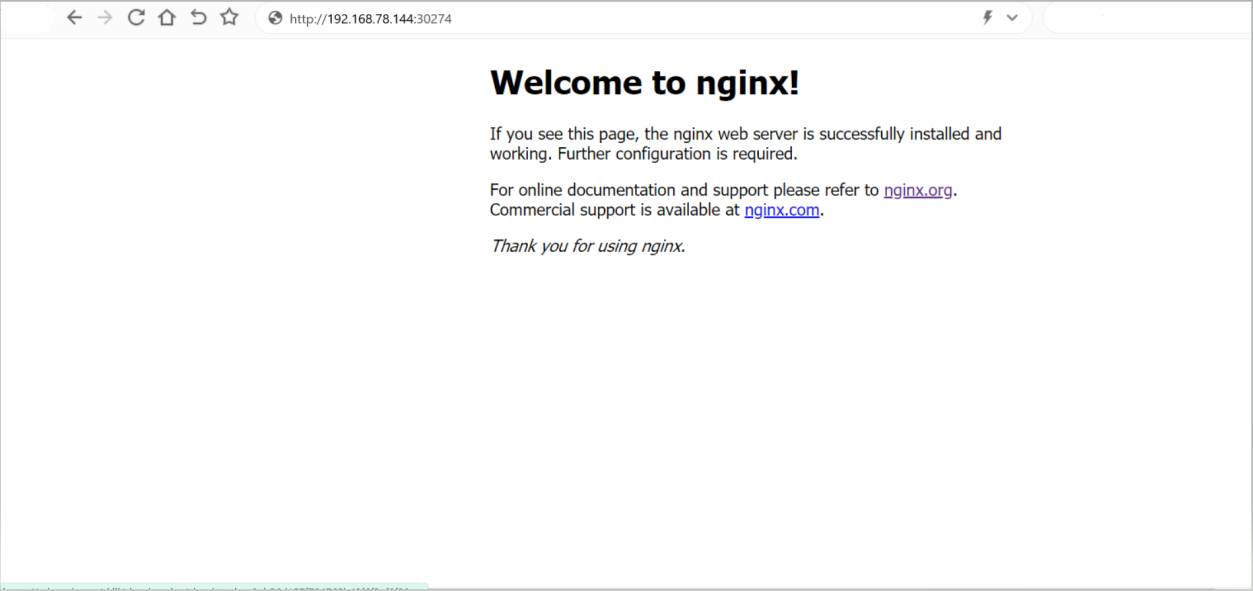
[root@k8s-master ~]# kubectl expose deployment nginx --port=80 --type=NodePort //--part:暴露端口号 //type=NodePort:类型
service/nginx exposed
[root@k8s-master ~]# kubectl get pod,svc
NAME READY STATUS RESTARTS AGE
pod/nginx-76d6c9b8c-6vnnf 0/1 ContainerCreating 0 17s
NAME TYPE CLUSTER-IP EXTERNAL-IP PORT(S) AGE
service/kubernetes ClusterIP 10.96.0.1 <none> 443/TCP 16h
service/nginx NodePort 10.98.79.60 <none> 80:30274/TCP 7s
[root@k8s-master ~]# kubectl get pod,svc
NAME READY STATUS RESTARTS AGE
pod/nginx-76d6c9b8c-6vnnf 1/1 Running 0 5m28s
NAME TYPE CLUSTER-IP EXTERNAL-IP PORT(S) AGE
service/kubernetes ClusterIP 10.96.0.1 <none> 443/TCP 16h
service/nginx NodePort 10.98.79.60 <none> 80:30274/TCP 5m18s
网页访问
Kubernetes快速部署的更多相关文章
- 高可用Kubernetes集群-16. ansible快速部署
说明 本文档指导采用二进制包的方式快速部署高可用kubernetes集群. 脚本托管:k8s-ansible(持续更新) 参考:高可用kubernetes集群 组件版本 组件 版本 备注 centos ...
- Kubernetes探索学习001--Centos7.6使用kubeadm快速部署Kubernetes集群
Centos7.6使用kubeadm快速部署kubernetes集群 为什么要使用kubeadm来部署kubernetes?因为kubeadm是kubernetes原生的部署工具,简单快捷方便,便于新 ...
- 快速部署Kubernetes集群管理
这篇文章介绍了如何快速部署一套Kubernetes集群,下面就快速开始吧! 准备工作 //关闭防火墙 systemctl stop firewalld.service systemctl disabl ...
- 使用 Sealos 在 3 分钟内快速部署一个生产级别的 Kubernetes 高可用集群
本文首发于:微信公众号「运维之美」,公众号 ID:Hi-Linux. 「运维之美」是一个有情怀.有态度,专注于 Linux 运维相关技术文章分享的公众号.公众号致力于为广大运维工作者分享各类技术文章和 ...
- [转帖]centos7 使用kubeadm 快速部署 kubernetes 国内源
centos7 使用kubeadm 快速部署 kubernetes 国内源 https://www.cnblogs.com/qingfeng2010/p/10540832.html 前言 搭建kube ...
- 【k8s】kubeadm快速部署Kubernetes
1.Kubernetes 架构图 kubeadm是官方社区推出的一个用于快速部署kubernetes集群的工具. 这个工具能通过两条指令完成一个kubernetes集群的部署: # 创建一个 Mast ...
- 快速部署一个Kubernetes集群
官方提供的三种部署方式 minikube Minikube是一个工具,可以在本地快速运行一个单点的Kubernetes,仅用于尝试Kubernetes或日常开发的用户使用. 部署地址:https:// ...
- 教你在Kubernetes中快速部署ES集群
摘要:ES集群是进行大数据存储和分析,快速检索的利器,本文简述了ES的集群架构,并提供了在Kubernetes中快速部署ES集群的样例:对ES集群的监控运维工具进行了介绍,并提供了部分问题定位经验,最 ...
- 第3章:快速部署一个Kubernetes集群
kubeadm是官方社区推出的一个用于快速部署kubernetes集群的工具. 这个工具能通过两条指令完成一个kubernetes集群的部署: # 创建一个 Master 节点$ kubeadm in ...
- kubeadm快速部署Kubernetes单节点
1. 安装要求 在开始之前,部署Kubernetes集群机器需要满足以下几个条件: 一台或多台机器,操作系统 CentOS7.x-86_x64 硬件配置:2GB或更多RAM,2个CPU或更多CPU,硬 ...
随机推荐
- MybatisPlus #{param}和${param}的用法详解
作用 mybatis-plus接口mapper方法中的注解(如@Select)或者xml(如)传入的参数是通过#{param}或者${param}来获取值. 区别 1.解析方式: #{param}:会 ...
- PYTHON用户流失数据挖掘:建立逻辑回归、XGBOOST、随机森林、决策树、支持向量机、朴素贝叶斯和KMEANS聚类用户画像|附代码数据
原文链接:http://tecdat.cn/?p=24346 最近我们被客户要求撰写关于用户流失数据挖掘的研究报告,包括一些图形和统计输出. 在今天产品高度同质化的品牌营销阶段,企业与企业之间的竞争集 ...
- zerotier的planet服务器(根服务器)-搭建教程
应用场景介绍: 利用阿里云服务器,搭建根服务器,把不同局域网打通,实现内网穿透,远程控制. 准备工具: 1.服务端:云服务器(有公网IP)Centos 7.6 2.客户端: 工控机(或者家里电脑 ...
- git lock fail解决
本地多个分支,remote .remote tracking.local checkout了2个不同版本分支,发现最后版本却是相同的,然后pull时报git lock fail, 看来发送了冲突了,删 ...
- WINDOWS 下 Visual Studio Code + Odoo12 错误解决方法
1. error: Microsoft Visual C++ 14.0 is required. Get it with "Build Tools for Visual Studio&quo ...
- css设置背景图(背景图太大导致图片显示不全)
.bg{background:url('/back.png');filter:"progid:DXImageTransform.Microsoft.AlphaImageLoader(sizi ...
- laravel Auth的使用
最新的文档是使用的 laravel/jetstream 扩展包,旧版本中的 php artisan make:auth 命令在新版本中已不能用,但是此博客没有使用文档提供的扩展包,而是使用的是lara ...
- SFINAE几种实现方式
一.通过函数返回值实现 template<class T> typename std::enable_if<std::is_trivially_default_constructib ...
- TCP协议之三次握手(二)
本节主要研究三次握手出现的一些异常情况和编程相关的知识: 上一节分析了三次握手的过程,本节会回答一些三次握手的小问题,然后利用linux系统调用实践一下简单的网络的编程. 三次握手的常见问题 Q 向一 ...
- 面试视频知识点整理1-7(http协议)
http协议类 1)http协议的主要特点 简单快速 统一资源符 灵活 通过http协议,可以修改http头,完成不同数据类型的传输 无连接 ...