python Scrapy 从零开始学习笔记(二)
在之前的文章中我们简单了解了一下Scrapy 框架和安装及目录的介绍,本章我们将根据 scrapy 框架实现博客园首页博客的爬取及数据处理。
我们先在自定义的目录中通过命令行来构建一个 scrapy 项目目录
scrapy startproject scrapyCnblogs
生成一下目录:

然后在终端命令行中输入
scrapy genspider cnblogs cnblogs.com
在 scrapCnblogs/spiders 下就会生成一个 cnblogs.py 的文件,代码如下:
 # -*- coding: utf-8 -*-

 import scrapy

 class CnblogsSpider(scrapy.Spider):

     name = 'cnblogs'

     allowed_domains = ['cnblogs.com']

     start_urls = ['http://cnblogs.com/']

     def parse(self, response):

         pass
在上面的代码中 allowed_domains 将限制爬虫的作用范围,start_urls 是爬虫的起始 url,爬取的结果将在 parse 方法中进行数据处理。
我们要做的案例是爬取博客园首页的博客列表,链接为 https://www.cnblogs.com/,内容如下:

本次我们就只爬取网页中间的博客列表中的:博客名称,链接和作者 这三个信息,分别定义为 title,link,author。
在页面筛选信息时我用的是我比较习惯用的 xpath,scrapy 框架集成了该模块,使用起来也非常方便。xpath 的使用规则:https://www.cnblogs.com/weijiutao/p/10879871.html
我们先通过控制台来查找到我们要获取的字段信息:
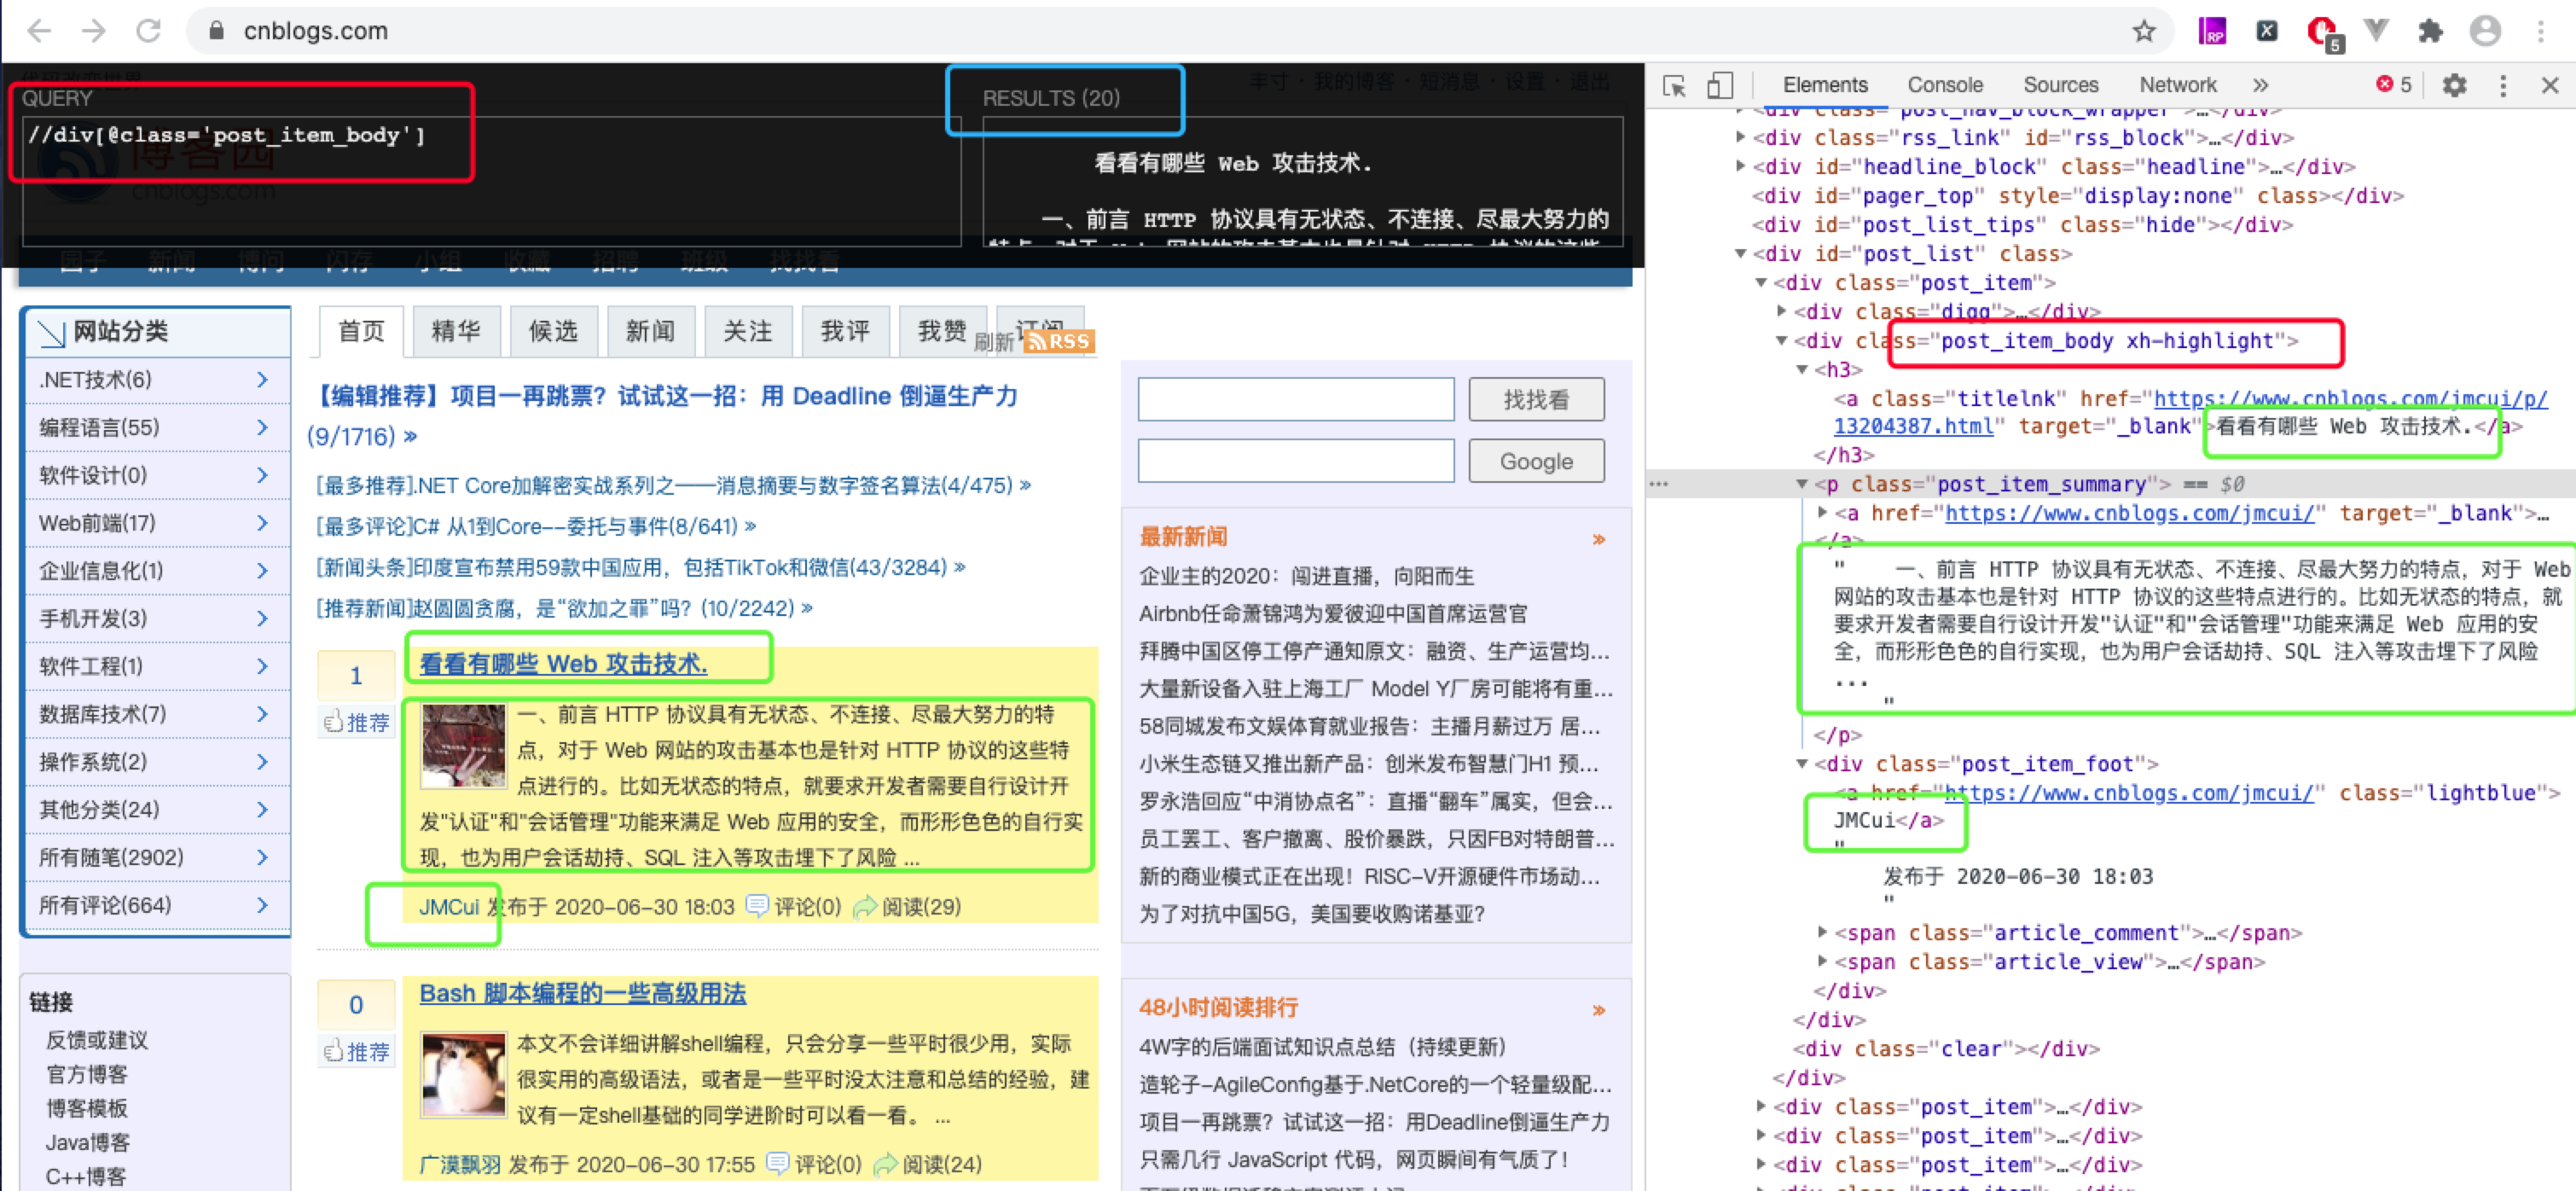
我们根据xpath获取到的信息将上面的 cnblogs.py 文件改为如下:
 # -*- coding: utf-8 -*-

 import scrapy

 # 创建一个爬虫类

 class CnblogsSpider(scrapy.Spider):

     # 爬虫名

     name = 'cnblogs'

     # 允许爬虫作用的范围

     allowed_domains = ['cnblogs.com']

     # 爬虫起始的url

     start_urls = ['https://www.cnblogs.com']

     def parse(self, response):

         # 通过 scrapy 自带的xpath匹配出所有博客的根结点列表集合

         post_list = response.xpath("//div[@class='post_item_body']")

         # 遍历根节点集合

         for post in post_list:

             # extract() 将匹配的对象结果转换为Unicode字符串,不加 extract() 结果为xpath匹配对象

             # title

             title = post.xpath("./h3/a[@class='titlelnk']/text()").extract()[0]

             # link

             link = post.xpath("./h3/a[@class='titlelnk']/@href").extract()[0]

             # author

             author = post.xpath("./div[@class='post_item_foot']/a/text()").extract()[0]

             print(title + link + author)
上面的代码中,我们只需要定义 allowed_domains 和 start_urls 这两个字段,scrapy 就会自动帮我们去进行内容爬取来,并且通过 parse() 方法返回 response 的结果,然后我们再通过 scrapy 提供的 xpath 模块过滤我们想要的信息就可以了。
在终端输出:
scrapy crawl cnblogs
其中 cnblogs 使我们在上面的代码中定义的爬虫名 name 的值,意思是启动该爬虫,然后我们就可以在控制台查看我们的打印结果了:

上面的代码已经大大简化了我们很久之前写的爬虫的文章,接下来我们再来将 scrapy 其他的文件串联起来。
在 scrapyCnblogs/items.py 中写入一下代码:
 # -*- coding: utf-8 -*-

 # Define here the models for your scraped items

 #

 # See documentation in:

 # https://docs.scrapy.org/en/latest/topics/items.html

 import scrapy

 class ScrapycnblogsItem(scrapy.Item):

     # define the fields for your item here like:

     # 标题

     title = scrapy.Field()

     # 链接

     link = scrapy.Field()

     # 作者

     author = scrapy.Field()
该代码是将我们想要过滤的信息进行定义,我们在此文件中定义了一个 ScrapycnblogsItem 的类,里面定义了 title,link 和 author 三个字段。
接下来将刚才写的 cnblogs.py 改为如下代码:
 # -*- coding: utf-8 -*-

 import scrapy

 # 引入 ScrapycnblogsItem 类

 from scrapyCnblogs.items import ScrapycnblogsItem

 # 创建一个爬虫类

 class CnblogsSpider(scrapy.Spider):

     # 爬虫名

     name = 'cnblogs'

     # 允许爬虫作用的范围

     allowed_domains = ['cnblogs.com']

     # 爬虫起始的url

     start_urls = ['https://www.cnblogs.com']

     def parse(self, response):

         # 通过 scrapy 自带的xpath匹配出所有博客的根结点列表集合

         post_list = response.xpath("//div[@class='post_item_body']")

         # 遍历根节点集合

         for post in post_list:

             # extract() 将匹配的对象结果转换为Unicode字符串,不加 extract() 结果为xpath匹配对象

             # title

             title = post.xpath("./h3/a[@class='titlelnk']/text()").extract()[0]

             # link

             link = post.xpath("./h3/a[@class='titlelnk']/@href").extract()[0]

             # author

             author = post.xpath("./div[@class='post_item_foot']/a/text()").extract()[0]

             # 将我们得到的数据封装到一个 `ScrapycnblogsItem` 对象

             item = ScrapycnblogsItem()

             item['title'] = title

             item['link'] = link

             item['author'] = author

             # 将获取的数据交给pipelines

             yield item
在上面的代码中,我们引入了刚刚定义的 ScrapycnblogsItem 类,然后将爬取过滤的信息复制给 item ,最后 yield 出去,这里所做的操作会将我们的信息交给 scrapyCnblogs/pipelines.py 文件,接下来我们就只需要在 pipelines.py 文件中对我们的数据进行操作就可以了。
pipelines.py 代码如下:
 # -*- coding: utf-8 -*-

 # Define your item pipelines here

 #

 # Don't forget to add your pipeline to the ITEM_PIPELINES setting

 # See: https://docs.scrapy.org/en/latest/topics/item-pipeline.html

 import json

 class ScrapycnblogsPipeline(object):

     # __init__ 方法是可选的,作为类的初始化方法

     def __init__(self):

         self.filename = open('cnblogs.json', 'w')

     # process_item 方法是必须写的,用来处理item数据

     def process_item(self, item, spider):

         text = json.dumps(dict(item), ensure_ascii=False) + ',\n'

         self.filename.write(text.encode('utf-8'))

         return item

     # close_spider 方法是可选的,结束时调用这个方法

     def close_spider(self, spider):

         self.filename.close()
在上面的代码中 ScrapycnblogsPipeline 类中的 process_item() 方法就会接收到 cnblogs.py 所返回的 item 信息,我们在 process_item() 方法中将所获取的 item 写入到了一个 cnblogs.json 的文件中。
最后还需要做的一步就是去 scrapyCnblogs/settings.py 文件中放开我们定义的这个管道文件了。
settings.py 代码如下:
 # -*- coding: utf-8 -*-

 # Scrapy settings for scrapyCnblogs project

 #

 # For simplicity, this file contains only settings considered important or

 # commonly used. You can find more settings consulting the documentation:

 #

 #     https://docs.scrapy.org/en/latest/topics/settings.html

 #     https://docs.scrapy.org/en/latest/topics/downloader-middleware.html

 #     https://docs.scrapy.org/en/latest/topics/spider-middleware.html

 BOT_NAME = 'scrapyCnblogs'

 SPIDER_MODULES = ['scrapyCnblogs.spiders']

 NEWSPIDER_MODULE = 'scrapyCnblogs.spiders'

 # Crawl responsibly by identifying yourself (and your website) on the user-agent

 # USER_AGENT = 'scrapyCnblogs (+http://www.yourdomain.com)'

 # Obey robots.txt rules

 ROBOTSTXT_OBEY = True

 # Configure maximum concurrent requests performed by Scrapy (default: 16)

 # CONCURRENT_REQUESTS = 32

 # Configure a delay for requests for the same website (default: 0)

 # See https://docs.scrapy.org/en/latest/topics/settings.html#download-delay

 # See also autothrottle settings and docs

 # 延迟 3 秒获取信息

 DOWNLOAD_DELAY = 3

 # The download delay setting will honor only one of:

 # CONCURRENT_REQUESTS_PER_DOMAIN = 16

 # CONCURRENT_REQUESTS_PER_IP = 16

 # Disable cookies (enabled by default)

 # COOKIES_ENABLED = False

 # Disable Telnet Console (enabled by default)

 # TELNETCONSOLE_ENABLED = False

 # Override the default request headers:

 # 定义报头信息

 DEFAULT_REQUEST_HEADERS = {

     'User-Agent': 'Mozilla/5.0 (Macintosh; Intel Mac OS X 10_15_5) AppleWebKit/537.36 (KHTML, like Gecko) Chrome/83.0.4103.116 Safari/537.36',

     'Accept': 'text/html,application/xhtml+xml,application/xml;q=0.9,*/*;q=0.8',

     'Accept-Language': 'en',

 }

 # Enable or disable spider middlewares

 # See https://docs.scrapy.org/en/latest/topics/spider-middleware.html

 # SPIDER_MIDDLEWARES = {

 #    'scrapyCnblogs.middlewares.ScrapycnblogsSpiderMiddleware': 543,

 # }

 # Enable or disable downloader middlewares

 # See https://docs.scrapy.org/en/latest/topics/downloader-middleware.html

 # DOWNLOADER_MIDDLEWARES = {

 #    'scrapyCnblogs.middlewares.ScrapycnblogsDownloaderMiddleware': 543,

 # }

 # Enable or disable extensions

 # See https://docs.scrapy.org/en/latest/topics/extensions.html

 # EXTENSIONS = {

 #    'scrapy.extensions.telnet.TelnetConsole': None,

 # }

 # Configure item pipelines

 # See https://docs.scrapy.org/en/latest/topics/item-pipeline.html

 # 管道文件

 ITEM_PIPELINES = {

     'scrapyCnblogs.pipelines.ScrapycnblogsPipeline': 300,  # 优先级,越小优先级越高

 }

 # Enable and configure the AutoThrottle extension (disabled by default)

 # See https://docs.scrapy.org/en/latest/topics/autothrottle.html

 # AUTOTHROTTLE_ENABLED = True

 # The initial download delay

 # AUTOTHROTTLE_START_DELAY = 5

 # The maximum download delay to be set in case of high latencies

 # AUTOTHROTTLE_MAX_DELAY = 60

 # The average number of requests Scrapy should be sending in parallel to

 # each remote server

 # AUTOTHROTTLE_TARGET_CONCURRENCY = 1.0

 # Enable showing throttling stats for every response received:

 # AUTOTHROTTLE_DEBUG = False

 # Enable and configure HTTP caching (disabled by default)

 # See https://docs.scrapy.org/en/latest/topics/downloader-middleware.html#httpcache-middleware-settings

 # HTTPCACHE_ENABLED = True

 # HTTPCACHE_EXPIRATION_SECS = 0

 # HTTPCACHE_DIR = 'httpcache'

 # HTTPCACHE_IGNORE_HTTP_CODES = []

 # HTTPCACHE_STORAGE = 'scrapy.extensions.httpcache.FilesystemCacheStorage'
在上面的代码第 70 行,我们就设置了 ScrapycnblogsPipelines 类的管道,同时还设置了一下延迟时间和报头信息,延迟时间如果不设置的话经常访问可能会被对方发现察觉而封IP,在爬取多页面信息的时候也有助于上次信息处理成功后再处理下次请求,避免数据不完整,报头信息是模拟浏览器的信息,都是为了增加我们的信息爬取成功率。
最后我们在终端输入:
scrapy crawl cnblogs
在我们的目录下就会生成一个 cnblogs.json 的文件,如下:

至此我们就完成了一个相对完整的基于 scrapy 框架爬取博客园首页博客列表的爬虫了!
python Scrapy 从零开始学习笔记(二)的更多相关文章
- python Scrapy 从零开始学习笔记(一)
在之前我做了一个系列的关于 python 爬虫的文章,传送门:https://www.cnblogs.com/weijiutao/p/10735455.html,并写了几个爬取相关网站并提取有效信息的 ...
- Python scrapy爬虫学习笔记01
1.scrapy 新建项目 scrapy startproject 项目名称 2.spiders编写(以爬取163北京新闻为例) 此例中用到了scrapy的Itemloader机制,itemloade ...
- oracle从零开始学习笔记 二
多表查询 等值连接(Equijoin) select ename,empno,sal,emp.deptno from emp,dept where dept.deptno=emp.deptno; 非等 ...
- python3.4学习笔记(二十六) Python 输出json到文件,让json.dumps输出中文 实例代码
python3.4学习笔记(二十六) Python 输出json到文件,让json.dumps输出中文 实例代码 python的json.dumps方法默认会输出成这种格式"\u535a\u ...
- python3.4学习笔记(二十五) Python 调用mysql redis实例代码
python3.4学习笔记(二十五) Python 调用mysql redis实例代码 #coding: utf-8 __author__ = 'zdz8207' #python2.7 import ...
- python3.4学习笔记(二十四) Python pycharm window安装redis MySQL-python相关方法
python3.4学习笔记(二十四) Python pycharm window安装redis MySQL-python相关方法window安装redis,下载Redis的压缩包https://git ...
- python3.4学习笔记(二十三) Python调用淘宝IP库获取IP归属地返回省市运营商实例代码
python3.4学习笔记(二十三) Python调用淘宝IP库获取IP归属地返回省市运营商实例代码 淘宝IP地址库 http://ip.taobao.com/目前提供的服务包括:1. 根据用户提供的 ...
- python3.4学习笔记(二十二) python 在字符串里面插入指定分割符,将list中的字符转为数字
python3.4学习笔记(二十二) python 在字符串里面插入指定分割符,将list中的字符转为数字在字符串里面插入指定分割符的方法,先把字符串变成list然后用join方法变成字符串str=' ...
- python3.4学习笔记(二十一) python实现指定字符串补全空格、前面填充0的方法
python3.4学习笔记(二十一) python实现指定字符串补全空格.前面填充0的方法 Python zfill()方法返回指定长度的字符串,原字符串右对齐,前面填充0.zfill()方法语法:s ...
随机推荐
- JQ三种提示框:提示信息框、确认框、输入文本框
浏览器的三种提示框: alert()提示信息框 confirm()提示确认框 prompt()提示输入文本框 1.alert()提示信息框 效果: 实现代码: <script> alert ...
- c++ 宏定义调用不定参数的函数
假设有一下函数 void Logging(int nLevel, const char* szFormat, ...); 则宏定义如下 #define LOG(FCFL) Logging##FCFL ...
- python使用selenium和requests.session登录抓取
# Author:song from selenium import webdriver from selenium.webdriver.common.keys import Keys from re ...
- 【板子】数论基础(持续更新ing...)
#include<cstdio> #include<iostream> #include<cstring> #include<cmath> #inclu ...
- POJ3057 Evacuation 二分图匹配+最短路
POJ3057 Evacuation 二分图匹配+最短路 题目描述 Fires can be disastrous, especially when a fire breaks out in a ro ...
- 利用SignalR实施响应股票数据波动
1.新建ASP.NET Web应用程序, 选择Empty模板. 2.创建Stock.cs类 public class Stock { /// <summary> /// 价格 /// & ...
- Spring IoC 公共注解详解
前言 本系列全部基于 Spring 5.2.2.BUILD-SNAPSHOT 版本.因为 Spring 整个体系太过于庞大,所以只会进行关键部分的源码解析. 什么是公共注解?公共注解就是常见的Java ...
- 从零开始学Electron笔记(四)
在之前的文章我们介绍了一下Electron的这个remote模块,接下来我们继续说一下Electron的右键菜单的制作. 在我们日常我们使用的软件中都会存在右键菜单的情况,比如我们用到的浏览器,开发所 ...
- (三)学习了解OrchardCore笔记——灵魂中间件ModularTenantContainerMiddleware的第一行①的模块部分
了解到了OrchardCore主要由两个中间件(ModularTenantContainerMiddleware和ModularTenantRouterMiddleware)构成,下面开始了解Modu ...
- 攻防世界ics-4
靶场地址https://adworld.xctf.org.cn/task/answer?type=web&number=3&grade=1&id=4918&page=2 ...