Spring源码之循环依赖
https://www.cnblogs.com/longy2012/articles/12834762.html
https://www.bilibili.com/video/BV1iD4y1o7pM?p=7
https://www.jianshu.com/p/8bb67ca11831
https://cloud.tencent.com/developer/article/1497692
https://blog.nowcoder.net/n/2bb528b258b44c7eab1703a52170ef09
总结
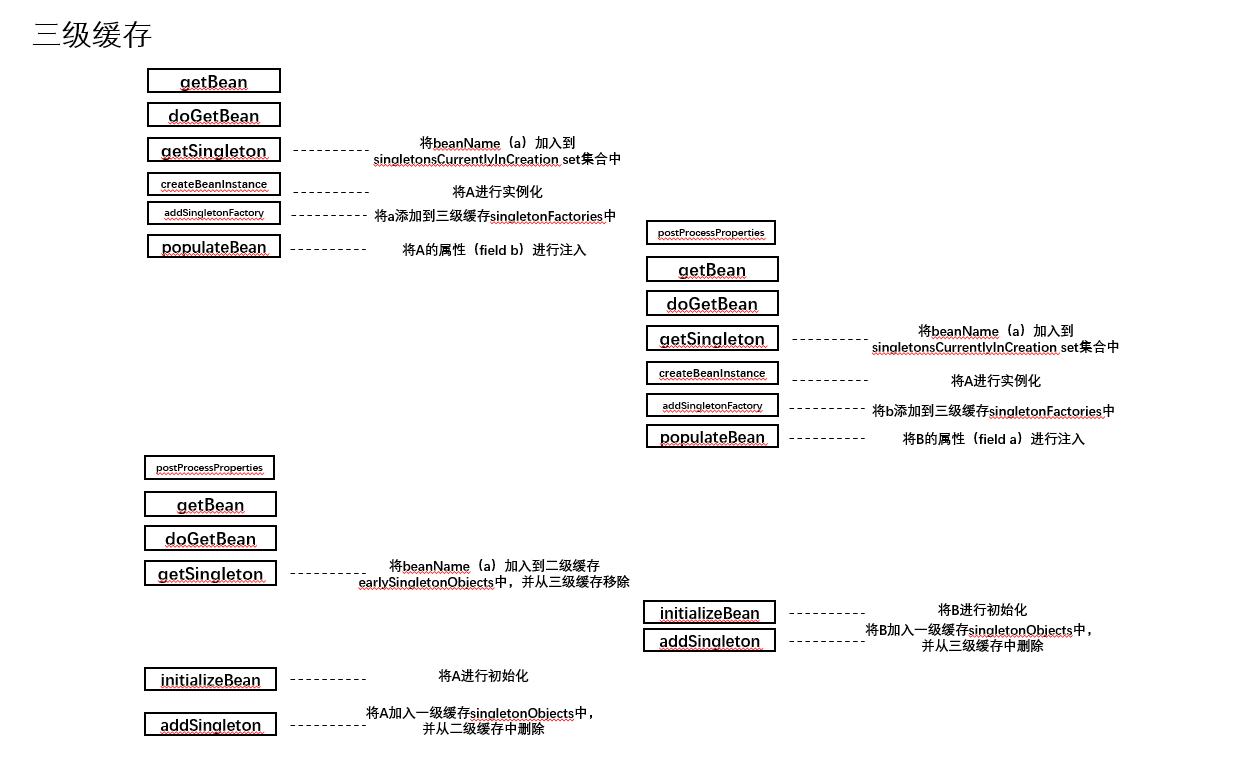
- 在DefaultSingletonBeanRegistry类getSingleton方法中将beanName(a)加入到singletonsCurrentlyInCreation set集合中
- A进行实例化(未初始化)
- A加入三级缓存singletonFactories中
- 在AbstractAutowireCapableBeanFactory中populateBean方法中开始属性填充(field B)(调用AutowiredAnnotationBeanPostProcessor类中postProcessProperties方法)
- 在DefaultSingletonBeanRegistry类getSingleton方法中将beanName(b)加入到singletonsCurrentlyInCreation set集合中
- 将B加入singletonsCurrentlyInCreation,标志为正在创建中
- B进行实例化(未初始化)
- B加入三级缓存singletonFactories中
- 开始对B类进行属性填充(A field)
- 重新走到AbstractBeanFactory中doGetBean方法,调用DefaultSingletonBeanRegistry类getSingleton方法,将A put到二级缓存earlySingletonObjects中,并在三级缓存singletonFactories中移除
- B进行初始化
- getSingleton方法中调用DefaultSingletonBeanRegistry类afterSingletonCreation方法,将beanName(b)从singletonsCurrentlyInCreation移除
- 走到DefaultSingletonBeanRegistry中getSingleton方法finally中,将B加入一级缓存,并从三级缓存中移除
- 将B返回,A进行初始化
- getSingleton方法中调用DefaultSingletonBeanRegistry类afterSingletonCreation方法,将beanName(a)从singletonsCurrentlyInCreation移除
- 最后走到DefaultSingletonBeanRegistry中getSingleton方法finally中,将A加入一级缓存,并从二级缓存中移除
示例
- @DependsOn
@DependsOn("b")

@Component

public class A {

}

@DependsOn("a")

@Component

public class B {

}
报错:
org.springframework.beans.factory.BeanCreationException: Error creating bean with name 'b' defined
- field属性注入循环依赖(不报错)
@Component

public class A {

    @Autowired

    private B b;

}

@Component

public class B {

    @Autowired

    private A a;

}
源码解析
三级缓存
DefaultSingletonBeanRegistry类中:
	/** Cache of singleton objects: bean name to bean instance. */

	//一级缓存

	private final Map<String, Object> singletonObjects = new ConcurrentHashMap<>(256);

	/** Cache of singleton factories: bean name to ObjectFactory. */

	//三级缓存

	private final Map<String, ObjectFactory<?>> singletonFactories = new HashMap<>(16);

	/** Cache of early singleton objects: bean name to bean instance. */

	//二级缓存

	private final Map<String, Object> earlySingletonObjects = new ConcurrentHashMap<>(16);
springboot中入口
调用链:
SpringApplication#run() --> SpringApplication#refreshContext() --> SpringApplication#refresh() --> ServletWebServerApplicationContext#refresh() --> AbstractApplicationContext#refresh() --> AbstractApplicationContext#finishBeanFactoryInitialization() --> DefaultListableBeanFactory#preInstantiateSingletons() --> AbstractBeanFactory#getBean() --> AbstractBeanFactory#doGetBean()
将beanName(a)加入到singletonsCurrentlyInCreation
AbstractBeanFactory#doGetBean()方法中:
if (!typeCheckOnly) {

	markBeanAsCreated(beanName);

}
markBeanAsCreated方法中:
this.alreadyCreated.add(beanName);
在getSingleton方法中,执行
beforeSingletonCreation(beanName);
this.singletonsCurrentlyInCreation.add(beanName)
其中singletonsCurrentlyInCreation为
/** Names of beans that are currently in creation. */

private final Set<String> singletonsCurrentlyInCreation =

		Collections.newSetFromMap(new ConcurrentHashMap<>(16));
A进行实例化(未初始化)
在在getSingleton方法执行到
singletonObject = singletonFactory.getObject();
调用匿名方法
() -> {

    	try {

    		return createBean(beanName, mbd, args);

    	}

    	catch (BeansException ex) {

    		// Explicitly remove instance from singleton cache: It might have been put there

    		// eagerly by the creation process, to allow for circular reference resolution.

    		// Also remove any beans that received a temporary reference to the bean.

    		destroySingleton(beanName);

    		throw ex;

    	}

    }
调用AbstractAutowireCapableBeanFactory#createBean() --> AbstractAutowireCapableBeanFactory#doCreateBean(),执行如下代码进行实例化:
if (instanceWrapper == null) {

	instanceWrapper = createBeanInstance(beanName, mbd, args);

}

Object bean = instanceWrapper.getWrappedInstance();
bean(A)具备地址
A加入三级缓存singletonFactories中
// Eagerly cache singletons to be able to resolve circular references

// even when triggered by lifecycle interfaces like BeanFactoryAware.

boolean earlySingletonExposure = (mbd.isSingleton() && this.allowCircularReferences &&

		isSingletonCurrentlyInCreation(beanName));

if (earlySingletonExposure) {

	if (logger.isTraceEnabled()) {

		logger.trace("Eagerly caching bean '" + beanName +

				"' to allow for resolving potential circular references");

	}

	addSingletonFactory(beanName, () -> getEarlyBeanReference(beanName, mbd, bean));

}
protected void addSingletonFactory(String beanName, ObjectFactory<?> singletonFactory) {

	Assert.notNull(singletonFactory, "Singleton factory must not be null");

	synchronized (this.singletonObjects) {

		if (!this.singletonObjects.containsKey(beanName)) {

			this.singletonFactories.put(beanName, singletonFactory);

			this.earlySingletonObjects.remove(beanName);

			this.registeredSingletons.add(beanName);

		}

	}

}
在populateBean方法中开始对A属性填充
populateBean(beanName, mbd, instanceWrapper);
对B重复上面步骤
调用链
AbstractApplicationContext#refresh() --> AbstractApplicationContext#finishBeanFactoryInitialization() --> DefaultListableBeanFactory#preInstantiateSingletons() --> AbstractBeanFactory#getBean() --> AbstractBeanFactory#doGetBean() --> AbstractAutowireCapableBeanFactory#createBean()
--> AbstractAutowireCapableBeanFactory#doCreateBean()
(上面为A,下面开始A属性B注入)
--> AbstractAutowireCapableBeanFactory#populateBean() --> AutowiredAnnotationBeanPostProcessor#postProcessProperties() --> InjectionMetadata#inject() --> AutowiredAnnotationBeanPostProcessor#inject() --> DefaultListableBeanFactory#resolveDependency() --> DefaultListableBeanFactory#doResolveDependency() --> DependencyDescriptor#resolveCandidate() --> AbstractBeanFactory#getBean() --> AbstractBeanFactory#doGetBean()
会和上面A同样做下面这些操作:
- 在DefaultSingletonBeanRegistry类getSingleton方法中将beanName(b)加入到singletonsCurrentlyInCreation set集合中
- 将B加入singletonsCurrentlyInCreation,标志为正在创建中
- B进行实例化(未初始化,具有B地址)
- B加入三级缓存singletonFactories中
- 开始对B类进行属性填充(A field)
将A put到二级缓存earlySingletonObjects中
重新对A执行doGetBean方法,执行getSingleton时,singletonFactory != null,故A放到二级缓存中,并从三级缓存中移除
Object sharedInstance = getSingleton(beanName);
protected Object getSingleton(String beanName, boolean allowEarlyReference) {

	// Quick check for existing instance without full singleton lock

	Object singletonObject = this.singletonObjects.get(beanName);

	if (singletonObject == null && isSingletonCurrentlyInCreation(beanName)) {

		singletonObject = this.earlySingletonObjects.get(beanName);

		if (singletonObject == null && allowEarlyReference) {

			synchronized (this.singletonObjects) {

				// Consistent creation of early reference within full singleton lock

				singletonObject = this.singletonObjects.get(beanName);

				if (singletonObject == null) {

					singletonObject = this.earlySingletonObjects.get(beanName);

					if (singletonObject == null) {

						ObjectFactory<?> singletonFactory = this.singletonFactories.get(beanName);

						if (singletonFactory != null) {

							singletonObject = singletonFactory.getObject();

							this.earlySingletonObjects.put(beanName, singletonObject);

							this.singletonFactories.remove(beanName);

						}

					}

				}

			}

		}

	}

	return singletonObject;

}
B进行初始化
此时B完成属性注入,A具有地址,开始初始化:
// Initialize the bean instance.

Object exposedObject = bean;

try {

	populateBean(beanName, mbd, instanceWrapper);

	exposedObject = initializeBean(beanName, exposedObject, mbd);

}
将beanName(b)从singletonsCurrentlyInCreation移除
B执行完AbstractBeanFactory类匿名方法中createBean(beanName, mbd, args),接着getSingleton往下执行,在finally中:
finally {

	if (recordSuppressedExceptions) {

		this.suppressedExceptions = null;

	}

	afterSingletonCreation(beanName);

}
protected void afterSingletonCreation(String beanName) {

	if (!this.inCreationCheckExclusions.contains(beanName) && !this.singletonsCurrentlyInCreation.remove(beanName)) {

		throw new IllegalStateException("Singleton '" + beanName + "' isn't currently in creation");

	}

}
将B加入一级缓存,并从三级缓存中移除
在getSingleton方法执行addSingleton(beanName, singletonObject);从而将B从三级缓存中移除,并添加到一级缓存中
protected void addSingleton(String beanName, Object singletonObject) {

	synchronized (this.singletonObjects) {

		this.singletonObjects.put(beanName, singletonObject);

		this.singletonFactories.remove(beanName);

		this.earlySingletonObjects.remove(beanName);

		this.registeredSingletons.add(beanName);

	}

}
完成A中B属性注入,对A进行初始化
A开始执行下面代码:
exposedObject = initializeBean(beanName, exposedObject, mbd);
开始将beanName(a)从singletonsCurrentlyInCreation移除;并从二级缓存中移除,添加到一级缓存
A接着getSingleton往下执行,在finally中执行afterSingletonCreation将beanName(a)从singletonsCurrentlyInCreation移除;
最后在addSingleton(beanName, singletonObject)将A从二级缓存中移除,添加到一级缓存
面试问题
- 一级缓存是否够用?
不能。多线程情况下,会获取到实例化但没有初始化的对象,属性都为null
- 二级缓存是否够用?
如果创建是普通类,二级缓存满足
- 为什么需要三级缓存?(代理)
在动态代理中,返回是代理类。如果没有三级缓存,最开始放置是实例化好对象,然后缓存有了,后面进行代理处理,那原来的对象是否覆盖??
	/**

	 * Obtain a reference for early access to the specified bean,

	 * typically for the purpose of resolving a circular reference.

	 * @param beanName the name of the bean (for error handling purposes)

	 * @param mbd the merged bean definition for the bean

	 * @param bean the raw bean instance

	 * @return the object to expose as bean reference

	 */

	protected Object getEarlyBeanReference(String beanName, RootBeanDefinition mbd, Object bean) {

		Object exposedObject = bean;

		if (!mbd.isSynthetic() && hasInstantiationAwareBeanPostProcessors()) {

			for (BeanPostProcessor bp : getBeanPostProcessors()) {

				if (bp instanceof SmartInstantiationAwareBeanPostProcessor) {

					SmartInstantiationAwareBeanPostProcessor ibp = (SmartInstantiationAwareBeanPostProcessor) bp;

					exposedObject = ibp.getEarlyBeanReference(exposedObject, beanName);

				}

			}

		}

		return exposedObject;

	}
Spring源码之循环依赖的更多相关文章
- Spring源码解析——循环依赖的解决方案
一.前言 承接<Spring源码解析--创建bean>.<Spring源码解析--创建bean的实例>,我们今天接着聊聊,循环依赖的解决方案,即创建bean的ObjectFac ...
- Spring IOC 容器源码分析 - 循环依赖的解决办法
1. 简介 本文,我们来看一下 Spring 是如何解决循环依赖问题的.在本篇文章中,我会首先向大家介绍一下什么是循环依赖.然后,进入源码分析阶段.为了更好的说明 Spring 解决循环依赖的办法,我 ...
- 3.2spring源码系列----循环依赖源码分析
首先,我们在3.1 spring5源码系列--循环依赖 之 手写代码模拟spring循环依赖 中手写了循环依赖的实现. 这个实现就是模拟的spring的循环依赖. 目的是为了更容易理解spring源码 ...
- 3.4 spring5源码系列--循环依赖的设计思想
前面已经写了关于三篇循环依赖的文章, 这是一个总结篇 第一篇: 3.1 spring5源码系列--循环依赖 之 手写代码模拟spring循环依赖 第二篇: 3.2spring源码系列----循环依赖源 ...
- 3.1 spring5源码系列--循环依赖 之 手写代码模拟spring循环依赖
本次博客的目标 1. 手写spring循环依赖的整个过程 2. spring怎么解决循环依赖 3. 为什么要二级缓存和三级缓存 4. spring有没有解决构造函数的循环依赖 5. spring有没有 ...
- 小白都能看懂的 Spring 源码揭秘之依赖注入(DI)源码分析
目录 前言 依赖注入的入口方法 依赖注入流程分析 AbstractBeanFactory#getBean AbstractBeanFactory#doGetBean AbstractAutowireC ...
- 【Spring源码解析】—— 依赖注入结合SpringMVC Demo-xml配置理解
在IOC容器初始化的梳理之后,对依赖注入做一个总结,就是bean实例化的过程,bean的定义有两种方式,一种是xml文件配置,一种是注解,这里是对xml配置文件的依赖注入的介绍,后续对bean与该部分 ...
- Spring源码-循环依赖源码解读
Spring源码-循环依赖源码解读 笔者最近无论是看书还是从网上找资料,都没发现对Spring源码是怎么解决循环依赖这一问题的详解,大家都是解释了Spring解决循环依赖的想法(有的解释也不准确,在& ...
- Spring源码分析(十七)循环依赖
本文结合<Spring源码深度解析>来分析Spring 5.0.6版本的源代码.若有描述错误之处,欢迎指正. 实例化bean是一个非常复杂的过程,而其中比较难以理解的就是对循环依赖的解决, ...
随机推荐
- 【UR #9】App 管理器
UOJ小清新题表 题目内容 UOJ链接 一句话题意:给出一个强联通的混合图,有一些有向边和无向边.删除一些边使其维持强联通的状态,求删边方案. 数据范围 \(1\leq n\leq 5000,0\le ...
- swoft 切面AOP尝试
官网文档 https://www.swoft.org/documents/v2/basic-components/aop/ 视频教程 https://www.bilibili.com/video/BV ...
- CentOS安装MySQL详解 转
引言 最近某云搞活动,买了个服务器作为平时学习和测试用,新机器啥也没有,一些常用软件的安装是免不了的,于是乎想着把安装过程都详细记录下来,一是做个备忘,二是给有需要的同学作个参考. Linux上安 ...
- nginx 是如何处理过期事件的?
目录 什么是过期事件 nginx 是如何处理过期事件的? 参考资料 什么是过期事件 对于不需要加入到 post 队列 延后处理的事件,nginx 的事件都是通过 ngx_epoll_process_e ...
- 分布式协调服务之Zookeeper集群部署
一.分布式系统概念 在聊Zookeeper之前,我们先来聊聊什么是分布式系统:所谓分布式系统就是一个系统的软件或硬件组件分布在网络中的不同计算机之上,彼此间通过消息传递进行通信和协作的系统:简单讲就是 ...
- 源代码 VS 汇编代码 VS 目标代码 VS 字节码 VS 机器码
1.源代码(source code) 源代码就是平时我们开发的代码:比如C.Java.Python.Shell...等 public class HelloWorld { public static ...
- day71:drf:API接口&Restful API规范&Django Rest Framework&drf中的序列化和反序列化功能
目录 1.web应用模式 2.API接口 3.Restful API规范 4.序列化 5.Django Rest Framework 1.drf的简单介绍 2.drf的特点 3.如何安装drf 4.d ...
- BERT模型详解
1 简介 BERT全称Bidirectional Enoceder Representations from Transformers,即双向的Transformers的Encoder.是谷歌于201 ...
- Codeforces Round 662 赛后解题报告(A-E2)
Codeforces Round 662 赛后解题报告 梦幻开局到1400+的悲惨故事 A. Rainbow Dash, Fluttershy and Chess Coloring 这个题很简单,我们 ...
- salesforce零基础学习(九十七)Big Object
本篇参考: https://developer.salesforce.com/docs/atlas.en-us.224.0.bigobjects.meta/bigobjects/async_query ...