tensorflow张量排序
本篇记录一下TensorFlow中张量的排序方法
tf.sort和tf.argsort
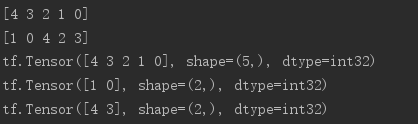
# 声明tensor a是由1到5打乱顺序组成的

a = tf.random.shuffle(tf.range(5))

# 打印排序后的tensor

print(tf.sort(a,direction='DESCENDING').numpy())

# 打印从大到小排序后,数字对应原来的索引

print(tf.argsort(a,direction='DESCENDING').numpy())

index = tf.argsort(a,direction='DESCENDING')

# 按照索引序列取值

print(tf.gather(a,index))

# 返回最大的两个值信息

res = tf.math.top_k(a,2)

# indices返回索引

print(res.indices)

# values返回值

print(res.values)
计算准确率实例:
# 定义模型输出预测概率

prob = tf.constant([[0.1,0.2,0.7],[0.2,0.7,0.1]])

# 定义y标签

target = tf.constant([2,0])

# 求top3的索引

k_b = tf.math.top_k(prob,3).indices

# 将矩阵进行转置,即把top-1,top-2,top-3分组

print(tf.transpose(k_b,[1,0]))

# 将y标签扩展成与top矩阵相同维度的tensor,方便比较

target = tf.broadcast_to(target,[3,2])

# 实现求准确率的方法

def accuracy(output,target,topk=(1,)):

    maxk = max(topk)

    batch_size = target.shape[0]

    pred = tf.math.top_k(output,maxk).indices

    pred = tf.transpose(pred,perm=[1,0])

    target_ = tf.broadcast_to(target,pred.shape)

    correct = tf.equal(pred,target_)

    res = []

    for k in topk:

        correct_k = tf.cast(tf.reshape(correct[:k],[-1]),dtype=tf.float32)

        correct_k = tf.reduce_sum(correct_k)

        acc = float(correct_k/batch_size)

        res.append(acc)

    return res
import tensorflow as tf
import os os.environ['TF_CPP_MIN_LOG_LEVEL'] = ''
tf.random.set_seed(2467) def accuracy(output, target, topk=(1,)):
maxk = max(topk)
batch_size = target.shape[0] pred = tf.math.top_k(output, maxk).indices
pred = tf.transpose(pred, perm=[1, 0])
target_ = tf.broadcast_to(target, pred.shape)
# [10, b]
correct = tf.equal(pred, target_) res = []
for k in topk:
correct_k = tf.cast(tf.reshape(correct[:k], [-1]), dtype=tf.float32)
correct_k = tf.reduce_sum(correct_k)
acc = float(correct_k* (100.0 / batch_size) )
res.append(acc) return res output = tf.random.normal([10, 6])
output = tf.math.softmax(output, axis=1)
target = tf.random.uniform([10], maxval=6, dtype=tf.int32)
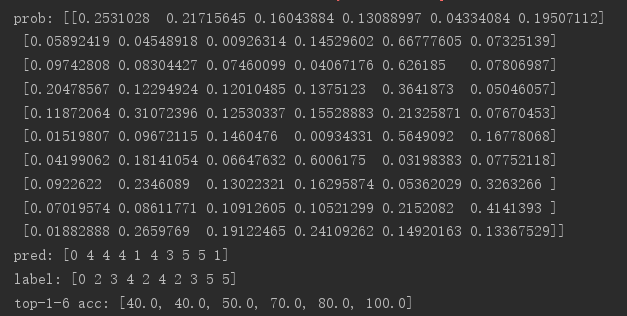
print('prob:', output.numpy())
pred = tf.argmax(output, axis=1)
print('pred:', pred.numpy())
print('label:', target.numpy()) acc = accuracy(output, target, topk=(1,2,3,4,5,6))
print('top-1-6 acc:', acc)
tensorflow张量排序的更多相关文章
- AI - TensorFlow - 张量(Tensor)
张量(Tensor) 在Tensorflow中,变量统一称作张量(Tensor). 张量(Tensor)是任意维度的数组. 0阶张量:纯量或标量 (scalar), 也就是一个数值,例如,\'Howd ...
- Tensorflow张量
张量常规解释 张量(tensor)理论是数学的一个分支学科,在力学中有重要应用.张量这一术语起源于力学,它最初是用来表示弹性介质中各点应力状态的,后来张量理论发展成为力学和物理学的一个有力的数学工具. ...
- tensorflow 张量的阶、形状、数据类型及None在tensor中表示的意思。
x = tf.placeholder(tf.float32, [None, 784]) x isn't a specific value. It's a placeholder, a value th ...
- TensorFlow—张量运算仿真神经网络的运行
import tensorflow as tf import numpy as np ts_norm=tf.random_normal([]) with tf.Session() as sess: n ...
- Tensorflow张量的形状表示方法
对输入或输出而言: 一个张量的形状为a x b x c x d,实际写出这个张量时: 最外层括号[…]表示这个是一个张量,无别的意义! 次外层括号有a个,表示这个张量里有a个样本 再往内的括号有b个, ...
- 121、TensorFlow张量命名
# tf.Graph对象定义了一个命名空间对于它自身包含的tf.Operation对象 # TensorFlow自动选择一个独一无二的名字,对于数据流图中的每一个操作 # 但是给操作添加一个描述性的名 ...
- tensorflow张量限幅
本篇内容有clip_by_value.clip_by_norm.gradient clipping 1.tf.clip_by_value a = tf.range(10) print(a) # if ...
- 吴裕雄--天生自然TensorFlow2教程:张量排序
import tensorflow as tf a = tf.random.shuffle(tf.range(5)) a tf.sort(a, direction='DESCENDING') # 返回 ...
- Tensorflow Lite从入门到精通
TensorFlow Lite 是 TensorFlow 在移动和 IoT 等边缘设备端的解决方案,提供了 Java.Python 和 C++ API 库,可以运行在 Android.iOS 和 Ra ...
随机推荐
- [Python源码剖析]字符缓冲池intern机制
static PyStringObject *characters[UCHAR_MAX + 1]; ... /* This dictionary holds all interned strings. ...
- HDU_2167_状态压缩dp
http://acm.hdu.edu.cn/showproblem.php?pid=2167 第一道状态压缩dp,其实就是爆搜,只不过把排除了大量不可能的情况,先用sta保存每行可能的情况,sum[i ...
- ARTS Week 2
Nov 4,2019 ~ Nov 10,2019 Algorithm 本周主要的算法是如何求两个数的最大公因数.传统的想法便是对这两个数分解质因数,而后找到其公共因数,再相乘,这样就会得到最大公因数了 ...
- js算法题
//较Low,看到的大神 帮补充 1.给定一个数组:,定义一个函数获取数组中所有的奇数,返回一个新数组:var arr1=[1,3,4,5,6,7,8,3,4,2,3,6]; function ...
- 用反射、泛型 改造SqlHelper
1. 数据准备 public class BaseModel { public int Id { set; get; } } public class Company : BaseModel { p ...
- Dapper系列 作者:懒懒的程序员一枚
Dapper 第一篇简单介绍什么是小巧玲珑?Dapper如何工作安装需求方法参数结果常用类型 Dapper 第二篇 Execute 方法介绍描述存储过程Insert语句Update语句Delete语句 ...
- Asp.net core下利用EF core实现从数据实现多租户(3): 按Schema分离 附加:EF Migration 操作
前言 前段时间写了EF core实现多租户的文章,实现了根据数据库,数据表进行多租户数据隔离. 今天开始写按照Schema分离的文章. 其实还有一种,是通过在数据表内添加一个字段做多租户的,但是这种模 ...
- 记一次IE浏览器做图片预览的坑
随便写写吧,被坑死了 IE 10 及 IE10以上,可以使用FileReader的方式,来做图片预览,加载本地图片显示 IE 9 8 7 没有FileReader这个对象,所以只能使用微软自己的东西来 ...
- Centos 7 主要命令改动 service chkconfig iptables
1.service.chkconfig => systemctl seivice和chkconfig 是linux上的常用命令在centos7上被systemctl代替. CentOS 7 使用 ...
- [CentOS7]sed 指定字符前后添加内容
指定字符前面添加 sed -i 's/指定的字符/需要添加的字符&/' 文件名称 修改Linux启动配置 将 GRUB_CMDLINE_LINUX="rd.lvm.lv=centos ...