Windows环境搭建 face_recognition,dlib
文章参考:https://blog.csdn.net/hongbin_xu/article/details/76284134
文章参考:https://blog.csdn.net/weixin_40450867/article/details/81734815
文章参考:https://blog.csdn.net/esting_tang/article/details/80974330
该库可以通过python或者命令行即可实现人脸识别的功能。使用dlib深度学习人脸识别技术构建,在户外脸部检测数据库基准(Labeled Faces in the Wild)上的准确率为99.38%。 在github上有相关的链接和API文档。
配置环境
安装dlib
方法一
首先配置dlib
我这里有一个dlib包,链接:https://pan.baidu.com/s/1drnxz251fvVVc9qoh61TTg 提取码:9pcl
下载好后运行cmd或者 pycharm的terminal 进入dlib 包所在的路径下,运行
pip install 【所下载的包】
import dlib

方法二
https://pypi.org/project/dlib/18.17.100/#downloads 找到需要的dlib版本
新版本需要自行编译
下载好后pip install 【文件路径】安装
安装face_recognition
直接使用 pip install 即可 我使用了 清华园的镜像
注意:下载速度过慢会报错
pip install -i https://pypi.tuna.tsinghua.edu.cn/simple face_recognition
import face_recognition

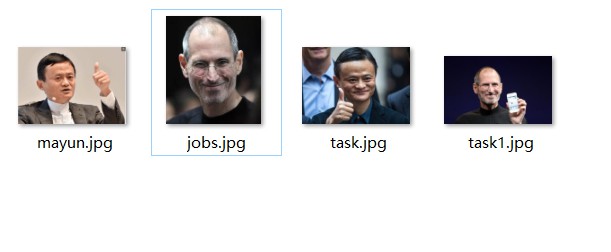
写一小段代码进行验证,我准备了四张图片
 import face_recognition

 mayun_image = face_recognition.load_image_file("mayun.jpg");

 jobs_image = face_recognition.load_image_file("jobs.jpg");

 task1_image = face_recognition.load_image_file("task1.jpg");

 mayun_encoding = face_recognition.face_encodings(mayun_image)[0]

 jobs_encoding = face_recognition.face_encodings(jobs_image)[0]

 task1_encoding = face_recognition.face_encodings(task1_image)[0]

 results = face_recognition.compare_faces([mayun_encoding, jobs_encoding], task1_encoding)

 labels = ['mayun', 'jobs']

 print('results:'+str(results))

 for i in range(0, len(results)):

     if results[i] == True:

         print('The person is:'+labels[i])
运行结果

Windows环境搭建 face_recognition,dlib的更多相关文章
- Windows环境搭建Red5流媒体服务器指南
Windows环境搭建Red5流媒体服务器指南 测试环境:Windows 7 一. 下载安装程序 red5-server 下载地址 https://github.com/Red5/red5-ser ...
- Battery Historian for windows环境搭建
Battery Historian for windows环境搭建 简介:Battery historian是一款通过上传bugreport文件分析用户手机中App的电池耗电情况的工具. Batter ...
- Android NDK r8 windows环境搭建
Android NDK r8 windows环境搭建 一.默认基础环境为已经完成Android开发环境的搭建 需要的软件及插件 1. JDK-7u25 2. Eclipse 3. Android SD ...
- Windows环境搭建Red5流媒体服务器指南(转)
Windows环境搭建Red5流媒体服务器指南 Windows环境搭建Red5流媒体服务器指南 测试环境:Windows 7 一. 下载安装程序 red5-server 下载地址 https:// ...
- Windows环境搭建与第一个C# Sample
Redis入门 - Windows环境搭建与第一个C# Sample 什么是Redis? Redis是一个开源.支持网络.基于内存.键值对存储数据库,使用ANSI C编写.从2013年5月开始,R ...
- Windows环境搭建Web自动化测试框架Watir
Windows环境搭建Web自动化测试框架Watir 一.前言 Web自动化测试一直是一个比较迫切的问题,对于现在web开发的敏捷开发,却没有相对应的敏捷测试,故开此主题,一边研究,一边将We ...
- Windows环境搭建mysql服务器
Windows环境搭建mysql服务器: 1.下载mysql-installer-community-5.7.3.0-m13.2063434697并安装 安装详细步骤>> 2.安装mys ...
- Go(02)windows环境搭建和vscode配置
之前讲述过linux环境下Go语言开发环境搭建,这次简述下windows的搭建以及vscode配置 windows环境搭建 同样去https://studygolang.com/dl下载windows ...
- Windows 环境搭建Redis集群(win 64位)
转: http://blog.csdn.net/zsg88/article/details/73715947 参考:https://www.cnblogs.com/tommy-huang/p/6240 ...
随机推荐
- 吴裕雄--天生自然JAVA SPRING框架开发学习笔记:Spring DI(依赖注入)的实现方式属性注入和构造注入
依赖注入(Dependency Injection,DI)和控制反转含义相同,它们是从两个角度描述的同一个概念. 当某个 Java 实例需要另一个 Java 实例时,传统的方法是由调用者创建被调用者的 ...
- 一个例子搞清楚Java程序执行顺序
当我们new一个GirlFriend时,我们都做了什么? 一个例子搞懂Java程序运行顺序 public class Girl { Person person = new Person("G ...
- 模块化CommonJs规范 part1
CommonJS规范 来自<JavaScript 标准参考教程(alpha)>,by 阮一峰 1.概述 Node 应用由模块组成,采用 CommonJS 模块规范. 每个文件就是一个模块, ...
- Tensorflow——用openpose进行人体骨骼检测
https://blog.csdn.net/eereere/article/details/80176007 参考资料code:https://github.com/ildoonet/tf-pose- ...
- HyperLedger Cello学习笔记
HyperLedger Cello学习笔记 转载请注明出处:HyperLedger Cello学习笔记 概述 Hyperledger Cello是Hyperledger下的一个子项目,其主要功能如下: ...
- React编写组件的局部样式
我们都知道,在Vue的单文件组件中,style标签中编写的样式默认为全局样式,如果我们想编写局部样式, 使用一个scoped关键字就可以. 那么在React中怎么实现呢? (注: 这种方法必须使用类选 ...
- 证书打印CSS知识点总结
需求: 1.证书内容动态填充: 2.证书背景图不要求打印,只为展示作用: 3.打印内容兼容屏幕分辨率: 实现: <!-- 外层div宽度为背景图片宽 --> <div style=& ...
- Django1.11序列化与反序列化
django序列化与反序列化 from rest_framwork import serializers serializers.ModelSerializer 模型类序列化器,必须依据模型类创建序列 ...
- Vue.js——5.生命周期
Vue的生命周期 创建阶段new Vue1,beforeCreate() 表示在实例没有被创建出来之前会执行它加载data和methods2,caeated() data 和methods被初始化了 ...
- OpenMP笔记(二)
原文:https://www.bearoom.xyz/2019/02/18/openmp2/ OpenMP是由三部分组成的:指令.库函数和环境变量. 一.指令 在C/C++中使用OpenMP需要用到的 ...