Swift 3 and OpenGL on Linux and macOS with GLFW
https://solarianprogrammer.com/2016/11/19/swift-opengl-linux-macos-glfw/
Swift 3 and OpenGL on Linux and macOS with GLFW
Posted on November 19, 2016 by Sol
This is a short article about how to get started with Swift 3 and OpenGL on Linux and macOS. In order to keep the code portable on both operating systems, we’ll use GLFW to create a window with an OpenGL context. Keep in mind that, at time of this writing, Swift can call directly any C library. However, if you need to use a C++ library you will need to write a C wrapper around it, because Swift 3 is not interoperable with C++.
As a practical example, we’ll use OpenGL to draw a yellow rectangle on a red background. In order to keep the code short and as simple as possible, we’ll use the fixed OpenGL functionality. If you want to use modern OpenGL, please check my other OpenGL articles. Replacing the fixed OpenGL functionality from the article example is left as an exercise for the reader. Basically, once you know how to call OpenGL functions from Swift and compile the code, it is just a question of writing supporting code for dealing with shaders, buffers and so on.
macOS prerequisites:
On macOS, first you need to install Xcode from the App Store. Start Xcodeand agree with the license.
Next, install Apple’s Command Line Tools with:
1 xcode-select --install
Once the above is installed, install the Homebrew package manager:
1 /usr/bin/ruby -e "$(curl -fsSL https://raw.githubusercontent.com/Homebrew/install/master/install)"
Next, we’ll use Homebrew to install GLFW:
1 brew install homebrew/versions/glfw3
Ubuntu Linux prerequisites:
If you don’t have latest versions of Swift and Clang installed on your system, check my Getting started with Swift 3 on Linux article.
Next step is to install GLFW:
1 sudo apt install libglfw3-dev libglfw3
Swift OpenGL example
At this point, I assume that you can build and run a Swift code from your Terminal. Assuming that you have a simple Swift program saved as test.swift, this is how you can compile and run the code:
1 swiftc test.swift

2 ./test
In order to use a C function from Swift, we need to let the compiler know the function definition. This can be done using an Objective-C header file. For example, if we want to use GLFW from Swift, we will add the next line in a file ending in .h:
1 #include <GLFW/glfw3.h>
I’ll assume the above line was saved in a file named opengl_includes.h.
Next, we can write our Swift code that uses GLFW and OpenGL functions:
 1 import Foundation

 2

 3 #if os(OSX)

 4 	import OpenGL

 5 #endif

 6

 7 // Initialize GLFW

 8 if(glfwInit() == 0) {

 9 	print("Failed to initialize GLFW! I'm out!")

10 	exit(-1)

11 }

12

13

14 // Open a window and attach an OpenGL context to the window surface

15 guard let window = glfwCreateWindow(600, 600, "OpenGL test - Swift", nil, nil)

16 else {

17 	print("Failed to open a window! I'm out!")

18 	glfwTerminate()

19 	exit(-1)

20 }

21

22 // Set the window context current

23 glfwMakeContextCurrent(window)

24

25 // Print the OpenGL version currently enabled on your machine

26 let version = String(cString: glGetString(UInt32(GL_VERSION)))

27 print(version)

28

29 // Use red to clear the screen

30 glClearColor(1, 0, 0, 1)

31

32 while (glfwWindowShouldClose(window) == 0) {

33 	// Clear the screen (window background)

34 	glClear(UInt32(GL_COLOR_BUFFER_BIT))

35

36 	// Draw a square using the (deprecated) fixed pipeline functionality

37 	glColor3f(1.0, 1.0, 0.0)

38 	glBegin(UInt32(GL_QUADS))

39 	glVertex2f(-0.5, -0.5)

40 	glVertex2f(0.5, -0.5)

41 	glVertex2f(0.5, 0.5)

42 	glVertex2f(-0.5, 0.5)

43 	glEnd()

44

45 	// Swap front and back buffers for the current window

46 	glfwSwapBuffers(window)

47

48 	// Poll for events

49 	glfwPollEvents()

50 }

51

52 // Destroy the window and its context

53 glfwDestroyWindow(window)

54

55 // Terminate GLFW

56 glfwTerminate()
Save the above code as main.swift.
macOS compilation:
At this point, you should have two files opengl_includes.h and main.swift in your current directory. Use the next command to create an executable:
1 xcrun -sdk macosx swiftc main.swift -I /usr/local/include -import-objc-header opengl_includes.h -L /usr/local/lib -lglfw3

2 ./main
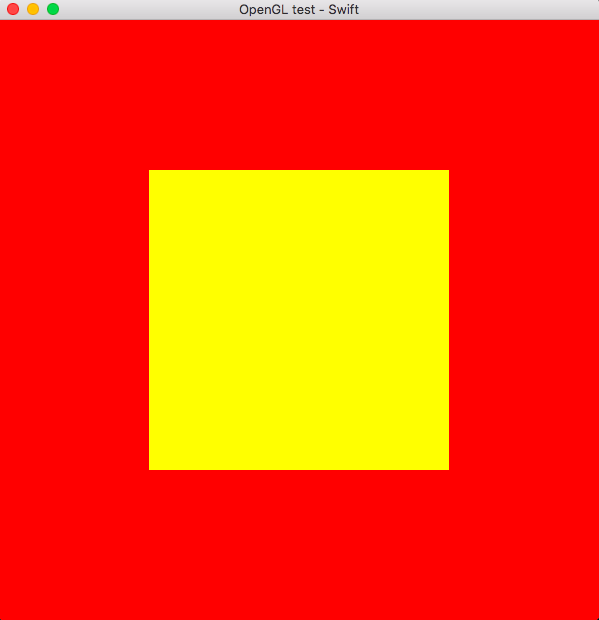
This is what you should see:
Ubuntu Linux compilation
At this point, you should have two files opengl_includes.h and main.swift in your current directory. Use the next command to create an executable:
1 swiftc main.swift -import-objc-header opengl_includes.h -lglfw -lGL

2 ./main
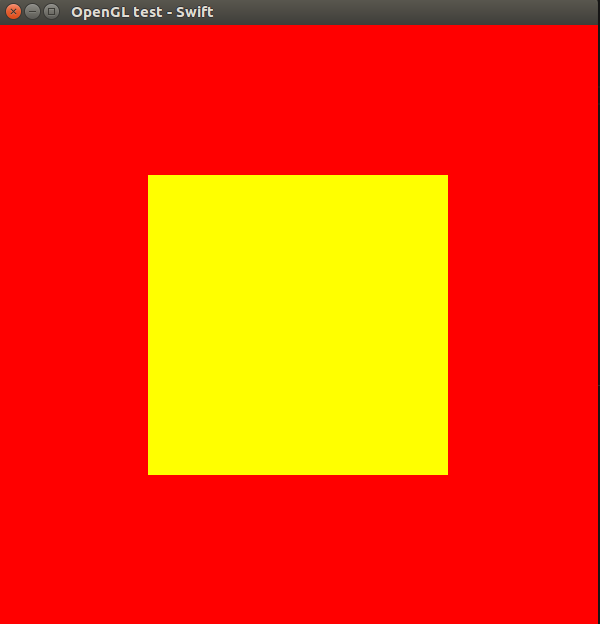
This is what you should see:
If you are interested to learn more about the Swift 3 syntax, I would recommend reading Swift Programming: The Big Nerd Ranch Guide (2nd Edition) by M Mathias, J Gallagher:
If you are interested to learn more about OpenGL, I would recommend reading OpenGL SuperBible by Graham Sellers, Richard S. Wright Jr., Nicholas Haemel:
大概步骤
在终端完成
1.安装
/usr/bin/ruby -e "$(curl -fsSL https://raw.githubusercontent.com/Homebrew/install/master/install)"
2.brew install homebrew/versions/glfw3
3.在任何路径下新建文件 opengl_includes.h main.swift
4.在当前路径下执行
①.xcrun -sdk macosx swiftc main.swift -I /usr/local/include -import-objc-header opengl_includes.h -L /usr/local/lib -lglfw3
②./main
Swift 3 and OpenGL on Linux and macOS with GLFW的更多相关文章
- Vysor破解助手for Linux and macOS
<Vysor Pro破解助手>提供了Windows下的Vysor破解工具,为了使用Linux及macOS同学的方便,最近整理了Linux及macOS版的Vysor破解助手. Linux版V ...
- Vmware中Linux或macOS客户端如何回收硬盘空间
Vmware对于Windows的客户端,使用GUI操作硬盘回收和整理磁盘即可.对于Linux或macOS客户端,需要在安装Vmware Tools之后,在客户端OS的终端Terminal里输入命令进行 ...
- MAVLink Linux/QNX/MacOs Integration Tutorial (UDP)
MAVLink Linux/QNX/MacOs Integration Tutorial (UDP) Overview This program was written to test the udp ...
- 深蓝词库转换2.5发布——支持微软五笔,支持Linux和macOS和更多命令行功能
最近利用晚上的时间,对很久没有新版本发布的深蓝词库转换进行了版本升级.本次升级主要包含的功能包括: 一.支持Win10自带的微软五笔输入法用户自定义短语的导入导出. 1.在转换输入法词库列表中选择“W ...
- [Linux实践] macOS平台Homebrew更新brew update卡死,完美解决
[Linux实践] macOS 平台 Homebrew 更新 brew update 卡死,完美解决 版本2020.01.05 摘要: 使用brew install [软件包]安装软件包时,卡在Upd ...
- OpenGL开发学习指南二(glfw+glad)
版权声明:本文为博主原创文章,未经博主允许不得转载.blog.liujunliang.com.cn https://blog.csdn.net/qq_33747722/article/details/ ...
- 在Mac 上搭建Linux虚拟机--MacOS & VMware10 & CentOS 7
在大型项目开发中, 需要使用Linux下的C语言对工程进行开发, 在个人PC或者工作站上搭建Linux系统十分容易且方便. 本篇文章将介绍操作系统和虚拟机的搭建: 1 操作系统2 虚拟机概念3 Lin ...
- 三类安装VMTools失败的解决方法(Windows、Linux、MacOs)
前言 写这篇笔记的原因,是前几天在虚拟机 Vmware 中重新安装了几个操作系统,突然发现 VMTools 这个工具成了一个特殊的问题,以前还没有发现,因为通常它就给你自动安装了.但是大多数时候也是需 ...
- 安装VMTools失败的三类解决方法(Windows、Linux、MacOs)
前言 写这篇笔记的原因,是前几天在虚拟机 Vmware 中重新安装了几个操作系统,突然发现 VMTools 这个工具成了一个特殊的问题,以前还没有发现,因为通常它就给你自动安装了.但是大多数时候也是需 ...
随机推荐
- js 函数
函数:封装了某一块功能 四要素: 1.返回类型 2.函数名 3.参数列表4.函数体强类型语言 返回类型 函数名 首字母大写 参数列表string(字符串) Show (int a){ 函数体 }弱类型 ...
- Oracle Database 12c Release 1下载安装(自身经历)
1.访问Oracle官网:https://www.oracle.com/index.html,下载Oracle Database 12c Release 1 (注意:File1和File2都要下载!! ...
- Python 判断字符串是否为数字
转载: http://www.runoob.com/python3/python3-check-is-number.html 以下实例通过创建自定义函数 is_number() 方法来判断字符串是否为 ...
- C++ 系列:继承
Copyright © 1900-2016, NORYES, All Rights Reserved. http://www.cnblogs.com/noryes/ 欢迎转载,请保留此版权声明. -- ...
- 重写AgileEAS.NET SOA 中间件平台账号密码的加密算法
一.平台简介 AgileEAS.NET SOA 中间件平台是一款基于基于敏捷并行开发思想和Microsoft .Net构件(组件)开发技术而构建的一个快速开发应用平台.用于帮助中小型软件企业建立一条适 ...
- 【leetcode】Length of Last Word
题目简述 Given a string s consists of upper/lower-case alphabets and empty space characters ' ', return ...
- 在IIS8.5的环境下配置WCF的Restful Service
今天在客户的环境中(Windows Server 2012 R2 + IIS 8.5)搭建Call WCF Restful Service的功能,发现了几个环境配置的问题,记录如下: 1):此环境先安 ...
- 更改conda安装源镜像
为了更好安装包需要制定conda安装包所使用的镜像为中国的镜像,目前为止只有一家提供了镜像 执行conda命令: conda config 会创建conda的配置文件,使用search everyth ...
- Element-ui,Mint-ui
style-loader css-loader style!css 饿了么团队开源一个基于vue 组件库 elementUI PC MintUI 移动端 官网: http://element.elem ...
- JAVA 引入 junit工具框架
我遇到的麻烦 : 开始直接按照视频上的来做,直接也是引入的他上面的jar ,但是我只引入了一个,就是上面的junit-4.4.jar,然后就会报错,会出现,空指针的错误, 后面我又按照网上的教程 这里 ...