【转载】Linux升级NTPD服务器-编译安装ntp-4.2.8p12与配置
【转载】Linux升级NTPD服务器-编译安装ntp-4.2.8p12与配置
1. 系统与软件版本
1.1 系统版本
rhel6.4(Red Hat Enterprise Linux Server release 6.4 (Santiago))
1.2 ntpd软件版本
ntp-4.2.8p12.tar.gz
1.3 下载地址
官方下载地址:http://support.ntp.org/bin/view/Main/SoftwareDownloads
参考文档:http://www.linuxfromscratch.org/blfs/view/svn/basicnet/ntp.html
2. 安装前提
2.1 安装依赖包
# 特别注意:先用命令rpm -qa | grep "gcc/gcc-c++/openssl-devel/ libstdc++* /libcap*"查看本系统是否已经安装有这些软件包,有的话就不需要再次安装!
[root@ntpserver ~]# yum install gcc gcc-c++ openssl-devel libstdc++* libcap*
一般显示输出的话就代表已经安装此软件包了!


2.2 备份旧版本的配置文件
[root@ntpserver ~]# cp -ar /etc/ntp /etc/ntp.bak
[root@ntpserver ~]# cp /etc/ntp.conf /etc/ntp.conf.bak
[root@ntpserver ~]# cp /etc/init.d/ntpd /etc/init.d/ntpd.bak
[root@ntpserver ~]# cp /etc/sysconfig/ntpd /etc/sysconfig/ntpd.bak
[root@ntpserver ~]# cp /etc/sysconfig/ntpdate /etc/sysconfig/ntpdate.bak
2.3 卸载yum安装的ntpd服务
[root@ntpserver ~]# yum erase ntp ntpdate
3. 编译安装ntp-4.2.8p9
3.1 创建/var/lib/ntp目录
[root@ntpserver ~]# install -v -m710 -o ntp -g ntp -d /var/lib/ntp
3.2 编译安装ntpd
# 这里要特别注意编译安装的命令格式:
[root@ntpserver ntp-4.2.8p9]# ./configure \--prefix=/usr \--bindir=/usr/sbin \--sysconfdir=/etc \--enable-linuxcaps \--with-lineeditlibs=readline \--docdir=/usr/share/doc/ntp-4.2.8p9 \--enable-all-clocks \--enable-parse-clocks \--enable-clockctl
[root@ntpserver ntp-4.2.8p9]# make && make install
4. 创建配置文件
[root@ntpserver ~]# cp /etc/init.d/ntpd.bak /etc/init.d/ntpd
[root@ntpserver ~]# cp /etc/sysconfig/ntpd.bak /etc/sysconfig/ntpd
[root@ntpserver ~]# cp /etc/sysconfig/ntpdate.bak /etc/sysconfig/ntpdate
[root@ntpserver ~]# mv /etc/ntp.bak /etc/ntp
[root@ntpserver ~]# cp /etc/ntp.conf.bak /etc/ntp.conf
5. 配置ntp.conf
在/etc/ntp.conf配置文件添加以下参数
server 127.127.1.0 # 这里以自己为ntpserver测试
fudge 127.127.1.0 stratum 10
下面是实际生产中的例子:

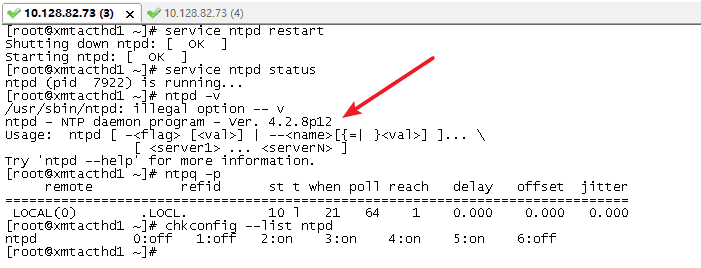
启动/重启ntpd服务
[root@ntpserver ~]# service ntpd start/restart
检查ntp服务是否开机启动,将其设置为开机启动。
[root@localhost ~]# chkconfig --list ntpd
ntpd 0:off 1:off 2:off 3:off 4:off 5:off 6:off
[root@localhost ~]# runlevel
N 3
[root@localhost ~]# chkconfig ntpd on #在运行级别2、3、4、5上设置为自动运行
[root@localhost ~]# chkconfig --list ntpd
ntpd 0:off 1:off 2:on 3:on 4:on 5:on 6:off
# 最后查看ntpd的版本,重启系统,验证服务:
6. 客户端配置
[root@localhost ~]# date
Sat Aug 8 08:08:13 CST 2015
/etc/ntp.conf添加服务端IP地址
server 10.17.83.106
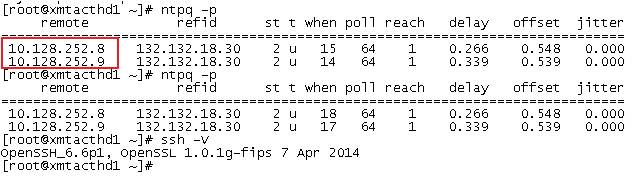
[root@localhost ~]# ntpq -p
remote refid st t when poll reach delay offset jitter
==============================================================================
10.17.83.106 10.17.82.25 12 u 3 64 1 0.628 4279381 0.001
等待几分钟,ntpd客户端自动去同步服务端的时间
[root@localhost ~]# date
Sat Aug 8 08:11:10 CST 2015
[root@localhost ~]# dat
Thu Dec 15 15:28:41 CST 2016
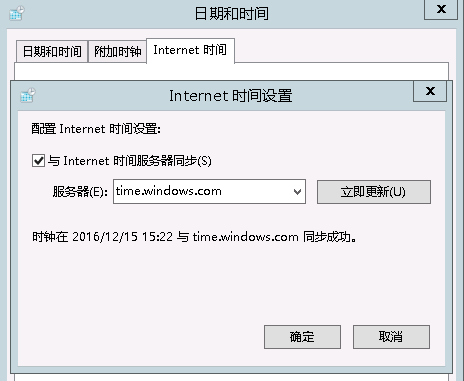
Windows客户端配置


【转载】Linux升级NTPD服务器-编译安装ntp-4.2.8p12与配置的更多相关文章
- Linux下指定版本编译安装LAMP
说明: 操作系统:CentOS 6.5 64位 需求: 编译安装LAMP运行环境 各软件版本如下: MySQL:mysql-5.1.73 Apache:httpd-2.2.31 PHP:php-5.2 ...
- Linux 从源码编译安装 OpenSSH
https://blog.csdn.net/bytxl/article/details/46639073 Linux 从源码编译安装 OpenSSH以及各问题解决 2015年06月25日 17:37: ...
- Linux 从源码编译安装 Nginx
Nginx 是一个高性能的 HTTP 和 反向代理服务器,也是一个 IMAP/POP3/SMTP 代理服务器.Nginx 编译安装比较简单,难点在于配置.下面是 Nignx 0.8.54 编译安装和简 ...
- PCL库在Linux环境下的编译安装
PCL库在Linux环境下的编译安装 PCL库的源码库:https://github.com/PointCloudLibrary/pcl 下载完了之后解压下来 编译库的几个步骤 mkdir build ...
- linux下源码编译安装mysql
1.安装依赖的包: yum install -y gdb cmake ncurses-devel bison bison-devel 2.创建mysql安装目录和数据文件目录 mkdir -p /us ...
- 2020ubuntu1804server编译安装redis5笔记(二)配置redis
前一篇笔记记录了ubuntu1804server编译安装redis5,接下来要配置redis5了 网址:https://www.cnblogs.com/qumogu/p/12435694.html 第 ...
- linux软件管理之------编译安装nginx服务器并手动编写自动化运行脚本
红帽系列的 linux软件管理分为三类:1. rpm 安装软件.2. yum 安装软件.3. 源码包编译安装.前面两种会在相关专题给出详细讲解.源码包的编译安装是非常关键的,我们知道linux的相关版 ...
- Linux 下源码编译安装 vim 8.1
前言 目前 linux 的各个发行版基本上都是带了一个 vi 编辑器的,而本文要说的 vim 编辑器对 vi 做了一些优化升级,更好用.当我们需要远程操作一台 linux 服务器的时候,只能使用命令行 ...
- 在Linux下源码编译安装GreatSQL/MySQL
欢迎来到 GreatSQL社区分享的MySQL技术文章,如有疑问或想学习的内容,可以在下方评论区留言,看到后会进行解答 GreatSQL社区原创内容未经授权不得随意使用,转载请联系小编并注明来源. 本 ...
随机推荐
- npm ERR! code ENOENT (未找到文件 error no entry)
问题: ENOENT一般是没找到文件或路径,包括因为权限问题没找到的情况 解决: 我这个是 目录选择错了 其他:
- windows平台下获取网卡MAC地址、硬盘序列号、主板序列号、CPU ID、BIOS序列号
转自http://blog.csdn.net/jhqin/article/details/5548656,如有侵权,请联系本人删除,谢谢!! 头文件:WMI_DeviceQuery.h /* ---- ...
- Sonar安装-Linux[20171227]
前言 一款不错的代码质量管理工具Sonar 前期准备 官方参考文档 https://docs.sonarqube.org/display/SONAR/Documentation ...
- angular、angular2、vue的生命周期
angular生命周期是什么 1.Angular每个组件都存在一个生命周期,从创建,变更到销毁.Angular提供组件生命周期钩子,把这些关键时刻暴露出来,赋予在这些关键结点和组件进行交互的能力,掌握 ...
- php GD 圆图 -处理成圆图片
<?php /** * 处理成圆图片,如果图片不是正方形就取最小边的圆半径,从左边开始剪切成圆形 * @param string $imgpath [description] * @return ...
- 【Js】JSON对象、JSON字符的使用总结
JSON对象 / JSON字符串区别 抛出一个最常见的疑问:什么是“JSON对象”,什么是“JSON字符串”,它俩的区别是什么? 废话不多说,直接上代码. 1.JSON对象: // javascrip ...
- Redis缓存数据库的安装与配置(3)
3 Redis主动同步设置方法 Redis主从同步 1.Redis主从同步特点 一个master可以拥有多个slave 多个slave可以连接同一个master,还可以连接到其他slave 主从复制不 ...
- stm32+lwip(四):网页服务器测试
我是卓波,很高兴你来看我的博客. 系列文章: stm32+lwip(一):使用STM32CubeMX生成项目 stm32+lwip(二):UDP测试 stm32+lwip(三):TCP测试 stm32 ...
- requests模块基础
requests模块 .caret, .dropup > .btn > .caret { border-top-color: #000 !important; } .label { bor ...
- poj2230 欧拉回路
http://poj.org/problem?id=2230 Description Bessie's been appointed the new watch-cow for the farm. E ...