UI-10-plist文件及UITableView的高级应用①
课程要点:
- plist文件的新建与读取
- 给UITableView设置变化的值
- 单元格的删除、插入及刷新
plist文件的新建与读取
新建plist
Commadn+N,iOS->Resouce->Property List


plist文件还有另外一种展现形式
右键plist文件,open as->Property List就是上面显示的这种方式来展现, open as->source Code 就是下面这种方式来展现
这种形式下我可以通过改变代码或者增加代码给plist修改或增加数据。
读取plist数据
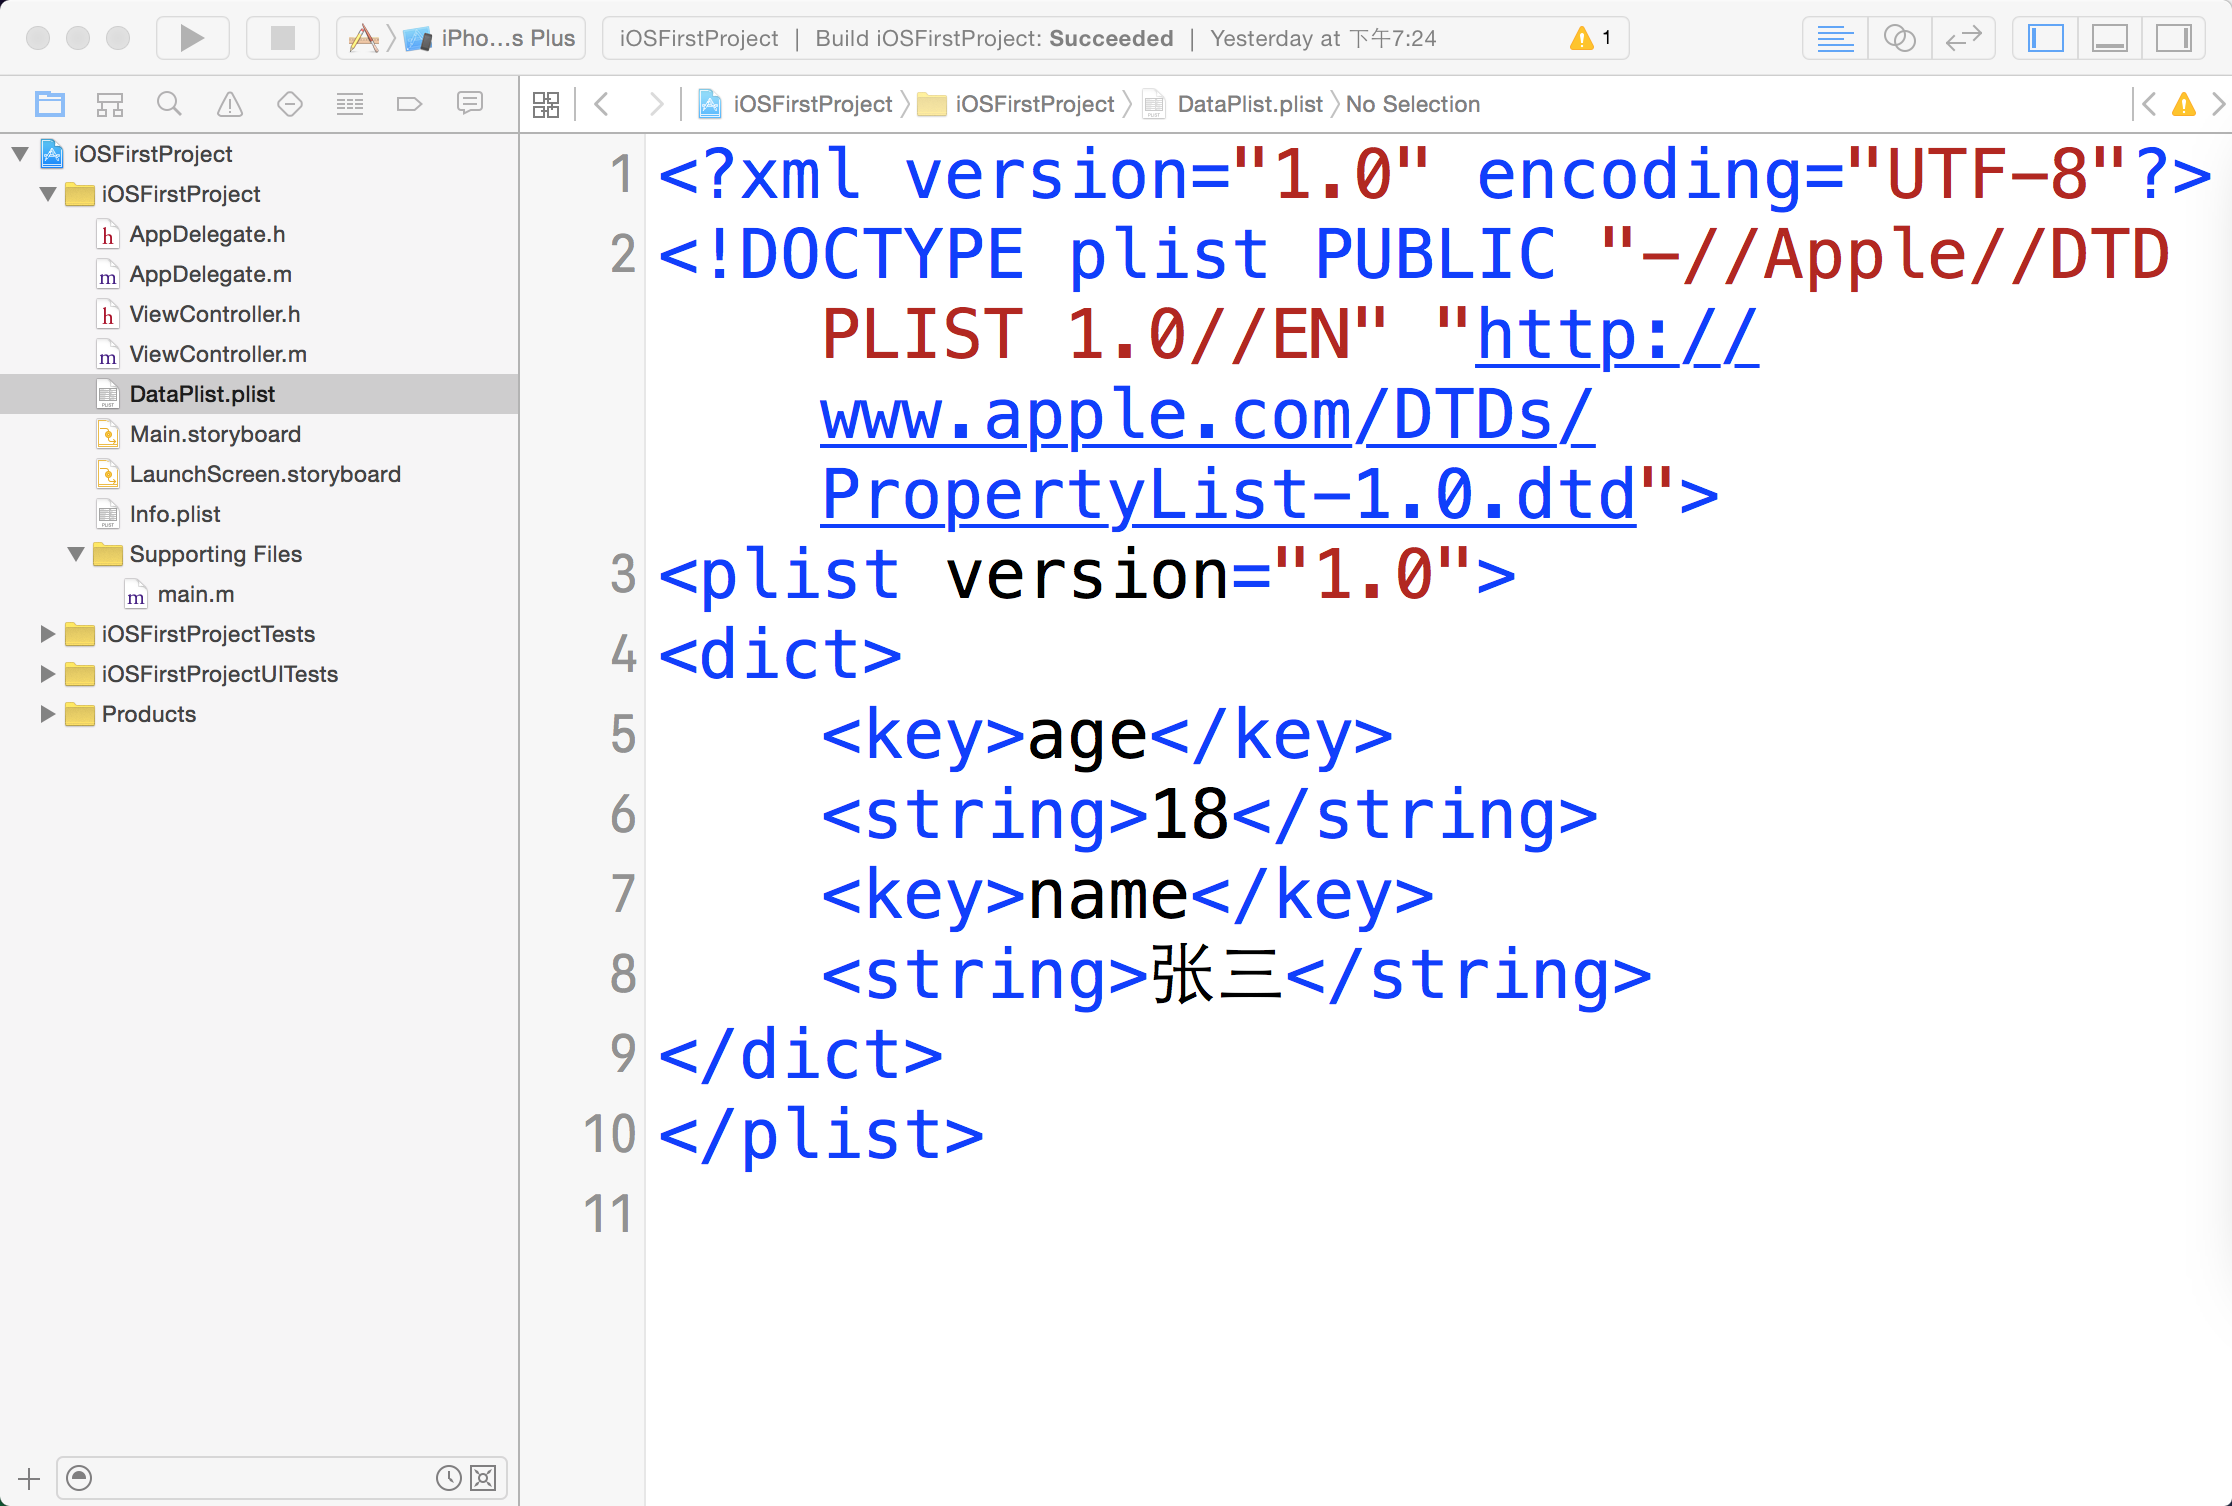
为了咱们的数据统一,我把我的plist里的代码留下。
<?xml version="1.0" encoding="UTF-8"?>

<!DOCTYPE plist PUBLIC "-//Apple//DTD PLIST 1.0//EN" "http://www.apple.com/DTDs/PropertyList-1.0.dtd">

<plist version="1.0">

<dict>

    <key>DataArray</key>

    <array>

        <dict>

            <key>age</key>

            <integer>16</integer>

            <key>name</key>

            <string>王五</string>

        </dict>

        <dict>

            <key>name</key>

            <string>张三</string>

            <key>age</key>

            <integer>18</integer>

        </dict>

        <dict>

            <key>name</key>

            <string>李四</string>

            <key>age</key>

            <integer>19</integer>

        </dict>

        <dict>

            <key>age</key>

            <integer>16</integer>

            <key>name</key>

            <string>赵六</string>

        </dict>

    </array>

</dict>

</plist>
读取plist文件分两步
1、找到plist文件在boundle中的路径,
2、使用字典读取该文件
boundles:iOS的应用都是通过bundle进行封装的,对应的bundle类型是Application类型,平时我们通过XCode编译出来的Target(即我们开发的应用),其实就是一个Application类型bundle,即一个文件夹!
    //获取到新建plist文件的路径。 第一个参数是文件的名字 第二个参数是文件的后缀
    NSString *path = [[NSBundle mainBundle] pathForResource:@"DataPlist" ofType:@"plist"];

    //通过字典获取到plist文件的内容(plist文件的最顶层是字典)

    NSDictionary *dict = [[NSDictionary alloc]initWithContentsOfFile:path];

    //输出内容

    NSLog(@"数据=%@",dict);
运行后控制台输出:
[7713:503574] 数据={

    DataArray =     (

                {

            age = 16;

            name = "\U738b\U4e94";

        },

                {

            age = 18;

            name = "\U5f20\U4e09";

        },

                {

            age = 19;

            name = "\U674e\U56db";

        },

                {

            age = 16;

            name = "\U8d75\U516d";

        }

    );

}
获取到plist文件中的DataArray数组。
    //通过mutableCopy将不可变数组,转变为可变数组
    NSMutableArray *dataArray = [dict[@"DataArray"] mutableCopy];

    NSLog(@"DataArray=%@",dataArray);
给UITableView设置变化的值
//

//  ViewController.m

//  Plist文件以及cell的增加与删除

//

//  Created by 王立广 on 15/12/14.

//  Copyright © 2015年 王立广. All rights reserved.

//

#import "ViewController.h"

@interface ViewController ()<UITableViewDataSource,UITableViewDelegate>

{

    //UITableView的数据源

    NSMutableArray *dataArray;

    UITableView *_tableView;

}

@end

@implementation ViewController

- (void)viewDidLoad {

    [super viewDidLoad];

    //获取到plist文件路径

    NSString *path = [[NSBundle mainBundle] pathForResource:@"DataPlist" ofType:@"plist"];

    //通过字典获取到plist文件中的字典

    NSDictionary *dict = [[NSDictionary alloc]initWithContentsOfFile:path];

    NSLog(@"数据=%@",dict);

    //将plist文件中的数组赋值给工程中的数据源数组

    dataArray = [dict[@"DataArray"] mutableCopy];

    _tableView = [[UITableView alloc]initWithFrame:CGRectMake(, , , ) style:UITableViewStylePlain];

    _tableView.delegate = self;

    _tableView.dataSource = self;

    _tableView.backgroundColor = [UIColor grayColor];

    [self.view addSubview:_tableView];

}

//给tableView设置行数

- (NSInteger)tableView:(UITableView *)tableView numberOfRowsInSection:(NSInteger)section{

    //数据源数组里面有几个元素,里面就有几行

    return dataArray.count;

}

//每次将要显示cell,就会调用这个方法,在这个方法内设置一个cell并返回就会就将cell放到tableView上面,

- (UITableViewCell *)tableView:(UITableView *)tableView cellForRowAtIndexPath:(NSIndexPath *)indexPath{

    /*

     * 这个方法会传进来两个参数

     * tableView:就是咱们正在操作的tableView

     * indexPath:这个值有两个属性section和row,分别标明这个cell位于第几段第几行

     */

    static NSString *cellID = @"cellID";

    UITableViewCell *cell = [tableView dequeueReusableCellWithIdentifier:cellID];

    if (cell == nil) {

        cell = [[UITableViewCell alloc]initWithStyle:UITableViewCellStyleSubtitle reuseIdentifier:cellID];

    }

    cell.backgroundColor = [UIColor yellowColor];

    //利用传进来的indexpath参数,来分别取数组里相应的字典,在通过key值得到咱们真正需要的数据

    cell.textLabel.text = dataArray[indexPath.row][@"name"];

    cell.detailTextLabel.text = [dataArray[indexPath.row][@"age"] stringValue];

    return cell;

}

@end
单元格的删除、插入及刷新
UITableView有两种模式
1、正常模式
2、编辑模式
  1)插入状态
  2)删除状态

左边是正常模式,中间是编辑模式下的删除状态,只要点击红色的减号,单元格右边就会出现删除按钮,如第三张图片所示。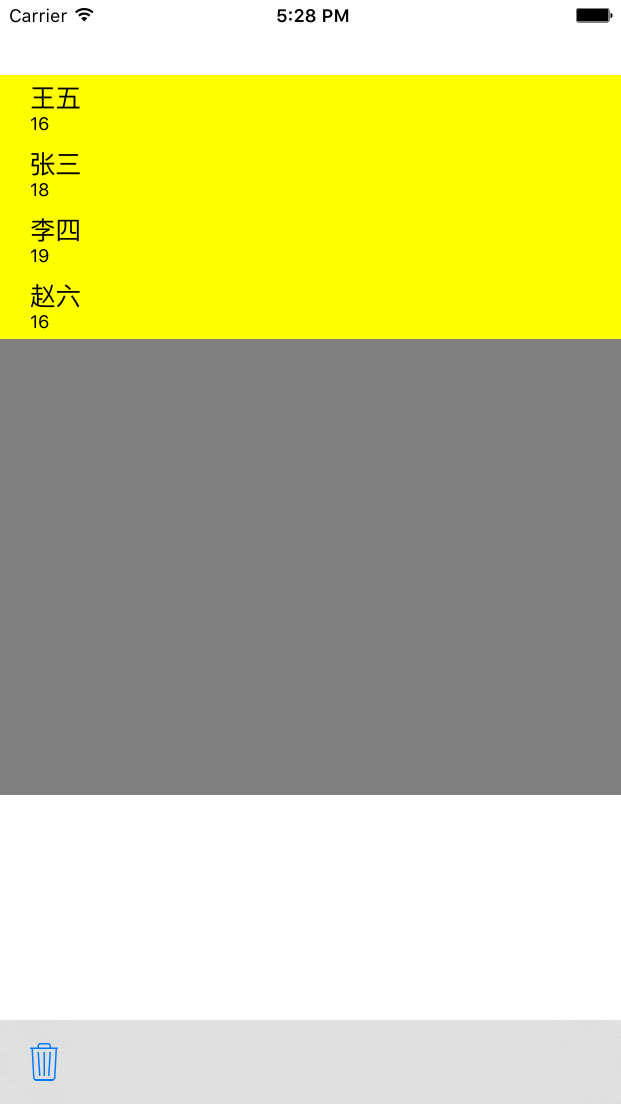
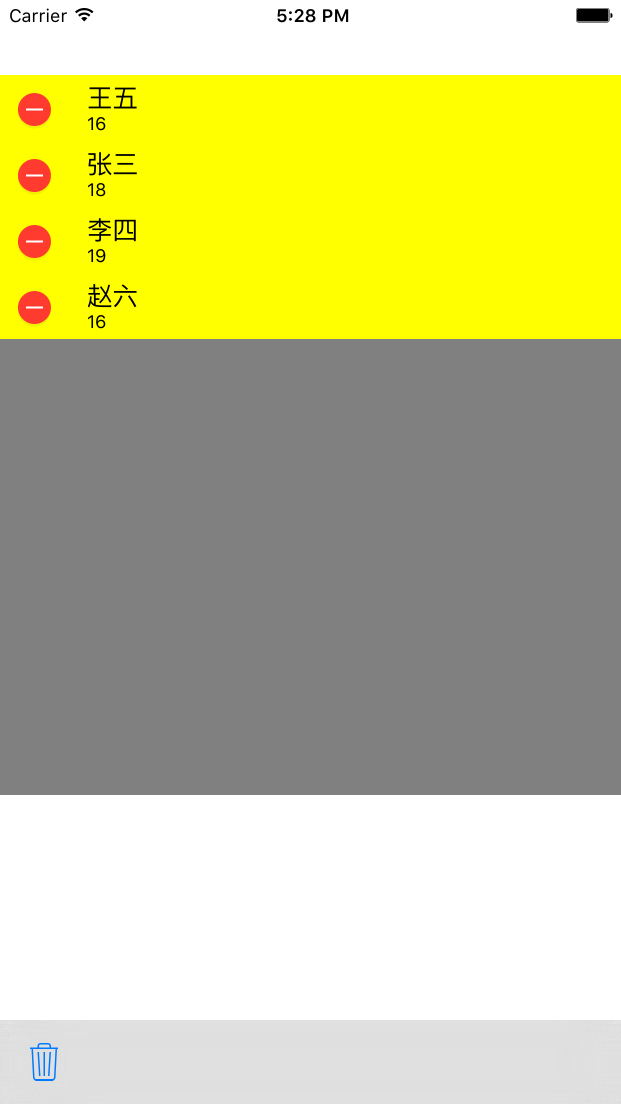

1、获取到tableView编译模式,tableView是UITableView的一个对象
tableView.iSEditing
2、给tableVIew设置编辑模式
[tableView setEditing:YES animated:YES];
3、只要进入编辑模式,系统就会自动调用这个方法来询问是要进入编辑模式下的删除状态还是插入状态。如果不实现这个方法,系统默认是删除状态。
- (UITableViewCellEditingStyle)tableView:(UITableView *)tableView editingStyleForRowAtIndexPath:(NSIndexPath *)indexPath{

    //这两种你可以都试试,看一下效果,但最终要选择删除模式,

    return UITableViewCellEditingStyleDelete;

//    return UITableViewCellEditingStyleInsert;

}
4、进入编辑模式后,通过上面的代理方法进入相应的状态,此时不管你点击的是删除按钮还是插入按钮,都会进入下面这个方法。实现这个方法直接右划也可以出现右边的删除按钮
- (void)tableView:(UITableView *)tableView commitEditingStyle:(UITableViewCellEditingStyle)editingStyle forRowAtIndexPath:(NSIndexPath *)indexPath{

    /*

        如果点击的是删除按钮,editingStyle参数就是UITableViewCellEditingStyleDelete

        如果点击的是插入按钮,editingStyle参数就是UITableViewCellEditingStyleInsert

        indexPath:能够获得你点击是哪一行哪一段。

     */

    //通过判断你点击的是删除还是插入做不同的操作

    if (editingStyle == UITableViewCellEditingStyleDelete) {

        //删除dataArray中相应cell的数据

        [dataArray removeObjectAtIndex:indexPath.row];

        //删除cell

        [tableView deleteRowsAtIndexPaths:@[indexPath]withRowAnimation:UITableViewRowAnimationTop];

    }else if (editingStyle == UITableViewCellEditingStyleInsert){

        NSMutableDictionary *tempDict = [NSMutableDictionary dictionary];
tempDict[@"name"] = @"小闪";
        tempDict[@"age"] = @(18);

        //在数据源数组中增加一个字典
[dataArray insertObject:tempDict atIndex:indexPath.row];
//插入一个cell
[tableView insertRowsAtIndexPaths:@[indexPath] withRowAnimation:UITableViewRowAnimationBottom];
    }

}
完整代码如下:
//

//  ViewController.m

//  Plist文件以及cell的增加与删除

//

//  Created by 王立广 on 15/12/14.

//  Copyright © 2015年 王立广. All rights reserved.

//

#import "ViewController.h"

@interface ViewController ()<UITableViewDataSource,UITableViewDelegate>

{

    //UITableView的数据源

    NSMutableArray *dataArray;

    UITableView *_tableView;

}

@end

@implementation ViewController

- (void)viewDidLoad {

    [super viewDidLoad];

    //获取到plist文件路径

    NSString *path = [[NSBundle mainBundle] pathForResource:@"DataPlist" ofType:@"plist"];

    //通过字典获取到plist文件中的字典

    NSDictionary *dict = [[NSDictionary alloc]initWithContentsOfFile:path];

    NSLog(@"数据=%@",dict[@"DataArray"][][@"name"]);

    //将plist文件中的数组赋值给工程中的数据源数组

    dataArray = [dict[@"DataArray"] mutableCopy];

    _tableView = [[UITableView alloc]initWithFrame:CGRectMake(, , , ) style:UITableViewStylePlain];

    _tableView.delegate = self;

    _tableView.dataSource = self;

    _tableView.backgroundColor = [UIColor grayColor];

    [self.view addSubview:_tableView];

    //在底部添加toolBar

    UIToolbar *toolBar = [[UIToolbar alloc]initWithFrame:CGRectMake(, , , )];

    toolBar.backgroundColor = [UIColor grayColor];

    [self.view addSubview:toolBar];

    UIBarButtonItem *trash = [[UIBarButtonItem alloc]initWithBarButtonSystemItem:UIBarButtonSystemItemTrash target:self action:@selector(trash)];

    //在toolBar上面加一个删除按钮

    toolBar.items = @[trash];

}

- (void)trash{

    //tableView.iSEditing获得tableView是否属于编辑模式,通过取反来改变tableView的编辑模式

    BOOL kbool = !_tableView.isEditing;

    // tableView setEditing给tableView设置编辑模式

    [_tableView setEditing:kbool animated:YES];

}

//只要进入编辑模式,系统就会自动调用这个方法来询问是要进入编辑模式下的删除状态还是插入状态。如果不实现这个方法,系统默认是删除状态。

- (UITableViewCellEditingStyle)tableView:(UITableView *)tableView editingStyleForRowAtIndexPath:(NSIndexPath *)indexPath{

    //这两种你可以都试试,看一下效果

    return UITableViewCellEditingStyleDelete;

//    return UITableViewCellEditingStyleInsert;

}

//进入编辑模式后,通过上面的代理方法进入相应的状态,此时不管你点击的是删除按钮还是插入按钮,都会进入下面这个方法。实现这个方法直接右划也可以出现右边的删除按钮
- (void)tableView:(UITableView *)tableView commitEditingStyle:(UITableViewCellEditingStyle)editingStyle forRowAtIndexPath:(NSIndexPath *)indexPath{

    /*

        如果点击的是删除按钮,editingStyle参数就是UITableViewCellEditingStyleDelete

        如果点击的是插入按钮,editingStyle参数就是UITableViewCellEditingStyleInsert

        indexPath:能够获得你点击是哪一行哪一段。

     */

    //通过判断你点击的是删除还是插入做不同的操作

    if (editingStyle == UITableViewCellEditingStyleDelete) {

        //删除dataArray中相应cell的数据

        [dataArray removeObjectAtIndex:indexPath.row];
//删除cell时,没有执行cellForRowAtIndexPath方法
        [tableView deleteRowsAtIndexPaths:@[indexPath]withRowAnimation:UITableViewRowAnimationTop];

    }else if (editingStyle == UITableViewCellEditingStyleInsert){

        NSMutableDictionary *tempDict = [NSMutableDictionary dictionary];
tempDict[@"name"] = @"小闪";
tempDict[@"age"] = @(18);
//在数据源数组中增加一个字典
       [dataArray insertObject:tempDict atIndex:indexPath.row];

        //插入一个cell
[tableView insertRowsAtIndexPaths:@[indexPath] withRowAnimation:UITableViewRowAnimationBottom];
   }

}

//给tableView设置行数

- (NSInteger)tableView:(UITableView *)tableView numberOfRowsInSection:(NSInteger)section{

    //数据源数组里面有几个元素,里面就有几行

    return dataArray.count;

}

//每次将要显示cell,就会调用这个方法,在这个方法内设置一个cell并返回就会就将cell放到tableView上面,

- (UITableViewCell *)tableView:(UITableView *)tableView cellForRowAtIndexPath:(NSIndexPath *)indexPath{

    //用static修饰的变量只会初始化一次。

    static NSString *cellID = @"cellID";

    /*

     * 这个方法会传进来两个参数

     * tableView:就是咱们正在操作的tableView

     * indexPath:这个值有两个属性section和row,分别标明这个cell位于第几段第几行

     */

    UITableViewCell *cell = [tableView dequeueReusableCellWithIdentifier:cellID];

    if (cell == nil) {

        cell = [[UITableViewCell alloc]initWithStyle:UITableViewCellStyleSubtitle reuseIdentifier:cellID];

    }

    cell.backgroundColor = [UIColor yellowColor];

    cell.textLabel.text = dataArray[indexPath.row][@"name"];

    cell.detailTextLabel.text = [dataArray[indexPath.row][@"age"] stringValue];

    return cell;

}

@end
PS:咱们在删除cell的同时也在数组中删除了cell所对应的数据。并没有删除plist文件中的内容。

 单元格的刷新

 改动有三:
 1、将存放plist数据的字典设置为全局变量
 2、在toolBar上新增了一个refresh按钮
 3、在refresh按钮的触发方法里,重新给数据源数组赋值,然后使用UITableView的reloadData方法刷新表格。
  PS:reloadData刷新的意思是tableView的所有代理方法重走。重新计算多少行,重新设置cell等等。。。。
//

//  ViewController.m

//  Plist文件以及cell的增加与删除

//

//  Created by 王立广 on 15/12/14.

//  Copyright © 2015年 王立广. All rights reserved.

//

#import "ViewController.h"

@interface ViewController ()<UITableViewDataSource,UITableViewDelegate>

{

    //UITableView的数据源

    NSMutableArray *dataArray;

    UITableView *_tableView;

    //从plist文件中取出来的字典

    NSDictionary *dict;

}

@end

@implementation ViewController

- (void)viewDidLoad {

    [super viewDidLoad];

    //获取到plist文件路径

    NSString *path = [[NSBundle mainBundle] pathForResource:@"DataPlist" ofType:@"plist"];

    //通过字典获取到plist文件中的字典

    dict = [[NSDictionary alloc]initWithContentsOfFile:path];

    NSLog(@"数据=%@",dict[@"DataArray"][][@"name"]);

    //将plist文件中的数组赋值给工程中的数据源数组

    dataArray = [dict[@"DataArray"] mutableCopy];

    _tableView = [[UITableView alloc]initWithFrame:CGRectMake(, , , ) style:UITableViewStylePlain];

    _tableView.delegate = self;

    _tableView.dataSource = self;

    _tableView.backgroundColor = [UIColor grayColor];

    [self.view addSubview:_tableView];

    //在底部添加toolBar

    UIToolbar *toolBar = [[UIToolbar alloc]initWithFrame:CGRectMake(, , , )];

    toolBar.backgroundColor = [UIColor grayColor];

    [self.view addSubview:toolBar];

    UIBarButtonItem *trash = [[UIBarButtonItem alloc]initWithBarButtonSystemItem:UIBarButtonSystemItemTrash target:self action:@selector(trash)];

    UIBarButtonItem *refresh = [[UIBarButtonItem alloc]initWithBarButtonSystemItem:UIBarButtonSystemItemRefresh target:self action:@selector(refresh)];

    //在toolBar上面加一个删除按钮

    toolBar.items = @[trash,refresh];


}

- (void)refresh{

        dataArray = [dict[@"DataArray"] mutableCopy];

        [_tableView reloadData];

}

- (void)trash{

    //tableView.iSEditing获得tableView是否属于编辑模式,通过取反来改变tableView的编辑模式

    BOOL kbool = !_tableView.isEditing;

    // tableView setEditing给tableView设置编辑模式

    [_tableView setEditing:kbool animated:YES];

}

//只要进入编辑模式,系统就会自动调用这个方法来询问是要进入编辑模式下的删除状态还是插入状态。如果不实现这个方法,系统默认是删除状态。

- (UITableViewCellEditingStyle)tableView:(UITableView *)tableView editingStyleForRowAtIndexPath:(NSIndexPath *)indexPath{

    //这两种你可以都试试,看一下效果,

    return UITableViewCellEditingStyleDelete;

//    return UITableViewCellEditingStyleInsert;

}

//进入编辑模式后,通过上面的代理方法进入相应的状态,此时不管你点击的是删除按钮还是插入按钮,都会进入下面这个方法。实现这个方法直接右划也可以出现右边的删除按钮

- (void)tableView:(UITableView *)tableView commitEditingStyle:(UITableViewCellEditingStyle)editingStyle forRowAtIndexPath:(NSIndexPath *)indexPath{

    /*

        如果点击的是删除按钮,editingStyle参数就是UITableViewCellEditingStyleDelete

        如果点击的是插入按钮,editingStyle参数就是UITableViewCellEditingStyleInsert

        indexPath:能够获得你点击是哪一行哪一段。

     */

    //通过判断你点击的是删除还是插入做不同的操作

    if (editingStyle == UITableViewCellEditingStyleDelete) {

        //删除dataArray中相应cell的数据

        [dataArray removeObjectAtIndex:indexPath.row];

        //删除cell时,没有执行cellForRowAtIndexPath方法

        [tableView deleteRowsAtIndexPaths:@[indexPath]withRowAnimation:UITableViewRowAnimationTop];

    }else if (editingStyle == UITableViewCellEditingStyleInsert){

        NSMutableDictionary *tempDict = [NSMutableDictionary dictionary];
tempDict[@"name"] = @"小闪";
        tempDict[@"age"] = @(18);

        //在数据源数组中增加一个字典
[dataArray insertObject:tempDict atIndex:indexPath.row];
        //插入一个cell

         [tableView insertRowsAtIndexPaths:@[indexPath] withRowAnimation:UITableViewRowAnimationBottom];
    }

}

//给tableView设置行数

- (NSInteger)tableView:(UITableView *)tableView numberOfRowsInSection:(NSInteger)section{

    //数据源数组里面有几个元素,里面就有几行

    return dataArray.count;

}

//每次将要显示cell,就会调用这个方法,在这个方法内设置一个cell并返回就会就将cell放到tableView上面,

- (UITableViewCell *)tableView:(UITableView *)tableView cellForRowAtIndexPath:(NSIndexPath *)indexPath{

    //用static修饰的变量只会初始化一次。

    static NSString *cellID = @"cellID";

    /*

     * 这个方法会传进来两个参数

     * tableView:就是咱们正在操作的tableView

     * indexPath:这个值有两个属性section和row,分别标明这个cell位于第几段第几行

     */

    UITableViewCell *cell = [tableView dequeueReusableCellWithIdentifier:cellID];

    if (cell == nil) {

        cell = [[UITableViewCell alloc]initWithStyle:UITableViewCellStyleSubtitle reuseIdentifier:cellID];

    }

    cell.backgroundColor = [UIColor yellowColor];

    cell.textLabel.text = dataArray[indexPath.row][@"name"];

    cell.detailTextLabel.text = [dataArray[indexPath.row][@"age"] stringValue];

    return cell;

}

- (CGFloat)tableView:(UITableView *)tableView heightForRowAtIndexPath:(NSIndexPath *)indexPath{

    return ;

}

@end
UI-10-plist文件及UITableView的高级应用①的更多相关文章
- iOS开发——高级UI&带你玩转UITableView
带你玩装UITableView 在实际iOS开发中UITableView是使用最多,也是最重要的一个控件,如果你不会用它,那别说什么大神了,菜鸟都不如. 其实关于UItableView事非常简单的,实 ...
- iOS开发——UI基础-懒加载,plist文件,字典转模型,自定义view
一.懒加载 只有使用到了商品数组才会创建数组 保证数组只会被创建一次 只要能够保证数组在使用时才创建, 并且只会创建一次, 那么我们就称之为懒加载 lazy - (void)viewDidLoad 控 ...
- UI进阶之--网易彩票手写plist文件,动态创建控制器与tableViewcell
点击右上角设置按钮 点击按钮后发生的事件:1. 控制器的跳转,进入新的控制器.view, 2. 跳转的时候对将要跳转的目标控制的子控件进行了布局.---通过手写plist文件的方式加载 为按钮注册单击 ...
- Swift - .plist文件数据的读取和存储
每次在Xcode中新建一个iOS项目后,都会自己产生一个.plist文件,里面记录项目的一些配置信息.我们也可以自己创建.plist文件来进行数据的存储和读取. .plist文件其实就是一个XML格式 ...
- plist文件的读取和xib加载cell
plist 文件读取 例如在工程里倒入了plist文件 在工程里需要用到plist文件里的信息,就需要把plist文件读取出来. 如程序: -(NSArray *)moreDataArr{ if (! ...
- 解析plist文件(字典里包着数组,数组中又包含字典)
#import "RootTableViewController.h" #import "City.h" @interface RootTableViewCon ...
- (转)IOS之Info.plist文件简介
原文:IOS之Info.plist文件简介 http://www.apkbus.com/android-130240-1-1.html (出处: Android开发论坛 - 安卓开发论坛 - Andr ...
- 数据持久化-Plist文件写入
数据持久化,常见4种:归档,plist文件,sqlite,coreData.今天复习的是plist文件读写. // // ViewController.m // Test_Plist // // Cr ...
- 还原TexturePacker plist 文件以及图片的方法 (切开各小图片)
原地址:http://blog.csdn.net/linuxchen/article/details/16865645 Python 脚本:(来自网络) unpack_plist.py 命令行: py ...
随机推荐
- 【动态规划】【零一背包】CODEVS 1014 装箱问题 2001年NOIP全国联赛普及组
#include<cstdio> #include<algorithm> using namespace std; ],f[]; int main() { scanf(&quo ...
- 开启关闭Centos的自动更新(转)
开启关闭Centos的自动更新 关闭Centos的自动更新,操作记录如下: [root@jwbdb alpha]# chkconfig –list yum-updatesd yum-updatesd ...
- [Eclipse]--Error:The superclass "javax.servlet.http.HttpServlet" was not found on the Java Build Path.
一段时间没用eclipse后,再去打开以前的项目,发现一打开前线标红.查看错误的时候,如下图所示: Error:The superclass "javax.servlet.http.Http ...
- 求一个整数个位数之和 Exercise06_02
import java.util.Scanner; /** * @author 冰樱梦 * 时间:2018年下半年 * 题目:求一个整数个位数之和 * */ public class Exercise ...
- Awesome图标 | 如何在某些编辑软件中使用Font Awesome字体图标
文章目录 Font Awesome 字体图标 在某些编辑软件中使用 Font Awesome 字体图标 Font Awesome 为您提供可缩放矢量图标,它可以被定制大小.颜色.阴影以及任何可以用 C ...
- MySQL第三方客户端工具
如前所述,MySQL是一个基于客户机--服务器的DBMS,因此,为了使用MySQl,你需要有一个客户机软件给MySQL提供要执行的命令.即你需要一个编写和测试MySQL脚本的工具. 1.MySQL命令 ...
- ArcGIS中的多个栅格波段合成一幅影像
此处用到了ArcGIS栅格处理中的Composite Bands工具( Data Management Tools --> Raster --> Raster Processing).具体 ...
- VirtualBox如何增加CentOS根目录容量
1.扩充磁盘容量 单位为M,40000为40G VBoxManage modifyhd centos.vdi --resize 40000 2.指定新的磁盘文件 系统 > 右击 > 设置 ...
- javascript快速入门24--XML基础
XML简介 XML代表Extensible Markup Language(eXtensible Markup Language的缩写,意为可扩展的标记语言).XML 被设计用来传输和存储数据.XML ...
- ubuntu下wine操作usb串口
呃,换成ubuntu后想玩下文曲星,貌似没有linux下的下载工具,只好用wine. 用的是ch340的usb转串口,不得不说ubuntu果然集大成,这些驱动都有了,用minicom设置设备为/dev ...