老男孩Day18作业:后台用户管理
一、作业需求:

1、用户组的增删改查

2、用户增删该查

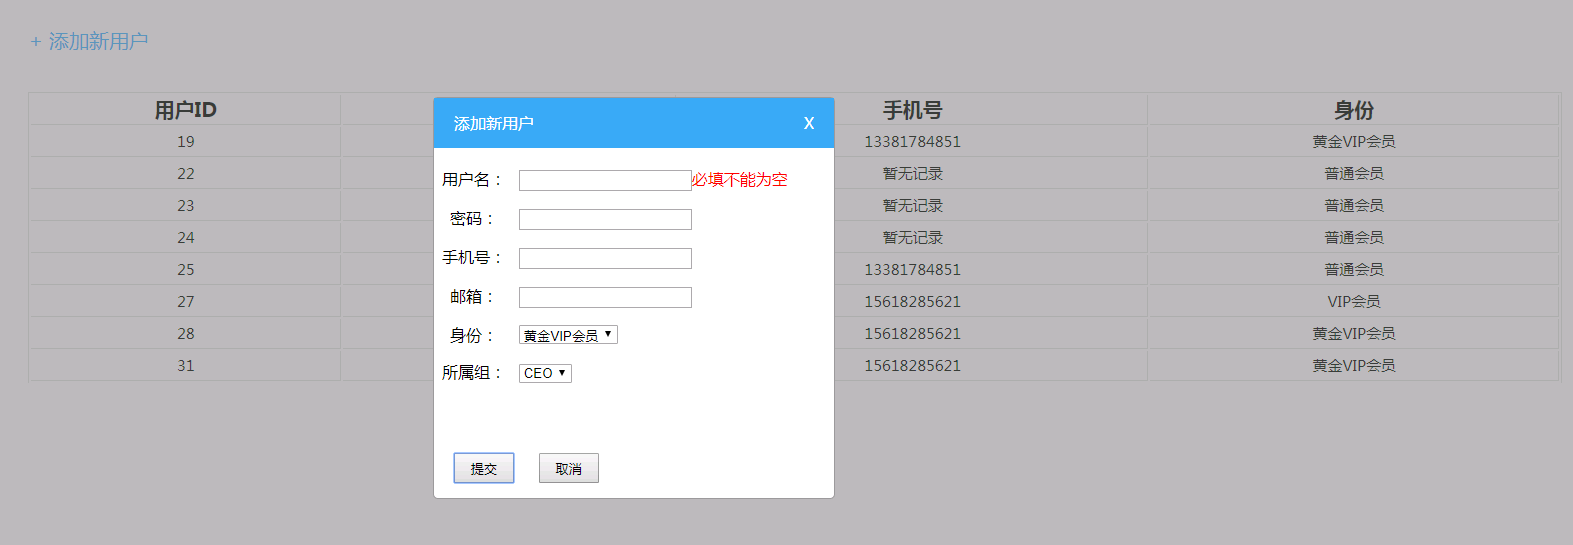
    - 添加必须是对话框

    - 删除必须是对话框

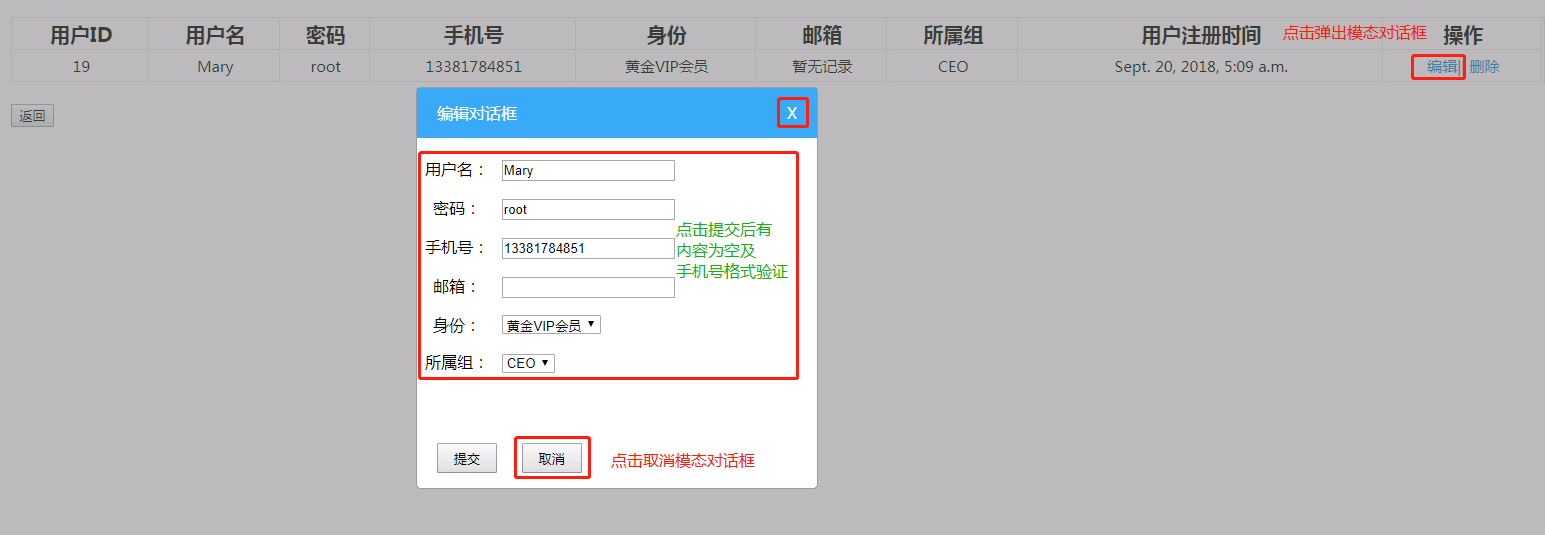
    - 修改,必须显示默认值

3、比较好看的页面

二、博客地址:https://www.cnblogs.com/catepython/p/9682884.html

三、运行环境

操作系统:Win10

Python:3.6.4rcl

Pycharm:2017.3.4

四、功能实现

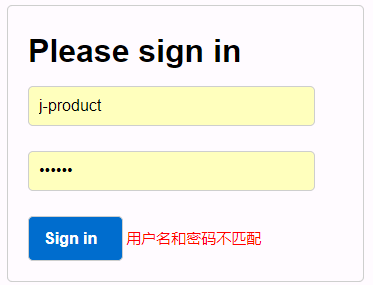
1、完成了后台登录UI、数据交互(判断与验证)接口

2、搭建配置Django框架

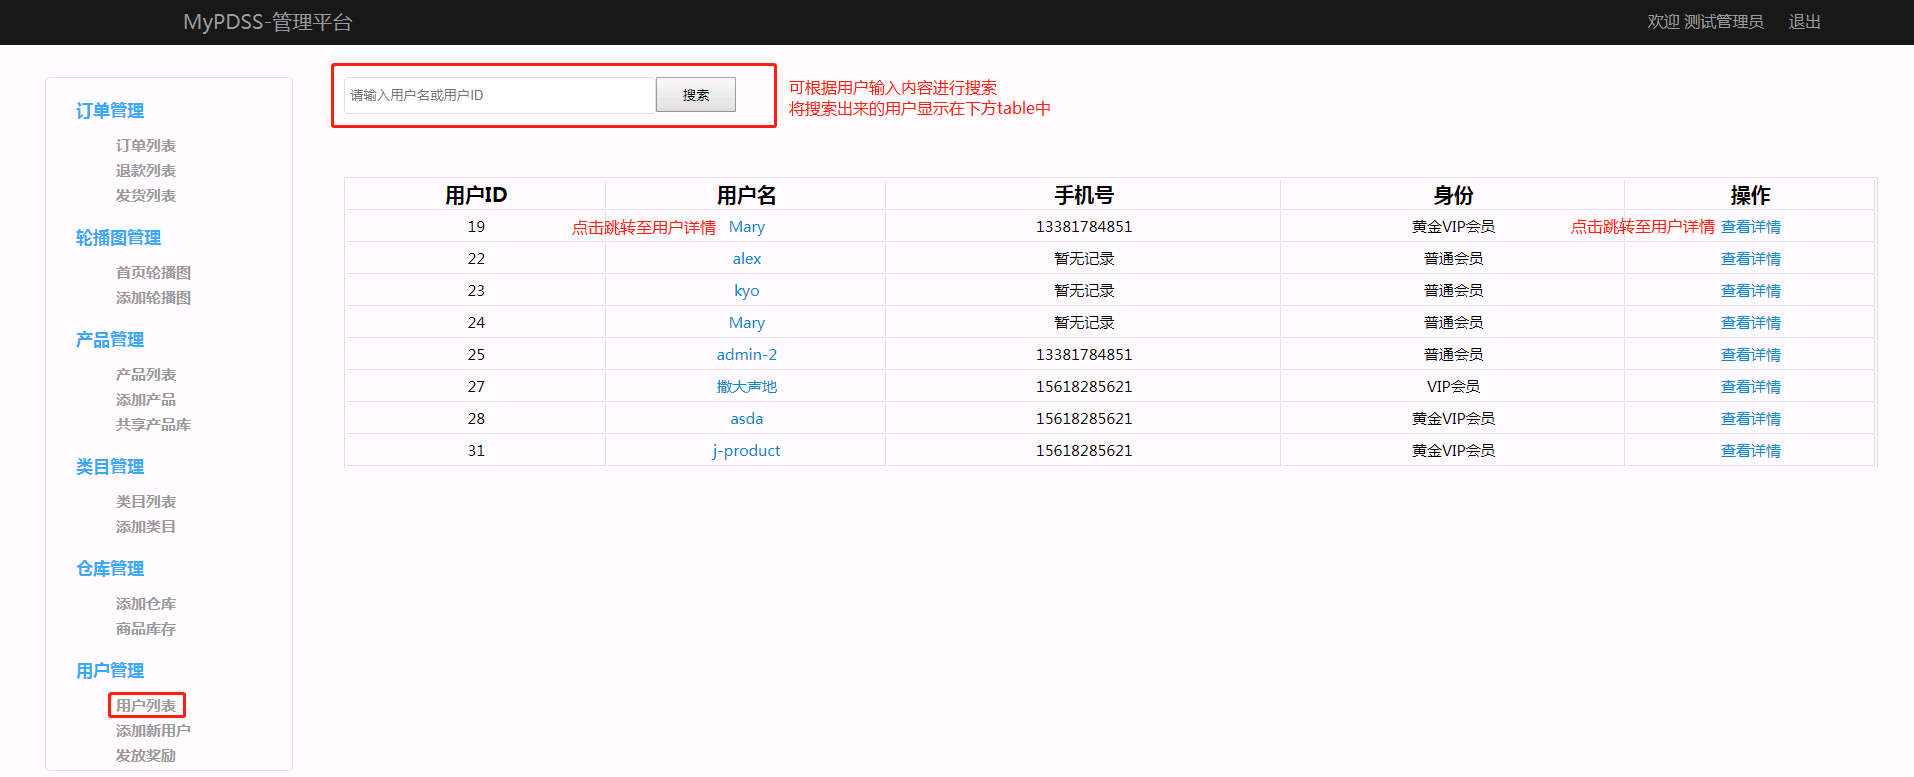
3、后台管理整体页面布局

4、用户管理模块相关功能的实现

5、对用户信息通过后台对数据库操作实现了增删改查

五、测试

1、对各UI的跳转进行功能测试

2、对用户数据的数据接口测试

3、编辑框中对用户输入的信息做了验证和判断

六、备注

通过此次学习和实践

1、掌握了Django框架基础知识

2、对后台页面布局更加的熟练

3、也熟练运用掌握了ORM操作
readme
一、相关知识
1、Django请求生命周期

        -> URL对应关系(匹配) -> 视图函数 -> 返回用户字符串

        -> URL对应关系(匹配) -> 视图函数 -> 打开一个HTML文件,读取内容

    2、创建django projcet

        django-admin startproject mysite

        ..

        mysite

            mysite

                - 配置文件

                - url.py

                - settings.py

        cd mysite

        python manage.py startapp cmdb

        mysite

            mysite

                - 配置文件

                - url.py

                - settings.py

            cmdb

                - views.py

                - admin.py

                - models.py # 创建数据库表

    3、配置

        模板路径

        静态文件路径

        # CSRF

    4、编写程序

        a. url.py

            /index/    ->   func

        b. views.py

            def func(request):

                # 包含所有的请求数据

                ...

                return HttpResponse('字符串')

                return render(request, 'index.html', {''})

                retrun redirect('URL')

        c. 模板语言

            return render(request, 'index.html', {'li': [11,22,33]})

            {% for item in li %}

                <h1>{{item}}</h1>

            {% endfor %}

            ***********  索引用点 **********

            <h2> {{item.0 }} </h2>

一、路由系统,URL

    1、url(r'^index/', views.index),

       url(r'^home/', views.Home.as_view()),

    2、url(r'^detail-(\d+).html', views.detail),

    3、url(r'^detail-(?P<nid>\d+)-(?P<uid>\d+).html', views.detail)

       PS:

            def detail(request, *args,**kwargs):

                pass

       实战:

            a.

                url(r'^detail-(\d+)-(\d+).html', views.detail),

                def func(request, nid, uid):

                    pass

                def func(request, *args):

                    args = (2,9)

                def func(request, *args, **kwargs):

                    args = (2,9)

            b.

                url(r'^detail-(?P<nid>\d+)-(?P<uid>\d+).html', views.detail)

                def func(request, nid, uid):

                    pass

                def funct(request, **kwargs):

                    kwargs = {'nid': 1, 'uid': 3}

                def func(request, *args, **kwargs):

                    args = (2,9)

    4、 name

        对URL路由关系进行命名, ***** 以后可以根据此名称生成自己想要的URL *****

        url(r'^asdfasdfasdf/', views.index, name='i1'),

        url(r'^yug/(\d+)/(\d+)/', views.index, name='i2'),

        url(r'^buy/(?P<pid>\d+)/(?P<nid>\d+)/', views.index, name='i3'),

        def func(request, *args, **kwargs):

            from django.urls import reverse

            url1 = reverse('i1')                              # asdfasdfasdf/

            url2 = reverse('i2', args=(1,2,))                 # yug/1/2/

            url3 = reverse('i3', kwargs={'pid': 1, "nid": 9}) # buy/1/9/

        xxx.html

            {% url "i1" %}               # asdfasdfasdf/

            {% url "i2" 1 2 %}           # yug/1/2/

            {% url "i3" pid=1 nid=9 %}   # buy/1/9/

        注:

            # 当前的URL

            request.path_info

    5、多级路由

        project/urls.py

            from django.conf.urls import url,include

            from django.contrib import admin

            urlpatterns = [

                url(r'^cmdb/', include("app01.urls")),

                url(r'^monitor/', include("app02.urls")),

            ]

        app01/urls.py

            from django.conf.urls import url,include

            from django.contrib import admin

            from app01 import views

            urlpatterns = [

                url(r'^login/', views.login),

            ]

        app02/urls.py

            from django.conf.urls import url,include

            from django.contrib import admin

            from app02 import views

            urlpatterns = [

                url(r'^login/', views.login),

            ]

    6、默认值(欠)

    7、命名空间(欠)

二、视图

    1、获取用户请求数据

        request.GET

        request.POST

        request.FILES

        PS:

            GET:获取数据

            POST:提交数据

    2、checkbox等多选的内容

        request.POST.getlist()

    3、上传文件

        # 上传文件,form标签做特殊设置

        obj = request.FILES.get('fafafa')

        obj.name

        f = open(obj.name, mode='wb')

        for item in obj.chunks():

            f.write(item)

        f.close()

    4、FBV & CBV

       function base view

        url.py

            index -> 函数名

        view.py

            def 函数(request):

                ...

        ====》

        /index/ -> 函数名

        /index/ -> 类

        ====》

        建议:两者都用

    5、装饰器

        欠

三、模板

四、ORM操作

    select * from tb where id > 1

    # 对应关系

    models.tb.objects.filter(id__gt=1)

    models.tb.objects.filter(id=1)

    models.tb.objects.filter(id__lt=1)

    创建类

    a. 先写类

        from django.db import models

        # app01_userinfo

        class UserInfo(models.Model):

            # id列,自增,主键

            # 用户名列,字符串类型,指定长度

            username = models.CharField(max_length=32)

            password = models.CharField(max_length=64)

    b. 注册APP

        INSTALLED_APPS = [

            'django.contrib.admin',

            'django.contrib.auth',

            'django.contrib.contenttypes',

            'django.contrib.sessions',

            'django.contrib.messages',

            'django.contrib.staticfiles',

            'app01',

        ]

    c. 执行命令

        python manage.py  makemigrations

        python manage.py  migrate

    d. ********** 注意 ***********

        Django默认使用MySQLdb模块链接MySQL

        主动修改为pymysql,在project同名文件夹下的__init__文件中添加如下代码即可:

            import pymysql

            pymysql.install_as_MySQLdb()

    1. 根据类自动创建数据库表

        # app下的models.py

        python manage.py  makemigrations

        python manage.py  migrate

        字段:

            字符串类型

            数字

            时间

            二进制

            自增(primary_key=True)

        字段的参数:

            null               -> db是否可以为空

            default            -> 默认值

            primary_key        -> 主键

            db_column          -> 列名

            db_index           -> 索引

            unique               -> 唯一索引

            unique_for_date    ->

            unique_for_month

            unique_for_year

            auto_now           -> 创建时,自动生成时间

            auto_now_add       -> 更新时,自动更新为当前时间

                # obj = UserGroup.objects.filter(id=1).update(caption='CEO')

                # obj = UserGroup.objects.filter(id=1).first()

                # obj.caption = "CEO"

                # obj.save()

            choices              -> django admin中显示下拉框,避免连表查询

            blank             -> django admin是否可以为空

            verbose_name      -> django admin显示字段中文

            editable          -> django admin是否可以被编辑

            error_messages    -> 错误信息欠

            help_text         -> django admin提示

            validators          -> django form ,自定义错误信息(欠)

            创建 Django 用户:python manage.py createsuperuser

    2. 根据类对数据库表中的数据进行各种操作

        一对多:

            a. 外检

            b.

                外键字段_id

            c.

                models.tb.object.create(name='root', user_group_id=1)

            d.

                userlist = models.tb.object.all()

                for row in userlist:

                    row.id

                    row.user_group_id

                    row.user_group.caption
重要笔记
二、程序结构图

三、效果图


四、数据结构


五、核心代码
cmdb/views 主代码逻辑
from django.shortcuts import render

from django.shortcuts import redirect

from django.shortcuts import HttpResponse

from cmdb import models

from django.views import View

# Create your views here.

def login(request):

    '''

    用户登录接口

    :param request:

    :return:

    '''

    mesg = ""

    if request.method == "POST":

        user = request.POST.get("user",None)

        password = request.POST.get("password",None)

        print(user,password)

        result = models.User_admin.objects.filter(user_name = user,password=password).first()

        if result:

            return redirect('/cmdb/home')

        else:

            mesg = "用户名和密码不匹配"

    return render(request,'登录.html',{"error_mesg":mesg})

def home(request):

    '''

    后台管理接口

    :param request:

    :return:

    '''

    return render(request,'后台管理.html')

def user_info(request):

    '''

    用户管理接口

    :param request:

    :return:

    '''

    if request.method == "POST":

        text = request.POST.get("text",None)

        if str(text).isdigit():    #判断text内容是否为整数, 如果是整数就用户ID搜索,如果是字符串就用户名搜索

            text = int(text)

            obj = models.User_admin.objects.filter(user_id=text).all()

            return render(request, "user_info.html", {"obj": obj})

        else:

            obj = models.User_admin.objects.filter(user_name__icontains=text).all()

            return render(request, "user_info.html",{"obj":obj})

    else:

        obj = models.User_admin.objects.all()

        return render(request, "user_info.html",{"obj":obj})

def user_detail(request,nid):

    '''

    用户详情管理接口

    包括用户信息编辑

    :param request:

    :param nid:

    :return:

    '''

    if request.method == "POST":

        user = request.POST.get("username",None)

        pwd = request.POST.get("pwd",None)

        email = request.POST.get("email", None)

        model = request.POST.get("model", None)

        type = request.POST.get("type", None)

        group = request.POST.get("group", None)

        print(user,pwd,email,model,type,group)

        models.User_admin.objects.filter(user_id=nid).update(user_name=user,

                                                                   password=pwd,email=email,model=model,

                                                                   type=type,user_group_id=group)

        return redirect('/cmdb/user_info-%s'%nid)

    else:

        row = models.User_admin.objects.filter(user_id=nid).first()

        return render(request, "user_detail.html",{"row": row})

class User_Delete(View):

    '''

    删除用户接口

    '''

    def dispatch(self, request, *args, **kwargs):

        result = super(User_Delete,self).dispatch(request,*args,**kwargs)

        return result

    def post(self,request,nid):

        models.User_admin.objects.filter(user_id=self.kwargs['nid']).delete()

        return redirect('/cmdb/user_info')

    def get(self,request,nid):

        models.User_admin.objects.filter(user_id=self.kwargs['nid']).delete()

        return redirect('/cmdb/user_info')

class User_Insert(View):

    '''

    添加用户接口

    '''

    def dispatch(self, request, *args, **kwargs):

        result = super(User_Insert,self).dispatch(request,*args,**kwargs)

        return result

    def post(self,request):

        user = request.POST.get("username", None)

        pwd = request.POST.get("pwd", None)

        email = request.POST.get("email", None)

        model = request.POST.get("model", None)

        type = request.POST.get("type", None)

        group = request.POST.get("group", None)

        print(user, pwd, email, model, type, group)

        models.User_admin.objects.create(user_name=user,password=pwd,email=email,model=model,type=type,user_group_id=group)

        return redirect('/cmdb/user_insert')

    def get(self,request):

        obj = models.User_admin.objects.all()

        return render(request, "user_insert.html", {"obj": obj})

def rom(request):

    # models.User_Group.objects.create(group_name="CEO",shop_id=1002)

    # models.User_admin.objects.create(user_name="alex",password = "admin",email='alex@163.com')

    # models.User_admin.objects.create(user_name="kyo", password="admin1")

    # models.User_admin.objects.create(user_name="Mary", password="root")

    # models.User_admin.objects.create(user_name="admin-2", password="admin2")

    # models.User_admin.objects.create(user_name="j-product", password="product")

    # models.User_Group.objects.create(group_name="QA",shop_id=1002)

    return HttpResponse("Rom")
views.py
cmdb/models 数据操作
from django.db import models

# Create your models here.

class User_admin(models.Model):

    '''

    user_admin表数据操作

    '''

    user_id = models.AutoField(primary_key=True)

    user_name = models.CharField(max_length=32)

    password = models.CharField(max_length=64)

    email = models.EmailField(max_length=64)

    model = models.IntegerField(null=True)

    type_choices = (

        (1,"黄金VIP用户"),

        (2, "VIP用户"),

        (3, "普通用户"),

    )

    type = models.IntegerField(choices=type_choices,default=3)

    user_group = models.ForeignKey('User_Group',to_field="group_id",on_delete=models.CASCADE,default=1)  #外键关联user_group表

    create_time = models.DateTimeField(auto_now_add=True)

    update_time = models.DateTimeField(auto_now=True)

class User_Group(models.Model):

    '''

    user_group表数据操作

    '''

    group_id = models.AutoField(primary_key=True)

    group_name = models.CharField(max_length=64)

    shop_id = models.IntegerField(null=True)

    create_time = models.DateTimeField(auto_now_add=True)

    update_time = models.DateTimeField(auto_now=True)
models
cmdb/urls cmdb模块下url路径配置
# -*- coding:utf-8 -*-

# Author:D.Gray

from django.urls import path

from django.conf.urls import url,include

from cmdb import views

urlpatterns = [

    path('login/', views.login),

    path('home/',views.home),

    path('orm/', views.rom),

    path('user_info/', views.user_info),

    url('user_info-(?P<nid>\d+)',views.user_detail),

    url('user_delete-(?P<nid>\d+)',views.User_Delete.as_view(),),

    path('user_insert/', views.User_Insert.as_view(),),

]
urls
六、前端页面
<!DOCTYPE html>

<html lang="en">

<head>

    <meta charset="UTF-8">

    <title>MyPDSS Admin</title>

    <style>

        body{

            margin: 0;

            padding: 0;

            font-family: "Arial","Microsoft YaHei","微软雅黑";

            font-size: 12px;

            line-height: 24px;

            background: #f8f8f8;

            overflow-y: scroll;

        }

        h1, h2, h3, form, img, ul, ol, li, dl, dt, dd, div, span, p {

            padding: 0;

            margin: 0;

            border: 0;

            font-style: normal;

            font-weight: normal;

        }

        .D{

            border: 1px solid #cccccc;

            height: 235px;

            width: 315px;

            margin: 45px auto;

            padding: 20px;

            border-radius: 5px;

        }

        .D h2{

            font-size: 32px;

            line-height: 50px;

            font-weight: bold;

            margin-bottom: 10px;

        }

        .D input{

            display: inline-block;

            height: auto;

            width: 250px;

            margin-bottom: 25px;

            padding: 10px 25px 10px 10px;

            border-radius: 5px;

            border: 1px solid #cccccc;

            font-size: 16px;

        }

        .D-submit{

            color: #fff;

            background-color: #006dcc;

            text-align: center;

            line-height: 20px;

            font-weight: bold;

            cursor: pointer;

        }

        a{

            text-decoration: none;

        }

    </style>

</head>

<body>

    <form rel="/login/" method="post">

        <div class="D">

            <h2>Please sign in </h2>

            <input type="text"  name = "user" placeholder="admin ID"/>

            <input type="password" name = "password" placeholder="password"/>

            <p>

                <input  type="submit" value="Sign in" class="D-submit" style="height: 45px;width: 95px;padding-left: 15px"/>

                <span style="color: red;font-size: 15px">{{ error_mesg }}</span>

            </p>

        </div>

    </form>

</body>

</html>
登录HTML
<!DOCTYPE html>

<html lang="en">

<head>

    <meta charset="UTF-8">

    <title>MyPDSS Admin</title>

    <style>

        .hide{

            display: none;

        }

        body{

            margin: 0;

        }

       a{

           text-decoration: none;

           color: inherit;

       }

        .pg-heard{

            height: 48px;

            background-color: #1b1b1b;

            color:  #999999;

            line-height: 48px;

        }

        .heard-lift{

            display: inline-block;

            width: 20%;

            font-size: 20px;

            text-align: center;

        }

        .heard-right{

            display: inline-block;

            float: right;

        }

        .heard-right span{

            margin-right: 20px;

            display: inline-block;

        }

        .heard-right a{

            color: #999999;

        }

        .heard-right a:hover{

            color: #3babf7;

            cursor: pointer;

        }

        .menu{

            position: fixed;

            top: 80px;

            left: 0;

            bottom: 0;

            width: 16%;

            min-height: 200px;

            overflow: auto;

        }

        .content{

            position: fixed;

            top: 80px;

            left: 18%;

            bottom: 0;

            width: 80%;

        }

        .menu-info{

            border: 1px solid #e3e3e3;

            width: 80%;

            margin-left: 15%;

            background-color: #f8f8f8;

            border-radius: 5px;

        }

        .dl{

            margin: 20px 30px auto;

            font-weight: bold;

        }

        .dl dt{

            font-size: 17px;

            color: #3babf7;

            margin-bottom: 15px;

        }

        .dl dd{

            font-size: 15px;

            color: #999999;

            margin-bottom: 5px;

        }

        dd:hover{

            color: firebrick;

            cursor: pointer;

        }

        .tab-menu{

            height: 50px;

            line-height: 50px;

            border-bottom: 1px solid #f5f5f5;

            font-size: 18px;

        }

        #t1,#t2,#t3{

            float: left;

            width: 10%;

            text-align: center;

        }

        .menu-item{

            color: #3babf7;

            border-radius: 5px;

            border-top: 1px solid #dddddd;

            border-left: 1px solid #dddddd;

            border-right: 1px solid #dddddd;

            border-bottom: 1px solid #f5f5f5;

        }

        #t1,#t2,#t3:hover{

            cursor: pointer;

        }

        .count div{

            float: left;

            margin-right: 10px;

            color: black;

        }

    </style>

</head>

<body>

    <!--头部标题栏-->

    <div class="pg-heard" >

        <div style="width: 90%;height: 100%;margin: 0 auto">

            <div class="heard-lift">MyPDSS-管理平台</div>

            <div class="heard-right">

                <span>欢迎 测试管理员</span>

                <a href="/cmdb/login/">退出</a>

            </div>

        </div>

    </div>

    <div class="pg-content">

        <div class="menu">

            <div class="menu-info">

                <dl class="dl">

                    <dt>订单管理</dt>

                    <dd><a>订单列表</a></dd>

                    <dd><a>退款列表</a></dd>

                    <dd><a>发货列表</a></dd>

                </dl>

                <dl class="dl">

                    <dt>轮播图管理</dt>

                    <dd><a>首页轮播图</a></dd>

                    <dd><a>添加轮播图</a></dd>

                </dl>

                <dl class="dl">

                    <dt>产品管理</dt>

                    <dd><a>产品列表</a></dd>

                    <dd><a>添加产品</a></dd>

                    <dd><a>共享产品库</a></dd>

                </dl>

                <dl class="dl">

                    <dt>类目管理</dt>

                    <dd><a>类目列表</a></dd>

                    <dd><a>添加类目</a></dd>

                </dl>

                <dl class="dl">

                    <dt>仓库管理</dt>

                    <dd><a>添加仓库</a></dd>

                    <dd><a>商品库存</a></dd>

                </dl>

                <dl class="dl">

                    <dt>用户管理</dt>

                    <dd><a href="/cmdb/user_info/">用户列表</a></dd>

                    <dd><a>添加新用户</a></dd>

                    <dd><a>发放奖励</a></dd>

                </dl>

            </div>

        </div>

        <div class="content">

            <div class="tab-menu">

                <div class="menu-item" id = "t1">待发货</div>

                <div class="" id = "t2">已发货</div>

                <div class="" id = "t3">已完成</div>

            </div>

{#            <div class="count">#}

{#                <div>内容一</div>#}

{#                <div>内容二</div>#}

{#                <div>内容三</div>#}

{#            </div>#}

        </div>

    </div>

    <script src="/static/jquery1.12.4.js"></script>

    <script>

        $(function () {

            $(".dl dt").click(function () {

                $(this).nextAll().removeClass('hide');

                $(this).parent().siblings().find("dd").addClass('hide');

            });

            $('#t1,#t2,#t3').click(function () {

                {#var index = $(this).index();#}

                $(this).css('color','#3babf7').siblings().css('color','black');

                $(this).addClass('menu-item').siblings().removeClass('menu-item');

{#                $(this).addClass('active').siblings().removeClass('active');#}

{#                $('.count').children().eq(index).removeClass('hide').siblings().addClass('hide')#}

            })

        })

    </script>

</body>

</html>
后台管理HTML
老男孩Day18作业:后台用户管理的更多相关文章
- MVC4做网站后台:用户管理 —用户
这块进行用户管理,可以浏览.查询已注册的用户,修改用户资料,删除用户等.没有做添加用户,不知是否必要.列表页还是使用easyui的datagrid.这个思路跟用户组的方式差不多. 1.接口Interf ...
- MVC4做网站后台:用户管理 ——用户组
用户管理这块包含用户和用户组两部分. 用户组包括浏览 用户组列表,添加.修改.删除用户组等.按照前面思路系统是依据用户组来判断用户权限的,用户组的最主要目的是划分权限.权限这块以后单独在做. 下面实现 ...
- MVC4做网站后台:用户管理 ——用户组 2、查看、修改、删除用户组
查看用户组资料和修改用户组资料结合在一起,在用户组列表双击查看用户组资料,修改资料点保存可以保存用户组,点删除可以删除用户组. 先在UserGroupController中添加 action publ ...
- MVC4做网站后台:用户管理 ——用户组 1、添加用户组
打开控制器UserGroupController 添加Add action /// <summary> /// 添加用户组 /// </summary> /// <ret ...
- MVC4做网站后台:用户管理 ——用户组补充
上次做完发现存在点问题. 1.是类型显示的为数字(如下图): 2.是不能根据类型进行查询. 首先做查询.easyui-datagrid可以添加toolbar. 在datagrid的data-optio ...
- 潭州课堂25班:Ph201805201 django 项目 第四十三课 后台 用户管理前后功能实现 (课堂笔记)
用户的展示,编辑,删除, 把用户显示出来,用户名,员工(是,否), 超级用户(是, 否) 活跃状态,(非活跃示为删除) 在前台要显示该用户所属的用户组,在前台代码中是调用类的属性,所以在 user 的 ...
- Python作业之用户管理
作业 流程图没有画,懒,不想画 readme没有写,懒,不想写.看注释吧233333 #! /usr/bin/env python # -*- coding: utf-8 -*- # __author ...
- 老男孩Day16作业:登录、注册、后台管理页面(动态)
一.作业需求: 1.后台管理主界面(左边菜单框.(全选.反选)框.返回顶部按钮) 2.老男孩登录.注册页面 二.博客地址:https://www.cnblogs.com/catepython/p/93 ...
- ASP.NET MVC5+EF6+EasyUI 后台管理系统(75)-微信公众平台开发-用户管理
系列目录 前言 本节主要是关注者(即用户)和用户组的管理,微信公众号提供了用户和用户组的管理,我们可以在微信公众号官方里面进行操作,添加备注和标签,以及移动用户组别,同时,微信公众号也提供了相应的接口 ...
随机推荐
- nginx反向代理负载均衡初次配置
反向代理,我个人理解是通过一台反向代理服务器,把客户端的把有请求按照一定的规则分发给后台的服务器.nginx作反向代理服务器的虚拟机配置如下: upstream itest { #正常情况下应该作如下 ...
- Java微信公众平台开发(十五)--微信JSSDK的使用
转自:http://www.cuiyongzhi.com/post/63.html 在前面的文章中有介绍到我们在微信web开发过程中常常用到的 [微信JSSDK中Config配置] ,但是我们在真正的 ...
- linux下静态库和动态库一些东西
http://www.cnblogs.com/changefuture/archive/2011/12/22/2297460.html Linux 动态链接库和静态库示例 文件预览 文件目录树如下, ...
- Vulkan Tutorial 09 图像与视图
操作系统:Windows8.1 显卡:Nivida GTX965M 开发工具:Visual Studio 2017 使用任何的VkImage,包括在交换链或者渲染管线中的,我们都需要创建VkImage ...
- The centos disc was not found in any of your drives.Please insert the centos disc and press OK to retry
查看虚拟机设置中关于CDROM的选项,将CDROM的状态改为已连接,不要奇怪,勾选上之后再按下OK就好了
- scala中存在的问题
2017-12-27 scala学习中存在的问题: 1.表达式的概念要搞清楚 2.八种基本数据类型要搞清楚 Byte\Short\Int\Long\Char\Boolean\Double\Float都 ...
- SESSION的知识
android模拟表单用到了httpclient,但是需要了解Jsessionid的相关知识 如下是从一篇博文摘抄来的 在web应用的开发中我们会经常看到这样的url:http://www.xxx.c ...
- ArcGIS JS API实现的距离测量与面积量算
转自https://www.cnblogs.com/deliciousExtra/p/5490937.html
- 数字图像处理实验(16):PROJECT 06-03,Color Image Enhancement by Histogram Processing 标签: 图像处理MATLAB 2017
实验要求: Objective: To know how to implement image enhancement for color images by histogram processing ...
- linux下安装sz/rz命令
参考 https://blog.csdn.net/kobejayandy/article/details/13291655
