目标检测之Faster-RCNN的pytorch代码详解(模型准备篇)
十月一的假期转眼就结束了,这个假期带女朋友到处玩了玩,虽然经济仿佛要陷入危机,不过没关系,要是吃不上饭就看书,吃精神粮食也不错,哈哈!开个玩笑,是要收收心好好干活了,继续写Faster-RCNN的代码解释的博客,本篇博客研究模型准备部分,也就是对应于代码目录/simple-faster-rcnn-pytorch-master/model/utils/文件夹,顾名思义,utils一般就是一些配置工具之类的文件,我们打开仔细看一下目录:

一.bbox_tools.py
大概有这么些文件夹,NMS文件夹里对应的是非极大值抑制部分的代码,这里就不班门弄斧了,有兴趣的大家可以仔细看看,到底非极大值是个什么原理,如何用代码进行实现,我主要看的是bbox_tools.py和creator_tools.py这两个文件,下面放上代码的流程图看一下大概的目录结构:

bbox_tools.py部分的代码主要由四个函数构成:1loc2bbox(src_bbox,loc)和bbox2loc(src_bbox,dst_bbox)是一对函数,其功能是刚好相反的,比如loc2bbox()看其函数的参数src_bbox,loc就知道是有已知源框框和位置偏差,求出目标框框的作用,而bbox2loc(src_bbox,dst_bbox)函数看其参数就知道是完成已知源框框和参考框框求出其位置偏差的功能!而这个bbox_iou看函数名字我们也大概能猜出是求两个bbox的相交的交并比的功能,最后的generate_anchor_base()的功能大概就是根据基准点生成9个基本的anchor的功能!ratios=[0.5,1,2],anchor_scales=[8,16,32]是长宽比和缩放比例,3x3的参数刚好得到9个anchor!
有了上述对函数的大概功能的印象,下面来看一下具体是如何用代码来实现这些功能的:
1 def loc2bbox(src_bbox,loc):
 def loc2bbox(src_bbox, loc):

     """Decode bounding boxes from bounding box offsets and scales.

     Given bounding box offsets and scales computed by

     :meth:`bbox2loc`, this function decodes the representation to

     coordinates in 2D image coordinates.

     Given scales and offsets :math:`t_y, t_x, t_h, t_w` and a bounding

     box whose center is :math:`(y, x) = p_y, p_x` and size :math:`p_h, p_w`,

     the decoded bounding box's center :math:`\\hat{g}_y`, :math:`\\hat{g}_x`

     and size :math:`\\hat{g}_h`, :math:`\\hat{g}_w` are calculated

     by the following formulas.

     * :math:`\\hat{g}_y = p_h t_y + p_y`

     * :math:`\\hat{g}_x = p_w t_x + p_x`

     * :math:`\\hat{g}_h = p_h \\exp(t_h)`

     * :math:`\\hat{g}_w = p_w \\exp(t_w)`

     The decoding formulas are used in works such as R-CNN [#]_.

     The output is same type as the type of the inputs.

     .. [#] Ross Girshick, Jeff Donahue, Trevor Darrell, Jitendra Malik. \

     Rich feature hierarchies for accurate object detection and semantic \

     segmentation. CVPR 2014.

     Args:

         src_bbox (array): A coordinates of bounding boxes.

             Its shape is :math:`(R, 4)`. These coordinates are

             :math:`p_{ymin}, p_{xmin}, p_{ymax}, p_{xmax}`.

         loc (array): An array with offsets and scales.

             The shapes of :obj:`src_bbox` and :obj:`loc` should be same.

             This contains values :math:`t_y, t_x, t_h, t_w`.

     Returns:

         array:

         Decoded bounding box coordinates. Its shape is :math:`(R, 4)`. \

         The second axis contains four values \

         :math:`\\hat{g}_{ymin}, \\hat{g}_{xmin},

         \\hat{g}_{ymax}, \\hat{g}_{xmax}`.

     """

     if src_bbox.shape[0] == 0:

         return xp.zeros((0, 4), dtype=loc.dtype)

     src_bbox = src_bbox.astype(src_bbox.dtype, copy=False)

     src_height = src_bbox[:, 2] - src_bbox[:, 0]

     src_width = src_bbox[:, 3] - src_bbox[:, 1]

     src_ctr_y = src_bbox[:, 0] + 0.5 * src_height

     src_ctr_x = src_bbox[:, 1] + 0.5 * src_width

     dy = loc[:, 0::4]

     dx = loc[:, 1::4]

     dh = loc[:, 2::4]

     dw = loc[:, 3::4]

     ctr_y = dy * src_height[:, xp.newaxis] + src_ctr_y[:, xp.newaxis]

     ctr_x = dx * src_width[:, xp.newaxis] + src_ctr_x[:, xp.newaxis]

     h = xp.exp(dh) * src_height[:, xp.newaxis]

     w = xp.exp(dw) * src_width[:, xp.newaxis]

     dst_bbox = xp.zeros(loc.shape, dtype=loc.dtype)

     dst_bbox[:, 0::4] = ctr_y - 0.5 * h

     dst_bbox[:, 1::4] = ctr_x - 0.5 * w

     dst_bbox[:, 2::4] = ctr_y + 0.5 * h

     dst_bbox[:, 3::4] = ctr_x + 0.5 * w

     return dst_bbox
loc2bbox()
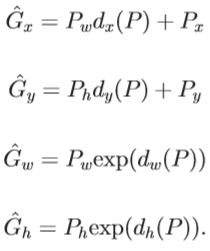
来看一下loc2bbox部分的代码,首先是一个if判断数据的类型,不是主要功能实现部分,紧接着src_height = src_bbox[:,2]- src_bbox[:,0]求出源框架的高度,用[:,2]-[:,0],之所以这么做是因为进行回归是要将数据格式从左上右下的坐标表示形式转化到中心点和长宽的表示形式,而bbox框的源位置类型应该是x0,y0,x1,y1这样用第三个减去第一个得到的自然是高度h,同样的办法也可以求出宽度w,然后函数进行了中心点的求解,就是用左上角的x0+1/2h,y0+1/2w很直觉的就可以求出中心点的坐标,接下来利用 dy = loc[:,0::4],dx = loc[:,1::4],dh=loc[:,2::4],dw=loc[:,3::4]分别求出回归预测loc的四个参数dy,dx,dh,dw来对源框bbox进行修正,即利用下述公式分别将源框的位置坐标转化为修正后框框的位置坐标x,y和宽度及高度w,h,
完成了目标框的位置确定,最后再将中心点坐标和长宽转换成左上角和右下角坐标的表示形式,就完成了loc2bbox函数的编写
2 def bbox2loc(src_bbox,dst_bbox):
这个函数的功能就是求出用于回归预测的ground_truth的值是多少,通俗点说就是你让我根据anchor来预测真实的目标的位置,那我需要学习,我学习的过程你得给我一个用于计算损失函数的目标偏移量吧!没错,这个函数的作用就是用来计算这个目标偏移量的,bbox2loc,其计算遵循了下述公式:
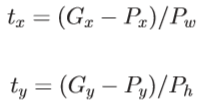

仔细看代码你就会发现确实程序就是这样写的,首先同样的计算出源框架也就是预测框架的中心点坐标和它的长和宽,完成从左上右下表示的坐标的方式到中心点坐标表示方式的转化得到Px,Py,Pw,Ph,同样的将ground_truth的左上右下角的坐标转换成中心点坐标和长宽的形式也就是上面公式里面的Gx,Gy,Gw,Gh,紧接着利用eps = xp.finfo(height.dtype).eps求出最小的正数,将height,width与其比较保证全部是非负!之后就利用上述的公式求出偏移量的值tx,ty,tw,th完成了从bbox到loc的转化!
3 def bbox_iou(bbox_a, bbox_b):
 def bbox_iou(bbox_a, bbox_b):

     """Calculate the Intersection of Unions (IoUs) between bounding boxes.

     IoU is calculated as a ratio of area of the intersection

     and area of the union.

     This function accepts both :obj:`numpy.ndarray` and :obj:`cupy.ndarray` as

     inputs. Please note that both :obj:`bbox_a` and :obj:`bbox_b` need to be

     same type.

     The output is same type as the type of the inputs.

     Args:

         bbox_a (array): An array whose shape is :math:`(N, 4)`.

             :math:`N` is the number of bounding boxes.

             The dtype should be :obj:`numpy.float32`.

         bbox_b (array): An array similar to :obj:`bbox_a`,

             whose shape is :math:`(K, 4)`.

             The dtype should be :obj:`numpy.float32`.

     Returns:

         array:

         An array whose shape is :math:`(N, K)`. \

         An element at index :math:`(n, k)` contains IoUs between \

         :math:`n` th bounding box in :obj:`bbox_a` and :math:`k` th bounding \

         box in :obj:`bbox_b`.

     """

     if bbox_a.shape[1] != 4 or bbox_b.shape[1] != 4:

         raise IndexError

     # top left

     tl = xp.maximum(bbox_a[:, None, :2], bbox_b[:, :2])

     # bottom right

     br = xp.minimum(bbox_a[:, None, 2:], bbox_b[:, 2:])

     area_i = xp.prod(br - tl, axis=2) * (tl < br).all(axis=2)

     area_a = xp.prod(bbox_a[:, 2:] - bbox_a[:, :2], axis=1)

     area_b = xp.prod(bbox_b[:, 2:] - bbox_b[:, :2], axis=1)

     return area_i / (area_a[:, None] + area_b - area_i)
bbox_iou
顾名思义,这个函数的作用就是计算两个bbox的IOU,所谓的IOU其实就是交并比,而 这个交并比就是两个IOU相交的面积除以相并的面积,用公式来表示就是:
这样的表达应该足够直观了吧,而整个函数也正是按照这个思路进行的,来看代码首先不满足.shape[1]的判断,说明bbox的形状不完整,直接raise IndexError ,然后分别取两个IOU左上的最大值和右下的最小值,这样其实就是完成了相交的工作(因为bbox现在的表示方式是左上坐标和右下坐标),之后利用numpy.prod返回给定轴上数组元素的乘积,分别求出area_i (相交的面积) area_a,area_b(两个bbox的面积)最后直接利用公式 area_i / area_a +area_b - area_i 就求出了两个框框之间的交并比!
4 def generate_anchor_base (base_size=16,ratios=[0.5,1,2],anchor_scales=[8,16,32]):
 def generate_anchor_base(base_size=16, ratios=[0.5, 1, 2],

                          anchor_scales=[8, 16, 32]):

     """Generate anchor base windows by enumerating aspect ratio and scales.

     Generate anchors that are scaled and modified to the given aspect ratios.

     Area of a scaled anchor is preserved when modifying to the given aspect

     ratio.

     :obj:`R = len(ratios) * len(anchor_scales)` anchors are generated by this

     function.

     The :obj:`i * len(anchor_scales) + j` th anchor corresponds to an anchor

     generated by :obj:`ratios[i]` and :obj:`anchor_scales[j]`.

     For example, if the scale is :math:`8` and the ratio is :math:`0.25`,

     the width and the height of the base window will be stretched by :math:`8`.

     For modifying the anchor to the given aspect ratio,

     the height is halved and the width is doubled.

     Args:

         base_size (number): The width and the height of the reference window.

         ratios (list of floats): This is ratios of width to height of

             the anchors.

         anchor_scales (list of numbers): This is areas of anchors.

             Those areas will be the product of the square of an element in

             :obj:`anchor_scales` and the original area of the reference

             window.

     Returns:

         ~numpy.ndarray:

         An array of shape :math:`(R, 4)`.

         Each element is a set of coordinates of a bounding box.

         The second axis corresponds to

         :math:`(y_{min}, x_{min}, y_{max}, x_{max})` of a bounding box.

     """

     py = base_size / 2.

     px = base_size / 2.

     anchor_base = np.zeros((len(ratios) * len(anchor_scales), 4),

                            dtype=np.float32)

     for i in six.moves.range(len(ratios)):

         for j in six.moves.range(len(anchor_scales)):

             h = base_size * anchor_scales[j] * np.sqrt(ratios[i])

             w = base_size * anchor_scales[j] * np.sqrt(1. / ratios[i])

             index = i * len(anchor_scales) + j

             anchor_base[index, 0] = py - h / 2.

             anchor_base[index, 1] = px - w / 2.

             anchor_base[index, 2] = py + h / 2.

             anchor_base[index, 3] = px + w / 2.

     return anchor_base
generate_anchor_base
这个函数的作用就是产生(0,0)坐标开始的基础的9个anchor框,(0,0)坐标是指的一次提取的特征图而言,从函数的名字我们也可以看出来,generate_anchor_base,
分析一下函数的参数base_size=16就是基础的anchor的宽和高其实是16的大小,再根据不同的放缩比和宽高比进行进一步的调整,ratios就是指的宽高的放缩比分别是0.5:1,1:1,1:2这样,最后一个参数是anchor_scales也就是在base_size的基础上再增加的量,本代码中对应着三种面积的大小(16*8)2 ,
(16*16)2 (16*32)2 也就是128,256,512的平方大小,三种面积乘以三种放缩比就刚刚好是9种anchor,示意图如下:
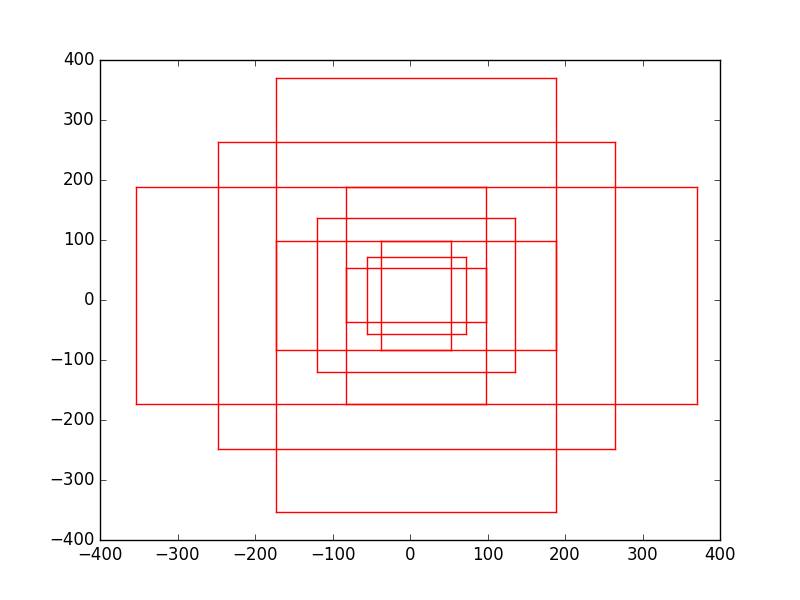 (图来自于三年一梦博客,文末附地址)
其实,Faster-rcnn的重要思想就是在这个地方体现出来了,到底怎样进行目标检测?如何才能不漏下任何一个目标?那就是遍历的方法,不是遍历图片,而是遍历特征图,对一次提取的特征图进行遍历(3*3的卷积核挨个特征产生anchor) 依次产生9个长宽比尺寸不同的anchor,力求将所有的在图中的目标都框住,产生完anchor之后再送入到9×2和9×4的Fc网络用来做分类和回归,对产生的anchor进行进一步的修正,这样几乎以极大的概率可以将图中所有的目标全部框住了! 后续再进行一些处理,如非极大值抑制,抑制住重复框住的anchor,产生良好的可视效果!
如果你仔细看过generate_anchor_base的代码,你可能会发现一些端倪,就在这一句 anchor_base = np.zeros((len(ratios) * len(anchor_scales), 4),dtype=np.float32) 这个地方的anchor_base为什么是np.zeros啊,没错,这样初始的坐标都是(0,0,0,0),对呀,其实这个函数一开始就只是以特征图的左上角为基准产生的9个anchor,根本没有对全图的所有anchor的产生做任何的解释!那所有的anchor是在哪里产生的呢?答案是在 model / region_proposal_network里!!
我们这就来看一下它的代码:根据函数的名字找了一下应该是_enumerate_shifted_anchor无疑了!下面接着来看看到底这个函数是如何产生整个特征图所有的anchor的!
 def _enumerate_shifted_anchor(anchor_base, feat_stride, height, width):

     # Enumerate all shifted anchors:

     #

     # add A anchors (1, A, 4) to

     # cell K shifts (K, 1, 4) to get

     # shift anchors (K, A, 4)

     # reshape to (K*A, 4) shifted anchors

     # return (K*A, 4)

     # !TODO: add support for torch.CudaTensor

     # xp = cuda.get_array_module(anchor_base)

     # it seems that it can't be boosed using GPU

     import numpy as xp

     shift_y = xp.arange(0, height * feat_stride, feat_stride)

     shift_x = xp.arange(0, width * feat_stride, feat_stride)

     shift_x, shift_y = xp.meshgrid(shift_x, shift_y)

     shift = xp.stack((shift_y.ravel(), shift_x.ravel(),

                       shift_y.ravel(), shift_x.ravel()), axis=1)

     A = anchor_base.shape[0]

     K = shift.shape[0]

     anchor = anchor_base.reshape((1, A, 4)) + \

              shift.reshape((1, K, 4)).transpose((1, 0, 2))

     anchor = anchor.reshape((K * A, 4)).astype(np.float32)

     return anchor
_enumerate_shifted_anchor
先来解释一下对于feature map的每一个点产生anchor的思想,正如代码中描述的那样,首先是将特征图放大16倍对应回原图,为什么要放大16倍,因为原图是经过4次pooling得到的特征图,所以缩小了16倍,对应于代码的
shift_y /shift_x = xp.arange(0, height * feat_stride, feat_stride) 而这个feat_stride=16就是放大的倍数,arange()函数大家都清楚,最后得到的效果就是纵横向都扩大了16倍对应回原图大小,shift_x,shift_y = xp.meshgrid(shift_x,shift_y)就是形成了一个纵横向偏移量的矩阵,也就是特征图的每一点都能够通过这个矩阵找到映射在原图中的具体位置!
具体来看这个函数的实现方法,说实话,可能是因为我的python功力不够的原因,这个函数我第二遍看还是思索了良久才想出来,本着不误人子弟的原则,哈哈,
首先是shift_y = xp.arange(0, height * feat_stride, feat_stride) 这个已经介绍过了,就是以feat_stride为间距产生从(0,height*feat_stride)的一行,同样的shift_x就是以feat_stride产生从(0,width*feat_stride)的一行,然后重点来了!
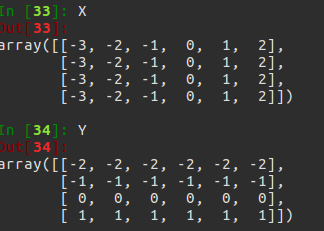
shift_x, shift_y = xp.meshgrid(shift_x, shift_y) 这个meshgrid是一个画网格函数,具体的可以百度它的作用,就是以shift_x为行,以shift_y的行为列产生矩阵,同样shift_y是以shift_y的行为列,以shift_x的行的个数为列数产生矩阵,描述不太清楚,看下例子:

最后得到的X,Y的结果是:再解释一下 产生的大X 以x的行为行,以y的元素个数为列构成矩阵,同样的产生的Y以y的行作为列,以x的元素个数作为列数产生矩阵!!!
紧接着 shift = xp.stack((shift_y.ravel(), shift_x.ravel(), shift_y.ravel(), shift_x.ravel()), axis=1)
经过刚才的变化,其实大X,Y的元素个数已经相同,看矩阵的结构也能看出,矩阵大小是相同的,X.ravel()之后变成一行,此时shift_x,shift_y的元素个数是相同的,都等于特征图的长宽的乘积(像素点个数),不同的是此时的shift_x里面装得是横向看的x的一行一行的偏移坐标,而此时的y里面装得是对应的纵向的偏移坐标!如果画个图的话就是这样:
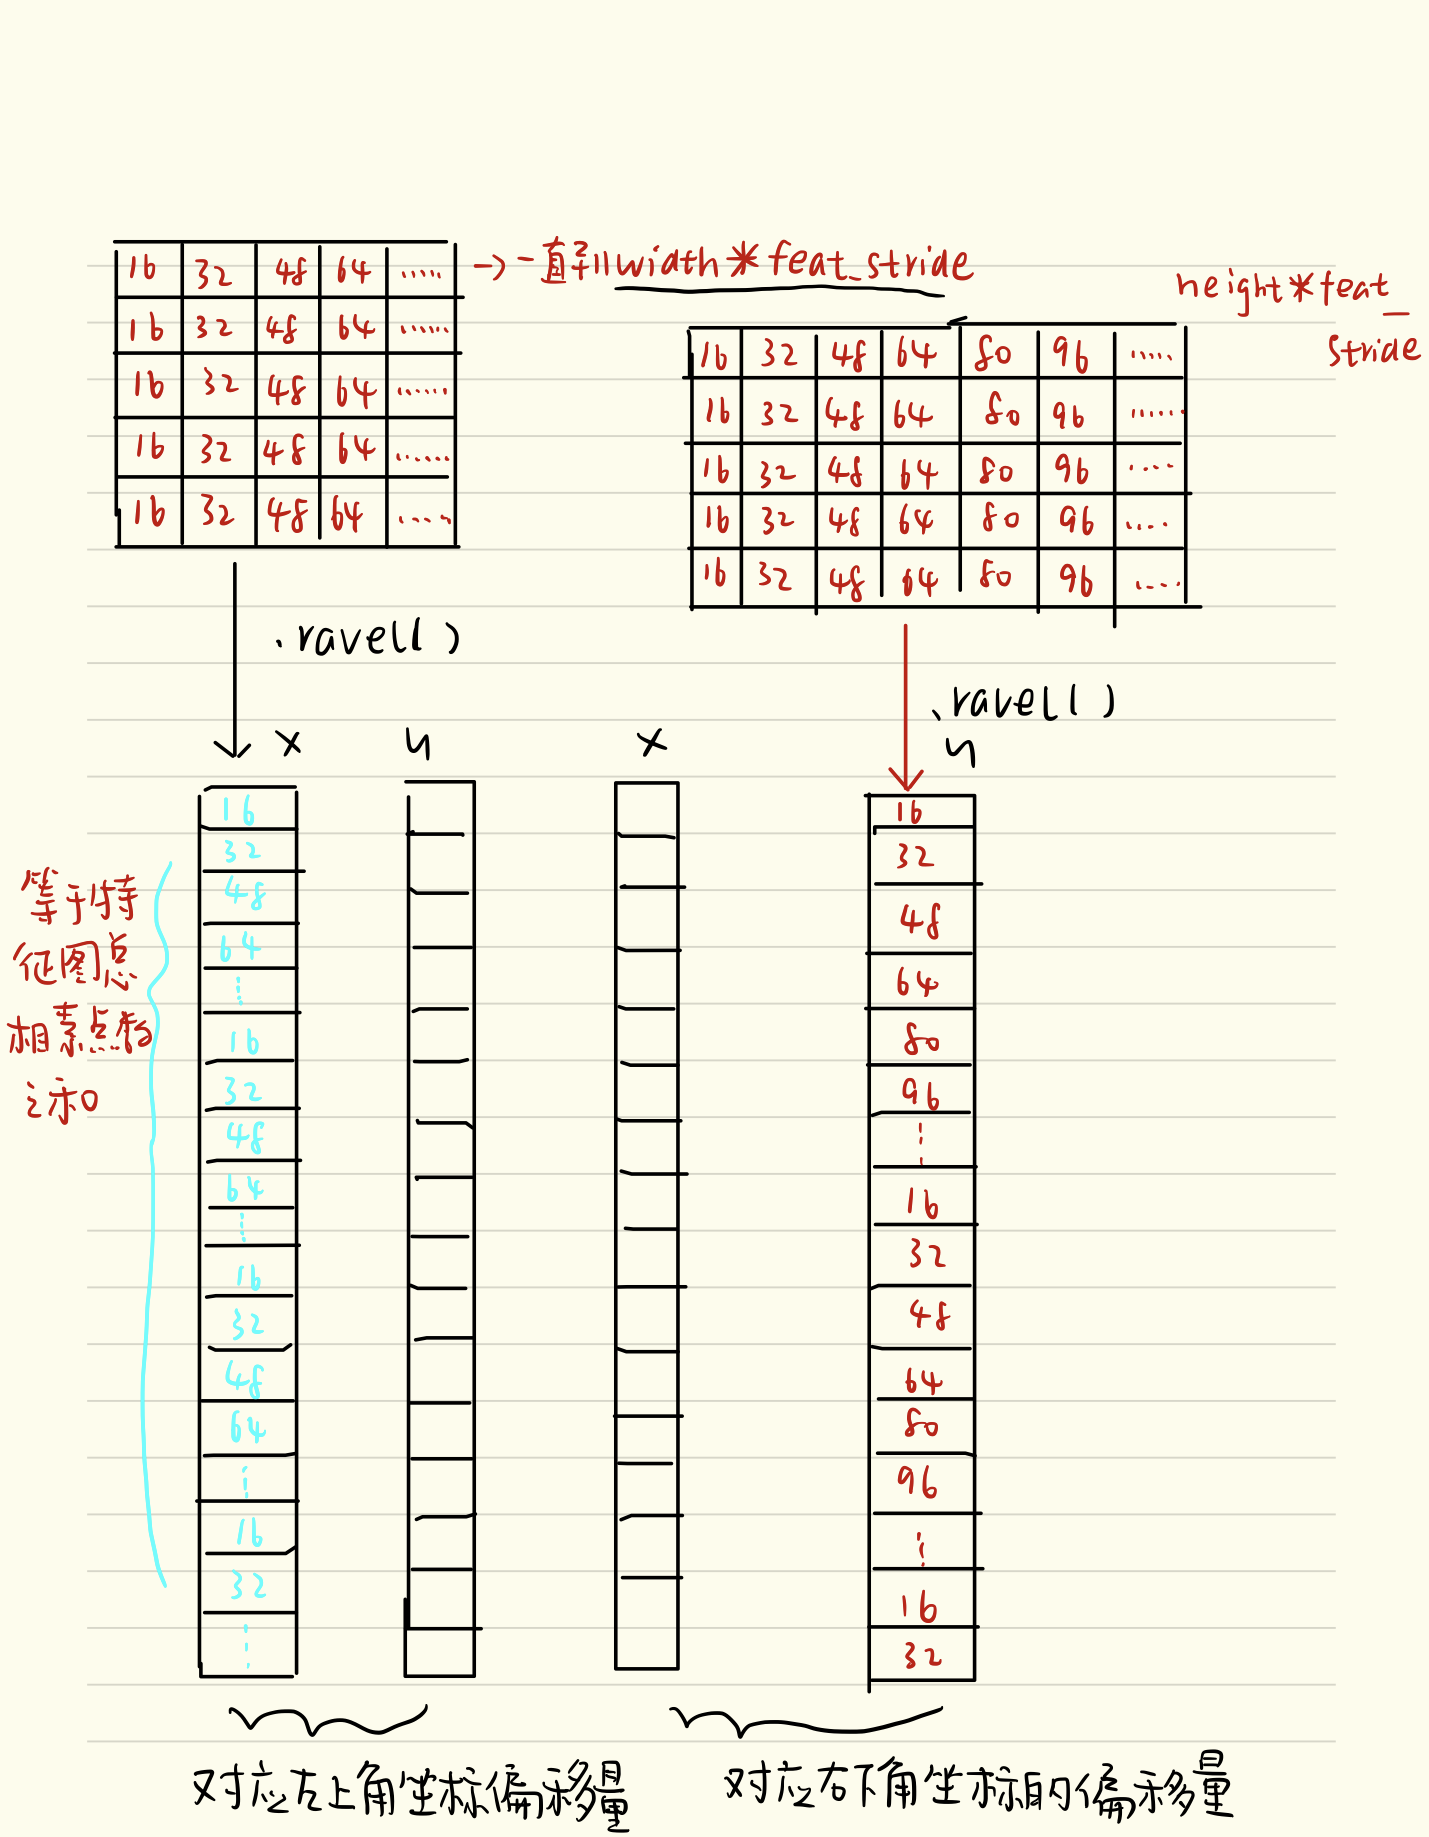 (单画个示意图,之后会更新电子版)
最后代码中的shift变量就变成了以特征图像素总个数为行,4列的这样的数据格式,可以看到下面的代码也会resize(1,K,4)这样的格式!接下来A = anchor_base.shape[0]代码读取base_anchor的个数,这里应该是等于9的,因为有9个base_anchor,同样K=shift.shapep[0]这里就是读取特征图中元素的总个数!也就是我们画的四列中的一列的行数,可能会有人费解,为什要堆叠成四列呢,我觉得应该是因为anchor的表示是左上右下坐标的形式,所有有四个坐标,而每两列恰好代表了横纵坐标的偏移量也就是一个点,所以最后用四列代表了两个点的偏移量。
anchor = anchor_base.reshape((1, A, 4)) + shift.reshape((1, K, 4)).transpose((1, 0, 2)) 命运终于无情的对小猫咪下手了,没错,这才是整个函数的关键,用基础的9个anchor的坐标分别和偏移量相加,最后得出了所有的anchor的坐标,四列可以堪称是左上角的坐标和右下角的坐标加偏移量的同步执行,飞速的从上往下捋一遍,所有的anchor就都出来了!一共K个特征点,每一个有A(9)个基本的anchor,所以最后reshape((K*A),4)的形式,也就得到了最后的所有的anchor.
最后上一张示意图:
 (图源机器之心博客)
每个特征点之间间距是16的距离,其实我觉得单看这张图真的不足以表达enumerate_shfited_anchor函数的运行过程,只是一个便于理解的示意图!
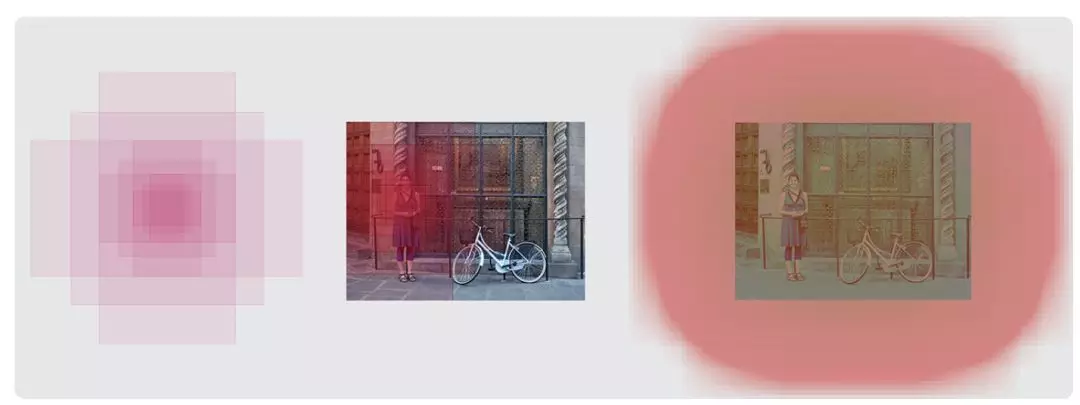
锚点及其9个anchor 单个锚点在一张图上表达 所有锚点的所有anchor在整幅图上的表达
最后一个问题就是为什么要将特征图对应回原图的大小呢?因为你要框住的待检测目标是在原图,而你选取anchor是在特征图上,pooling之后特征之间的相对位置不变,但是尺寸缩小为原来的1/16,也就是说,一个点对应于原图的16个点的信息,原图和特征图对应的感受野是不一样的,而你的anchor目的是为了框原图的目标的,如果不remap回原图的话,你一个base_size的anchor基本就框住了特征图的大部分的信息,这样的目标检测没有任何意义的,论文作者之所以采用这种网络结构其中一个目的也是为了让特征图和原图的对应关系明确,方便remap回原图从而选取anchor,产生proposal!
二 Creator_tools.py文件
creator.py文件也是需要重点解释的部分,因为它基本上涵盖了整个网络优化的全部内容,其中的三个creator每一个都有自己独特的作用,所以在正式介绍代码之前,我想先解释一点理论部分的内容,先看下代码的框架来认识下今天要讲的主角吧!
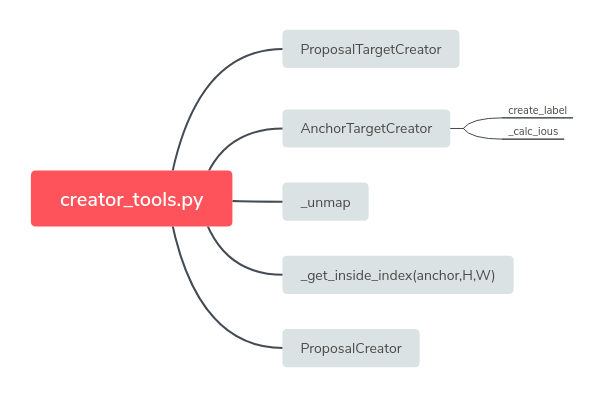
大致的函数框架是这样的,可以看出里面有三个主要的类 1ProposalTargetCreator 2 AnchorTargetCreator 3 ProposalCreator
首先介绍
1 AnchorTargetCreator
AnchorTargetCreator的作用是啥呢?其实AnchorTargetCreator的作用就是为Faster-RCNN专有的RPN网络提供自我训练的样本,RPN网络正是利用AnchorTargetCreator产生的样本作为数据进行网络的训练和学习的,这样产生的预测anchor的类别和位置才更加精确,anchor变成真正的ROIS需要进行位置修正,而AnchorTargetCreator产生的带标签的样本就是给RPN网络进行训练学习用哒!自我修正自我提高!
那么AnchorTargetCreator选取样本的标准是什么呢?
答:之前我们直到_enumerate_shifted_anchor函数在一幅图上产生了20000多个anchor,而AnchorTargetCreator就是要从20000多个Anchor选出256个用于二分类和所有的位置回归!为预测值提供对应的真实值,选取的规则是:
1.对于每一个Ground_truth bounding_box 从anchor中选取和它重叠度最高的一个anchor作为样本!
2 从剩下的anchor中选取和Ground_truth bounding_box重叠度超过0.7的anchor作为样本,注意正样本的数目不能超过128
3随机的从剩下的样本中选取和gt_bbox重叠度小于0.3的anchor作为负样本,正负样本之和为256
PS:需要注意的是对于每一个anchor,gt_label要么为1,要么为0,所以这样实现二分类,而计算回归损失时,只有正样本计算损失,负样本不参与计算。
有了这几条规则我们来看AnchorTargetCreator的函数:
 class AnchorTargetCreator(object):

     """Assign the ground truth bounding boxes to anchors.

     Assigns the ground truth bounding boxes to anchors for training Region

     Proposal Networks introduced in Faster R-CNN [#]_.

     Offsets and scales to match anchors to the ground truth are

     calculated using the encoding scheme of

     :func:`model.utils.bbox_tools.bbox2loc`.

     .. [#] Shaoqing Ren, Kaiming He, Ross Girshick, Jian Sun. \

     Faster R-CNN: Towards Real-Time Object Detection with \

     Region Proposal Networks. NIPS 2015.

     Args:

         n_sample (int): The number of regions to produce.

         pos_iou_thresh (float): Anchors with IoU above this

             threshold will be assigned as positive.

         neg_iou_thresh (float): Anchors with IoU below this

             threshold will be assigned as negative.

         pos_ratio (float): Ratio of positive regions in the

             sampled regions.

     """

     def __init__(self,

                  n_sample=256,

                  pos_iou_thresh=0.7, neg_iou_thresh=0.3,

                  pos_ratio=0.5):

         self.n_sample = n_sample

         self.pos_iou_thresh = pos_iou_thresh

         self.neg_iou_thresh = neg_iou_thresh

         self.pos_ratio = pos_ratio

     def __call__(self, bbox, anchor, img_size):

         """Assign ground truth supervision to sampled subset of anchors.

         Types of input arrays and output arrays are same.

         Here are notations.

         * :math:`S` is the number of anchors.

         * :math:`R` is the number of bounding boxes.

         Args:

             bbox (array): Coordinates of bounding boxes. Its shape is

                 :math:`(R, 4)`.

             anchor (array): Coordinates of anchors. Its shape is

                 :math:`(S, 4)`.

             img_size (tuple of ints): A tuple :obj:`H, W`, which

                 is a tuple of height and width of an image.

         Returns:

             (array, array):

             #NOTE: it's scale not only  offset

             * **loc**: Offsets and scales to match the anchors to \

                 the ground truth bounding boxes. Its shape is :math:`(S, 4)`.

             * **label**: Labels of anchors with values \

                 :obj:`(1=positive, 0=negative, -1=ignore)`. Its shape \

                 is :math:`(S,)`.

         """

         img_H, img_W = img_size

         n_anchor = len(anchor)

         inside_index = _get_inside_index(anchor, img_H, img_W)

         anchor = anchor[inside_index]

         argmax_ious, label = self._create_label(

             inside_index, anchor, bbox)

         # compute bounding box regression targets

         loc = bbox2loc(anchor, bbox[argmax_ious])

         # map up to original set of anchors

         label = _unmap(label, n_anchor, inside_index, fill=-1)

         loc = _unmap(loc, n_anchor, inside_index, fill=0)

         return loc, label
AnchorTargeCreator
首先是读取图片的尺寸大小,然后用len(anchor)读取anchor的个数,一般对应20000个左右,之后调用_get_inside_index(anchor,img_H,img_W)来将那些超出图片范围的anchor全部去掉,mask只保留位于图片内部的,再调用self._create_label(inside_index,anchor,bbox)筛选出符合条件的正例128个负例128并给它们附上相应的label,最后调用bbox2loc将anchor和bbox进行求偏差当作回归计算的目标!
展开来仔细看下_create_label 这个函数:
首先初始化label,然后label.fill(-1)将所有标号全部置为-1,调用_clac_ious(anchor,bbox,inside_dex)产生argmax_ious,max_ious,gt_argmax_ious , 之后进行判断,如果label[max_ious<self.neg_ious_thresh] = 0定义为负样本,而label[gt_argmax_ous]=1直接定义为正样本,同时label[max_ious>self.pos_iou_thresh]=1也定义为正样本,这里的定义规则其实gt_argmax_ious就是和gt_bbox重叠读最高的anchor,直接定义为正样本,而max_ious就是指的重叠度大于0.7的直接定义为正样本,而小于0.3的定义负样本,和开始讲的规则实际是一一对应的,程序接下来还有一个判断就是说如果选出来的label==1的个数大于pos_ratio*n_samples就是正样本如果按照这个规则选取多了的话,就调用np.random.choice(pos_index,size(len(pos_index)-n_pos),replace=False)就是总数不变随机丢弃掉一些正样本的意思!同样的方法如果负样本选择多了也随机丢弃掉一些,最后将序列argmax_ious,label返回!
这里其实我写博客的时候有一句代码想不到合理的解释:就是loc = bbox2loc(anchor,bbox[argmax_ious]]) 为什么anchor要和argmax_ious进行bbox2loc???到底是哪些和那些?一对一还是一对多啊?? 后来我顿悟了,argmax_ious本来就是按顺序针对每一个anchor分别和IOUS进行交并比选取每一行的最大值产生的啊!argmax_ious只是列的序号,加上bbox就完成了bbox的选择工作,anchor自然要和对应最大的那个进行相交呗,还有一个问题就是为什么所有的anchor都要求bbox2loc?那可有20000个呢!!哈哈,记得我“答”那一行写的啥不,选出256用于二分类和所有的进行位置回归!是所有的啊,程序这里不就是很好的体现吗!
2ProposalCreator
proposal的作用又是啥咧? 其实proposalCreator做的就是生成ROIS的过程,而且整个过程只有前向计算没有反向传播,所以完全可以只用numpy和Tensor就把它计算出来咯! 那具体的选取流程又是啥样的呢?
1对于每张图片,利用FeatureMap,计算H/16*W/16*9大约20000个anchor属于前景的概率和其对应的位置参数,这个就是RPN网络正向作用的过程,没毛病,然后从中选取概率较大的12000张,利用位置回归参数,修正这12000个anchor的位置4 利用非极大值抑制,选出2000个ROIS!没错,整个流程读下来发现确实只有前向传播的过程
看代码:
 class ProposalCreator:

     # unNOTE: I'll make it undifferential

     # unTODO: make sure it's ok

     # It's ok

     """Proposal regions are generated by calling this object.

     The :meth:`__call__` of this object outputs object detection proposals by

     applying estimated bounding box offsets

     to a set of anchors.

     This class takes parameters to control number of bounding boxes to

     pass to NMS and keep after NMS.

     If the paramters are negative, it uses all the bounding boxes supplied

     or keep all the bounding boxes returned by NMS.

     This class is used for Region Proposal Networks introduced in

     Faster R-CNN [#]_.

     .. [#] Shaoqing Ren, Kaiming He, Ross Girshick, Jian Sun. \

     Faster R-CNN: Towards Real-Time Object Detection with \

     Region Proposal Networks. NIPS 2015.

     Args:

         nms_thresh (float): Threshold value used when calling NMS.

         n_train_pre_nms (int): Number of top scored bounding boxes

             to keep before passing to NMS in train mode.

         n_train_post_nms (int): Number of top scored bounding boxes

             to keep after passing to NMS in train mode.

         n_test_pre_nms (int): Number of top scored bounding boxes

             to keep before passing to NMS in test mode.

         n_test_post_nms (int): Number of top scored bounding boxes

             to keep after passing to NMS in test mode.

         force_cpu_nms (bool): If this is :obj:`True`,

             always use NMS in CPU mode. If :obj:`False`,

             the NMS mode is selected based on the type of inputs.

         min_size (int): A paramter to determine the threshold on

             discarding bounding boxes based on their sizes.

     """

     def __init__(self,

                  parent_model,

                  nms_thresh=0.7,

                  n_train_pre_nms=12000,

                  n_train_post_nms=2000,

                  n_test_pre_nms=6000,

                  n_test_post_nms=300,

                  min_size=16

                  ):

         self.parent_model = parent_model

         self.nms_thresh = nms_thresh

         self.n_train_pre_nms = n_train_pre_nms

         self.n_train_post_nms = n_train_post_nms

         self.n_test_pre_nms = n_test_pre_nms

         self.n_test_post_nms = n_test_post_nms

         self.min_size = min_size

     def __call__(self, loc, score,

                  anchor, img_size, scale=1.):

         """input should  be ndarray

         Propose RoIs.

         Inputs :obj:`loc, score, anchor` refer to the same anchor when indexed

         by the same index.

         On notations, :math:`R` is the total number of anchors. This is equal

         to product of the height and the width of an image and the number of

         anchor bases per pixel.

         Type of the output is same as the inputs.

         Args:

             loc (array): Predicted offsets and scaling to anchors.

                 Its shape is :math:`(R, 4)`.

             score (array): Predicted foreground probability for anchors.

                 Its shape is :math:`(R,)`.

             anchor (array): Coordinates of anchors. Its shape is

                 :math:`(R, 4)`.

             img_size (tuple of ints): A tuple :obj:`height, width`,

                 which contains image size after scaling.

             scale (float): The scaling factor used to scale an image after

                 reading it from a file.

         Returns:

             array:

             An array of coordinates of proposal boxes.

             Its shape is :math:`(S, 4)`. :math:`S` is less than

             :obj:`self.n_test_post_nms` in test time and less than

             :obj:`self.n_train_post_nms` in train time. :math:`S` depends on

             the size of the predicted bounding boxes and the number of

             bounding boxes discarded by NMS.

         """

         # NOTE: when test, remember

         # faster_rcnn.eval()

         # to set self.traing = False

         if self.parent_model.training:

             n_pre_nms = self.n_train_pre_nms

             n_post_nms = self.n_train_post_nms

         else:

             n_pre_nms = self.n_test_pre_nms

             n_post_nms = self.n_test_post_nms

         # Convert anchors into proposal via bbox transformations.

         # roi = loc2bbox(anchor, loc)

         roi = loc2bbox(anchor, loc)

         # Clip predicted boxes to image.

         roi[:, slice(0, 4, 2)] = np.clip(

             roi[:, slice(0, 4, 2)], 0, img_size[0])

         roi[:, slice(1, 4, 2)] = np.clip(

             roi[:, slice(1, 4, 2)], 0, img_size[1])

         # Remove predicted boxes with either height or width < threshold.

         min_size = self.min_size * scale

         hs = roi[:, 2] - roi[:, 0]

         ws = roi[:, 3] - roi[:, 1]

         keep = np.where((hs >= min_size) & (ws >= min_size))[0]

         roi = roi[keep, :]

         score = score[keep]

         # Sort all (proposal, score) pairs by score from highest to lowest.

         # Take top pre_nms_topN (e.g. 6000).

         order = score.ravel().argsort()[::-1]

         if n_pre_nms > 0:

             order = order[:n_pre_nms]

         roi = roi[order, :]

         # Apply nms (e.g. threshold = 0.7).

         # Take after_nms_topN (e.g. 300).

         # unNOTE: somthing is wrong here!

         # TODO: remove cuda.to_gpu

         keep = non_maximum_suppression(

             cp.ascontiguousarray(cp.asarray(roi)),

             thresh=self.nms_thresh)

         if n_post_nms > 0:

             keep = keep[:n_post_nms]

         roi = roi[keep]

         return roi
ProposalCreator
下面对应选取流程解释代码:
最开始初始化一些参数,比如nms_thresh=0.7,训练和测试选取不同的样本,min_size=16等等,果然代码一进来就针对训练和测试过程分别设置了不同的参数,然后rois = loc2bbox(anchor,loc)利用预测的修正值,对12000个anchor进行修正,
之后利用numpy.clip(rois[:,slice(0,4,2)],0,img_size[0])函数将产生的rois的大小全部裁剪到图片范围以内!然后计算图片的高度和宽度,二者任何一个小于开始我们规定的min_size都直接mask掉!只保留剩下的Rois,然后对剩下的ROIs进行打分,对得到的分数进行合并然后进行排序,只保留属于前景的概率排序后的前12000/6000个(分别对应训练和测试时候的配置),之后再调用非极大值抑制函数,将重复的抑制掉,就可以将筛选后ROIS进行返回啦!ProposalCreator的函数的说明也结束了
3Proposal_TargetCreator
好了,到了最后一个需要解释的部分了,唉,这个博客感觉写了好久啊, 整整白天一天! Proposal_TragetCreator的作用又是什么呢?简略点说那就是提供GroundTruth样本供ROISHeads网络进行自我训练的!那这个ROISHeads网络又是什么呢?就是接收ROIS对它进行n_class类别的预测以及最终目标检测位置的!也就是最终输出结果的网络啊,你说它重要不重要!最终输出结果的网络的性能的好坏完全取决于它,肯定重要呗!同样解释下它的流程:
ProposalCreator产生2000个ROIS,但是这些ROIS并不都用于训练,经过本ProposalTargetCreator的筛选产生128个用于自身的训练,规则如下:
1 ROIS和GroundTruth_bbox的IOU大于0.5,选取一些(比如说本实验的32个)作为正样本
2 选取ROIS和GroundTruth_bbox的IOUS小于等于0的选取一些比如说选取128-32=96个作为负样本
3然后分别对ROI_Headers进行训练
对应的代码部分如下:
 class ProposalTargetCreator(object):

     """Assign ground truth bounding boxes to given RoIs.

     The :meth:`__call__` of this class generates training targets

     for each object proposal.

     This is used to train Faster RCNN [#]_.

     .. [#] Shaoqing Ren, Kaiming He, Ross Girshick, Jian Sun. \

     Faster R-CNN: Towards Real-Time Object Detection with \

     Region Proposal Networks. NIPS 2015.

     Args:

         n_sample (int): The number of sampled regions.

         pos_ratio (float): Fraction of regions that is labeled as a

             foreground.

         pos_iou_thresh (float): IoU threshold for a RoI to be considered as a

             foreground.

         neg_iou_thresh_hi (float): RoI is considered to be the background

             if IoU is in

             [:obj:`neg_iou_thresh_hi`, :obj:`neg_iou_thresh_hi`).

         neg_iou_thresh_lo (float): See above.

     """

     def __init__(self,

                  n_sample=128,

                  pos_ratio=0.25, pos_iou_thresh=0.5,

                  neg_iou_thresh_hi=0.5, neg_iou_thresh_lo=0.0

                  ):

         self.n_sample = n_sample

         self.pos_ratio = pos_ratio

         self.pos_iou_thresh = pos_iou_thresh

         self.neg_iou_thresh_hi = neg_iou_thresh_hi

         self.neg_iou_thresh_lo = neg_iou_thresh_lo  # NOTE:default 0.1 in py-faster-rcnn

     def __call__(self, roi, bbox, label,

                  loc_normalize_mean=(0., 0., 0., 0.),

                  loc_normalize_std=(0.1, 0.1, 0.2, 0.2)):

         """Assigns ground truth to sampled proposals.

         This function samples total of :obj:`self.n_sample` RoIs

         from the combination of :obj:`roi` and :obj:`bbox`.

         The RoIs are assigned with the ground truth class labels as well as

         bounding box offsets and scales to match the ground truth bounding

         boxes. As many as :obj:`pos_ratio * self.n_sample` RoIs are

         sampled as foregrounds.

         Offsets and scales of bounding boxes are calculated using

         :func:`model.utils.bbox_tools.bbox2loc`.

         Also, types of input arrays and output arrays are same.

         Here are notations.

         * :math:`S` is the total number of sampled RoIs, which equals \

             :obj:`self.n_sample`.

         * :math:`L` is number of object classes possibly including the \

             background.

         Args:

             roi (array): Region of Interests (RoIs) from which we sample.

                 Its shape is :math:`(R, 4)`

             bbox (array): The coordinates of ground truth bounding boxes.

                 Its shape is :math:`(R', 4)`.

             label (array): Ground truth bounding box labels. Its shape

                 is :math:`(R',)`. Its range is :math:`[0, L - 1]`, where

                 :math:`L` is the number of foreground classes.

             loc_normalize_mean (tuple of four floats): Mean values to normalize

                 coordinates of bouding boxes.

             loc_normalize_std (tupler of four floats): Standard deviation of

                 the coordinates of bounding boxes.

         Returns:

             (array, array, array):

             * **sample_roi**: Regions of interests that are sampled. \

                 Its shape is :math:`(S, 4)`.

             * **gt_roi_loc**: Offsets and scales to match \

                 the sampled RoIs to the ground truth bounding boxes. \

                 Its shape is :math:`(S, 4)`.

             * **gt_roi_label**: Labels assigned to sampled RoIs. Its shape is \

                 :math:`(S,)`. Its range is :math:`[0, L]`. The label with \

                 value 0 is the background.

         """

         n_bbox, _ = bbox.shape

         roi = np.concatenate((roi, bbox), axis=0)

         pos_roi_per_image = np.round(self.n_sample * self.pos_ratio)

         iou = bbox_iou(roi, bbox)

         gt_assignment = iou.argmax(axis=1)

         max_iou = iou.max(axis=1)

         # Offset range of classes from [0, n_fg_class - 1] to [1, n_fg_class].

         # The label with value 0 is the background.

         gt_roi_label = label[gt_assignment] + 1

         # Select foreground RoIs as those with >= pos_iou_thresh IoU.

         pos_index = np.where(max_iou >= self.pos_iou_thresh)[0]

         pos_roi_per_this_image = int(min(pos_roi_per_image, pos_index.size))

         if pos_index.size > 0:

             pos_index = np.random.choice(

                 pos_index, size=pos_roi_per_this_image, replace=False)

         # Select background RoIs as those within

         # [neg_iou_thresh_lo, neg_iou_thresh_hi).

         neg_index = np.where((max_iou < self.neg_iou_thresh_hi) &

                              (max_iou >= self.neg_iou_thresh_lo))[0]

         neg_roi_per_this_image = self.n_sample - pos_roi_per_this_image

         neg_roi_per_this_image = int(min(neg_roi_per_this_image,

                                          neg_index.size))

         if neg_index.size > 0:

             neg_index = np.random.choice(

                 neg_index, size=neg_roi_per_this_image, replace=False)

         # The indices that we're selecting (both positive and negative).

         keep_index = np.append(pos_index, neg_index)

         gt_roi_label = gt_roi_label[keep_index]

         gt_roi_label[pos_roi_per_this_image:] = 0  # negative labels --> 0

         sample_roi = roi[keep_index]

         # Compute offsets and scales to match sampled RoIs to the GTs.

         gt_roi_loc = bbox2loc(sample_roi, bbox[gt_assignment[keep_index]])

         gt_roi_loc = ((gt_roi_loc - np.array(loc_normalize_mean, np.float32)

                        ) / np.array(loc_normalize_std, np.float32))

         return sample_roi, gt_roi_loc, gt_roi_label
ProposalTargetCreator
因为这些数据是要放入到整个大网络里进行训练的,比如说位置数据,所以要对其位置坐标进行数据增强处理(归一化处理)
首先确定bbox.shape找出n_bbox的个数,然后将bbox和rois连接起来,确定需要的正样本的个数,调用bbox_iou进行IOU的计算,按行找到最大值,返回最大值对应的序号以及其真正的IOU,之后利用最大值的序号将那些挑出的最大值的label+1从0,n_fg_class-1 变到1,n_fg_class,同样的根据IOUS的最大值将正负样本找出来,如果找出的样本数目过多就随机丢掉一些,之后将正负样本序号连接起来,得到它们对应的真实的label,然后统一的将负样本的label全部置为0,这样筛选出来的样本的label就已经确定了,之后将sample_rois取出来,根据它和bbox的偏移量计算出loc,最后返回sample_rois,gt_roi_loc和gt_rois_label,完成任务使命!
终于将模型准备部分全部讲解完了,如果你对解释中的名词有一些不理解,比如说不知道ROIS_Heads对应哪一部分网络,我可以再附上一个网络的框架图,当然不是我画的,是原作者画得,算是加强印象吧,打了这么多的字真的是累了,如果你看完觉得对理解代码确实有点帮助,欢迎给我留言哦!~共同学习进步!peace!
参考博客: https://www.cnblogs.com/king-lps/p/8981222.html
目标检测之Faster-RCNN的pytorch代码详解(模型准备篇)的更多相关文章
- 目标检测之Faster-RCNN的pytorch代码详解(模型训练篇)
本文所用代码gayhub的地址:https://github.com/chenyuntc/simple-faster-rcnn-pytorch (非本人所写,博文只是解释代码) 好长时间没有发博客了 ...
- 目标检测之Faster-RCNN的pytorch代码详解(数据预处理篇)
首先贴上代码原作者的github:https://github.com/chenyuntc/simple-faster-rcnn-pytorch(非代码作者,博文只解释代码) 今天看完了simple- ...
- 【目标检测】Faster RCNN算法详解
Ren, Shaoqing, et al. “Faster R-CNN: Towards real-time object detection with region proposal network ...
- 目标检测算法Faster R-CNN
一:Faster-R-CNN算法组成: 1.PRN候选框提取模块: 2.Fast R-CNN检测模块. 二:Faster-R-CNN框架介绍 三:RPN介绍 3.1训练步骤:1.将图片输入到VGG或Z ...
- 【目标检测】SSD+Tensorflow 300&512 配置详解
SSD_300_vgg和SSD_512_vgg weights下载链接[需要科学上网~]: Model Training data Testing data mAP FPS SSD-300 VGG-b ...
- 深度学习与CV教程(12) | 目标检测 (两阶段,R-CNN系列)
作者:韩信子@ShowMeAI 教程地址:http://www.showmeai.tech/tutorials/37 本文地址:http://www.showmeai.tech/article-det ...
- faster RCNN(keras版本)代码讲解(3)-训练流程详情
转载:https://blog.csdn.net/u011311291/article/details/81121519 https://blog.csdn.net/qq_34564612/artic ...
- 非极大值抑制(NMS,Non-Maximum Suppression)的原理与代码详解
1.NMS的原理 NMS(Non-Maximum Suppression)算法本质是搜索局部极大值,抑制非极大值元素.NMS就是需要根据score矩阵和region的坐标信息,从中找到置信度比较高的b ...
- Kaggle网站流量预测任务第一名解决方案:从模型到代码详解时序预测
Kaggle网站流量预测任务第一名解决方案:从模型到代码详解时序预测 2017年12月13日 17:39:11 机器之心V 阅读数:5931 近日,Artur Suilin 等人发布了 Kaggl ...
随机推荐
- NDK下载地址
官方下载地址 http://developer.android.com/ndk/downloads/index.html 没有提供旧版下载链接,只能修改链接方式下载 http://dl.google. ...
- 使用TestFlight测试时候相关内容
前言:记录一下使用TestFlight测试时候相关内容 场景:在我们添加测试员:给测试员发送了邀请:测试员使用TestFlight的时候,其实是有崩溃的次数的记录的,相应的崩溃的信息也是可以查询到的. ...
- vue2.0移除或更改的一些东西
一.vue2.0移除了$index和$key 虽然说现在很多文章说他们的代码是vue2.0版本的,但是有一些仔细一看,发现并不全是2.0版本,有些语法还是1.0的版本,比如这个$index,$key, ...
- js中实现页面跳转(返回前一页、后一页)
一:JS 重载页面,本地刷新,返回上一页 代码如下: <a href="javascript:history.go(-1)">返回上一页</a> <a ...
- Reverse a String-freecodecamp算法题目
Reverse a String(翻转字符串) 题目要求: 把字符串转化成数组 借助数组的reverse方法翻转数组顺序 把数组转化成字符串 思路: 用.split('')将字符串转换成单个字母组成的 ...
- #leetcode刷题之路6- Z 字形变换
将一个给定字符串根据给定的行数,以从上往下.从左到右进行 Z 字形排列.比如输入字符串为 "LEETCODEISHIRING" 行数为 3 时,排列如下:L C I ...
- BZOJ2844: albus就是要第一个出场(线性基)
Time Limit: 6 Sec Memory Limit: 128 MBSubmit: 2054 Solved: 850[Submit][Status][Discuss] Descriptio ...
- centos7中vsftp的搭建
开启vsftpd:service vsftpd start关闭vsftp:service vsftpd stop 安装vsftpd: yum -y install vsftpd 建立vsftpd帐号: ...
- 【Linux】wget: command not found的两种解决方法
1.rpm 安装 下载wget的RPM包: http://mirrors.163.com/centos/6.8/os/x86_64/Packages/wget-1.12-8.el6.x86_64.rp ...
- python的pymysql模块简介
一.介绍 在python中用pymysql模块来对mysql进行操作,该模块本质就是一个套接字客户端软件,使用前需要事先安装 pip3 install pymysql 二.操作简介 import py ...
