Qt信号之自定义数据类型
【1】为什么需要自定义数据类型?
内置类型毕竟很有局限性,否则为什么还需要类呢。总之,有时候,我们多么希望信号能发送自定义数据类型。
幸哉~ Qt是支持自定义信号,且自定义信号可以发送自定义数据类型的对象。
【2】使用方法(声明 和 注册自定义数据类型)
1)引入头文件:#include<QMetaType>
2)添加声明:利用宏 Q_DECLARE_METATYPE
3)注册:利用方法 qRegisterMetaType
【3】实例Demo
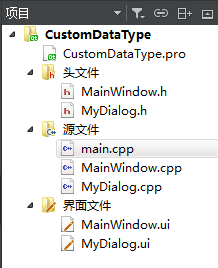
1.文件目录(为了更好的模拟现实项目的需求,示例程序逻辑比较复杂)
2.pro文件
 #-------------------------------------------------

 #

 # Project created by QtCreator --27T21::

 #

 #-------------------------------------------------

 QT       += core gui

 greaterThan(QT_MAJOR_VERSION, ): QT += widgets

 TARGET = CustomDataType

 TEMPLATE = app

 DEFINES += QT_DEPRECATED_WARNINGS

 SOURCES += main.cpp\

     MyDialog.cpp \

     MainWindow.cpp

 HEADERS  += \

     MyDialog.h \

     MainWindow.h

 FORMS    += \

     MyDialog.ui \

     MainWindow.ui
3.MyDialog.h(自定义数据类型CustomDataType,使用宏Q_DECLARE_METATYPE声明数据类型)
 #ifndef MYDIALOG_H

 #define MYDIALOG_H

 #include <QDialog>

 #include <QMetaType>

 namespace Ui

 {

     class MyDialog;

 }

 class CustomDataType

 {

 public:

     CustomDataType(int n = ) : m_nValue(n) {}

     ~CustomDataType() {}

     int getValue() const { return m_nValue; }

     void setValue(int nValue) { m_nValue = nValue; }

 private:

     int m_nValue;

 };

 class MyDialog : public QDialog

 {

     Q_OBJECT

 public:

     explicit MyDialog(QWidget *parent = );

     ~MyDialog();

 public slots:

     void onTextChanged(const QString &str);

 signals:

     void postData(const CustomDataType &data);

 protected:

     void closeEvent(QCloseEvent *event);

 private:

     Ui::MyDialog *m_pUI;

     CustomDataType m_data;

 };

 Q_DECLARE_METATYPE(CustomDataType)

 #endif // MYDIALOG_H
4.MyDialog.cpp(构造函数中利用qRegisterMetaType注册自定义数据类型)
 #include "MyDialog.h"

 #include "ui_MyDialog.h"

 MyDialog::MyDialog(QWidget *parent) :

     QDialog(parent),

     m_pUI(new Ui::MyDialog)

 {

     m_pUI->setupUi(this);

     qRegisterMetaType<CustomDataType>("CustomDataType");

     connect(m_pUI->lineEdit, &QLineEdit::textChanged, this, &MyDialog::onTextChanged);

 }

 MyDialog::~MyDialog()

 {

     if (m_pUI)

     {

         delete m_pUI;

         m_pUI = Q_NULLPTR;

     }

 }

 void MyDialog::closeEvent(QCloseEvent *event)

 {

     emit postData(m_data);

     QDialog::closeEvent(event);

 }

 void MyDialog::onTextChanged(const QString & str)

 {

     bool bOK = false;

     int nNumber = str.toInt(&bOK);

     bOK ? m_data.setValue(nNumber) : m_data.setValue(-);

 }
5.MainWindow.h(业务类中直接定义槽函数,利用自定义数据类型作为参数类型即可)
 #ifndef MAINWINDOW_H

 #define MAINWINDOW_H

 #include <QDebug>

 #include <QMainWindow>

 #include "MyDialog.h"

 namespace Ui

 {

     class MainWindow;

 }

 class MainWindow : public QMainWindow

 {

     Q_OBJECT

 public:

     explicit MainWindow(QWidget *parent = );

     ~MainWindow();

 public slots:

     void onPostData(const CustomDataType &data);

     void onPushButtonPress();

 private:

     MyDialog m_dialog;

     Ui::MainWindow *m_pUI;

 };

 #endif // MAINWINDOW_H
6.MainWindow.cpp(connect正常连接信号与槽,并定义槽函数)
 #include "MainWindow.h"

 #include "ui_mainwindow.h"

 MainWindow::MainWindow(QWidget *parent)

     : QMainWindow(parent)

     , m_pUI(new Ui::MainWindow)

 {

     m_pUI->setupUi(this);

     connect(&m_dialog, &MyDialog::postData, this, &MainWindow::onPostData);

     connect(m_pUI->pushButton, &QPushButton::pressed, this, &MainWindow::onPushButtonPress);

 }

 MainWindow::~MainWindow()

 {

     if (m_pUI)

     {

         delete m_pUI;

         m_pUI = Q_NULLPTR;

     }

 }

 void MainWindow::onPostData(const CustomDataType &data)

 {

     m_pUI->pushButton->setText(QString::number(data.getValue()));

 }

 void MainWindow::onPushButtonPress()

 {

     m_dialog.show();

 }
7.main.cpp
 #include "MainWindow.h"

 #include <QApplication>

 int main(int argc, char *argv[])

 {

     QApplication a(argc, argv);

     MainWindow w;

     w.show();

     return a.exec();

 }
8.ui文件请自理。
【4】运行效果图
按顺序图1->图2->图3
图1:弹出主窗体,主窗体中央部位放置一个PushButton,点击PushButton后,弹出图2对话框。
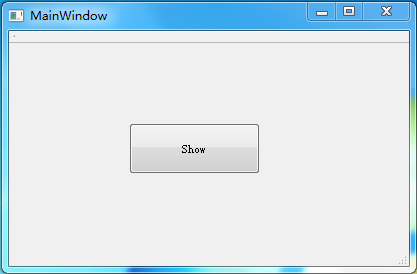
图2:对话框中间放置一个LineEdit,编辑数值123456,然后关闭对话框。
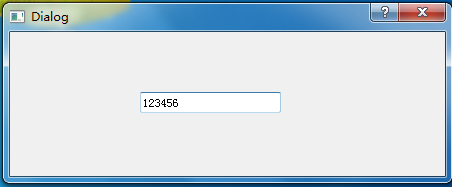
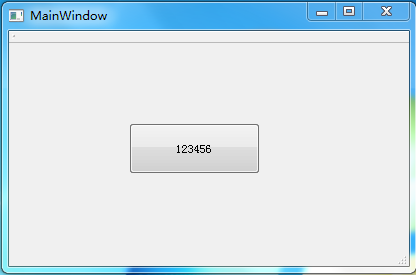
图3:当图2对话框被关闭时,会发送信号,信号会附加自定义数据类型的数据对象。
主窗体的响应槽函数从自定义数据对象中获取值,然后刷新PushButton文本为设置的数据值。
【5】源码剖析
1)宏 Q_DECLARE_METATYPE
源码如下。摘自版本路径(C:\Qt\Qt5.7.1\5.7\msvc2013\include\QtCore\qmetatype.h)
 #define Q_DECLARE_METATYPE(TYPE) Q_DECLARE_METATYPE_IMPL(TYPE)

 #define Q_DECLARE_METATYPE_IMPL(TYPE)                                   \

     QT_BEGIN_NAMESPACE                                                  \

     template <>                                                         \

     struct QMetaTypeId< TYPE >                                          \

     {                                                                   \

         enum { Defined =  };                                           \

         static int qt_metatype_id()                                     \

             {                                                           \

                 static QBasicAtomicInt metatype_id = Q_BASIC_ATOMIC_INITIALIZER(); \

                 if (const int id = metatype_id.loadAcquire())           \

                     return id;                                          \

                 const int newId = qRegisterMetaType< TYPE >(#TYPE,      \

                               reinterpret_cast< TYPE *>(quintptr(-))); \

                 metatype_id.storeRelease(newId);                        \

                 return newId;                                           \

             }                                                           \

     };                                                                  \

     QT_END_NAMESPACE

 #ifndef Q_BASIC_ATOMIC_INITIALIZER

 #  define Q_BASIC_ATOMIC_INITIALIZER(a) { (a) }

 #endif
2) 模板函数qRegisterMetaType
源码如下。摘自版本路径(C:\Qt\Qt5.7.1\5.7\msvc2013\include\QtCore\qmetatype.h)
 template <typename T>

 int qRegisterMetaType(const char *typeName

 #ifndef Q_QDOC

     , T * dummy = Q_NULLPTR

     , typename QtPrivate::MetaTypeDefinedHelper<T, QMetaTypeId2<T>::Defined && !QMetaTypeId2<T>::IsBuiltIn>::DefinedType defined =

         QtPrivate::MetaTypeDefinedHelper<T, QMetaTypeId2<T>::Defined && !QMetaTypeId2<T>::IsBuiltIn>::Defined

 #endif

 )

 {

 #ifdef QT_NO_QOBJECT

     QT_PREPEND_NAMESPACE(QByteArray) normalizedTypeName = typeName;

 #else

     QT_PREPEND_NAMESPACE(QByteArray) normalizedTypeName = QMetaObject::normalizedType(typeName);

 #endif

     return qRegisterNormalizedMetaType<T>(normalizedTypeName, dummy, defined);

 }

 template<typename T, bool defined>

 struct MetaTypeDefinedHelper

 {

     enum DefinedType { Defined = defined };

 };

 template <typename T>

 int qRegisterNormalizedMetaType(const QT_PREPEND_NAMESPACE(QByteArray) &normalizedTypeName

 #ifndef Q_QDOC

     , T * dummy =

     , typename QtPrivate::MetaTypeDefinedHelper<T, QMetaTypeId2<T>::Defined && !QMetaTypeId2<T>::IsBuiltIn>::DefinedType defined =

         QtPrivate::MetaTypeDefinedHelper<T, QMetaTypeId2<T>::Defined && !QMetaTypeId2<T>::IsBuiltIn>::Defined

 #endif

 )

 {

 #ifndef QT_NO_QOBJECT

     Q_ASSERT_X(normalizedTypeName == QMetaObject::normalizedType(normalizedTypeName.constData()),

                "qRegisterNormalizedMetaType",

                "qRegisterNormalizedMetaType was called with a not normalized type name, please call qRegisterMetaType instead.");

 #endif

     const int typedefOf = dummy ? - : QtPrivate::QMetaTypeIdHelper<T>::qt_metatype_id();

     if (typedefOf != -)

         return QMetaType::registerNormalizedTypedef(normalizedTypeName, typedefOf);

     QMetaType::TypeFlags flags(QtPrivate::QMetaTypeTypeFlags<T>::Flags);

     if (defined)

         flags |= QMetaType::WasDeclaredAsMetaType;

     const int id = QMetaType::registerNormalizedType(normalizedTypeName,

                                    QtMetaTypePrivate::QMetaTypeFunctionHelper<T>::Destruct,

                                    QtMetaTypePrivate::QMetaTypeFunctionHelper<T>::Construct,

                                    int(sizeof(T)),

                                    flags,

                                    QtPrivate::MetaObjectForType<T>::value());

     if (id > )

     {

         QtPrivate::SequentialContainerConverterHelper<T>::registerConverter(id);

         QtPrivate::AssociativeContainerConverterHelper<T>::registerConverter(id);

         QtPrivate::MetaTypePairHelper<T>::registerConverter(id);

         QtPrivate::MetaTypeSmartPointerHelper<T>::registerConverter(id);

     }

     return id;

 }
详细内容。
Good Good Study,Day Day Up.
顺序 选择 循环 总结
Qt信号之自定义数据类型的更多相关文章
- 如何在Qt中使用自定义数据类型
这里我们使用下面这个struct来做说明(这里不管是struct还是class都一样): struct Player { int number; QString firstName; QString ...
- QT 信号槽connect中解决自定义数据类型或数组作为函数参数的问题——QT qRegisterMetaType 注册MetaType——关键:注册自定义数据类型或QMap等容器类
一般情况下信号槽直接连接方式不会出现问题,但是如果信号与槽在不同线程或Qt::QueuedConnection方式连接,可能会在连接期间报以下类似问题,如: QObject::connect: Can ...
- Qt之创建自定义类型
摘要: 简述 当使用Qt创建用户界面时,特别是那些带有特殊控制和特征的界面时,开发者通常需要创建新数据类型来扩展或替换Qt现有的的值类型集合. 标准类型,比如:QSize.QColor和QString ...
- QT信号和槽
QT信号和槽 ============ 信号和槽是一种高级接口,应用于对象之间的通信,它是 QT 的核心特性.要正确的处理信号和槽,必须借助一个称为 moc(Meta Object Compiler) ...
- 转: Qt信号槽实现原理 清晰明了
转: https://blog.csdn.net/perfectguyipeng/article/details/78082360 本文使用 ISO C++ 一步一步实现了一个极度简化的信号与槽的系统 ...
- QT信号槽详解
1 QT信号槽详解 1.1 信号和槽的定义 信号是触发信号,例如按钮的点击触发一个clicked信号,槽是用来接收信号,并处理信号,相当于信号响应函数.一个信号可以关联多个槽函数,信 ...
- 自定义数据类型使用QVariant转换的方法
QVariant类型的放入和取出必须是相对应的,你放入一个int就必须按int取出,不能用toString(), Qt不会帮你自动转换. 数据核心无非就是一个 union,和一个标记类型的type:传 ...
- Qt信号槽-原理分析
目录 一.问题 二.Moc 1.变量 2.Q_OBJECT展开后的函数声明 3.自定义信号 三.connect 四.信号触发 1.直连 2.队列连接 五.总结 六.推荐阅读 一.问题 学习Qt有一段时 ...
- QT使用提升自定义组件
QT使用提升自定义组件 QTC++QT自定义 QT 组件提升来实现自定义功能 介绍 我们在使用QT设置界面之后,往往需要自己实现一些方法,如果是单独 的还好,但是如果遇到很多同类型的都有需求, 比如 ...
随机推荐
- 使用poi写excel文件
- html多文件上传,可支持预览
<!DOCTYPE html> <html lang="en"> <head> <meta charset="UTF-8&quo ...
- 【JMeter】JMeter如何输出测试报告
环境要求 1:jmeter3.0版本之后开始支持动态生成测试报表 2:jdk版本1.7以上 3:需要jmx脚本文件 基本操作 1:在你的脚本文件路径下,执行cmd命令:jmeter -n -t tes ...
- CGPoint,CGSize,CGRect转NSString以及CGRect的一些便捷实用方法
打印代码小技巧 UIKIT_EXTERN NSString *NSStringFromCGPoint(CGPoint point); UIKIT_EXTERN NSString *NSStringFr ...
- what's the python之异常处理
what's the 异常 python程序中会出现异常,即bug.若出现异常程序就报错,异常之后的代码就不会继续往下执行,这是一个正常程序不允许出现的,但是在某些程序交互的时候难免会因为用户输入问题 ...
- [django]梳理drf知识点2
外键关系的自动维护 原始提交的server数据 { ... "manufacturer": "DELL", "model_name": &q ...
- token的使用流程
- IntelliJ IDEA 配置tomcat 启动项目
1.打开file中setting中搜索Application Servers,如下图 2.添加服务器类型,例如tomcat,如下图,添加完成之后可以选定tomcat的目录,tomcat Home配置t ...
- seq2seq和attention应用到文档自动摘要
一.摘要种类 抽取式摘要 直接从原文中抽取一些句子组成摘要.本质上就是个排序问题,给每个句子打分,将高分句子摘出来,再做一些去冗余(方法是MMR)等.这种方式应用最广泛,因为比较简单.经典方法有Lex ...
- 从零开始一起学习SLAM | 学习SLAM到底需要学什么?
SLAM涉及的知识面很广,我简单总结了 “SLAM知识树” 如下所示: (公众号菜单栏回复 “树” 可获得清晰版) 可以看到涉及的知识面还是比较广的.这里放出一张SLAM圈子里喜闻乐见的表达悲喜交加心 ...