Java的oauth2.0 服务端与客户端的实现
oauth原理简述
oauth本身不是技术,而是一项资源授权协议,重点是协议!Apache基金会提供了针对Java的oauth封装。我们做Java web项目想要实现oauth协议进行资源授权访问,直接使用该封装就可以。
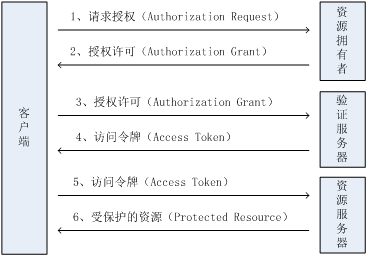
oauth2.0 的协议实现原理,所有的技术层面的开发都是围绕这张图。
整个开发流程简述一下:
1、 在客户端web项目中构造一个oauth的客户端请求对象(OAuthClientRequest),在此对象中携带客户端信息(clientId、accessTokenUrl、response_type、redirectUrl),将此信息放入http请求中,重定向到服务端。此步骤对应上图1
2、 在服务端web项目中接受第一步传过来的request,从中获取客户端信息,可以自行验证信息的可靠性。同时构造一个oauth的code授权许可对象(OAuthAuthorizationResponseBuilder),并在其中设置授权码code,将此对象传回客户端。此步骤对应上图2
3、 在在客户端web项目中接受第二步的请求request,从中获得code。同时构造一个oauth的客户端请求对象(OAuthClientRequest),此次在此对象中不仅要携带客户端信息(clientId、accessTokenUrl、clientSecret、GrantType、redirectUrl),还要携带接受到的code。再构造一个客户端请求工具对象(oAuthClient),这个工具封装了httpclient,用此对象将这些信息以post(一定要设置成post)的方式请求到服务端,目的是为了让服务端返回资源访问令牌。此步骤对应上图3。(另外oAuthClient请求服务端以后,会自行接受服务端的响应信息。
4、 在服务端web项目中接受第三步传过来的request,从中获取客户端信息和code,并自行验证。再按照自己项目的要求生成访问令牌(accesstoken),同时构造一个oauth响应对象(OAuthASResponse),携带生成的访问指令(accesstoken),返回给第三步中客户端的oAuthClient。oAuthClient接受响应之后获取accesstoken,此步骤对应上图4
5、 此时客户端web项目中已经有了从服务端返回过来的accesstoken,那么在客户端构造一个服务端资源请求对象(OAuthBearerClientRequest),在此对象中设置服务端资源请求URI,并携带上accesstoken。再构造一个客户端请求工具对象(oAuthClient),用此对象去服务端靠accesstoken换取资源。此步骤对应上图5
6、 在服务端web项目中接受第五步传过来的request,从中获取accesstoken并自行验证。之后就可以将客户端请求的资源返回给客户端了。
代码:
客户端:
一、pom依赖:
|
<dependency> <groupId>org.apache.oltu.oauth2</groupId> <artifactId>org.apache.oltu.oauth2.client</artifactId> <version>0.31</version> </dependency> |
二、controller方法:
2.1 向服务端请求授权码code的controller方法:
|
@RequestMapping("/server") @Controller public class ServerController{ String clientId = null; String clientSecret = null; String accessTokenUrl = null; String userInfoUrl = null; String redirectUrl = null; String response_type = null; String code= null; //提交申请code的请求 @RequestMapping("/requestServerCode") public String requestServerFirst(HttpServletRequestrequest, HttpServletResponseresponse, RedirectAttributesattr) throwsOAuthProblemException{ clientId = "clientId"; clientSecret = "clientSecret"; accessTokenUrl = "responseCode"; redirectUrl = "http://localhost:8081/oauthclient01/server/callbackCode"; response_type = "code"; OAuthClient oAuthClient =new OAuthClient(new URLConnectionClient()); String requestUrl = null; try { //构建oauthd的请求。设置请求服务地址(accessTokenUrl)、clientId、response_type、redirectUrl OAuthClientRequest accessTokenRequest = OAuthClientRequest .authorizationLocation(accessTokenUrl) .setResponseType(response_type) .setClientId(clientId) .setRedirectURI(redirectUrl) .buildQueryMessage(); requestUrl = accessTokenRequest.getLocationUri(); System.out.println(requestUrl); } catch (OAuthSystemExceptione) { e.printStackTrace(); } return "redirect:http://localhost:8082/oauthserver/"+requestUrl ; } |
此段代码对应开发步骤1.其中accessTokenUrl是服务端返回code的controller方法映射地址。redirectUrl是告诉服务端,code要传回客户端的一个controller方法,该方法的映射地址就是redirectUrl。
2.2 向服务端请求资源访问令牌access token的controller方法:
|
//接受客户端返回的code,提交申请access token的请求 @RequestMapping("/callbackCode") public Object toLogin(HttpServletRequestrequest)throws OAuthProblemException{ System.out.println("-----------客户端/callbackCode--------------------------------------------------------------------------------"); clientId = "clientId"; clientSecret = "clientSecret"; accessTokenUrl="http://localhost:8082/oauthserver/responseAccessToken"; userInfoUrl = "userInfoUrl"; redirectUrl = "http://localhost:8081/oauthclient01/server/accessToken"; HttpServletRequest httpRequest = (HttpServletRequest)request; code = httpRequest.getParameter("code"); System.out.println(code); OAuthClient oAuthClient =new OAuthClient(new URLConnectionClient()); try { OAuthClientRequest accessTokenRequest = OAuthClientRequest .tokenLocation(accessTokenUrl) .setGrantType(GrantType.AUTHORIZATION_CODE) .setClientId(clientId) .setClientSecret(clientSecret) .setCode(code) .setRedirectURI(redirectUrl) .buildQueryMessage(); //去服务端请求access token,并返回响应 OAuthAccessTokenResponse oAuthResponse =oAuthClient.accessToken(accessTokenRequest, OAuth.HttpMethod.POST); //获取服务端返回过来的access token String accessToken = oAuthResponse.getAccessToken(); //查看access token是否过期 Long expiresIn =oAuthResponse.getExpiresIn(); System.out.println("客户端/callbackCode方法的token:::"+accessToken); System.out.println("-----------客户端/callbackCode--------------------------------------------------------------------------------"); return"redirect:http://localhost:8081/oauthclient01/server/accessToken?accessToken="+accessToken; } catch (OAuthSystemExceptione) { e.printStackTrace(); } return null; } |
此方法对应开发步骤3的全部和步骤4的一半,也就是还包括接受服务端返回的access token。最后的redirect地址不是服务端的地址,只是将此token传进客户端的另一个方法,该方法就是最后的资源请求方法。
2.3 利用服务端给的token去请求服务端的资源的controller方法。这里说的资源就是服务端数据库中的user表的uname值的拼接字段。
|
//接受服务端传回来的access token,由此token去请求服务端的资源(用户信息等) @RequestMapping("/accessToken") public ModelAndView accessToken(StringaccessToken) { System.out.println("---------客户端/accessToken----------------------------------------------------------------------------------"); userInfoUrl = "http://localhost:8082/oauthserver/userInfo"; System.out.println("accessToken"); OAuthClient oAuthClient =new OAuthClient(new URLConnectionClient()); try { OAuthClientRequest userInfoRequest =new OAuthBearerClientRequest(userInfoUrl) .setAccessToken(accessToken).buildQueryMessage(); OAuthResourceResponse resourceResponse =oAuthClient.resource(userInfoRequest, OAuth.HttpMethod.GET, OAuthResourceResponse.class); String username = resourceResponse.getBody(); System.out.println(username); ModelAndView modelAndView =new ModelAndView("usernamePage"); modelAndView.addObject("username",username); System.out.println("---------客户端/accessToken----------------------------------------------------------------------------------"); returnmodelAndView; } catch (OAuthSystemExceptione) { e.printStackTrace(); } catch (OAuthProblemExceptione) { e.printStackTrace(); } System.out.println("---------客户端/accessToken----------------------------------------------------------------------------------"); return null; } |
此方法对应开发步骤5的全部和步骤6的一半,也就是还包括接受服务端返回的资源信息。获取了资源信息之后,其余的开发就和平时的springmvc一毛一样了。
以上三个方法我全部封装在同一个ServerController类中。
服务端
三 pom依赖
|
1. <dependency> 2. <groupId>org.apache.oltu.oauth2</groupId> 3. <artifactId>org.apache.oltu.oauth2.authzserver</artifactId> 4. <version>0.31</version> 5. </dependency> 6. <dependency> 7. <groupId>org.apache.oltu.oauth2</groupId> 8. <artifactId>org.apache.oltu.oauth2.resourceserver</artifactId> 9. <version>0.31</version> 10. </dependency> |
四 controller方法
4.1 向客户端返回授权码code的controller方法
|
@Controller public class AuthorizeController{ @Autowired private UserServiceuserService; //向客户端返回授权许可码 code @RequestMapping("/responseCode") public Object toShowUser(Modelmodel, HttpServletRequestrequest){ System.out.println("----------服务端/responseCode--------------------------------------------------------------"); try { //构建OAuth授权请求 OAuthAuthzRequest oauthRequest =new OAuthAuthzRequest(request); /*oauthRequest.getClientId(); oauthRequest.getResponseType(); oauthRequest.getRedirectURI(); System.out.println(oauthRequest.getClientId()); System.out.println(oauthRequest.getResponseType()); System.out.println(oauthRequest.getRedirectURI());*/ if(oauthRequest.getClientId()!=null&&oauthRequest.getClientId()!="") { //设置授权码 String authorizationCode ="authorizationCode"; //利用oauth授权请求设置responseType,目前仅支持CODE,另外还有TOKEN String responseType =oauthRequest.getParam(OAuth.OAUTH_RESPONSE_TYPE); //进行OAuth响应构建 OAuthASResponse.OAuthAuthorizationResponseBuilderbuilder = OAuthASResponse.authorizationResponse(request, HttpServletResponse.SC_FOUND); //设置授权码 builder.setCode(authorizationCode); //得到到客户端重定向地址 String redirectURI =oauthRequest.getParam(OAuth.OAUTH_REDIRECT_URI); //构建响应 final OAuthResponseresponse =builder.location(redirectURI).buildQueryMessage(); System.out.println("服务端/responseCode内,返回的回调路径:"+response.getLocationUri()); System.out.println("----------服务端/responseCode--------------------------------------------------------------"); String responceUri =response.getLocationUri(); //根据OAuthResponse返回ResponseEntity响应 HttpHeaders headers =new HttpHeaders(); try { headers.setLocation(new URI(response.getLocationUri())); } catch (URISyntaxExceptione) { // TODO Auto-generated catch block e.printStackTrace(); } return"redirect:"+responceUri; } } catch (OAuthSystemExceptione) { e.printStackTrace(); } catch (OAuthProblemExceptione) { e.printStackTrace(); } System.out.println("----------服务端/responseCode--------------------------------------------------------------"); return null; } } |
此段代码对应开发步骤2
4.2 向客户端返回资源访问令牌accesstoken的controller方法
|
@Controller public class AccessTokenController { //获取客户端的code码,向客户端返回access token @RequestMapping(value="/responseAccessToken",method = RequestMethod.POST) public HttpEntity token(HttpServletRequest request){ System.out.println("--------服务端/responseAccessToken-----------------------------------------------------------"); OAuthIssuer oauthIssuerImpl=null; OAuthResponse response=null; //构建OAuth请求 try { OAuthTokenRequest oauthRequest =new OAuthTokenRequest(request); String authCode =oauthRequest.getParam(OAuth.OAUTH_CODE); String clientSecret = oauthRequest.getClientSecret(); if(clientSecret!=null||clientSecret!=""){ //生成Access Token oauthIssuerImpl =new OAuthIssuerImpl(new MD5Generator()); final StringaccessToken =oauthIssuerImpl.accessToken(); System.out.println(accessToken); System.out.println("--oooo---"); //生成OAuth响应 response = OAuthASResponse .tokenResponse(HttpServletResponse.SC_OK) .setAccessToken(accessToken) .buildJSONMessage(); } System.out.println("--------服务端/responseAccessToken-----------------------------------------------------------"); //根据OAuthResponse生成ResponseEntity return new ResponseEntity(response.getBody(), HttpStatus.valueOf(response.getResponseStatus())); } catch (OAuthSystemExceptione) { // TODO Auto-generated catch block e.printStackTrace(); } catch (OAuthProblemExceptione) { // TODO Auto-generated catch block e.printStackTrace(); } System.out.println("--------服务端/responseAccessToken-----------------------------------------------------------"); return null; } } |
此段代码对应开发步骤4的前面一半,即服务端验证code、生成token并给客户端
4.3 向客户端返回请求资源(username)的controller方法
|
@Controller public class UserInfoController { @Autowired private UserServiceuserService; @RequestMapping("/userInfo") public HttpEntity userInfo(HttpServletRequest request)throws OAuthSystemException{ System.out.println("-----------服务端/userInfo-------------------------------------------------------------"); try { //获取客户端传来的OAuth资源请求 OAuthAccessResourceRequest oauthRequest =new OAuthAccessResourceRequest(request, ParameterStyle.QUERY); //获取Access Token String accessToken =oauthRequest.getAccessToken(); System.out.println("accessToken"); //验证Access Token /*if (accessToken==null||accessToken=="") { // 如果不存在/过期了,返回未验证错误,需重新验证 OAuthResponse oauthResponse = OAuthRSResponse .errorResponse(HttpServletResponse.SC_UNAUTHORIZED) .setError(OAuthError.ResourceResponse.INVALID_TOKEN) .buildHeaderMessage(); HttpHeaders headers = new HttpHeaders(); headers.add(OAuth.HeaderType.WWW_AUTHENTICATE, oauthResponse.getHeader(OAuth.HeaderType.WWW_AUTHENTICATE)); return new ResponseEntity(headers, HttpStatus.UNAUTHORIZED); } */ //返回用户名 User user=userService.selectByPrimaryKey(1); String username = accessToken+"---"+Math.random()+"----"+user.getUname(); System.out.println(username); System.out.println("服务端/userInfo::::::ppp"); System.out.println("-----------服务端/userInfo----------------------------------------------------------"); return new ResponseEntity(username, HttpStatus.OK); } catch (OAuthProblemExceptione) { // TODO Auto-generated catch block e.printStackTrace(); //检查是否设置了错误码 String errorCode =e.getError(); if (OAuthUtils.isEmpty(errorCode)) { OAuthResponse oauthResponse = OAuthRSResponse .errorResponse(HttpServletResponse.SC_UNAUTHORIZED) .buildHeaderMessage(); HttpHeaders headers =new HttpHeaders(); headers.add(OAuth.HeaderType.WWW_AUTHENTICATE, oauthResponse.getHeader(OAuth.HeaderType.WWW_AUTHENTICATE)); return new ResponseEntity(headers, HttpStatus.UNAUTHORIZED); } OAuthResponse oauthResponse = OAuthRSResponse .errorResponse(HttpServletResponse.SC_UNAUTHORIZED) .setError(e.getError()) .setErrorDescription(e.getDescription()) .setErrorUri(e.getUri()) .buildHeaderMessage(); HttpHeaders headers =new HttpHeaders(); headers.add(OAuth.HeaderType.WWW_AUTHENTICATE, oauthResponse.getHeader(OAuth.HeaderType.WWW_AUTHENTICATE)); System.out.println("-----------服务端/userInfo------------------------------------------------------------------------------"); return new ResponseEntity(HttpStatus.BAD_REQUEST); } } } |
此代码对应开发步骤6的前一半。即服务端验证access token、并将资源信息给客户端
至此,整个Java集成oauth就完成了。
另外:需要验证的客户端信息,如clientId、clientSecret都是自行指定,与自己的项目相关,同时客户端信息的验证方法也是依情况而定,没有什么具体标准,我的demo里为了方便,基本上省略了客户端信息验证,都是默认合法。但是accessTokenUrl、userInfoUrl、redirectUrl一定要与自己的项目路径相符合。response_type、GrantType有标准模板,见代码。服务端生成的access token也是有标准的,见代码,too。
其他的所有模块和代码就是普通的spring-springmvc-mybatis了。
项目运行:
项目下载地址:点击打开链接
下载项目压缩包,解压,里面两个maven项目:oauthserver和oauthclient01,分别对应oauth服务端和客户端。
服务端对应的数据库sql文件在源码压缩包里可以看到。
两个项目分别用8082端口(服务端端口)和8081端口(客户端端口)部署并启动。
输入客户端地址:http://localhost:8081/oauthclient01/index,显示如下:
点击到服务端请求资源,就可以得到如下结果:
即获取到了服务端的资源。
Java的oauth2.0 服务端与客户端的实现的更多相关文章
- oauth2.0服务端与客户端搭建
oauth2.0服务端与客户端搭建 - 推酷 今天搭建了oauth2.0服务端与客户端.把搭建的过程记录一下.具体实现的功能是:client.ruanwenwu.cn的用户能够通过 server.ru ...
- java http post/get 服务端和客户端实现json传输
注:本文来源于<java http post/get 服务端和客户端实现json传输> 最近需要写http post接口所以学习下. 总的还是不难直接上源码! PostHttpClient ...
- 创建自己的OAuth2.0服务端(一)
如果对OAuth2.0有任何的疑问,请先熟悉OAuth2.0基础的文章:http://www.cnblogs.com/alunchen/p/6956016.html 1. 前言 本篇文章时对 客户端的 ...
- Apache Oltu 实现 OAuth2.0 服务端【授权码模式(Authorization Code)】
要实现OAuth服务端,就得先理解客户端的调用流程,服务提供商实现可能也有些区别,实现OAuth服务端的方式很多,具体可能看 http://oauth.net/code/ 各语言的实现有(我使用了Ap ...
- java网络编程-单线程服务端与客户端通信
该服务器一次只能处理一个客户端请求;p/** * 利用Socket进行简单服务端与客户端连接 * 这是服务端 */public class EchoServer { private ServerSoc ...
- 写个OAuth2.0的请求端来测试自己的OAuth2.0服务端(二)
在上一篇文章中,我们介绍了怎么创建自己的服务器,现在我们开始写个client端,来测试. 我们创建一个MVC项目,叫TestOAuthClient 1. 代码开始 1)第一步,我们创建一个MainCo ...
- Java WebService 简单实例-服务端和客户端
转载自ITeye:https://www.iteye.com/topic/1135747/
- Java TCP服务端向客户端发送图片
/** * 1.创建TCP服务端,TCP客户端 * 2.服务端等待客户端连接,客户端连接后,服务端向客户端写入图片 * 3.客户端收到后进行文件保存 * @author Administrator * ...
- 一些java考过的测试题和自己制作模拟服务端和客户端
媒体 1,java环境变量: PATH: .;%JAVA_HOME%\bin;%JAVA_HOME%\jre\bin; CLASSPATH: .;%JAVA_HOME%\jre\lib\rt.jar ...
随机推荐
- jquery----用户密码验证
<!DOCTYPE html> <html lang="en"> <head> <meta charset="UTF-8&quo ...
- poj2992 阶乘分解
/* 将C(n,k)质因数分解,然后约束个数按公式计算 */ #include<iostream> #include<cstring> #include<cstdio&g ...
- python+selenium十二:一个输入框双层input标签
先点击第一个,再对第二个进行操作,否则操作失败 driver.find_element_by_css_selector(".pwd").click()driver.find_ele ...
- myEclipse配置java版本(环境、项目、编译)
从别的地方导入一个项目的时候,经常会遇到eclipse/Myeclipse报Description Resource Path Location Type Java compiler level d ...
- python 全栈开发,Day121(DButils,websocket)
昨日内容回顾 1.Flask路由 1.endpoint="user" # 反向url地址 2.url_address = url_for("user") 3.m ...
- poj 1631 最多能有多少条不交叉的线 最大非降子序列 (LIS)
左边的数字是1 2 3 4 5.... 右边的数字 第一个输入的和1连 第2个输入的和2连 右边再按从小到大排序 要求连线不能交叉 问最多能有多少条不交叉的线 假如右边有5个1 那么答案会是5 所以是 ...
- 跨域资源共享CORS
CORS是一个W3C标准,全称是"跨域资源共享"(Cross-origin resource sharing).它允许浏览器向跨源服务器,发出XMLHttpRequest请求,从而 ...
- AndroidStudio将html5打包成apk
我想将html5的动画效果打包成手机app,以方便传播.而在android开发的组件中就直接由webview可以访问网页,另外在android工程中,assets文件夹下的内容是不会在被编译的,因此可 ...
- Python list 函数
list 修改列表元素: 下标直接修改 list[下标]=值 列表添加元素: list.append(值)末尾追加 列表插入元素: list.insert(下标,元素) 列表删除元素: del li ...
- c++ primer 笔记 (三)
标准库类型string 和 vector ,分别定义了大小可变的字符串和集合. bitset,提供了一个抽象方法来操作位的集合.提供更方便的处理位的方式(相对于整型值上 ...


