springboot(三 使用mybatis +springboot 完成简单的增删改查)
先说一些注解:
@EnableAutoConfiguration 可以帮助SpringBoot应用将所有符合条件的@Configuration配置都加载到当前SpringBoot创建并使用的IoC容器。
@ComponentScan 扫包
@Configuration 用于定义配置类,可替换xml配置文件
使用以上是三个注解 则可以实现 springboot 的启动类的功能,不过每次 写的太得 所以 可以使用@SpringBootApplication 代替三个注解,实现启动类功能
- @Target(ElementType.TYPE)
- @Retention(RetentionPolicy.RUNTIME)
- @Documented
- @Inherited
- @SpringBootConfiguration
- @EnableAutoConfiguration
- @ComponentScan(excludeFilters = {
- @Filter(type = FilterType.CUSTOM, classes = TypeExcludeFilter.class),
- @Filter(type = FilterType.CUSTOM, classes = AutoConfigurationExcludeFilter.class) })
- public @interface SpringBootApplication
@SringBootApplication只能作用于同级目录之下,其余目录之下无法扫描不起作用
使用springboot搭建mybatis
第一步:导入 mybatis 所需要的依赖
- <?xml version="1.0" encoding="UTF-8"?>
- <project xmlns="http://maven.apache.org/POM/4.0.0"
- xmlns:xsi="http://www.w3.org/2001/XMLSchema-instance"
- xsi:schemaLocation="http://maven.apache.org/POM/4.0.0 http://maven.apache.org/xsd/maven-4.0.0.xsd">
- <modelVersion>4.0.0</modelVersion>
- <parent>
- <groupId>org.springframework.boot</groupId>
- <artifactId>spring-boot-starter-parent</artifactId>
- <version>2.1.2.RELEASE</version>
- <relativePath /> <!-- lookup parent from repository -->
- </parent>
- <groupId>com.example</groupId>
- <artifactId>springboot-mybatis-demo</artifactId>
- <version>0.0.1-SNAPSHOT</version>
- <name>springboot-mybatis-demo</name>
- <description>Demo project for Spring Boot</description>
- <properties>
- <java.version>1.8</java.version>
- </properties>
- <dependencies>
- <dependency>
- <groupId>org.springframework.boot</groupId>
- <artifactId>spring-boot-starter</artifactId>
- </dependency>
- <dependency>
- <groupId>org.springframework.boot</groupId>
- <artifactId>spring-boot-starter-web</artifactId>
- </dependency>
- <dependency>
- <groupId>org.springframework.boot</groupId>
- <artifactId>spring-boot-starter-test</artifactId>
- <scope>test</scope>
- </dependency>
- <!-- 添加 mybatis所需要的依赖 -->
- <dependency>
- <groupId>org.mybatis.spring.boot</groupId>
- <artifactId>mybatis-spring-boot-starter</artifactId>
- <version>1.1.1</version>
- </dependency>
- <!-- 引入数据库连接 注意版本,版本低了 执行的时候 报错 -->
- <dependency>
- <groupId>mysql</groupId>
- <artifactId>mysql-connector-java</artifactId>
- <version>5.1.46</version>
- </dependency>
- </dependencies>
- <build>
- <plugins>
- <plugin>
- <groupId>org.springframework.boot</groupId>
- <artifactId>spring-boot-maven-plugin</artifactId>
- </plugin>
- </plugins>
- </build>
- </project>
第二步:创建数据库表
CREATE TABLE `users` (
`name` varchar(50) DEFAULT NULL,
`age` int(50) DEFAULT NULL
) ENGINE=InnoDB DEFAULT CHARSET=utf8mb4 COLLATE=utf8mb4_0900_ai_ci

创建一个名为users的表,有两个字段name和age
第三步:编写mapper类 创建一个 名为com.example.mapper的包,并创建 UserMapper接口
- package com.example.mpper;
- import java.util.List;
- import org.apache.ibatis.annotations.Delete;
- import org.apache.ibatis.annotations.Insert;
- import org.apache.ibatis.annotations.Mapper;
- import org.apache.ibatis.annotations.Param;
- import org.apache.ibatis.annotations.Select;
- import org.apache.ibatis.annotations.Update;
- @Mapper//如果不用mapper注解 则需要在启动类中配置@MapperScan(basePackages = { "包名" })
- public interface UserMapper {
- @Select("SELECT * FROM USERS WHERE NAME = #{name}")
- List<com.example.entity.User> findByName(@Param("name") String name);
- @Insert("INSERT INTO USERS(NAME, AGE) VALUES(#{name}, #{age})")
- int insert(@Param("name") String name, @Param("age") Integer age);
- @Delete("DELETE FROM USERS WHERE AGE=#{age}")
- void delete(@Param("age") int age);
- @Update("UPDATE USERS SET AGE=#{age} WHERE NAME=#{name}")
- void update(@Param("name") String name, @Param("age") int age);
- }
- @Mapper注解:mybatis的注解,不用像以前那样配置 xml文件,然后在xml文件里面 写 sql语句了
- 第四步:创建 UserService类,
- package com.example.service;
- import java.util.List;
- import org.springframework.beans.factory.annotation.Autowired;
- import org.springframework.stereotype.Controller;
- import com.example.entity.User;
- import com.example.mpper.UserMapper;
- @Controller
- public class UserService {
- @Autowired
- public UserMapper mapper;
- public List<User> findUser(String name) {
- return mapper.findByName(name);
- }
- public void insertUser(String name, int age) {
- mapper.insert(name, age);
- }
- public void delet(int age) {
- mapper.delete(age);
- }
- public void update(String name, int age) {
- mapper.update(name, age);
- }
- }
第五步: 编写 controller类
- package com.example.controller;
- import java.util.List;
- import org.springframework.beans.factory.annotation.Autowired;
- import org.springframework.stereotype.Controller;
- import org.springframework.web.bind.annotation.RequestMapping;
- import org.springframework.web.bind.annotation.ResponseBody;
- import com.example.entity.User;
- import com.example.service.UserService;
- @Controller
- public class UserController {
- @Autowired
- public UserService service;
- @RequestMapping("/selectUser")
- @ResponseBody
- public List<User> selectUser(String name) {
- List<User> users = service.findUser(name);
- return users;
- }
- @RequestMapping("/insertUser")
- public String insertUser(String name, int age) {
- service.insertUser(name, age);
- return "success";
- }
- @RequestMapping("/deletUser")
- @ResponseBody
- public String deletUser(int age) {
- service.delet(age);
- return "success";
- }
- @RequestMapping("/updateUser")
- @ResponseBody
- public String updateUser(String name, int age) {
- service.update(name, age);
- return "success";
- }
- }
- 第六步:编写启动类
- 编写启动类的时候 选择用的是@SpringBootApplication注解启动,所以 要保证所有的都再同一目录结构
- package com.example;
- import org.springframework.boot.SpringApplication;
- import org.springframework.boot.autoconfigure.SpringBootApplication;
- @SpringBootApplication
- public class SpringbootMybatisDemoApplication {
- public static void main(String[] args) {
- SpringApplication.run(SpringbootMybatisDemoApplication.class, args);
- }
- }
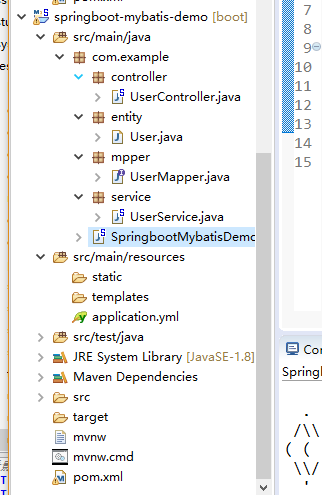
完整项目包结构:
如果只是这样,启动的时候会报错,找不到 数据源,所以我们还需要配置数据源
第七步:配置 数据源 springboot 的配置文件 有两种 一种是properties文件 一种 是yml文件,原来一直用的是properties文件,没有yml文件好用。可读性,编写的时候都要方便些
- spring:
- datasource:
- url: jdbc:mysql://localhost:3306/test?useUnicode=true&characterEncoding=utf8
- driver-class-name: com.mysql.jdbc.Driver
- username: root
- password: root
这里如果 使用yml文件没有自动提示 或者补全的话 可以升级或者安装sts插件,在抛出一个问题 如果有多个数据源的时候springboot如何处理多个数据源,按照上面步骤就可以简单的完成一个 spring boot+mybatis的crud
如果哪里有问题的,有人到了这个文章 则留言 改正...........
springboot(三 使用mybatis +springboot 完成简单的增删改查)的更多相关文章
- ElasticSearch6(三)-- Java API实现简单的增删改查
基于ElasticSearch6.2.4, Java API创建索引.查询.修改.删除,pom依赖和获取es连接 可查看此文章. package com.xsjt.learn; import java ...
- SSM框架之MyBatis框架实现简单的增删改查
MyBatis框架介绍 MyBatis是一个优秀的数据持久层框架,在实体类和SQL语句之间建立映射关系是一种半自动化的ORM实现,其封装性要低于Hibernate,性能优越,并且小巧,简单易学,应用也 ...
- Mybatis的简介+简单实现增删改查案例
@ 目录 总结内容 1. 基本概念 2. Mybatis的使用 需求 配置文件简介 总结 总结内容 1. 基本概念 Mybatis是一款优秀的持久层框架,它支持定制化SQL.存储过程以及高级映射.My ...
- Golang中map的三种声明方式和简单实现增删改查
package main import ( "fmt" ) func main() { test3 := map[string]string{ "one": & ...
- mybatis实现最简单的增删改查
1.数据库设计 2.项目结构(针对User不用管Blogger) User.java package com.yunqing.mybatis.bean; public class User { pri ...
- MyBatis学习--简单的增删改查
jdbc程序 在学习MyBatis的时候先简单了解下JDBC编程的方式,我们以一个简单的查询为例,使用JDBC编程,如下: Public static void main(String[] args) ...
- SpringBoot+Mybatis+Maven+MySQL逆向工程实现增删改查
SpringBoot+Mybatis+MySQL+MAVEN逆向工程实现增删改查 这两天简单学习了下SpringBoot,发现这玩意配置起来是真的方便,相比于SpringMVC+Spring的配置简直 ...
- 小D课堂-SpringBoot 2.x微信支付在线教育网站项目实战_3-2.使用Mybatis注解开发视频列表增删改查
笔记 2.使用Mybatis注解开发视频列表增删改查 讲解:使用Mybatis3.x注解方式 增删改查实操, 控制台打印sql语句 1.控制台打印sql语句 ...
- MyBatis简单的增删改查以及简单的分页查询实现
MyBatis简单的增删改查以及简单的分页查询实现 <? xml version="1.0" encoding="UTF-8"? > <!DO ...
- SpringMVC之简单的增删改查示例(SSM整合)
本篇文章主要介绍了SpringMVC之简单的增删改查示例(SSM整合),这个例子是基于SpringMVC+Spring+Mybatis实现的.有兴趣的可以了解一下. 虽然已经在做关于SpringMVC ...
随机推荐
- git 应用
git - 简易指南 助你开始使用 git 的简易指南,木有高深内容,;). 安装 下载 git OSX 版 下载 git Windows 版 下载 git Linux 版 创建新仓库 创建新文件夹, ...
- 微信导出群记录V3.0
一.序 导出东北师范大学2017级软件工程微信群的聊天记录,形式不限,但需要包含文字.图片和链接,不允许截图. 聊天记录的时间段为2017年11月3日12:00起至2018年1月3日12:00. 二. ...
- hdu4614 Vases and Flowers 线段树
Alice is so popular that she can receive many flowers everyday. She has N vases numbered from 0 to N ...
- LeetCode – Number of Islands
Given a -d grid map of 's (water), count the number of islands. An island is surrounded by water and ...
- 【git】一台机器上使用不同的git账号
1.生成一个新的自定义名称的公钥: ssh-keygen -t rsa -C "shangxiaofei3@163.com" -f ~/.ssh/sxfself 一直点击回车 执行 ...
- 浮动IP(FLOAT IP)
主要谈一谈关于浮动IP的东西,介绍下浮动IP是什么 1.为什么要有浮动IP这个东西 现在有一个场景,在一台Linux上部署一个web应用,应用跑在tomcat里面,linux网卡上的ip是 ...
- Computer Go Programming 学习
https://senseis.xmp.net/?ComputerGoProgramming https://www.worldscientific.com/doi/pdf/10.1142/S0218 ...
- Unity3D协同函数与异步加载功能实战 学习
- .Net Core 应用方向 图谱
.Net Core 应用方向 图谱, 如下图 : 大规模并行计算 是 大数据 和 人工智能 的 基础, 是 未来 大计算能力 的 基础, 网格计算 是 未来 大计算能力 的 一个 分支 . 所以, ...
- centos7 docker私有仓库搭建
习Docker的过程中Docker的私有仓库一直没能成功,就是因为CentOS 6.x和CentOS 7默认引入了支持https认证,每次在push和pull的时候都会报错,今天是周末,利用一天的时间 ...