Nginx安装(zhuan)
http://www.nginx.cn/install
************************
nginx可以使用各平台的默认包来安装,本文是介绍使用源码编译安装,包括具体的编译参数信息。
正式开始前,编译环境gcc g++ 开发库之类的需要提前装好,这里默认你已经装好。
ububtu平台编译环境可以使用以下指令
apt-get install libtool
|
1
2
|
apt-get install build-essential
apt-get install libtool
|
centos平台编译环境使用如下指令
安装make:
|
1
|
yum -y install gcc automake autoconf libtool make
|
安装g++:
|
1
|
yum install gcc gcc-c++
|
下面正式开始
---------------------------------------------------------------------------
一般我们都需要先装pcre, zlib,前者为了重写rewrite,后者为了gzip压缩。
1.选定源码目录
可以是任何目录,本文选定的是/usr/local/src
|
1
|
cd /usr/local/src
|
2.安装PCRE库
ftp://ftp.csx.cam.ac.uk/pub/software/programming/pcre/ 下载最新的 PCRE 源码包,使用下面命令下载编译和安装 PCRE 包:
wget ftp://ftp.csx.cam.ac.uk/pub/software/programming/pcre/pcre-8.37.tar.gz
tar -zxvf pcre-8.37.tar.gz
cd pcre-8.34
./configure
make
make install
|
1
2
3
4
5
6
7
|
cd /usr/local/src
wget ftp://ftp.csx.cam.ac.uk/pub/software/programming/pcre/pcre-8.37.tar.gz
tar -zxvf pcre-8.37.tar.gz
cd pcre-8.34
./configure
make
make install
|
3.安装zlib库
http://zlib.net/zlib-1.2.8.tar.gz 下载最新的 zlib 源码包,使用下面命令下载编译和安装 zlib包:
wget http://zlib.net/zlib-1.2.8.tar.gz
tar -zxvf zlib-1.2.8.tar.gz
cd zlib-1.2.8
./configure
make
make install
|
1
2
3
4
5
6
7
8
|
cd /usr/local/src
wget http://zlib.net/zlib-1.2.8.tar.gz
tar -zxvf zlib-1.2.8.tar.gz
cd zlib-1.2.8
./configure
make
make install
|
4.安装ssl(某些vps默认没装ssl)
wget https://www.openssl.org/source/openssl-1.0.1t.tar.gz
tar -zxvf openssl-1.0.1t.tar.gz
|
1
2
3
|
cd /usr/local/src
wget https://www.openssl.org/source/openssl-1.0.1t.tar.gz
tar -zxvf openssl-1.0.1t.tar.gz
|
5.安装nginx
Nginx 一般有两个版本,分别是稳定版和开发版,您可以根据您的目的来选择这两个版本的其中一个,下面是把 Nginx 安装到 /usr/local/nginx 目录下的详细步骤:
wget http://nginx.org/download/nginx-1.4.2.tar.gz
tar -zxvf nginx-1.4.2.tar.gz
cd nginx-1.4.2
./configure --sbin-path=/usr/local/nginx/nginx \
--conf-path=/usr/local/nginx/nginx.conf \
--pid-path=/usr/local/nginx/nginx.pid \
--with-http_ssl_module \
--with-pcre=/opt/app/openet/oetal1/chenhe/pcre-8.37 \
--with-zlib=/opt/app/openet/oetal1/chenhe/zlib-1.2.8 \
--with-openssl=/opt/app/openet/oetal1/chenhe/openssl-1.0.1t
make
make install
|
1
2
3
4
5
6
7
8
9
10
11
12
13
14
15
|
cd /usr/local/src
wget http://nginx.org/download/nginx-1.4.2.tar.gz
tar -zxvf nginx-1.4.2.tar.gz
cd nginx-1.4.2
./configure --sbin-path=/usr/local/nginx/nginx \
--conf-path=/usr/local/nginx/nginx.conf \
--pid-path=/usr/local/nginx/nginx.pid \
--with-http_ssl_module \
--with-pcre=/opt/app/openet/oetal1/chenhe/pcre-8.37 \
--with-zlib=/opt/app/openet/oetal1/chenhe/zlib-1.2.8 \
--with-openssl=/opt/app/openet/oetal1/chenhe/openssl-1.0.1t
make
make install
|
--with-pcre=/usr/src/pcre-8.34 指的是pcre-8.34 的源码路径。
--with-zlib=/usr/src/zlib-1.2.7 指的是zlib-1.2.7 的源码路径。
安装成功后 /usr/local/nginx 目录下如下
fastcgi.conf.default logs scgi_params
fastcgi_params mime.types scgi_params.default
fastcgi_params.default mime.types.default uwsgi_params
html nginx uwsgi_params.default
koi-utf nginx.conf win-utf
|
1
2
3
4
5
6
|
fastcgi.conf koi-win nginx.conf.default
fastcgi.conf.default logs scgi_params
fastcgi_params mime.types scgi_params.default
fastcgi_params.default mime.types.default uwsgi_params
html nginx uwsgi_params.default
koi-utf nginx.conf win-utf
|
6.启动
确保系统的 80 端口没被其他程序占用,运行/usr/local/nginx/nginx 命令来启动 Nginx,
|
1
|
netstat -ano|grep 80
|
如果查不到结果后执行,有结果则忽略此步骤(ubuntu下必须用sudo启动,不然只能在前台运行)
|
1
|
sudo /usr/local/nginx/nginx
|
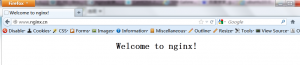
打开浏览器访问此机器的 IP,如果浏览器出现 Welcome to nginx! 则表示 Nginx 已经安装并运行成功。
-----------------------------------------------------
到这里nginx就安装完成了,如果只是处理静态html就不用继续安装了
如果你需要处理php脚本的话,还需要安装php-fpm。
下面安装排错
附:可能遇到的错误和一些帮助信息
1.1编译pcre错误
libtool: compile: Try `libtool --help' for more information.
make[1]: *** [pcrecpp.lo] Error 1
make[1]: Leaving directory `/usr/local/src/pcre-8.34'
make: *** [all] Error 2
|
1
2
3
4
5
|
libtool: compile: unrecognized option `-DHAVE_CONFIG_H'
libtool: compile: Try `libtool --help' for more information.
make[1]: *** [pcrecpp.lo] Error 1
make[1]: Leaving directory `/usr/local/src/pcre-8.34'
make: *** [all] Error 2
|
解决办法:安装g++,别忘了重新configure
apt-get install build-essential
make clean
./configure
make
|
1
2
3
4
5
|
apt-get install g++
apt-get install build-essential
make clean
./configure
make
|
1.2 make出错
./configure: error: SSL modules require the OpenSSL library.
You can either do not enable the modules, or install the OpenSSL library
into the system, or build the OpenSSL library statically from the source
with nginx by using --with-openssl=<path> option.
|
1
2
3
4
5
|
make: *** No rule to make target `build', needed by `default'. Stop.
./configure: error: SSL modules require the OpenSSL library.
You can either do not enable the modules, or install the OpenSSL library
into the system, or build the OpenSSL library statically from the source
with nginx by using --with-openssl=<path> option.
|
按照第4步的安装方法或
ubuntu下
apt-get install libssl-dev
|
1
2
|
apt-get install openssl
apt-get install libssl-dev
|
centos下
|
1
|
yum -y install openssl openssl-devel
|
2.nginx编译选项
make是用来编译的,它从Makefile中读取指令,然后编译。
make install是用来安装的,它也从Makefile中读取指令,安装到指定的位置。
configure命令是用来检测你的安装平台的目标特征的。它定义了系统的各个方面,包括nginx的被允许使用的连接处理的方法,比如它会检测你是不是有CC或GCC,并不是需要CC或GCC,它是个shell脚本,执行结束时,它会创建一个Makefile文件。nginx的configure命令支持以下参数:
--prefix=定义一个目录,存放服务器上的文件 ,也就是nginx的安装目录。默认使用path/usr/local/nginx。--sbin-path=设置nginx的可执行文件的路径,默认为pathprefix/sbin/nginx--conf-path=设置在nginx.conf配置文件的路径。nginx允许使用不同的配置文件启动,通过命令行中的-c选项。默认为pathprefix/conf/nginx.conf--pid-path=path 设置nginx.pid文件,将存储的主进程的进程号。安装完成后,可以随时改变的文件名 , 在nginx.conf配置文件中使用 PID指令。默认情况下,文件名 为prefix/logs/nginx.pid--error-log-path=设置主错误,警告,和诊断文件的名称。安装完成后,可以随时改变的文件名 ,在nginx.conf配置文件中 使用 的error_log指令。默认情况下,文件名 为pathprefix/logs/error.log--http-log-path=设置主请求的HTTP服务器的日志文件的名称。安装完成后,可以随时改变的文件名 ,在nginx.conf配置文件中 使用 的access_log指令。默认情况下,文件名 为pathprefix/logs/access.log--user=设置nginx工作进程的用户。安装完成后,可以随时更改的名称在nginx.conf配置文件中 使用的 user指令。默认的用户名是nobody。name--group=设置nginx工作进程的用户组。安装完成后,可以随时更改的名称在nginx.conf配置文件中 使用的 user指令。默认的为非特权用户。name--with-select_module--without-select_module 启用或禁用构建一个模块来允许服务器使用select()方法。该模块将自动建立,如果平台不支持的kqueue,epoll,rtsig或/dev/poll。--with-poll_module--without-poll_module启用或禁用构建一个模块来允许服务器使用poll()方法。该模块将自动建立,如果平台不支持的kqueue,epoll,rtsig或/dev/poll。--without-http_gzip_module— 不编译压缩的HTTP服务器的响应模块。编译并运行此模块需要zlib库。--without-http_rewrite_module不编译重写模块。编译并运行此模块需要PCRE库支持。--without-http_proxy_module— 不编译http_proxy模块。--with-http_ssl_module— 使用https协议模块。默认情况下,该模块没有被构建。建立并运行此模块的OpenSSL库是必需的。--with-pcre=— 设置PCRE库的源码路径。PCRE库的源码(版本4.4 - 8.30)需要从PCRE网站下载并解压。其余的工作是Nginx的./ configure和make来完成。正则表达式使用在location指令和 ngx_http_rewrite_module 模块中。path--with-pcre-jit—编译PCRE包含“just-in-time compilation”(1.1.12中, pcre_jit指令)。--with-zlib=—设置的zlib库的源码路径。要下载从 zlib(版本1.1.3 - 1.2.5)的并解压。其余的工作是Nginx的./ configure和make完成。ngx_http_gzip_module模块需要使用zlib 。path--with-cc-opt=— 设置额外的参数将被添加到CFLAGS变量。例如,当你在FreeBSD上使用PCRE库时需要使用:parameters--with-cc-opt="-I /usr/local/include。.如需要需要增加select()支持的文件数量:--with-cc-opt="-D FD_SETSIZE=2048".--with-ld-opt=—设置附加的参数,将用于在链接期间。例如,当在FreeBSD下使用该系统的PCRE库,应指定:parameters--with-ld-opt="-L /usr/local/lib".
典型实例(下面为了展示需要写在多行,执行时内容需要在同一行)
--sbin-path=/usr/local/nginx/nginx
--conf-path=/usr/local/nginx/nginx.conf
--pid-path=/usr/local/nginx/nginx.pid
--with-http_ssl_module
--with-pcre=../pcre-4.4
--with-zlib=../zlib-1.1.3
|
1
2
3
4
5
6
7
|
./configure
--sbin-path=/usr/local/nginx/nginx
--conf-path=/usr/local/nginx/nginx.conf
--pid-path=/usr/local/nginx/nginx.pid
--with-http_ssl_module
--with-pcre=../pcre-4.4
--with-zlib=../zlib-1.1.3
|
********************************
附配置文件
[root@localhost nginx-1.10.2]# yum install gcc.x86_64
[root@localhost nginx-1.10.2]# yum install gcc-c++.x86_64
[root@localhost nginx-1.10.2]# yum install automake.noarch
[root@localhost nginx-1.10.2]# yum install libtool.x86_64
[root@localhost nginx-1.10.2]# yum install libtool-ltdl.x86_64
[root@localhost nginx-1.10.2]# yum install libtool-ltdl-devel.x86_64
[root@localhost nginx-1.10.2]# yum install pcre-devel.x86_64
[root@localhost nginx-1.10.2]# yum install pcre-static.x86_64
[root@localhost nginx-1.10.2]# yum install zlib-static.x86_64
[root@localhost nginx-1.10.2]# yum install openssl.x86_64
[root@localhost nginx-1.10.2]# yum install openssl-devel.x86_64
[root@localhost nginx-1.10.2]# yum install openssl-static.x86_64
[root@localhost nginx-1.10.2]# ./configure --user=www --group=www --prefix=/usr/local/nginx
--with-http_stub_status_module --with-http_ssl_module --with-http_gzip_static_module --with-ipv6 --with-http_sub_module
********************
附nginx配置文件
user www www;
worker_processes auto;
worker_rlimit_nofile 65535;
error_log logs/error.log;
pid /var/run/nginx.pid;
events {
use epoll;
worker_connections 51200;
}
http
{
include mime.types;
default_type application/octet-stream;
server_names_hash_bucket_size 128;
client_header_buffer_size 32k;
large_client_header_buffers 4 32k;
client_max_body_size 100m;
sendfile on;
tcp_nopush on;
keepalive_timeout 60;
tcp_nodelay on;
fastcgi_connect_timeout 600;
fastcgi_send_timeout 600;
fastcgi_read_timeout 600;
fastcgi_buffer_size 64k;
fastcgi_buffers 16 256k;
fastcgi_busy_buffers_size 256k;
fastcgi_temp_file_write_size 256k;
fastcgi_intercept_errors on;
gzip on;
gzip_min_length 1k;
gzip_buffers 4 16k;
gzip_http_version 1.1;
gzip_comp_level 4;
gzip_types text/plain application/x-javascript text/css application/xml;
gzip_vary on;
log_format log.1 '$http_X_ClientIP - $remote_user [$time_local] "$request" '
'$status $body_bytes_sent "$http_referer" '
'"$http_user_agent" "$http_x_forwarded_for" "$request_time"'
'"$remote_addr"';
log_format access_log '$remote_addr - $remote_user [$time_local] "$request" '
'$status $body_bytes_sent "$http_referer" '
'"$http_user_agent" $http_x_forwarded_for';
server
{
listen 80;
charset utf-8;
server_name server1.english.gov.cn server1.english.bbc.org;
index index.html index.htm index.php index.shtml;
root /export/htdocs/server1;
access_log logs/server1.english.gov.cn.log log.1;
error_page 500 502 503 504 /50x.html;
location = /50x.html {
root /usr/local/nginx/html;
}
location ~ (/\.svn/|/include/config/|/lib/|/cdnup/) {
deny all;
}
# location ~ .*\.(php|php5|php4|shtml)?$ {
# root /export/htdocs;
# try_files $uri =404;
# fastcgi_pass unix:/tmp/php-cgi.sock;
# fastcgi_index index.php;
# include fastcgi.conf;
#include pathinfo.conf;
# }
}
server
{
listen 80;
charset utf-8;
server_name server.gov.cn server.bbc.org;
index index.html index.htm index.php index.shtml;
root /export/htdocs/server;
access_log server.gov.cn.log log.1;
error_page 500 502 503 504 /50x.html;
location = /50x.html {
root /usr/local/nginx/html;
}
location ~ (/\.svn/|/include/config/|/lib/|/cdnup/) {
deny all;
}
# location ~ .*\.(php|php5|php4|shtml)?$ {
# root /export/htdocs;
# try_files $uri =404;
# fastcgi_pass unix:/tmp/php-cgi.sock;
# fastcgi_index index.php;
# include fastcgi.conf;
#include pathinfo.conf;
# }
}
}
Nginx安装(zhuan)的更多相关文章
- zabbix 3.0.3 (nginx)安装过程中的问题排错记录
特殊注明:安装zabbix 2.4.8和2.4.6遇到2个问题,如下:找了很多解决办法,实在无解,只能换版本,尝试换(2.2.2正常 | 3.0.3正常)都正常,最后决定换3.0.3 1.Error ...
- Nginx 安装以及反向代理配置(windows)
安装 windows 下 Nginx 安装非常简单,下载地址 http://nginx.org/en/download.html. 选择红框这个,下载下来是个 zip 文件,解压.这时我们双击根目录的 ...
- nginx安装与配置
一.在线安装 ubuntu 安装 sudo apt-get install nginx 安装后文件结构为: 配置文件:/etc/nginx ,并且每台虚拟主机已经安排在 /etc/nginx/site ...
- Windows下将nginx安装为服务运行
今天看到nginx这个小服务器软件正式版更新到了1.4.2,想玩下它.这个服务器软件虽小,但功能强大,是开源软件,有着良好的性能,被很多个人.企业,甚至大型企业所使用! 由于是在Windows下,所以 ...
- windows下nginx安装、配置与使用(转载)
目前国内各大门户网站已经部署了Nginx,如新浪.网易.腾讯等:国内几个重要的视频分享网站也部署了Nginx,如六房间.酷6等.新近发现Nginx 技术在国内日趋火热,越来越多的网站开始部署Nginx ...
- 阿里云服务器Linux CentOS安装配置(八)nginx安装、配置、域名绑定
阿里云服务器Linux CentOS安装配置(八)nginx安装.配置.域名绑定 1.安装nginx yum -y install nginx 2.启动nginx service nginx star ...
- Linux系统下Nginx安装详解
该随笔为个人原创,后期会根据项目实践实时更新,如若转载,请注明出处,方便大家获得最新博文! 注:安装Nginx需要Linux系统已经安装 openssl-fips-2.0.2.tar.gz zli ...
- Linux下查看Nginx安装目录、版本号信息?
Linux环境下,怎么确定Nginx是以那个config文件启动的? 输入命令行: ps -ef | grep nginx 摁回车,将出现如下图片: master process 后面的就是 ngi ...
- nginx安装及负载均衡配置
Nginx (“engine x”) 是一个高性能的 HTTP 和 反向代理 服务器,也是一个 IMAP/POP3/SMTP 代理服务器. Nginx 是由 Igor Sysoev 为俄罗斯访问量第二 ...
随机推荐
- CI框架 QQ接口(第三方登录接口PHP版)
本帖内容较多,大部分都是源码,要修改的地方只有一个,其他只要复制过去,就可以完美运行.本帖主要针对CI框架,不用下载SDK,按我下面的步骤,建文件,复制代码就可以了.10分钟不要,接口就可完成.第一步 ...
- 20150625_Andriod_01_ListView1_条目选中
android listview 参考地址: http://www.cnblogs.com/zhengbeibei/archive/2013/05/14/3078805.html http://xy ...
- 水流雨渍shader
战神斯巴达之魂的雨渍做的很逼真,尝试了下,似乎是差不多了,整体欠缺不少 普通平面: 环形流动: 河流: shader实现,3层加上一个偏移层 圆形的雨渍流动和河流要重新展一下UV
- python递归小疑惑
代码如下: def crawlAndGet(keyword, n): if n>0: jsondata = os.system('scrapy crawl beijing -a store_di ...
- Android 4.4之后删除短信进行处理
android 4.4删除短信 android 4.4之后非默认的短信应用已经没有办法删除短信了.像以前那样用如下方法是不会没法删除短信的(即使在xml中配置了短信的读写权限),同时也不会有报错或其他 ...
- 在VS中编译C++静态库以及使用的方法
1.编译静态库 // add.h #pragma once class Add { public: Add(void); ~Add(void); int add(int a,int b); }; #i ...
- CodeForces 651B Beautiful Paintings 贪心
A. Joysticks time limit per test 1 second memory limit per test 256 megabytes input standard input o ...
- 【leetcode❤python】235. Lowest Common Ancestor of a Binary Search Tree
#-*- coding: UTF-8 -*- # Definition for a binary tree node.# class TreeNode(object):# def __init ...
- V-rep学习笔记:转动关节1
V-REP(Virtual Robot Experimentation Platform),是全球领先的机器人及模拟自动化软件平台.V-REP让使用者可以模拟整个机器人系统或其子系统(如感测器或机械结 ...
- Nessus基本命令
/etc/init.d/nessusd start 启动nessusd服务 默认端口8834 添加用户(未知是什么用户) sudo /opt/nessus/sbin/nessus-adduser