Spring boot -环境搭建 ,初步接触(1)
1. Eclipse 创建 maven project
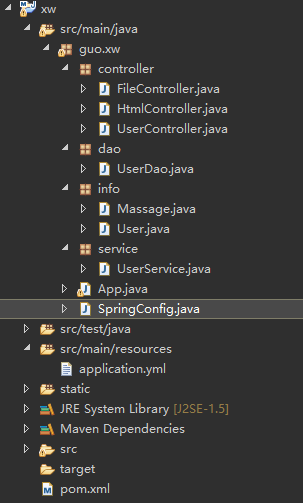
项目目录如下:
2. pom.xml 配置文件
<project xmlns="http://maven.apache.org/POM/4.0.0" xmlns:xsi="http://www.w3.org/2001/XMLSchema-instance"

	xsi:schemaLocation="http://maven.apache.org/POM/4.0.0 http://maven.apache.org/xsd/maven-4.0.0.xsd">

	<modelVersion>4.0.0</modelVersion>

	<groupId>guo</groupId>

	<artifactId>xw</artifactId>

	<version>0.0.1-SNAPSHOT</version>

	<packaging>jar</packaging>

	<name>xw</name>

	<url>http://maven.apache.org</url>

	<properties>

		<project.build.sourceEncoding>UTF-8</project.build.sourceEncoding>

	</properties>

	<dependencies>

		<dependency>

			<groupId>org.springframework.boot</groupId>

			<artifactId>spring-boot-starter-web</artifactId>

			<version>1.3.3.RELEASE</version>

		</dependency>

		<dependency>

			<groupId>junit</groupId>

			<artifactId>junit</artifactId>

			<version>3.8.1</version>

			<scope>test</scope>

		</dependency>

	</dependencies>

</project>
application.yml (放置在resources 下面)
8080端口被占用,在yml文件中修改端口为 8092 。不能有tab键值,缩进 用空格键
server:

      port: 8092
3.SpringConfig.java (放置在包最外层)
@Configuration //通过该注解来表明该类是一个Spring的配置,相当于一个xml文件

@ComponentScan(basePackages = "guo.xw")

public class SpringConfig {

    @Bean         // 通过该注解来表明是一个Bean对象,相当于xml中的<bean>

    public UserDao getUserDAO(){

        return new UserDao();    // 直接new对象做演示

    }

}
4. 主入口App.java (放置在包最外层)
@SpringBootApplication

public class App

{

    public static void main( String[] args )

    {

        System.out.println( "Hello World!" );

        SpringApplication.run(App.class, args);

        AnnotationConfigApplicationContext context = new AnnotationConfigApplicationContext(SpringConfig.class);

        UserService userService = context.getBean(UserService.class);

        List<User> list = userService.queryUserList();

        for (User user : list) {

            System.out.println(user.getName()+ ", " + user.getAge());

        }

        context.destroy();

    }

}
5. Controller
@RestController
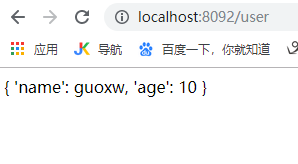
public class UserController { @RequestMapping(path="/user" ,method=RequestMethod.GET)
public String testUser(){ return "{ 'name': guoxw, 'age': 10 }";
} @RequestMapping(path="/userUpdate" , method=RequestMethod.POST)
public User userPost(@RequestBody User user ) { int age=user.getAge()*2;
String name=user.getName()+"_update"; User user2=new User();
user2.setAge(age);
user2.setName(name); return user2; } }
6. get 方法
get带参数的:
	@RequestMapping(path="/", method=RequestMethod.GET)

	public String Test(@RequestParam(name="name", required=true) String name) {

		logger.debug("Parameter is: {}", name);

		return "Test123" + name;

	}
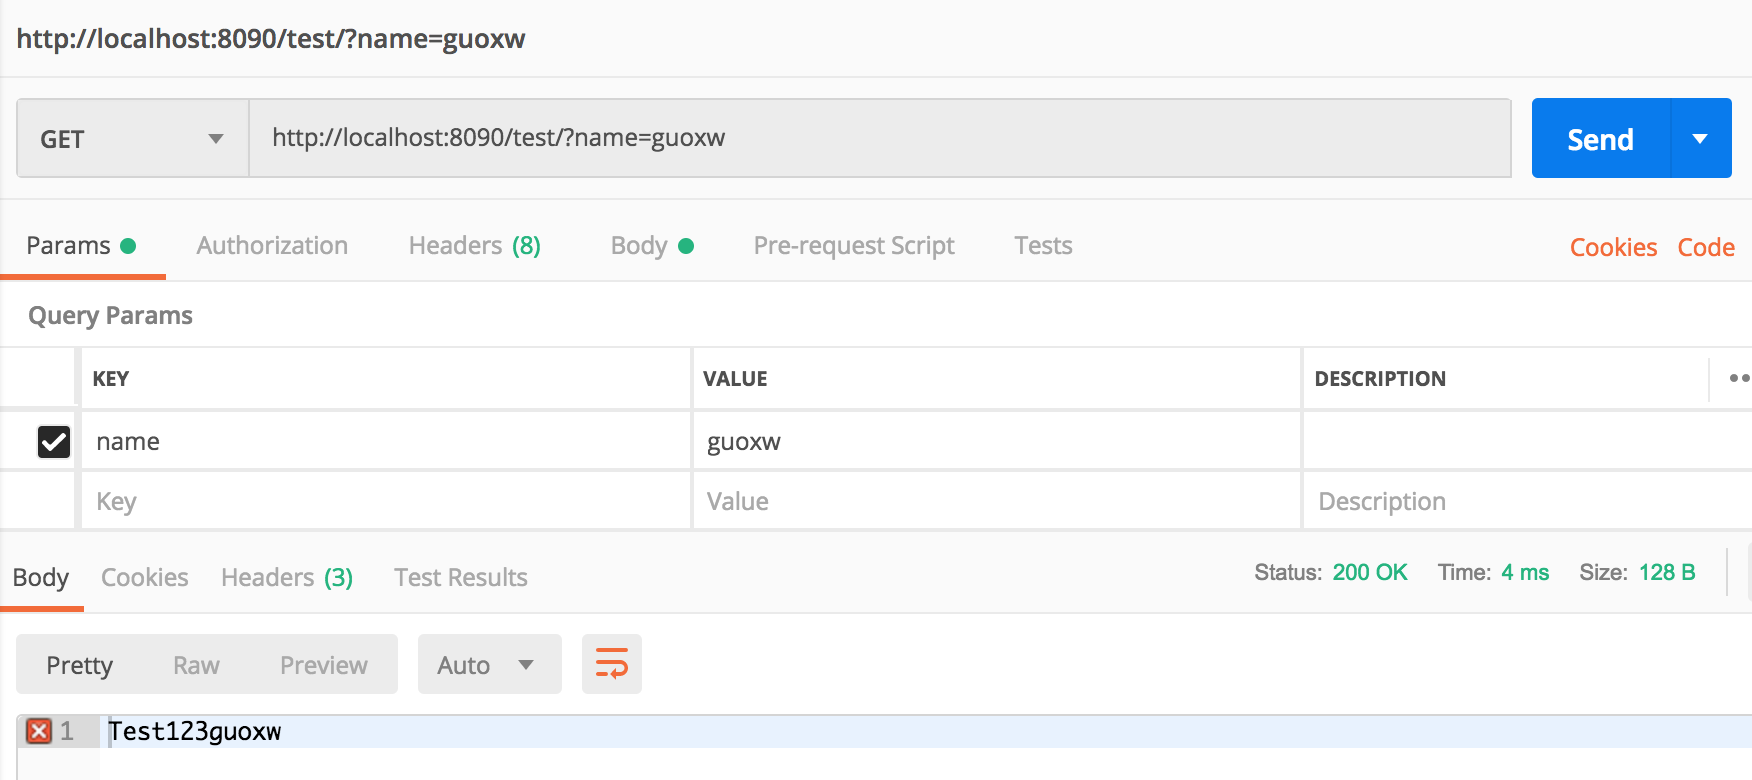
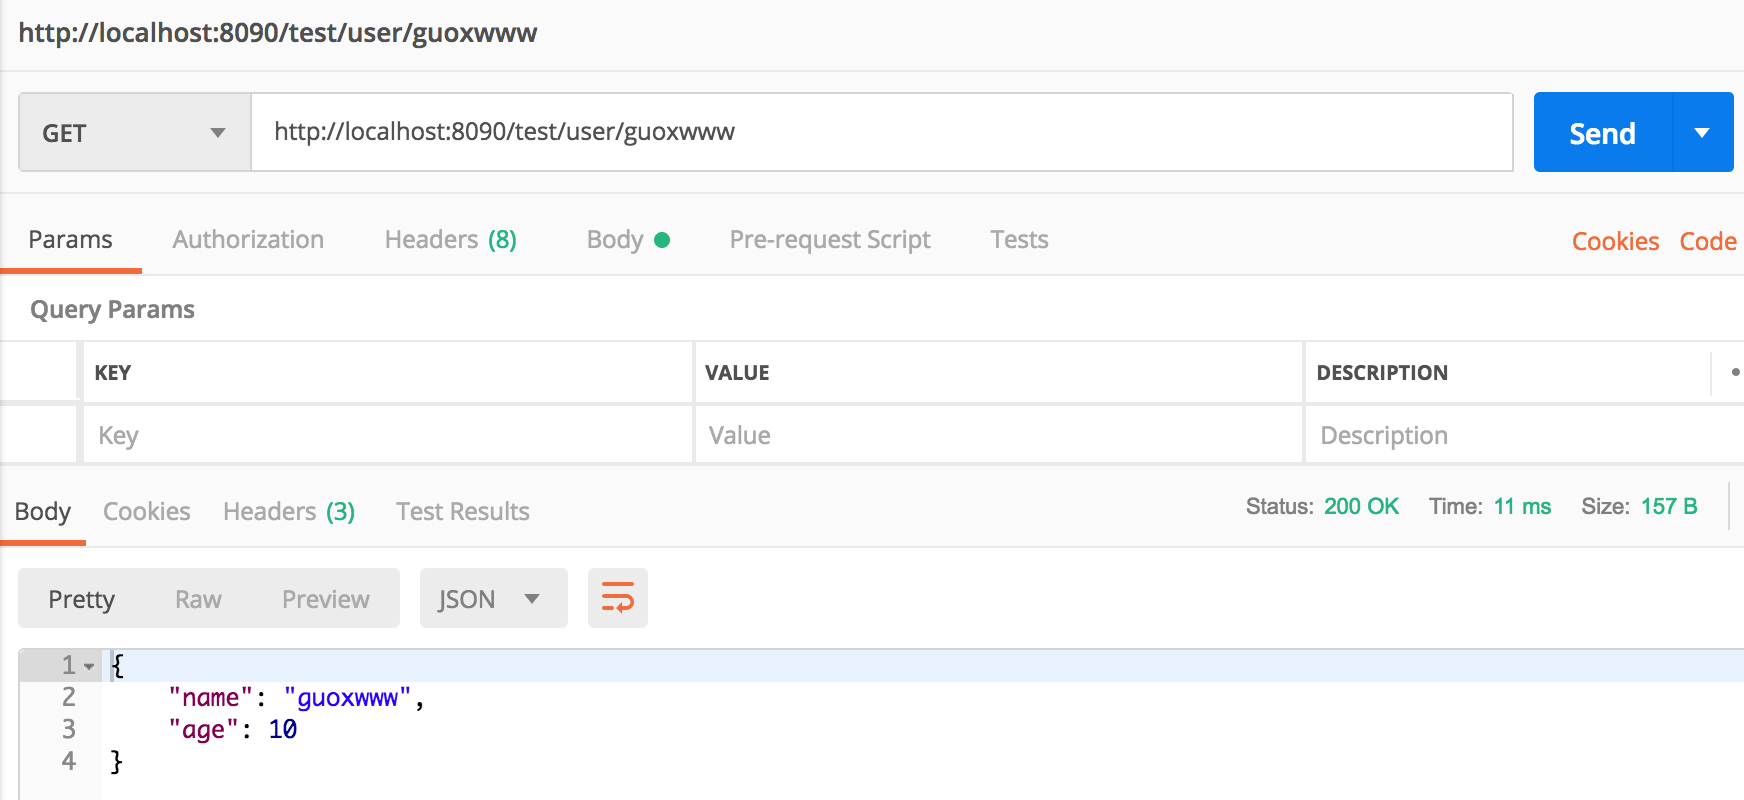
// http://localhost:8092/test/user/guoxw_parameter
@RequestMapping(path="/user/{name}", method=RequestMethod.GET)

	public User TestUser(@PathVariable String name) {

		logger.debug("Parameter is: {}", name);

		User user = new User();

		user.setName(name);

		user.setAge(10);

		return user;

	}
post 方法

7. 上传图片
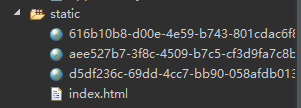
static 文件下放置html 以及 上传保存的图片。(static 目录应该在resources 下面 。上图中位置是不对,不过也不影响运行)
html文件
<!DOCTYPE HTML>

<html>

    <head>

        <title>pictureUploading</title>

        <meta http-equiv="Content-Type" content="text/html;charset=UTF-8 ">

    </head>

    <body>

     <form enctype="multipart/form-data" method="post" action="/upload">

            文件:<input type="file" name="fileUpload"/>

            <input type="submit" value="上传"/>

        </form>

    </body>

</html>
FileController
@RestController

public class FileController {

	 @RequestMapping(path="/upload" ,  method=RequestMethod.POST)

	    public Object upload(MultipartFile fileUpload){

	        //获取文件名

	        String fileName = fileUpload.getOriginalFilename();

	        //获取文件后缀名

	        String suffixName = fileName.substring(fileName.lastIndexOf("."));

	        //重新生成文件名

	        fileName = UUID.randomUUID()+suffixName;

	        //指定本地文件夹存储图片

	        String filePath = "D:/eclipseWorkSpace/SpringTestOne/xw/static/";

	        try {

	            //将图片保存到static文件夹里

	            fileUpload.transferTo(new File(filePath+fileName));

	            return new Massage(0,"success to upload");

	        } catch (Exception e) {

	            e.printStackTrace();

	            return new Massage(-1,"fail to upload");

	        }

	    }

}
运行如:
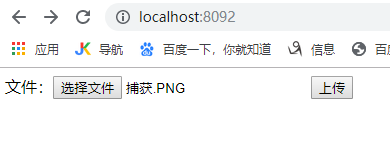
选择文件后,点击上传,则返回上传结果信息。
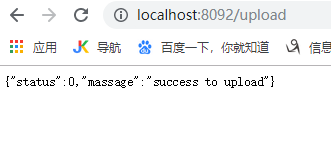
可以看到上传的图片
8.
只是熟悉下Spring boot框架,其中的具体原理和细节都不太清楚,后续再整理学习。
code:(Spring boot 初步接触 (1) )
链接: https://pan.baidu.com/s/1_qNHW3qwxnXMMmiKg4hJ7A 提取码: gjjj
Spring boot -环境搭建 ,初步接触(1)的更多相关文章
- Spring Boot环境搭建。
1.环境准备. jdk1.8 idea(如果不会激活可以看另外一篇:https://www.cnblogs.com/joeking/p/11119123.html) 2.打开idea 如果是idea的 ...
- spring boot 环境搭建
1.开发工具 https://spring.io/tools/sts/all 2.demo https://start.spring.io 3.下载maven https://maven.apache ...
- spring boot 环境配置(profile)切换
Spring Boot 集成教程 Spring Boot 介绍 Spring Boot 开发环境搭建(Eclipse) Spring Boot Hello World (restful接口)例子 sp ...
- 最新版ssh hibernate spring struts2环境搭建
最新版ssh hibernate spring struts2环境搭建 最新版spring Framework下载地址:spring4.0.0RELEASE环境搭建 http://repo.sprin ...
- Spring Boot 环境变量读取 和 属性对象的绑定
网上看到的一些方法,结合我看到的 和我们现在使用的.整理成此文: 第一种方法 参见catoop的博客之 Spring Boot 环境变量读取 和 属性对象的绑定(尊重原创) 第二种方法 class不用 ...
- Spring MVC 环境搭建(二)
在Spring MVC 环境搭建(一)中我们知道 spring 的配置是通过 urlmapping 映射到控制器,然后通过实现Controller接口的handlerequest方法转向页面. 但这存 ...
- Spring MVC 环境搭建(一)
一.建立 JavaWeb 项目 1.建立一个 Java 项目. 2.在项目下新建一个文件夹 webapp (命名可自取,这个目录即是网站根目录),再在该文件夹下新建一个 WEB-INF 文件夹(命名固 ...
- Spring MVC 环境搭建(maven+SpringMVC+mybatis+Freemarker)
Spring MVC 环境搭建(maven+SpringMVC+mybatis+Freemarker) 一.准备工作 1.Eclipse Java EE IDE(4.4.1) 2.JDK 3.Tomc ...
- 在spring boot环境中使用fastjson + redis的高速缓存技术
因为项目需求,需要在spring boot环境中使用redis作数据缓存.之前的解决方案是参考的http://wiselyman.iteye.com/blog/2184884,具体使用的是Jackso ...
随机推荐
- 新版本的molar mass(uva-1586)明明debug过了,各种测试还是WA真是气死我了
#include <bits/stdc++.h> using namespace std; double trans(string a) { stringstream ss; ss< ...
- Django CBV视图解决csrf认证
urls.py from django.conf.urls import url from appxx import views urlpatterns = [ url(r"^$" ...
- 23.match_phrase_prefix实现search-time搜索推荐
主要知识点: 搜索推荐的使用场景 用法 原理 一.搜索推荐的使用场景 搜索推荐,就是在你做搜索时,当你写出一部搜索词时,es会自提示接下来要写的词,比如当你在搜索hello w 时,如果es中有如下文 ...
- 解析特殊格式的xml到map
由于项目特殊,需要解析的xml文档样式特别,所以自己写了一个解析特殊xml的方法 先提供xml样式 <?xml version="1.0" encoding="UT ...
- 【codeforces 510D】Fox And Jumping
[题目链接]:http://codeforces.com/contest/510/problem/D [题意] 你可以买n种卡片; 每种卡片的花费对应c[i]; 当你拥有了第i种卡片之后; 你可以在任 ...
- codeforeces近日题目小结
题目源自codeforeces的三场contest contest/1043+1055+1076 目前都是solved 6/7,都差了最后一题 简单题: contest/1043/E: 先不考虑m个限 ...
- noi.openjudge——2971 抓住那头牛
http://noi.openjudge.cn/ch0205/2971/ 总时间限制: 2000ms 内存限制: 65536kB 描述 农夫知道一头牛的位置,想要抓住它.农夫和牛都位于数轴上,农夫 ...
- insert into varchar2(8000)
在看12c的文档的时候发现varcahr2最大长度是4000 byte VARCHAR2 Data Type The VARCHAR2 data type specifies a variable-l ...
- tiny4412移植opencv2.4.7手记
在买了新的4412板子后.打算趁着刚成功在6410上移植过的经验,速度解决下.不想出现了各种问题.小结下: 1.关于opencv的移植: tiny4412的linux3.5上,须要把opencv的li ...
- Linux系统编程——特殊进程之僵尸进程
僵尸进程(Zombie Process) 进程已执行结束,但进程的占用的资源未被回收.这种进程称为僵尸进程. 在每一个进程退出的时候,内核释放该进程全部的资源.包含打开的文件.占用的内存等. 可是仍然 ...