Android欢迎页面以及引导页面
开发环境:Windows 10 x64,Android Studio 3.0
很多APP都会在启动主界面(MainActivity)之前显示一个短暂的欢迎页面,设置微博,知乎,百度之类APP还是在欢迎页面上显示广告。
尝试着做一个欢迎页面,会短暂停留三秒后转到主界面。


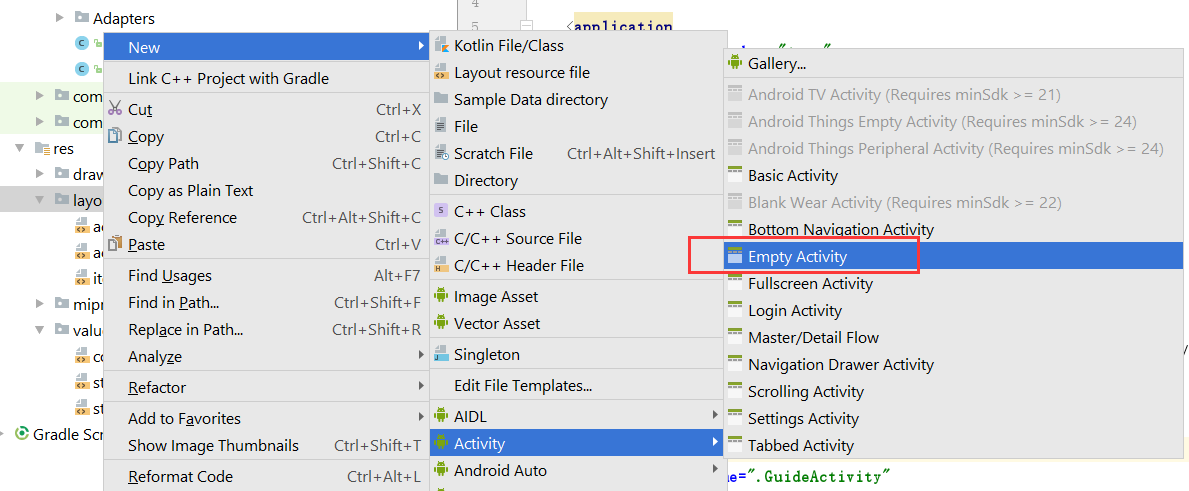
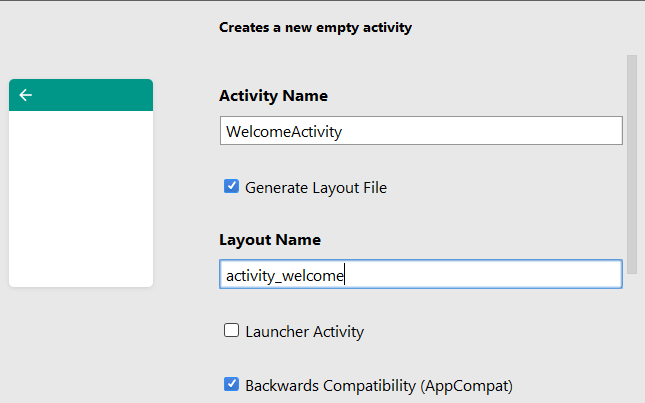
创建了WelcomeActivity,然后在自动生成的activity_welcome.xml布局上随便写一个布局。
回到WelcomeActivity.java,将OnCreate修改如下:
@Override

    protected void onCreate(Bundle savedInstanceState) {

        super.onCreate(savedInstanceState);

        setContentView(R.layout.activity_welcome);

        Handler handler = new Handler();

        //当计时结束,跳转至主界面

        handler.postDelayed(new Runnable() {

            @Override

            public void run() {

                Intent intent = new Intent(WelcomeActivity.this, MainActivity.class);

                startActivity(intent);

                WelcomeActivity.this.finish();

            }

        }, 3000);

    }
MainActivity是app的主界面。
为了让app启动的时候显示现实Welcome页面,我们还需要修改一下AndroidManifest.xml文件:
<activity

            android:name=".WelcomeActivity"

            android:theme="@style/Theme.AppCompat.Light.NoActionBar">

            <intent-filter>

                <action android:name="android.intent.action.MAIN" />

                <category android:name="android.intent.category.LAUNCHER" />

            </intent-filter>

        </activity>
---------------------------------------------------------------------------------------------------------------------------------------------------------
至于引导页面,一般出现在app安装后首次使用的时候。
我们先创建一个item_guide.xml文件,作为引导页面的布局文件。
<RelativeLayout xmlns:android="http://schemas.android.com/apk/res/android"

    xmlns:app="http://schemas.android.com/apk/res-auto"

    xmlns:tools="http://schemas.android.com/tools"

    android:layout_width="match_parent"

    android:layout_height="match_parent">

    <ImageView

        android:id="@+id/item_guide_iv_lunch"

        android:layout_width="match_parent"

        android:layout_height="match_parent"

        android:scaleType="fitXY"/>                    全屏的图片

    <RadioGroup

        android:id="@+id/item_guide_rg_indicate"

        android:layout_width="wrap_content"

        android:layout_height="wrap_content"

        android:layout_alignParentBottom="true"

        android:layout_centerHorizontal="true"

        android:orientation="horizontal"

        android:layout_margin="20dp">                   引导页面下端的一组RadioButton,会显示当前是第几页的引导页

    </RadioGroup>

    <Button

        android:id="@+id/item_guide_btn_start"

        android:layout_width="wrap_content"

        android:layout_height="wrap_content"

        android:layout_centerInParent="true"

        android:visibility="gone"

        android:text="立即开始!"></Button>                 按钮,出现在最后一个页面

</RelativeLayout>
为了不同引导页让RadioButton显示不同的状态,我们需要顶一个selector
在drawable文件夹添加三个文件:launch_guide_radio_btn.xml, icon_point_c.png, icon_point_n.png 文件内容分别如下:
<?xml version="1.0" encoding="utf-8"?>

<selector xmlns:android="http://schemas.android.com/apk/res/android">

    <item android:state_checked="true" android:drawable="@drawable/icon_point_c" />

    <item android:drawable="@drawable/icon_point_n" />

</selector>


然后,我们需要定义一个Adapter
public class LaunchSimpleAdapter extends PagerAdapter {

    private LayoutInflater mInflater;

    private Context mContext;

    private ArrayList<View> mViewList = new ArrayList<View>();

    public LaunchSimpleAdapter(Context context, int[] imageArray) {

        mInflater = LayoutInflater.from(context);

        mContext = context;

        for (int i=0; i<imageArray.length; i++) {

            View view = mInflater.inflate(R.layout.item_guide, null);

            ImageView iv_launch = (ImageView) view.findViewById(R.id.item_guide_iv_lunch);

            RadioGroup rg_indicate = (RadioGroup) view.findViewById(R.id.item_guide_rg_indicate);

            Button btn_start = (Button) view.findViewById(R.id.item_guide_btn_start);

            iv_launch.setImageResource(imageArray[i]);

            for (int j=0; j<imageArray.length; j++) {

                RadioButton radio = new RadioButton(mContext);

                radio.setLayoutParams(new LayoutParams(LayoutParams.WRAP_CONTENT, LayoutParams.WRAP_CONTENT));   //android.view.ViewGroup.LayoutParams

                radio.setButtonDrawable(R.drawable.launch_guide_radio_btn);

                radio.setPadding(10, 10, 10, 10);

                rg_indicate.addView(radio);

            }

            ((RadioButton)rg_indicate.getChildAt(i)).setChecked(true);

            if (i == imageArray.length-1) {

                btn_start.setVisibility(View.VISIBLE);

                btn_start.setOnClickListener(new OnClickListener() {

                    @Override

                    public void onClick(View v) {

                        Toast.makeText(mContext, "Welcome to XXX App", Toast.LENGTH_SHORT).show();

                    }

                });

            }

            mViewList.add(view);

        }

    }

    @Override

    public int getCount() {

        return mViewList.size();

    }

    @Override

    public boolean isViewFromObject(View arg0, Object arg1) {

        return arg0 == arg1;

    }

    @Override

    public void destroyItem(ViewGroup container, int position, Object object) {

        container.removeView(mViewList.get(position));

    }

    @Override

    public Object instantiateItem(ViewGroup container, int position) {

        container.addView(mViewList.get(position));

        return mViewList.get(position);

    }

}
最后,我们需要创建GuideActivity
<?xml version="1.0" encoding="utf-8"?>

<RelativeLayout xmlns:android="http://schemas.android.com/apk/res/android"

    xmlns:app="http://schemas.android.com/apk/res-auto"

    xmlns:tools="http://schemas.android.com/tools"

    android:layout_width="match_parent"

    android:layout_height="match_parent"

    >

    <android.support.v4.view.ViewPager

        android:id="@+id/vp_launch"

        android:layout_width="match_parent"

        android:layout_height="match_parent" />

</RelativeLayout>
public class GuideActivity extends AppCompatActivity {

    private int[] lanuchImageArray = {

            R.drawable.guide_1, R.drawable.guide_2, R.drawable.guide_3, R.drawable.guide_4};

    @Override

    protected void onCreate(Bundle savedInstanceState) {

        super.onCreate(savedInstanceState);

        setContentView(R.layout.activity_guide);

        ViewPager vp_launch = (ViewPager) findViewById(R.id.vp_launch);

        LaunchSimpleAdapter adapter = new LaunchSimpleAdapter(this, lanuchImageArray);

        vp_launch.setAdapter(adapter);

        vp_launch.setCurrentItem(0);

    }

}
这样,一个最建议的引导页面就完成了。当然,现在的引导页面不是全屏的。如果希望全屏,我们可以做如下修改:
在values/styles.xml页面添加一个样式:
<!-- 引导页-->

    <style name="FullScreen" parent="Theme.AppCompat.Light.NoActionBar">

        <item name="android:windowFullscreen">true</item>  //设置全屏

        <item name="android:windowNoTitle">true</item> //设置没有状态栏

        <item name="android:textSize">20sp</item>

        <item name="android:textStyle">bold|italic</item>

    </style>
然后在AndroidManifest.xml修改一下:
<activity

            android:name=".GuideActivity"

            android:theme="@style/FullScreen">

        </activity>
参考文章:
【Android】如何实现启动APP时引导页、欢迎页功能之(一)引导页功能的实现
Android:Welcome,一个容易使用和扩展的引导页控件
Android欢迎页面以及引导页面的更多相关文章
- Android高度仿新浪微博引导页面
在写这一篇文章之前,先向大家推荐一篇博文:http://blog.csdn.net/dawanganban/article/details/17297671 感谢这位博主,我在该博主的基础上完成了对新 ...
- AndroidUI 引导页面的使用
一个应用程序都少不了欢迎页面和引导页面,本文主要讲如何制作一个引页面: 首页所有的目录结构: 新建Welcome引导页面和Activity: <RelativeLayout xmlns:andr ...
- android UI进阶之用ViewPager实现欢迎引导页面
ViewPager需要android-support-v4.jar这个包的支持,来自google提供的一个附加包.大家搜下即可. ViewPager主要用来组织一组数据,并且通过左右滑动的方式来展示. ...
- Android开发必知--WebView加载html5实现炫酷引导页面
大多数人都知道,一个APP的引导页面还是挺重要的,不过要想通过原生的Android代码做出一个非常炫酷的引导页相对还是比较复杂的,正巧html5在制作炫酷动画网页方面比较给力,我们不妨先利用html5 ...
- android UI进阶之用ViewPager实现欢迎引导页面[转]
ViewPager需要android-support-v4.jar这个包的支持,来自google提供的一个附加包.大家搜下即可. ViewPager主要用来组织一组数据,并且通过左右滑动的方式来展示. ...
- App引导页面源代码的实现
一.页面效果图
- ViewPager实现启动引导页面(个人认为很详细)
效果如图: 启动页面是一张图片+延时效果,这里就不给出布局文件了. WelcomeActivity分析:在启动页面检测是否是第一次运行程序,如果是,则先跳转到引导界面的Activity——AndyVi ...
- 使用ViewPagerAdapter 页面引导适配器设置app启动页,引导页面的实现
一般的app第一次安装启动的时候,都会有一个启动页面和引导页的画面,然后才进入主程序.anndroid中的ViewPagerAdapter 是一个继承与PageAdapter的 页面引导适配器.由于我 ...
- swift3.0 创建一个app引导页面
swift毕竟不像是oc ,第三方的框架很多,更何况是3.0,自己动手写了个引导页面,看得上我代码的麻友可以拿去用 引导页面有三个部分构成,scrollview用语切换引导视图,pageControl ...
随机推荐
- luogu 1939 【模板】矩阵加速(数列)
题目大意: a[1]=a[2]=a[3]=1 a[x]=a[x-3]+a[x-1] (x>3) 求a数列的第n项%1000000007 思路: 使用矩阵快速幂进行加速 在草稿纸上填了填数 然后就 ...
- codeforces round #427 div2
A:读懂题,乘一下判断大小就行了 #include<bits/stdc++.h> using namespace std; int main() { int s, v1, v2, t1, ...
- php 时间戳和时间的转换
PHP的时间戳与具体时间转化 三个内置函数: time() //获取UNIX系统时间戳 mktime(hour,minute,second,month,day,year) //将指定时间转化为时间戳 ...
- codevs1026商务旅行
1036 商务旅行 时间限制: 1 s 空间限制: 128000 KB 题目等级 : 钻石 Diamond 题解 题目描述 Description 某首都城市的商人要经常到各城镇去做 ...
- vue学习记录(一)—— vue开发调试神器vue-devtools安装
网上有些贴子少了至关重要的一步导致我一直没装上, 切记!!install后还需build,且install和build都在vue-devtools文件夹内执行 github下载地址 点击跳转 具体步骤 ...
- MFC学习篇(一):用OpenCV显示视频
首先是一些基础的步骤,如建立MFC应用,添加按钮等,博主主要参考了下面这篇文章,其中的前32步都是用OpenCV显示图片和视频所必须的,即通用的.由于LZ原来有配置OpenCV的基础,所以配制还是比较 ...
- Mac上随时切换PYTHON版本
在MAC上,默认安装了python2.*,自己又安装了python3.*:假如我们需要在终端上随时切换python控制台到需要的版本,可以采用下面的方法. 1.用命令 sudo vi ~/.bas ...
- Java系列学习(一)-JDK下载与安装
1.Java语言平台版本 J2SE:Java 2 Platform Standard Edition,java平台标准版 J2ME:Java 2 Platform Micro Edition,java ...
- jQuery封装的选项卡方法
********************************************************2018/3/15更新********************************* ...
- Singleton.java.ft not found 相关错误的解决办法
Entry fileTemplates//Singleton.java.ft not found in C:/Users/admin/Desktop/android-studio/lib/resour ...
