TableLayout表格布局
1.本节学习路线图
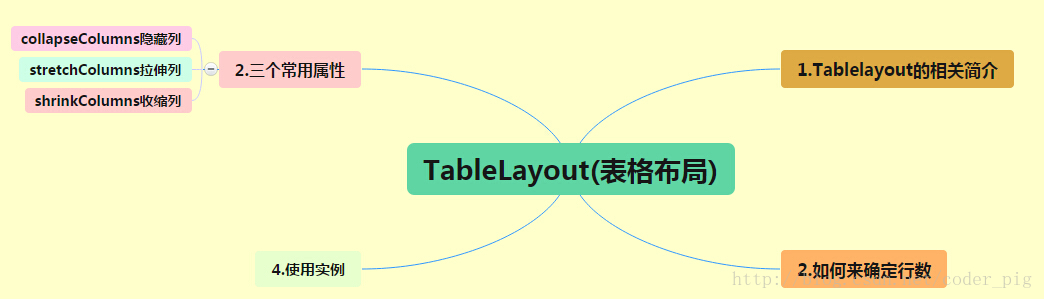
路线图分析: 从上面的路线图,可以看出TableLayout的用法还是很简单的,无非就是确定表格的行数,以及使用 那三个属性来设置每一行中的第某列的元素隐藏,拉伸,或者收缩即可!
2.TableLayout的介绍
相信学过HTML的朋友都知道,我们可以通过< table >< tr >< td >就可以生成一个HTML的表格, 而Android中也允许我们使用表格的方式来排列组件,就是行与列的方式,就说我们这节的TableLayout! 但却不像我们后面会讲到的Android 4.0后引入的GridLayout(网格)布局一样,直接就可以设置多少行与多少列!
3.如何确定行数与列数
- ①如果我们直接往TableLayout中添加组件的话,那么这个组件将占满一行!!!
- ②如果我们想一行上有多个组件的话,就要添加一个TableRow的容器,把组件都丢到里面!
- ③tablerow中的组件个数就决定了该行有多少列,而列的宽度由该列中最宽的单元格决定
- ④tablerow的layout_width属性,默认是fill_parent的,我们自己设置成其他的值也不会生效!!! 但是layout_height默认是wrapten——content的,我们却可以自己设置大小!
- ⑤整个表格布局的宽度取决于父容器的宽度(占满父容器本身)
- ⑥有多少行就要自己数啦,一个tablerow一行,一个单独的组件也一行!多少列则是看tableRow中 的组件个数,组件最多的就是TableLayout的列数
4.三个常用属性
android:collapseColumns:设置需要被隐藏的列的序号
android:shrinkColumns:设置允许被收缩的列的列序号
android:stretchColumns:设置运行被拉伸的列的列序号以上这三个属性的列号都是从0开始算的,比如shrinkColunmns = "2",对应的是第三列!
可以设置多个,用逗号隔开比如"0,2",如果是所有列都生效,则用"*"号即可
除了这三个常用属性,还有两个属性,分别就是跳格子以及合并单元格,这和HTML中的Table类似:android:layout_column="2":表示的就是跳过第二个,直接显示到第三个格子处,从1开始算的!
android:layout_span="4":表示合并4个单元格,也就说这个组件占4个单元格
属性使用示例:
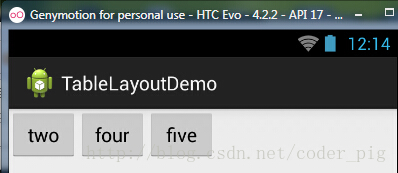
①collapseColumns(隐藏列)
流程:在TableRow中定义5个按钮后,接着在最外层的TableLayout中添加以下属性: android:collapseColumns = "0,2",就是隐藏第一与第三列,代码如下:
<TableLayout

    android:id="@+id/TableLayout2"

    android:layout_width="fill_parent"

    android:layout_height="wrap_content"

    android:collapseColumns="0,2" >

    <TableRow>

        <Button

            android:layout_width="wrap_content"

            android:layout_height="wrap_content"

            android:text="one" />

        <Button

            android:layout_width="wrap_content"

            android:layout_height="wrap_content"

            android:text="two" />

        <Button

            android:layout_width="wrap_content"

            android:layout_height="wrap_content"

            android:text="three" />

        <Button

            android:layout_width="wrap_content"

            android:layout_height="wrap_content"

            android:text="four" />

        <Button

            android:layout_width="wrap_content"

            android:layout_height="wrap_content"

            android:text="five" />

    </TableRow>

</TableLayout>
运行效果图:
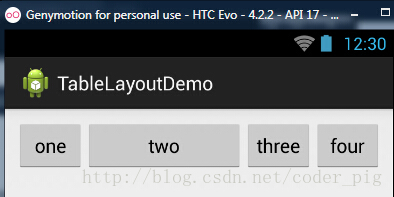
②stretchColumns(拉伸列)
流程:在TableLayout中设置了四个按钮,接着在最外层的TableLayout中添加以下属性: android:stretchColumns = "1"
设置第二列为可拉伸列,让该列填满这一行所有的剩余空间,代码如下:
<TableLayout

    android:id="@+id/TableLayout2"

    android:layout_width="fill_parent"

    android:layout_height="wrap_content"

    android:stretchColumns="1" >

    <TableRow>

        <Button

            android:layout_width="wrap_content"

            android:layout_height="wrap_content"

            android:text="one" />

        <Button

            android:layout_width="wrap_content"

            android:layout_height="wrap_content"

            android:text="two" />

        <Button

            android:layout_width="wrap_content"

            android:layout_height="wrap_content"

            android:text="three" />

        <Button

            android:layout_width="wrap_content"

            android:layout_height="wrap_content"

            android:text="four" />

    </TableRow>

</TableLayout>
运行效果图:
③shrinkColumns(收缩列)
步骤:这里为了演示出效果,设置了5个按钮和一个文本框,在最外层的TableLayout中添加以下属性: android:shrinkColumns = "1"
设置第二个列为可收缩列,代码如下:
<TableLayout

    android:id="@+id/TableLayout2"

    android:layout_width="fill_parent"

    android:layout_height="wrap_content"

    android:shrinkColumns="1" >

    <TableRow>

        <Button

            android:layout_width="wrap_content"

            android:layout_height="wrap_content"

            android:text="one" />

        <Button

            android:layout_width="wrap_content"

            android:layout_height="wrap_content"

            android:text="two" />

        <Button

            android:layout_width="wrap_content"

            android:layout_height="wrap_content"

            android:text="three" />

        <Button

            android:layout_width="wrap_content"

            android:layout_height="wrap_content"

            android:text="four" />

        <Button

            android:layout_width="wrap_content"

            android:layout_height="wrap_content"

            android:text="five" />

        <TextView

            android:layout_width="wrap_content"

            android:layout_height="wrap_content"

            android:text="文本XX" />

    </TableRow>

</TableLayout>
运行截图:
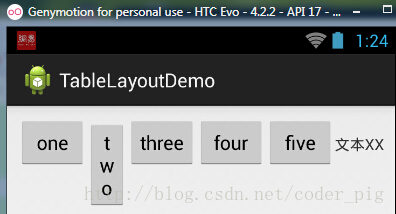
从图中我们可以看到two这个按钮被挤压成条条状,这个就是收缩,为了保证表格能适应 父容器的宽度!至于另外两个属性就不讲解了,用法和HTML相同!有兴趣的可以研究下!
5.使用实例
使用TableLayout来完成简单的登录界面,运行效果图如下:
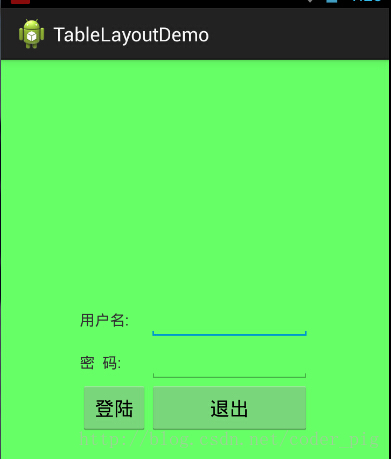
流程解析:
①调用gravity属性,设置为center_vertical,让布局里面的组件在竖直方向上居中
②将TableLayout中的第一和第四列设置为可拉伸
③在每个TableRow中添加两个TextView,用于拉伸填满该行,这样可以让表格水平居中
android:stretchColumns="0,3" 设置为0.3,是为了让两边都充满,那么中间部分就可以居中了
详细代码如下:
<TableLayout xmlns:android="http://schemas.android.com/apk/res/android"

    xmlns:tools="http://schemas.android.com/tools"

    android:id="@+id/TableLayout1"

    android:layout_width="match_parent"

    android:layout_height="match_parent"

    tools:context=".MainActivity"

    android:stretchColumns="0,3"

    android:gravity="center_vertical"

    android:background="#66FF66"

    >

    <TableRow>

        <TextView />

        <TextView

            android:layout_width="wrap_content"

            android:layout_height="wrap_content"

            android:text="用户名:"/>

        <EditText

            android:layout_width="wrap_content"

            android:layout_height="wrap_content"

            android:minWidth="150dp"/>

        <TextView />

    </TableRow>

    <TableRow>

        <TextView />

        <TextView

            android:layout_width="wrap_content"

            android:layout_height="wrap_content"

            android:text="密  码:"

        />

        <EditText

            android:layout_width="wrap_content"

            android:layout_height="wrap_content"

            android:minWidth="150dp"

        />

        <TextView />

    </TableRow>

    <TableRow>

        <TextView />

        <Button

            android:layout_width="wrap_content"

            android:layout_height="wrap_content"

            android:text="登陆"/>

        <Button

            android:layout_width="wrap_content"

            android:layout_height="wrap_content"

            android:text="退出"/>

        <TextView />

    </TableRow>

</TableLayout>
6.发现的问题
相信大家在使用这个这TableLayout的TableRow的时候会遇到这个警告:
当然,程序还是可以运行的,不过或许你是强迫症患者,看到黄色感叹号你就不爽的话! 而解决这个警告的方法也是很奇葩的:只要你的TableLayout里面有2个或以上的TableRow就可以了!
本节小结:
好的,关于Android的第三个布局:TableLayout就到这里~无非就是五个属性的使用而已,实际开发 表格布局我们用的不多,知道简单的用法就可以了!

TableLayout表格布局的更多相关文章
- 【转】TableLayout(表格布局)
转自:http://www.cnblogs.com/zhangs1986/archive/2013/01/17/2864536.html TableLayout(表格布局) 表格布局模型以行列的形式管 ...
- Android零基础入门第29节:善用TableLayout表格布局,事半功倍
原文:Android零基础入门第29节:善用TableLayout表格布局,事半功倍 前面学习了线性布局和相对布局,线性布局虽然方便,但如果遇到控件需要排列整齐的情况就很难达到要求,用相对布局又比较麻 ...
- Android布局-TableLayout表格布局
一.表格布局-TableLayout 1.概念 表格布局采用行列的形式来管理UI的控件.表格布局适合于有规则的布局. TableRow,用来管理行,TableRow中的一个空间占据该行的一列.若不用T ...
- 案例:TableLayout表格布局——迷你计算器
计算器可以常用线性布局(LinearLayout)和表格布局(tableLayout).Gridlayout 今天我用的是表格布局 效果如下: 代码如下: <TableLayout xmlns: ...
- TableLayout(表格布局)
表格布局模型以行列的形式管理子控件,每一行为一个TableRow的对象,当然也可以是一个View的对象.TableRow可以添加子控件,每添加一个为一列. TableLayout属性: android ...
- 2.2.3 TableLayout(表格布局)
3.如何确定行数与列数 ①如果我们直接往TableLayout中添加组件的话,那么这个组件将占满一行!!! ②如果我们想一行上有多个组件的话,就要添加一个TableRow的容器,把组件都丢到里面! ③ ...
- android的布局-----TableLayout(表格布局)
学习导图 (1)TableLayout的相关简介 java的swing编程和html中经常会使用到表格,可见表格的应用开发中使用还是比较多的,同样android也为我们提供这样的布局方式. (2)如何 ...
- Android之TableLayout表格布局
1.相关属性 1.1.常用属性 android:collapseColumns 设置需要被隐藏的列的序列号 android:shrinkColumns 设置允许被收缩的列的序列号 android:st ...
- TableLayout表格布局详解
一.Tablelayout简介 Tablelayout类以行和列的形式对控件进行管理,每一行为一个TableRow对象,或一个View控件.当为TableRow对象时,可在TableRow下添加子控件 ...
随机推荐
- Altium Designer四层板起步
参考转自:https://www.cnblogs.com/raymon-tec/p/5631318.html 双层板:一个是Top layer,一个是Bottom layer,layer层是信号层,也 ...
- (转)如何启动或关闭数据库的归档(ARCHIVELOG)模式
转自:http://www.eygle.com/archives/2004/10/oracle_howtoeci.html Oracle数据库可以运行在2种模式下:归档模式(archivelog)和非 ...
- Docker---(1)Docker 简介
原文:Docker---(1)Docker 简介 版权声明:欢迎转载,请标明出处,如有问题,欢迎指正!谢谢!微信:w1186355422 https://blog.csdn.net/weixin_39 ...
- 每日技术总结:vue router传参方式,js获取设备高度
今天貌似没什么问题,23333…… 1.vue router 路由传参的方式 应用情景:从分类页(category.vue)进入商品列表页(list.vue),需要传递商品分类id(catId),商品 ...
- SpringCloud微服务学习笔记
SpringCloud微服务学习笔记 项目地址: https://github.com/taoweidong/Micro-service-learning 单体架构(Monolithic架构) Mon ...
- POJ 题目2506Tiling(大数)
Tiling Time Limit: 1000MS Memory Limit: 65536K Total Submissions: 8128 Accepted: 3941 Descriptio ...
- 神经网络 vs 大脑
海马区域(负责记忆的关键区域) 0. 常见概念 神经递质:neurotransmitter 在突触传递中是担当"信使"的特定化学物质.简称递质. 重要的神经递质有:乙酰胆碱: 1. ...
- 【奇葩笔试】—— printf() 作为函数的参数及其返回值
int f(int a, int b, int c){ return 0; } int main(int, char**){ f(printf("a"), printf(" ...
- Tidhy
JavaBean.hbm.xml(hibernate配置方面的): <?xml version="1.0" encoding="UTF-8"?> & ...
- Node.js日志框架选型比較:Bunyan
前一篇Node.js日志框架选型比較:Winston Bunyan Bunyan(by Trent Mick)是另外一个值得考虑的日志框架,以稍微不同的方式处理结构化,机器可读性被重点对待. 其结果是 ...