MongoDB分布式集群搭建(分片加副本集)
环境准备
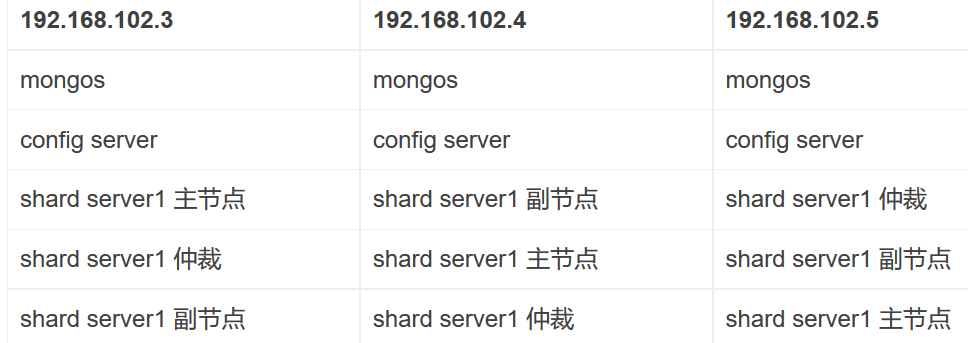
服务器
环境搭建
文件配置和目录添加
新建目录的操作要在三台机器中进行,为配置服务器新建数据目录和日志目录
mkdir -p $MONGODB_HOME/config/data

mkdir -p $MONGODB_HOME/config/log
为分片服务器新建数据目录和日志目录
mkdir -p $MONGODB_HOME/shared1/data

mkdir -p $MONGODB_HOME/shared1/log

mkdir -p $MONGODB_HOME/shared2/data

mkdir -p $MONGODB_HOME/shared2/log

mkdir -p $MONGODB_HOME/shared3/data

mkdir -p $MONGODB_HOME/shared3/log
为路由服务器新建数据目录和日志目录(路由服务器只用到日志目录)
mkdir -p $MONGODB_HOME/mongos/log
配置服务器搭建
在三台机器上做相同的配置
#vim $MONGODB_HOME/conf/config.cfg
## 配置文件内容

pidfilepath=/root/softWare/mongodb3.4.7/mongodb-linux-x86_64-debian71-3.4.7/config/log/configsrv.pid

dbpath=/root/softWare/mongodb3.4.7/mongodb-linux-x86_64-debian71-3.4.7/config/data

logpath=/root/softWare/mongodb3.4.7/mongodb-linux-x86_64-debian71-3.4.7/config/log/congigsrv.log

logappend = true

bind_ip = 0.0.0.0

port = 21000

fork = true

#declare this is a config db of a cluster;

configsvr = true

#副本集名称

replSet=configs

#设置最大连接数

maxConns=20000
启动三台机器上的mongo实例,
mongod -f $MONGODB_HOME/conf/config.cfg
登录任意一台config服务器,进行初始化
#mongo --port 21000

config = {

  "_id": "configs",

  "members": [

    {

      "_id": 0,

      "host": "192.168.102.3:21000"

    },

    {

      "_id": 1,

      "host": "192.168.102.4:21000"

    },

    {

      "_id": 2,

      "host": "192.168.102.5:21000"

    }

  ]

}
分片服务器搭建
每个分片服务都是有3台机器上的复制集组成,所以以下每个分片服务的配置要在三台机器上进行相同的操作
第一个分片服务器的搭建
新建配置文件
#vim $MONGODB_HOME/conf/shared1.cfg
#配置文件内容

pidfilepath = /root/softWare/mongodb3.4.7/mongodb-linux-x86_64-debian71-3.4.7/shared1/log/shared1.pid

dbpath = /root/softWare/mongodb3.4.7/mongodb-linux-x86_64-debian71-3.4.7/shared1/data

logpath = /root/softWare/mongodb3.4.7/mongodb-linux-x86_64-debian71-3.4.7/shared1/log/shared1.log

logappend = true

bind_ip = 0.0.0.0

port = 27001

fork = true

#打开web监控

httpinterface=true

rest=true

#副本集名称

replSet=shared1

#declare this is a shard db of a cluster;

shardsvr = true

#设置最大连接数

maxConns=20000
然后启动每个机器上的分片服务,
mongod -f $MONGODB_HOME/conf/shared1.cfg
登录任意分片服务器,进行初始化
#mongo --port 27001

config={

  "_id": "shared1",

  "members": [

    {

      "_id": 0,

      "host": "192.168.102.3:27001"

    },

    {

      "_id": 1,

      "host": "192.168.102.4:27001"

    },

    {

      "_id": 2,

      "host": "192.168.102.5:27001",

      "arbiterOnly": true

    }

  ]

}
第二个分片服务器的搭建
新建配置文件
#vim $MONGODB_HOME/conf/shared2.cfg

pidfilepath = /root/softWare/mongodb3.4.7/mongodb-linux-x86_64-debian71-3.4.7/shared2/log/shared2.pid

dbpath = /root/softWare/mongodb3.4.7/mongodb-linux-x86_64-debian71-3.4.7/shared2/data

logpath = /root/softWare/mongodb3.4.7/mongodb-linux-x86_64-debian71-3.4.7/shared2/log/shared2.log

logappend = true

bind_ip = 0.0.0.0

port = 27002

fork = true

#打开web监控

httpinterface=true

rest=true

#副本集名称

replSet=shared2

#declare this is a shard db of a cluster;

shardsvr = true

#设置最大连接数

maxConns=20000
然后启动每个机器上的分片服务,
mongod -f $MONGODB_HOME/conf/shared2.cfg
登录任意分片服务器,进行初始化
#mongo --port 27002

config={

  "_id": "shared2",

  "members": [

    {

      "_id": 0,

      "host": "192.168.102.3:27002"

    },

    {

      "_id": 1,

      "host": "192.168.102.4:27002",

      "arbiterOnly": true

    },

    {

      "_id": 2,

      "host": "192.168.102.5:27002"

    }

  ]

}
第三个分片服务器的搭建
新建配置文件
#vim $MONGODB_HOME/conf/shared3.cfg

pidfilepath = /root/softWare/mongodb3.4.7/mongodb-linux-x86_64-debian71-3.4.7/shared3/log/shared3.pid

dbpath = /root/softWare/mongodb3.4.7/mongodb-linux-x86_64-debian71-3.4.7/shared3/data

logpath = /root/softWare/mongodb3.4.7/mongodb-linux-x86_64-debian71-3.4.7/shared3/log/shared3.log

logappend = true

bind_ip = 0.0.0.0

port = 27003

fork = true

#打开web监控

httpinterface=true

rest=true

#副本集名称

replSet=shared3

#declare this is a shard db of a cluster;

shardsvr = true

#设置最大连接数

maxConns=20000
然后启动每个机器上的分片服务,
mongod -f $MONGODB_HOME/conf/shared3.cfg
登录任意分片服务器,进行初始化
#mongo --port 27003

config={

  "_id": "shared3",

  "members": [

    {

      "_id": 0,

      "host": "192.168.102.3:27003"

    },

    {

      "_id": 1,

      "host": "192.168.102.4:27003",

      "arbiterOnly": true

    },

    {

      "_id": 2,

      "host": "192.168.102.5:27003"

    }

  ]

}
路由服务器搭建
路由服务器同样也是要在三台机器上做相同的配置和操作
pidfilepath = /root/softWare/mongodb3.4.7/mongodb-linux-x86_64-debian71-3.4.7/mongos/log/mongos.pid

logpath = /root/softWare/mongodb3.4.7/mongodb-linux-x86_64-debian71-3.4.7/mongos/log/mongos.log

logappend = true

bind_ip = 0.0.0.0

port = 20000

fork = true

#监听的配置服务器,只能有1个或者3个 configs为配置服务器的副本集名字

configdb = configs/192.168.102.3:21000,192.168.102.4:21000,192.168.102.5:21000

#设置最大连接数

maxConns=20000
登录mongos服务,在程序里面进行设置让分片生效
#mongo --port 20000

use admin

sh.addShard("shared1/192.168.102.3:27001,192.168.102.4:27001,192.168.102.5:27001")

sh.addShard("shared2/192.168.102.3:27002,192.168.102.4:27002,192.168.102.5:27002")

sh.addShard("shared3/192.168.102.3:27003,192.168.102.4:27003,192.168.102.5:27003")
指定相应的数据库与表的分片生效
#指定testdb分片生效

db.runCommand( { enablesharding :"testdb"});

#指定数据库里需要分片的集合和片键

db.runCommand( { shardcollection : "testdb.table1",key : {id: 1} } )
分片测试
登录mongos进行数据的插入。具体过程如下:
mongo  192.168.102.3:20000

#使用testdb

use  testdb;

#插入测试数据

for (var i = 1; i <= 100000; i++)

db.table1.save({id:i,"test1":"testval1"});

#查看分片情况如下,部分无关信息省掉了

db.table1.stats();

{

        "sharded" : true,

        "ns" : "testdb.table1",

        "count" : 100000,

        "numExtents" : 13,

        "size" : 5600000,

        "storageSize" : 22372352,

        "totalIndexSize" : 6213760,

        "indexSizes" : {

                "_id_" : 3335808,

                "id_1" : 2877952

        },

        "avgObjSize" : 56,

        "nindexes" : 2,

        "nchunks" : 3,

        "shards" : {

                "shard1" : {

                        "ns" : "testdb.table1",

                        "count" : 42183,

                        "size" : 0,

                        ...

                        "ok" : 1

                },

                "shard2" : {

                        "ns" : "testdb.table1",

                        "count" : 38937,

                        "size" : 2180472,

                        ...

                        "ok" : 1

                },

                "shard3" : {

                        "ns" : "testdb.table1",

                        "count" :18880,

                        "size" : 3419528,

                        ...

                        "ok" : 1

                }

        },

        "ok" : 1

}
分片的key的设置会影响每个分片的数据量。
集群维护
启动集群
启动集群的顺序是:
1,启动配置服务。
2,启动分片服务。
3,启动路由服务。
JackerWang 于2017年8月29日上午的广州
MongoDB分布式集群搭建(分片加副本集)的更多相关文章
- [转]搭建高可用mongodb集群(二)—— 副本集
在上一篇文章<搭建高可用MongoDB集群(一)——配置MongoDB> 提到了几个问题还没有解决. 主节点挂了能否自动切换连接?目前需要手工切换. 主节点的读写压力过大如何解决? 从节点 ...
- 搭建高可用mongodb集群(二)—— 副本集
在上一篇文章<搭建高可用MongoDB集群(一)——配置MongoDB> 提到了几个问题还没有解决. 主节点挂了能否自动切换连接?目前需要手工切换. 主节点的读写压力过大如何解决? 从节点 ...
- 搭建高可用mongodb集群(二)—— 副本集
在上一篇文章<搭建高可用MongoDB集群(一)--配置MongoDB> 提到了几个问题还没有解决. 主节点挂了能否自动切换连接?目前需要手工切换. 主节点的读写压力过大如何解决? 从节点 ...
- MongoDB集群搭建-分片
MongoDB集群搭建-分片 一.场景: 1,机器的磁盘不够用了.使用分片解决磁盘空间的问题. 2,单个mongod已经不能满足写数据的性能要求.通过分片让写压力分散到各个分片上面,使用分片服务器自身 ...
- mongodb3.6集群搭建:分片+副本集
mongodb是最常用的noSql数据库,在数据库排名中已经上升到了前五.这篇文章介绍如何搭建高可用的mongodb(分片+副本)集群. 在搭建集群之前,需要首先了解几个概念:路由,分片.副本集.配置 ...
- 集群搭建完成简要测试集群(性能)带宽与IOPS
集群搭建好之后网络,raid卡策略,磁盘都会影响集群的性能.为了避免因上述问题使得集群的性能受到影响,我们依次进行测试,最后得到基本的集群性能. 网络 首先是网络,ceph集群一大堆让人摸不着头脑的问 ...
- Redis5以上版本伪集群搭建(高可用集群模式)
redis集群需要至少要三个master节点,我们这里搭建三个master节点,并且给每个master再搭建一个slave节点,总共6个redis节点,这里用一台机器(可以多台机器部署,修改一下ip地 ...
- mongodb3.6集群搭建:分片集群认证
上篇集群已经创建,现在加入认证. 1. 生成密钥文件每个服务器上创建路径: mkdir -p /var/lib/mongo/auth 生成64字节的密钥文件openssl rand -base64 6 ...
- 分布式实时日志系统(一)环境搭建之 Jstorm 集群搭建过程/Jstorm集群一键安装部署
最近公司业务数据量越来越大,以前的基于消息队列的日志系统越来越难以满足目前的业务量,表现为消息积压,日志延迟,日志存储日期过短,所以,我们开始着手要重新设计这块,业界已经有了比较成熟的流程,即基于流式 ...
随机推荐
- Jquery table元素操作-创建|数据填充|重置|隐藏行
1.Jquery创建表格 /** * 创建表格 * @param label 标题 json格式,数据结构见附录1 * @param data 数据 json格式,数据结构见附录1 * @param ...
- Hibernate学习之一对多关联
注意事项: 1.单向一对多 只需在“一”放进行配置2.双向一对多 需要在关联双方都加以配置,而且需要在一的一方设置inverse=true 首先是实体类: TAddress.java(多的一方) ...
- angular JS中使用jquery datatable添加ng-click事件
'use strict'; app.controller('DataTableCtrl', function ($scope, $compile) { $scope.show = function ( ...
- 网关(Gatesvr) 设计(1)
Gate解决的问题: 1.用户在服务端的实例可以在不同的进程中,也可以移动到同一个进程中.2.用户只需要与服务端建立有限条连接,即可以访问到任意服务进程.这个连接的数量不会随服务进程的数量增长而线性增 ...
- Swift 细节
1.swift ?和 !的区别 1.1 Swift语言使用var定义变量,但和别的语言不同,Swift里不会自动给变量赋初始值,也就是说变量不会有默认值,所以要求使用变量之前必须要对其初始化.如果在使 ...
- 读论文系列:Deep transfer learning person re-identification
读论文系列:Deep transfer learning person re-identification arxiv 2016 by Mengyue Geng, Yaowei Wang, Tao X ...
- JVM学习笔记三:垃圾收集器及内存管理策略
垃圾收集器 上文说到了垃圾收集算法,这次我们聊一下HotSpot的具体垃圾收集器的实现,以JDK1.7为例,其包含的可选垃圾收集器如下图: 不同收集器之间的连线,代表它们可以搭配使用,收集器所属的区域 ...
- ajax-jquery方法-初步入门01(整理)
-----------------------------------2017.07.21写----------------------------------------- 相比较原生javascr ...
- [技术]浅谈c++ this指针
背景 matrix operator*=(const matrix &a){ *this=*this*a; return *this; } XXX:诶,你这个*this是什么啊,是指针吗 博主 ...
- Uva 11988 Broken Keyboard STL+链表
两种方法,直接上代码 STL标准模板库 #include <iostream> #include <list> #include <algorithm> #incl ...