来个Button看一看
0.目录
1.前言
2.基本属性与方法
3.点点更健康
4.我的Button有点多
5.震惊!TextView竟然...
1.前言
每次写代码总会忘记一些东西,又要重新Goooooooooogle,好烦呐~
本文参考网站(排名不分先后):
1.Android Button的基本使用
2.Android中设置文本颜色的三种方法
3.android:layout_gravity和android:gravity的区别
2.基本属性与方法
Button 支持的 XML 属性及相关方法:
| XML属性 | 相关方法 | 说明 |
|---|---|---|
| android:id | findViewById | 在XML中设置id,然后在.java中才可以调用这个按钮做其他事 |
| android:text | setText() | 设置文字 |
| android:textColor | setTextColor() | 设置文字颜色 |
| android:textSize | setTextSize() | 设置文字大小 |
| android:background | setBackground() | 设置背景颜色或者背景图片 |
| android:enabled | setEnabled() | 设置按钮是否可以被点击 |
| android:layout_gravity | 设置按钮的位置 | |
| android:gravity | 设置文字的位置 |
以下用实例来讲解:
XML文件为:
<LinearLayout xmlns:android="http://schemas.android.com/apk/res/android"
    xmlns:tools="http://schemas.android.com/tools"
    android:layout_width="match_parent"
    android:layout_height="match_parent"
    android:orientation="vertical"
    tools:context="com.example.pylearn_01_1.MainActivity" >

    <Button
        android:id="@+id/btn1"
        android:layout_width="wrap_content"
        android:layout_height="wrap_content"
        android:text="自古一楼没卵用" />

    <Button
        android:id="@+id/btn2"
        android:layout_width="fill_parent"
        android:layout_height="wrap_content"
        android:text="使用XML布局"
        android:textColor="@android:color/white"
        android:textSize="50sp" />

    <Button
        android:id="@+id/btn3"
        android:layout_width="wrap_content"
        android:layout_height="wrap_content" />

    <Button
        android:id="@+id/btn4"
        android:layout_width="wrap_content"
        android:layout_height="wrap_content"
        android:background="@android:color/background_dark" />

    <Button
        android:id="@+id/btn5"
        android:layout_width="wrap_content"
        android:layout_height="wrap_content"
        android:text="可远观而不可亵玩"
        android:enabled="false" />

    <Button
        android:id="@+id/btn6"
        android:layout_width="wrap_content"
        android:layout_height="wrap_content"
        android:text="使用layout_gravity让按钮居中"
        android:layout_gravity="center" />

    <Button
        android:id="@+id/btn7"
        android:layout_width="wrap_content"
        android:layout_height="wrap_content"
        android:text="使用gravity让文字居中"
        android:gravity="center" />

</LinearLayout>
java文件为:
package com.example.pylearn_01_1;

import android.app.Activity;
import android.os.Bundle;
import android.view.Menu;
import android.view.MenuItem;
import android.widget.Button;

public class MainActivity extends Activity {

    /* pylearn_01_1
     * Button基本属性与方法
     */
    Button btn3;

    @Override
    protected void onCreate(Bundle savedInstanceState) {
        super.onCreate(savedInstanceState);
        setContentView(R.layout.activity_main);

        btn3=(Button)findViewById(R.id.btn3);

        btn3.setText("使用java布局");//设置文字内容
        btn3.setTextColor(android.graphics.Color.RED);//设置文字颜色
        btn3.setTextSize(45);//设置文字大小
        btn3.setEnabled(false);//设置按钮不能被点击
    }

    @Override
    public boolean onCreateOptionsMenu(Menu menu) {
        // Inflate the menu; this adds items to the action bar if it is present.
        getMenuInflater().inflate(R.menu.main, menu);
        return true;
    }

    @Override
    public boolean onOptionsItemSelected(MenuItem item) {
        // Handle action bar item clicks here. The action bar will
        // automatically handle clicks on the Home/Up button, so long
        // as you specify a parent activity in AndroidManifest.xml.
        int id = item.getItemId();
        if (id == R.id.action_settings) {
            return true;
        }
        return super.onOptionsItemSelected(item);
    }
}
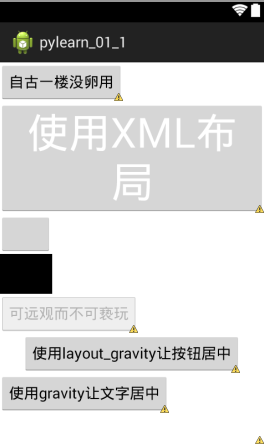
eclipse中看xml为:

模拟器中运行结果为:

源代码在此:pylearn_01_1
3.点点更健康
Button弄出来当然不是为了当花瓶的,咱们需要通过点击它来完成一些事情。
按钮的点击事件可以使用
btn.setOnClickListener(new OnClickListener() {
    @Override
    public void onClick(View v) {
        //do something
    }
});
来实现。
源代码在此:pylearn_01_2
也可以使用
btn1.setOnClickListener(this);
btn2.setOnClickListener(this);然后让MainActivity extends Activity implements OnClickListener实现onClick方法:
@Override
public void onClick(View v) {
    // TODO 自动生成的方法存根
    switch ( v.getId() ) {
        case R.id.btn1:
            fun_btn1();
            break;
        case R.id.btn2:
            fun_btn2();
            break;
    }
}源代码在此:pylearn_01_3
这两种方法都可以实现按钮点击事件的处理。
4.我的Button有点多
如何实现多个Button平分天下:
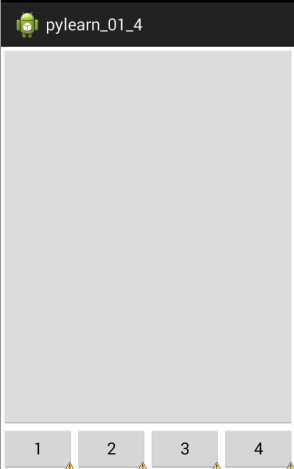
使用android:layout_weight控制各个按钮的权重,然后在parent布局中控制好权重和android:weightSum。最后设置各个按钮的占比为android:layout_width="0dp"。这样就实现了按钮的多个按钮的平均分配。
<LinearLayout xmlns:android="http://schemas.android.com/apk/res/android"
    xmlns:tools="http://schemas.android.com/tools"
    android:layout_width="match_parent"
    android:layout_height="match_parent"
    android:orientation="vertical"
    tools:context="com.example.pylearn_01_1.MainActivity" >

    <Button
        android:id="@+id/btn"
        android:layout_width="fill_parent"
        android:layout_height="0dp"
        android:layout_weight="1" />

    <LinearLayout
        android:layout_width="fill_parent"
        android:layout_height="wrap_content"
        android:weightSum="4" >

        <Button
            android:id="@+id/btn1"
            android:layout_width="0dp"
            android:layout_height="wrap_content"
            android:layout_weight="1"
            android:text="1" />

        <Button
            android:id="@+id/btn2"
            android:layout_width="0dp"
            android:layout_height="wrap_content"
            android:layout_weight="1"
            android:text="2" />

        <Button
            android:id="@+id/btn3"
            android:layout_width="0dp"
            android:layout_height="wrap_content"
            android:layout_weight="1"
            android:text="3" />

        <Button
            android:id="@+id/btn4"
            android:layout_width="0dp"
            android:layout_height="wrap_content"
            android:layout_weight="1"
            android:text="4" />
    </LinearLayout>
</LinearLayout>
效果如下:

源代码在此:pylearn_01_4
5.震惊!TextView竟然...
忘记在哪看到的一句话:
能用TextView的地方就别用Button
Button能实现的基本上TextView也能实现
有兴趣可以试试:把上面所有程序中的Button换成TextView,毫无违和感。
来个Button看一看的更多相关文章
- 瞧一瞧,看一看呐,用MVC+EF快速弄出一个CRUD,一行代码都不用写,真的一行代码都不用写!!!!
瞧一瞧,看一看呐用MVC+EF快速弄出一个CRUD,一行代码都不用写,真的一行代码都不用写!!!! 现在要写的呢就是,用MVC和EF弄出一个CRUD四个页面和一个列表页面的一个快速DEMO,当然是在不 ...
- 2015年4月27日---C语言:输出特殊图案,请在c环境中运行,看一看,Very Beautiful!
---恢复内容开始--- 题目:输出特殊图案,请在c环境中运行,看一看,Very Beautiful! 1.程序分析:字符共有256个.不同字符,图形不一样. 2.程序源代码: [code=c] #i ...
- Loj#6183. 看无可看
Loj#6183. 看无可看 题目描述 首先用特征根求出通项公式\(A_n=p\cdot 3^n+q\cdot(-1)^n\).通过给定的\(f_0,f_1\)可以解出\(p,q\). 然后我们要求的 ...
- 看无可看 分治FFT+特征值方程
题面: 看无可看(see.pas/cpp/c) 题目描述 “What’s left to see when our eyes won’t open?” “若彼此瞑目在即,是否终亦看无可看?” ---- ...
- Scrum模拟微信看一看“疫情专区”的敏捷开发过程
无论作为产品用户还是管理咨询顾问,都非常非常喜欢微信.自认感情比较克制属于“高冷”挂,但从很多方面都太佩服太崇拜张小龙了(新书里微信也会是最喜欢的案例之一,真的不只是一个产品而已,很多方面都太牛了). ...
- Mysql数据库优化技术之配置篇、索引篇 ( 必看 必看 转)
转自:Mysql数据库优化技术之配置篇.索引篇 ( 必看 必看 ) (一)减少数据库访问对于可以静态化的页面,尽可能静态化对一个动态页面中可以静态的局部,采用静态化部分数据可以生成XML,或者文本文件 ...
- iOS - 基础知识总结(OC版) 面试必看 再不看就要用swift了
OC的理解与特性 OC作为一门面向对象的语言,自然具有面向对象的语言特性:封装.继承.多态.它既具有静态语言的特性(如C++),又有动态语言的效率(动态绑定.动态加载等).总体来讲,OC确实是一门不错 ...
- 今天做项目用到框架,关于angual,然后自己整理了一番,自己上网也看了看。
1. Angular 1.1. 库与框架的区别 jQuery:库 库一般都是封装了一些常用的方法 自己手动去调用这些方法,来完成我们的功能 $('#txt').val('我是小明'): $('div' ...
- PHP_Bibel阅读学习(一)——看书看经典,写文写代码
基础快速再看一下,然后每天有新的好玩的看. 这本书,反正好评不少,就是`PHP和MySQL Web开发`,机械工业出版社,澳洲人写的,红皮,有兴趣的可以看一下. 第一篇 使用PHP 一.入门 5分钟翻 ...
随机推荐
- 点击下拉,其余不动的jquery事件(转)
<!DOCTYPE html PUBLIC "-//W3C//DTD XHTML 1.0 Transitional//EN" "http://www.w3.org/ ...
- virualbox 安装 otter 必备软件
前言 最近研究了一下阿里otter项目(分布式数据库同步),所以就在virualbox 上开始准备学习一下,遇到了不少坑,所以记录一下啊. otter 项目:https://github.com/al ...
- 2017web前端面试总结
2017web前端面试总结 从今年3月份开始面试笔试找实习找校招到现在也半年多了,拿到了不少offer,也有了自己的一点心得体会,这里写出来分享一下,拙见勿喷. 注意一下,以下的观点仅代表我个人的体会 ...
- AngularJS学习篇(十九)
AngularJS Bootstrap 可以在你的 AngularJS 应用中加入 Twitter Bootstrap,你可以在你的 <head>元素中添加如下代码: <link r ...
- vue初级学习--组件的使用(自定义组件)
一.导语 突然冒出四个字,分即是合,嗯,优点道理....................... 二.正文 在搞的仿淘宝demo,之前加入购物车是与商品详情一块的,今天把它单独拆出来,复用性高点,那这样 ...
- 让盒子两端对齐小技巧 => inline-block
今天在项目中碰到了设计盒子两端对齐的栗子,咱们用inline-block方法轻松的解决了,下面是我的经验: 原理: 利用文字text-align:justify; 操纵inline-block盒子,能 ...
- Do you kown Asp.Net Core -- 配置Kestrel端口
Kestrel介绍 在Asp.Net Core中,我们的web application 其实是运行在Kestrel服务上,它是一个基于libuv开源的跨平台可运行 Asp.Net Core 的web服 ...
- Windows Forms DataGridView中合并单元格
Windows Forms DataGridView 没有提供合并单元格的功能,要实现合并单元格的功能就要在CellPainting事件中使用Graphics.DrawLine和 Graphics.D ...
- [转载] HBase vs Cassandra:我们迁移系统的原因
转载自http://www.csdn.net/article/2010-11-29/282698 我的团队近来正在忙于一个全新的产品——即将发布的网络游戏www.FightMyMonster.com. ...
- Python进阶---面向对象的程序设计思想
Python的面向对象 一.面向过程与面向对象的对比 面向过程的程序设计的核心是过程(流水线式思维),过程即解决问题的步骤,面向过程的设计就好比精心设计好一条流水线,考虑周全什么时候处理什么东西. 优 ...
