简单的整合 shiro + SpringMVC 例子
简单的整合shiro和springmvc的例子
想要整合Shiro和springmvc,在网上找了很多例子,感觉都有一点复杂。所以就自己写了一个最简单整合项目,记录在这里以备后面查看。
这个例子包含如下三个部分:
1.简单的页面
2.shiro配置
3.springmvc配置
shiro可以直接和spring整合,但是这样需要单独配置spring用于整合shiro,在配置springmvc。配置文件看起来乱七八糟的。所以这里就shiro不采用spring来管理。因此这里的整合类似 shiro + servlet + springmvc。这样配置相对简单好理解。但也是最简单的配置,只能用于学习,用在实际项目中,还得改写。
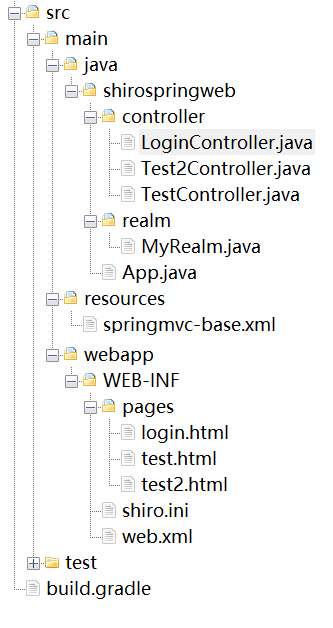
下面是项目结构图(realm那个文件夹可有可没有,只是如果删除了,就需要将shiro.ini文件中 myrealm = shirospringweb.realm xxxx 那行删除掉)

下面是具体步骤
(1).添加依赖
既然是简单,那引用也是最少的,具体如下
dependencies {

    // Use JUnit Jupiter for testing.

    testImplementation 'org.junit.jupiter:junit-jupiter:5.7.1'

    // This dependency is used by the application.

    implementation 'com.google.guava:guava:30.1-jre'

	// ++ Adding Spring dependencies

	implementation 'org.springframework:spring-context:5.3.9'

	implementation 'org.springframework:spring-webmvc:5.3.9'

	// ++ Using Servlet for SpringMvc

	implementation 'javax.servlet:javax.servlet-api:4.0.1'

	// ++ Using shiro-web

	implementation 'org.apache.shiro:shiro-web:1.7.1'

}
其中前面两个是建立项目自带的,所以只需要引用后面的四个包就可以咯
(2).Servlet中配置Shiro
在servlet整合shiro,只需要在web.xml中引用shiro的上下文监听器(读取shiro配置文件),并配置shiro过滤器即可,具体如下:
<!-- Shiro直接拦截,不经过spring -->

<listener>

	<listener-class>org.apache.shiro.web.env.EnvironmentLoaderListener</listener-class>

</listener>

<!-- 对应filter-->

<filter>

	<filter-name>shiroFilter</filter-name>

	<filter-class>org.apache.shiro.web.servlet.ShiroFilter</filter-class>

	</filter>

<!-- filter Mapping-->

<filter-mapping>

	<filter-name>shiroFilter</filter-name>

	<url-pattern>/*</url-pattern>

</filter-mapping>
在web.xml中配置好shiro后,需要在WEB-INF文件夹下书写shiro.ini的配置文件,具体如下
[main]

authc.loginUrl = /login

authc.usernameParam = username

authc.passwordParam = password

authc.successUrl = /

authc.failureKeyAttribute = shiroLoginFailure

logout.redirectUrl = /

myrealm = shirospringweb.realm.MyRealm

[users]

liang = 123, role1

wang = 123, role2

[urls]

/ = anon

/test = anon

/test2 = authc

/login = authc

/logout = logout

/** = anon
这样shiro就可以配合servlet工作了
(3).配置springMVC
最简单springmvc的配置,只需要配置一个DispatcherServlet,并在其配置文件(resources/springmvc-base.xml)中打开包扫描,就好了,具体如下:
<!-- 配置SpringMVC -->

<servlet>

	<servlet-name>springServlet</servlet-name>

	<servlet-class>org.springframework.web.servlet.DispatcherServlet</servlet-class>

	<init-param>

		<param-name>contextConfigLocation</param-name>

		<param-value>classpath:springmvc-base.xml</param-value>

	</init-param>

</servlet>

<!-- 对应servlet mapping -->

<servlet-mapping>

	<servlet-name>springServlet</servlet-name>

	<url-pattern>/*</url-pattern>

</servlet-mapping>
resources/springmvc-base.xml的配置文件如下(主要是打开包扫描和注解驱动):
<?xml version="1.0" encoding="utf-8"?>

<beans xmlns="http://www.springframework.org/schema/beans"

    xmlns:xsi="http://www.w3.org/2001/XMLSchema-instance"

    xmlns:context="http://www.springframework.org/schema/context"

    xmlns:mvc="http://www.springframework.org/schema/mvc"

	xmlns:aop="http://www.springframework.org/schema/aop"

    xsi:schemaLocation="http://www.springframework.org/schema/beans http://www.springframework.org/schema/beans/spring-beans.xsd

        http://www.springframework.org/schema/context http://www.springframework.org/schema/context/spring-context-4.1.xsd

        http://www.springframework.org/schema/mvc http://www.springframework.org/schema/mvc/spring-mvc-4.1.xsd

		http://www.springframework.org/schema/aop http://www.springframework.org/schema/aop/spring-aop.xsd">

		<context:component-scan base-package="shirospringweb.controller"/>

		<mvc:annotation-driven />

		<!-- 用来处理当 DispatcherServlet 拦截全部请求的时候,它在RequestHandler处捡出静态资源的请求 -->

		<mvc:default-servlet-handler />

</beans>
然后书写上面shiro配置文件中的对应controller和前端页面就可以了。具体如下:
3.1 TestController 及其页面
TestController的代码,如下所示
package shirospringweb.controller;

import org.springframework.stereotype.Controller;

import org.springframework.web.bind.annotation.RequestMapping;

@Controller

public class TestController{

	@RequestMapping("/test")

	public String testPage(){

		return "WEB-INF/pages/test.html";

	}

}
对应前端页面,如下所示(别看他挺多的样子其实啥也没有,这里主要是将了一个在springmvc页面中也是中文的配置,可以当做没看见)
<html>
<head>
<title>TestPage</title>
</head>
<body>
TestPage,
<br/>
This Page only display English character.
<br />
To display chineses character, you should add an encoding filter in web.xml, like this
<br />
<br />
<br />
<filter><br />
<filter-name>encodingFilter</filter-name><br />
<filter-class>org.springframework.web.filter.CharacterEncodingFilter</filter-class><br />
<init-param><br />
<param-name>encoding</param-name><br />
<param-value>UTF-8</param-value><br />
</init-param><br />
<init-param><br />
<param-name>forceEncoding</param-name><br />
<param-value>true</param-value><br />
</init-param><br />
</filter><br />
<filter-mapping><br />
<filter-name>encodingFilter</filter-name><br />
<url-pattern>/*</url-pattern><br />
</filter-mapping><br />
</body>
</html>3.2 Test2Controller 及其页面
Test2Controller的代码
package shirospringweb.controller;

import org.springframework.stereotype.Controller;

import org.springframework.web.bind.annotation.RequestMapping;

@Controller

public class Test2Controller {

	@RequestMapping("/test2")

	public String getTest2Page(){

		return "WEB-INF/pages/test2.html";

	}

}
其对应的界面如下:
<html>

	<head>

		Test 2 Page

	</head>

	<body>

		This is the test 2 page <br/>

		(Can not display chinese Character, more information <a href="/app/test">click here</a>)

	</body>

</html>
3.3 LoginController 及其对应的界面
LoginController的代码
package shirospringweb.controller;

import org.springframework.stereotype.Controller;

import org.springframework.web.bind.annotation.RequestMapping;

@Controller

public class LoginController {

	@RequestMapping("/login")

	public String getLogin(){

		return "WEB-INF/pages/login.html";

	}

}
其对应的登录界面
<html>

	<head>Login Page</head>

	<body>

		This is Login Page With No Chinese Character

		<br>

		<form action="/app/login" method="POST">

			username : <input name="username" /><br/>

			password : <input name="password" /><br/>

			<input type="submit" value="LOGIN"/>

		</form>

	</body>

</html>
好了,代码到这儿完事儿了,下面是运行的效果图
(4).运行效果
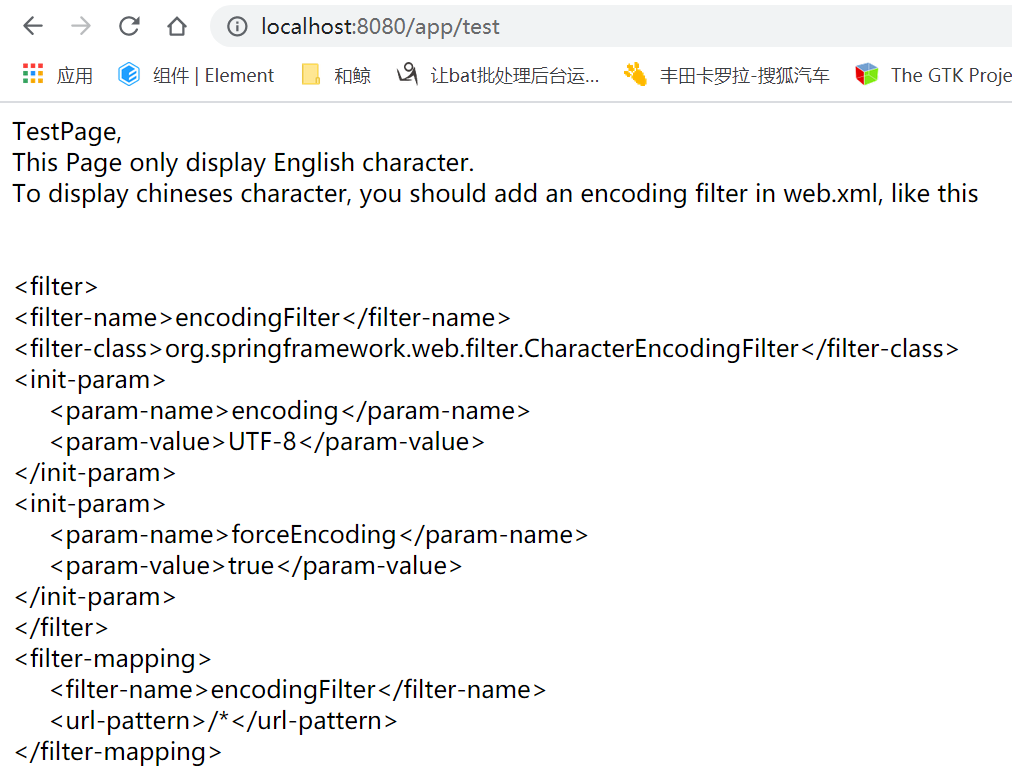
4.1 首先访问/app/test页面可以访问到(shiro未拦截)
页面如下

4.2 其实访问/app/test2需要登录,登录后需要后跳转(可能需要访问两次,有一次请求URL会带参数,这个shiro会报错,这是shiro的问题,可以百度解决)具体如下:

登录后跳转

访问/logout会退出到主页面,这个就不截图了
结束了
简单的整合 shiro + SpringMVC 例子的更多相关文章
- SpringMVC整合Shiro——(3)
SpringMVC整合Shiro,Shiro是一个强大易用的Java安全框架,提供了认证.授权.加密和会话管理等功能. 第一步:配置web.xml <!-- 配置Shiro过滤器,先让Shiro ...
- SpringMVC整合Shiro权限框架
尊重原创:http://blog.csdn.net/donggua3694857/article/details/52157313 最近在学习Shiro,首先非常感谢开涛大神的<跟我学Shiro ...
- SpringMVC整合Shiro,Shiro是一个强大易用的Java安全框架,提供了认证、授权、加密和会话管理等功能
SpringMVC整合Shiro,Shiro是一个强大易用的Java安全框架,提供了认证.授权.加密和会话管理等功能. 第一步:配置web.xml <!-- 配置Shiro过滤器,先让Shiro ...
- SpringBoot整合Shiro实现基于角色的权限访问控制(RBAC)系统简单设计从零搭建
SpringBoot整合Shiro实现基于角色的权限访问控制(RBAC)系统简单设计从零搭建 技术栈 : SpringBoot + shiro + jpa + freemark ,因为篇幅原因,这里只 ...
- Spring Boot 最简单整合Shiro+JWT方式
简介 目前RESTful大多都采用JWT来做授权校验,在Spring Boot 中可以采用Shiro和JWT来做简单的权限以及认证验证,在和Spring Boot集成的过程中碰到了不少坑.便结合自身以 ...
- SpringBoot整合Shiro权限框架实战
什么是ACL和RBAC ACL Access Control list:访问控制列表 优点:简单易用,开发便捷 缺点:用户和权限直接挂钩,导致在授予时的复杂性,比较分散,不便于管理 例子:常见的文件系 ...
- Spring整合Shiro做权限控制模块详细案例分析
1.引入Shiro的Maven依赖 <!-- Spring 整合Shiro需要的依赖 --> <dependency> <groupId>org.apache.sh ...
- 补习系列(6)- springboot 整合 shiro 一指禅
目标 了解ApacheShiro是什么,能做什么: 通过QuickStart 代码领会 Shiro的关键概念: 能基于SpringBoot 整合Shiro 实现URL安全访问: 掌握基于注解的方法,以 ...
- SSM整合shiro
采用maven构建项目 1pom.xml中加入shiro依赖 <!-- shiro --> <dependency> <groupId>org.apache.shi ...
随机推荐
- zbxtable的使用
实验环境: zabbix server 172.16.1.121 mysql 172.16.1.121 访问端 172.16.1.122 54.1 zbxtable 1 说明 ZbxTable使用Go ...
- 24、Keepalived高可用介绍
24.1.什么是keepalived: Keepalived 软件起初是专为 LVS 负载均衡软件设计的,用来管理并监控 LVS 集群系统中各个服务节点的状态,后来又加入了可以实现高可用的 VRRP ...
- 5、cobbler搭建本地saltstack yum仓库
5.1.安装cobbler: 参考"linux运维_集群_01(35.cobbler自动化安装操作系统:)" 5.2.cobbler yum源常用操作命令: cobbler rep ...
- 二叉搜索树(Binary Search Tree)(Java实现)
@ 目录 1.二叉搜索树 1.1. 基本概念 1.2.树的节点(BinaryNode) 1.3.构造器和成员变量 1.3.公共方法(public method) 1.4.比较函数 1.5.contai ...
- ps 合并两张图片
1.ps 打开第一张图片,2.打开另一张图片为图层.3.选中图层,创建蒙版: 4.点击蒙版+按Alt键,打开蒙版:5.打开蒙版后选中渐变工具,途中黑色为不显示区域,(注意渐变模式要改为正常):6.调整 ...
- 使用.net6 WebApplication打造最小API
.net6在preview4时给我们带来了一个新的API:WebApplication,通过这个API我们可以打造更小的轻量级API服务.今天我们来尝试一下如何使用WebApplication设计一个 ...
- linux下的压缩命令 tar zip gunzip
p.p1 { margin: 0; font: 12px Arial; color: rgba(5, 42, 136, 1) } p.p2 { margin: 0; font: 12px " ...
- Mysql索引降维 优化查询 提高效率
在前一篇文章中,我们已经介绍了索引.索引的优化规则等等 原文链接:Siam博客 mysql索引优化 在其中我们有引申出组合索引,多个单字段索引冲突两个知识点. 本文章主要是与后者有关联. 在原文中,我 ...
- mysql大量数据分页查询优化-延迟关联
所有的php初学者都应该知道,mysql的分页语句写法如下: 1 select * from a limit (page-1)*page_size,page_size 而当这语句分页到一定程度时,例如 ...
- Linux创建ftp并设置权限以及忘记ftp帐号(密码)修改 (转)
忘记ftp密码修改方法:1.登录服务器 cd /etc/vsftpdcat ftpusers找到对应的ftp用户名 (如果用户名也忘记了 那么 cd /etc 然后cat passwd 查看用户 ...
