centos7编译linux的内核源码
昨天编译了一个linux 内核源码,遇到一些问题, 今天把我遇到的问题和解决方法分享给大家。希望可以帮助到需要的人。
1.检查是否安装了相应的包
我第一次编译的时候只安装的“Development Tools” 包,”Compatibility Libraries“和”Development and Creative Workstation“没有安装
[root@localhost yum.repos.d]# yum groups list                       #查看包组列表

Loaded plugins: fastestmirror, langpacks

There is no installed groups file.

Maybe run: yum groups mark convert (see man yum)

Loading mirror speeds from cached hostfile

Available Environment Groups:

   Minimal Install

   Compute Node

   Infrastructure Server

   File and Print Server

   Basic Web Server

   Virtualization Host

   Server with GUI

   GNOME Desktop

   KDE Plasma Workspaces

   Development and Creative Workstation

Available Groups:

   Compatibility Libraries

   Console Internet Tools

   Development Tools

   Graphical Administration Tools

   Legacy UNIX Compatibility

   Scientific Support

   Security Tools

   Smart Card Support

   System Administration Tools

   System Management

Done
2.下载源码从https://www.kernel.org/网站下载需要编译的内核。
这里直接使用wget命令进行下载
[root@localhost yum.repos.d]# cd /root                                                               #切换到root目录

[root@localhost ~]# wget https://cdn.kernel.org/pub/linux/kernel/v4.x/testing/linux-4.7-rc7.tar.xz   #使用wget下载文件,这里下载的我下载的不是一个稳定版本的

--2016-07-11 09:59:34--  https://cdn.kernel.org/pub/linux/kernel/v4.x/testing/linux-4.7-rc7.tar.xz

Resolving cdn.kernel.org (cdn.kernel.org)... 151.101.88.69

Connecting to cdn.kernel.org (cdn.kernel.org)|151.101.88.69|:443... connected.

HTTP request sent, awaiting response... 200 OK

Length: 90401360 (86M) [application/x-xz]

Saving to: ‘linux-4.7-rc7.tar.xz’

100%[===================================================================================>] 90,401,360   392KB/s   in 6m 35s

2016-07-11 10:06:10 (223 KB/s) - ‘linux-4.7-rc7.tar.xz’ saved [90401360/90401360]

[root@localhost ~]# ls -l | grep linux                                                              #查看下载的文件

-rw-r--r--. 1 root root 90401360 Jul 10 23:41 linux-4.7-rc7.tar.xz
3.解压文件和创建符号链接文件
tar -xf linux-4.7-rc7.tar.xz  -C /usr/src/                                                            #解压缩到指定目录

[root@localhost ~]# ls

anaconda-ks.cfg  Documents  initial-setup-ks.cfg  Music     Public     Videos

Desktop          Downloads  linux-4.7-rc7.tar.xz  Pictures  Templates

[root@localhost ~]# cd /usr/src/                                                                      #进入文件目录

[root@localhost src]# ls

debug  kernels  linux-4.7-rc7

[root@localhost src]# ln -sv linux-4.7-rc7/ linux                                                     #创建符号链接

‘linux’ -> ‘linux-4.7-rc7/’

[root@localhost src]# ls                                                                            #查看

debug  kernels  linux  linux-4.7-rc7
4.创建.config文件
[root@localhost linux]# ls

arch   COPYING  Documentation  fs       ipc      kernel  MAINTAINERS  net             samples   sound  virt

block  CREDITS  drivers        include  Kbuild   lib     Makefile     README          scripts   tools

certs  crypto   firmware       init     Kconfig  linux   mm           REPORTING-BUGS  security  usr

[root@localhost linux]# make menuconfig                                                                 #启动配置

  HOSTCC  scripts/basic/fixdep

  HOSTCC  scripts/kconfig/mconf.o

In file included from scripts/kconfig/mconf.c:23:0:

scripts/kconfig/lxdialog/dialog.h:38:20: fatal error: curses.h: No such file or directory

 #include CURSES_LOC

                    ^

compilation terminated.

make[1]: *** [scripts/kconfig/mconf.o] Error 1

make: *** [menuconfig] Error 2
这里报错误了。 提示curses.h 这个文件找不到。
[root@localhost linux]# yum search curses                                              #从yum源查找curses相关的包 , 配置本地yum源看我上篇博客。

Loaded plugins: fastestmirror, langpacks

Loading mirror speeds from cached hostfile

==================================================== N/S matched: curses ====================================================

ncurses.x86_64 : Ncurses support utilities

ncurses-devel.i686 : Development files for the ncurses library

ncurses-devel.x86_64 : Development files for the ncurses library

ncurses-libs.i686 : Ncurses libraries

ncurses-libs.x86_64 : Ncurses libraries

ncurses-static.i686 : Static libraries for the ncurses library

ncurses-static.x86_64 : Static libraries for the ncurses library

ocaml-curses.x86_64 : OCaml bindings for ncurses

ocaml-curses-devel.x86_64 : Development files for ocaml-curses

NetworkManager-tui.x86_64 : NetworkManager curses-based UI

ncurses-base.noarch : Descriptions of common terminals

ncurses-term.noarch : Terminal descriptions

  Name and summary matches only, use "search all" for everything.

[root@localhost linux]# yum install ncurses                                               #安装ncurses

Loaded plugins: fastestmirror, langpacks

Loading mirror speeds from cached hostfile

Package ncurses-5.9-13.20130511.el7.x86_64 already installed and latest version

Nothing to do

[root@localhost linux]# yum install ncurses-devel                                          #安装ncurses-devel

Loaded plugins: fastestmirror, langpacks

Loading mirror speeds from cached hostfile

Resolving Dependencies

--> Running transaction check

---> Package ncurses-devel.x86_64 0:5.9-13.20130511.el7 will be installed

--> Finished Dependency Resolution

Dependencies Resolved

=============================================================================================================================

 Package                       Arch                   Version                               Repository                  Size

=============================================================================================================================

Installing:

 ncurses-devel                 x86_64                 5.9-13.20130511.el7                   localcdrom                 713 k

Transaction Summary

=============================================================================================================================

Install  1 Package

Total download size: 713 k

Installed size: 2.1 M

Is this ok [y/d/N]: y

Downloading packages:

Running transaction check

Running transaction test

Transaction test succeeded

Running transaction

  Installing : ncurses-devel-5.9-13.20130511.el7.x86_64                                                                  1/1

  Verifying  : ncurses-devel-5.9-13.20130511.el7.x86_64                                                                  1/1

Installed:

  ncurses-devel.x86_64 0:5.9-13.20130511.el7

Complete!
再次make menuconfig这个命令后,会出现如下的字符界面,我们就可以在这个界面上对内核进行配置。我们这里是第二次使用make menuconfig了,需要先运行:make mrproper来清除以前的配置,回到默认配置,然后再运行:make menuconfig生成.config文件 通过这个工具可以设置内核配置参数。
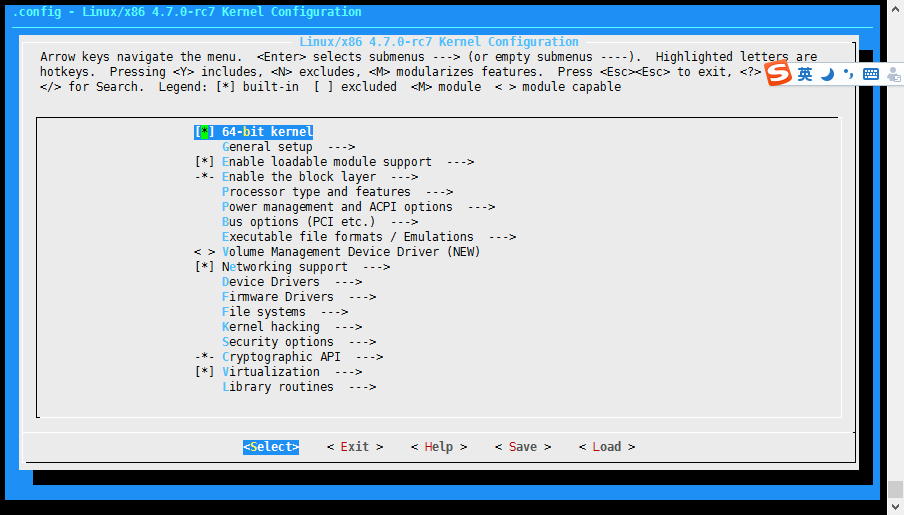
关于选择这个地方需要说明下。
- [*]:编译到内核文件中去,也就是类似这个vmlinuz-3.10.0-693.el7.x86_64文件中去。
- [m]: 编译到模块文件中去,也就是放到类似这个/lib/modules/3.10.0-693.el7.x86_64/目录中去。
5.执行make 命令
[root@localhost linux]# make

  HOSTCC  scripts/kconfig/conf.o

  HOSTLD  scripts/kconfig/conf

scripts/kconfig/conf  --silentoldconfig Kconfig

  SYSTBL  arch/x86/entry/syscalls/../../include/generated/asm/syscalls_32.h

  SYSHDR  arch/x86/entry/syscalls/../../include/generated/asm/unistd_32_ia32.h

  SYSHDR  arch/x86/entry/syscalls/../../include/generated/asm/unistd_64_x32.h

  SYSTBL  arch/x86/entry/syscalls/../../include/generated/asm/syscalls_64.h

  HYPERCALLS arch/x86/entry/syscalls/../../include/generated/asm/xen-hypercalls.h

  SYSHDR  arch/x86/entry/syscalls/../../include/generated/uapi/asm/unistd_32.h

  SYSHDR  arch/x86/entry/syscalls/../../include/generated/uapi/asm/unistd_64.h

  SYSHDR  arch/x86/entry/syscalls/../../include/generated/uapi/asm/unistd_x32.h

  HOSTCC  scripts/basic/bin2c

  HOSTCC  arch/x86/tools/relocs_32.o

  HOSTCC  arch/x86/tools/relocs_64.o

  HOSTCC  arch/x86/tools/relocs_common.o

  HOSTLD  arch/x86/tools/relocs

  CHK     include/config/kernel.release

  UPD     include/config/kernel.release

  WRAP    arch/x86/include/generated/asm/clkdev.h

  WRAP    arch/x86/include/generated/asm/cputime.h

  WRAP    arch/x86/include/generated/asm/dma-contiguous.h

  WRAP    arch/x86/include/generated/asm/early_ioremap.h

  WRAP    arch/x86/include/generated/asm/mcs_spinlock.h

  WRAP    arch/x86/include/generated/asm/mm-arch-hooks.h

  CHK     include/generated/uapi/linux/version.h

  UPD     include/generated/uapi/linux/version.h

  CHK     include/generated/utsrelease.h

  UPD     include/generated/utsrelease.h

  CC      arch/x86/purgatory/purgatory.o

  AS      arch/x86/purgatory/stack.o

  AS      arch/x86/purgatory/setup-x86_64.o

  CC      arch/x86/purgatory/sha256.o

  AS      arch/x86/purgatory/entry64.o

  CC      arch/x86/purgatory/string.o

  LD      arch/x86/purgatory/purgatory.ro

  BIN2C   arch/x86/purgatory/kexec-purgatory.c

  CC      kernel/bounds.s

  CHK     include/generated/bounds.h

  UPD     include/generated/bounds.h

  CHK     include/generated/timeconst.h

  UPD     include/generated/timeconst.h

  CC      arch/x86/kernel/asm-offsets.s

  CHK     include/generated/asm-offsets.h

  UPD     include/generated/asm-offsets.h

  CALL    scripts/checksyscalls.sh

  HOSTCC  scripts/genksyms/genksyms.o

  SHIPPED scripts/genksyms/parse.tab.c

  HOSTCC  scripts/genksyms/parse.tab.o

  SHIPPED scripts/genksyms/lex.lex.c

  SHIPPED scripts/genksyms/keywords.hash.c

  SHIPPED scripts/genksyms/parse.tab.h

  HOSTCC  scripts/genksyms/lex.lex.o

  HOSTLD  scripts/genksyms/genksyms

  CC      scripts/mod/empty.o

  HOSTCC  scripts/mod/mk_elfconfig

  MKELF   scripts/mod/elfconfig.h

  HOSTCC  scripts/mod/modpost.o

  CC      scripts/mod/devicetable-offsets.s

  GEN     scripts/mod/devicetable-offsets.h

  HOSTCC  scripts/mod/file2alias.o

  HOSTCC  scripts/mod/sumversion.o

  HOSTLD  scripts/mod/modpost

  HOSTCC  scripts/selinux/genheaders/genheaders

  HOSTCC  scripts/selinux/mdp/mdp

  HOSTCC  scripts/kallsyms

  HOSTCC  scripts/pnmtologo

  HOSTCC  scripts/conmakehash

  HOSTCC  scripts/recordmcount

  HOSTCC  scripts/sortextable

  HOSTCC  scripts/asn1_compiler

  HOSTCC  scripts/sign-file

scripts/sign-file.c:25:30: fatal error: openssl/opensslv.h: No such file or directory

 #include <openssl/opensslv.h>

                              ^
上面的报错了, 才发现原来的编译环境的包没有安装好。
执行下面命令安装包
[root@localhost linux]# yum groups list

Loaded plugins: fastestmirror, langpacks

There is no installed groups file.

Maybe run: yum groups mark convert (see man yum)

Loading mirror speeds from cached hostfile

Available Environment Groups:

   Minimal Install

   Compute Node

   Infrastructure Server

   File and Print Server

   Basic Web Server

   Virtualization Host

   Server with GUI

   GNOME Desktop

   KDE Plasma Workspaces

   Development and Creative Workstation

Available Groups:

   Compatibility Libraries

   Console Internet Tools

   Development Tools

   Graphical Administration Tools

   Legacy UNIX Compatibility

   Scientific Support

   Security Tools

   Smart Card Support

   System Administration Tools

   System Management

Done

[root@localhost linux]#yum groups  install  "Development and Creative Workstation" "Compatibility Libraries" -y
这里可以仅仅安装openssl相关的基础包和开发包即可的,但是为了后续其他的编译安装,我就直接安装了"Compatibility Libraries"包。
6.执行 make clean 和make
[root@localhost linux]# make clean                                             # 清空错误的编译环境

  CLEAN   .

  CLEAN   arch/x86/purgatory

  CLEAN   arch/x86/tools

  CLEAN   .tmp_versions

[root@localhost linux]# make                               # 再次编译 ,这里可以指定并行度的,如果你有4个cpu,可以执行如下命令 make -j 4 来加速编译进度。
7. 执行 make modules_install
8. 执行make install
[root@localhost linux]# make modules_install

[root@localhost linux]# make install
9.重新电脑选择新编译好的linux
10 卸载新内核
- 删除/lib/modules目录下对应版本的库文件
- 删除/usr/src/linux目录下的源码和压缩文件
- 删除/boot/启动的内核和内核镜像文件
- 删除grub.conf配置文件新内核对应的条目
centos7编译linux的内核源码的更多相关文章
- linux、内核源码、内核编译与配置、内核模块开发、内核启动流程(转)
linux是如何组成的?答:linux是由用户空间和内核空间组成的为什么要划分用户空间和内核空间?答:有关CPU体系结构,各处理器可以有多种模式,而LInux这样的划分是考虑到系统的安全性,比如X86 ...
- 【转】如何下载并编译Android4.0内核源码goldfish(图文)
原文网址:http://blog.csdn.net/flydream0/article/details/7070392 关于如何下载Android4.0源码,请查看我的博客内另一篇文章(同样是图文教程 ...
- linux启动内核源码分析
内核的启动时从main.c这个文件里面的start_kernel函数开始的,这个文件在linux源码里面的init文件夹下面 下面我们来看看这个函数 这个函数很长,可以看个大概过去 asmlinkag ...
- Linux Hugetlbfs内核源码简析-----(二)Hugetlbfs挂载
本文只讨论执行"mount none /mnt/huge -t hugetlbfs"命令后,mount系统调用的执行过程(基于Linux-3.4.51),不涉及进程相关的细节. m ...
- 编译联想A820内核源码
编译平台:Fedora 20 x64 交叉编译工具链:arm-linux-androideabi-4.6 话说这个编译工具我研究了两天,Fedora自带一个arm-none-eabi的ToolChai ...
- linux内核源码注解
轻松学习Linux操作系统内核源码的方法 针对好多Linux 爱好者对内核很有兴趣却无从下口,本文旨在介绍一种解读linux内核源码的入门方法,而不是解说linux复杂的内核机制:一.核心源程序的文件 ...
- 阅读 Linux 内核源码
阅读Linux Kernel Source Code 假如你在Linux系统下面阅读Linux内核源代码,那么需要准备一些工具. ①Linux的内核源码 内核源码的下载地址:Index of /pub ...
- Linux内核源码真是个好东西
我突然发现,我是这么爱Linux内核源码.... 真幸福死了.... int vsprintf(char *buf, const char *fmt, va_list args) 这函数的实现 ...
- 【转】Linux CentOS内核编译:下载CentOS源码、编译2.6.32-220的错误(apic.c:819 error 'numi_watchdog' undeclared)
一.下载CentOS源码 1.1 查看CentOS版本 cat /etc/issue 1.2 查看Linux内核版本 uname -r 1.3 下载 文件名:kernel-2.6.32-220.el6 ...
随机推荐
- Monkey压力测试操作步骤说明
一.需配置java环境和android环境 JDK安装包:链接:https://pan.baidu.com/s/1SlnBOS0f3m2wVpEZBPfmag ...
- formdata的使用方法
function upload_single_file(value){ if(value==''){ layer.msg('请添加文件',{time:1500}) }else{ var formDat ...
- HDU 4609 3-idiots (组合数学 + FFT)
题意:给定 n 条边,问随机选出 3 条边,能组成三角形的概率是多少. 析:答案很明显就是 能组成三角形的种数 / (C(n, 3)).现在的问题是怎么求能组成三角形的种数. 这个博客说的非常清楚了 ...
- stm32f10x_it.c、stm32f10x_it.h和stm32f10x_conf.h文件作用
如上图,在STM32的Keil工程文件(Project)中一般都包含stm32f10x_it.c.stm32f10x_it.h和stm32f10x_conf.h这三个文件,但是在ST官方提供的标准库“ ...
- 关于http与https的注意点
背景:在一次项目生产上线中遇到地址在IOS版本的app中打不开或者接口请求不返回的情况,在安卓机和PC上表现正常,经排查,问题出在http请求上,原因详解 在早期PC上和安卓手机上比较不严格,在htt ...
- 基于MFC的socket编程
网络编程 1.windows 套接字编程(开放的网络编程接口)添加头文件#include<windows.h> 2.套接字及其分类 socket分为两种:(1)数据报socket:无连接套 ...
- 删除CSDN点击“阅读更多”按钮跳转到登录界面的功能
manifest.json { "manifest_version": 2, "name": "Helper2", "versio ...
- 黑群晖DS3617xs-DSM6.1.7up3/up2 开启ROOT用户,同时SATA改eSATA,挂载NTFS硬盘设置(二)
这两天闲来没事在某宝上搞了个黑群晖主机就j1900/4G小主机系统是DCM 6.1.7up3 15284版 网上修改的教程很多,走了好多弯路终于搞定我的黑群NAS,现分享给各位道友,有不足的地方请给位 ...
- c#图像处理入门(-bitmap类和图像像素值获取方法)
c#图像处理入门 -bitmap类和图像像素值获取方法 一.Bitmap类 Bitmap对象封装了GDI+中的一个位图,此位图由图形图像及其属性的像素数据组成.因此Bitmap是用于处理由像素数据定义 ...
- 剑指offer面试题24:二叉搜索树的后序遍历序列
题目:输入一个整数数组,判断该数组是不是某二叉搜索树的后序遍历的结果.如果是返回true,否则返回false. 假设输入的数组任意两个数字都不相同 解题思路:二叉搜索树的特点是根节点的左子树的值小于等 ...