项目那几步走:先配置setting路径文件、创建数据库、执行数据库迁移命令、配置mysql数据库信息、注册app、注释中间件、pymysql替换mysqldb-配置urls路由-继续视图函数-然后HTML页面展示-HTML里面导入css文件、models配置数据库表、
django使用mysql数据库:
首先cmd创建库
1、settings:
"""
Django settings for day42 project.

Generated by 'django-admin startproject' using Django 1.11.26.

For more information on this file, see
https://docs.djangoproject.com/en/1.11/topics/settings/

For the full list of settings and their values, see
https://docs.djangoproject.com/en/1.11/ref/settings/
"""

import os

# Build paths inside the project like this: os.path.join(BASE_DIR, ...)
BASE_DIR = os.path.dirname(os.path.dirname(os.path.abspath(__file__)))

# Quick-start development settings - unsuitable for production
# See https://docs.djangoproject.com/en/1.11/howto/deployment/checklist/

# SECURITY WARNING: keep the secret key used in production secret!
SECRET_KEY = 't2#m1=lilserv388oi=m6i=4b7@-lj6@+kg2-_^oa)wdpi5(96'

# SECURITY WARNING: don't run with debug turned on in production!
DEBUG = True

ALLOWED_HOSTS = []

# Application definition

INSTALLED_APPS = [
    'django.contrib.admin',         #系统内置app
    'django.contrib.auth',
    'django.contrib.contenttypes',
    'django.contrib.sessions',
    'django.contrib.messages',
    'django.contrib.staticfiles',
    "app01.apps.App01Config",       #注册app
]

MIDDLEWARE = [
    'django.middleware.security.SecurityMiddleware',
    'django.contrib.sessions.middleware.SessionMiddleware',
    'django.middleware.common.CommonMiddleware',
    #'django.middleware.csrf.CsrfViewMiddleware',  #注释中间件
    'django.contrib.auth.middleware.AuthenticationMiddleware',
    'django.contrib.messages.middleware.MessageMiddleware',
    'django.middleware.clickjacking.XFrameOptionsMiddleware',
]

ROOT_URLCONF = 'day42.urls'

TEMPLATES = [
    {
        'BACKEND': 'django.template.backends.django.DjangoTemplates',
        'DIRS': [os.path.join ( BASE_DIR, 'templates' )]
        ,
        'APP_DIRS': True,
        'OPTIONS': {
            'context_processors': [
                'django.template.context_processors.debug',
                'django.template.context_processors.request',
                'django.contrib.auth.context_processors.auth',
                'django.contrib.messages.context_processors.messages',
            ],
        },
    },
]

WSGI_APPLICATION = 'day42.wsgi.application'

# Database
# https://docs.djangoproject.com/en/1.11/ref/settings/#databases
#配置数据库信息:
DATABASES = {
    'default': {
        'ENGINE': 'django.db.backends.mysql',
        'NAME': "day43",
        'HOST': "127.0.0.1",
        'PORT': 3306,
        'USER': "root",
        'PASSWORD': "123",
    }
}
#默认使用mysqldb的模块 要使用pymysql替换mysqldb
import pymysql
pymysql.install_as_MySQLdb()
# Password validation
# https://docs.djangoproject.com/en/1.11/ref/settings/#auth-password-validators

AUTH_PASSWORD_VALIDATORS = [
    {
        'NAME': 'django.contrib.auth.password_validation.UserAttributeSimilarityValidator',
    },
    {
        'NAME': 'django.contrib.auth.password_validation.MinimumLengthValidator',
    },
    {
        'NAME': 'django.contrib.auth.password_validation.CommonPasswordValidator',
    },
    {
        'NAME': 'django.contrib.auth.password_validation.NumericPasswordValidator',
    },
]

# Internationalization
# https://docs.djangoproject.com/en/1.11/topics/i18n/

LANGUAGE_CODE = 'en-us'

TIME_ZONE = 'UTC'

USE_I18N = True

USE_L10N = True

USE_TZ = True

# Static files (CSS, JavaScript, Images)
# https://docs.djangoproject.com/en/1.11/howto/static-files/
#配置路径文件:

STATIC_URL = '/static/'

STATICFILES_DIRS = [
    os.path.join(BASE_DIR,'static')
]
2、urls路由:
"""day42 URL Configuration

The `urlpatterns` list routes URLs to views. For more information please see:
    https://docs.djangoproject.com/en/1.11/topics/http/urls/
Examples:
Function views
    1. Add an import:  from my_app import views
    2. Add a URL to urlpatterns:  url(r'^$', views.home, name='home')
Class-based views
    1. Add an import:  from other_app.views import Home
    2. Add a URL to urlpatterns:  url(r'^$', Home.as_view(), name='home')
Including another URLconf
    1. Import the include() function: from django.conf.urls import url, include
    2. Add a URL to urlpatterns:  url(r'^blog/', include('blog.urls'))
"""
from django.conf.urls import url
from django.contrib import admin
from django.shortcuts import HttpResponse, render
from app01 import views
#配置urls路由

urlpatterns = [
    url(r'^admin/', admin.site.urls),
    url(r'^index/', views.index),
    url(r'^modal/', views.modal),
    url(r'^login/', views.login),
]
3、views视图函数:
from django.shortcuts import render,HttpResponse

# Create your views here.

def index(request):
    print(request.path_info)
    # return HttpResponse('<h1>index</h1>')
    return render(request, 'index.html')

def modal(request):
    return render(request, 'modal.html')

def login(request):
    return render(request,"login.html")
4、HTML页面展示:
<!DOCTYPE html>
<html lang="en">
<head>
    <meta charset="UTF-8">
    <title>Title</title>
{#    增加bootstrap样式:#}
    <link rel="stylesheet" href="/static/plugins/bootstrap-3.3.7-dist/css/bootstrap.min.css">
{#    导入css文件:#}
    <link rel="stylesheet" href="/static/css/signin.css">
</head>
<body>

    <div class="container">

      <form class="form-signin">
        <h2 class="form-signin-heading">Please sign in</h2>
        <label for="inputEmail" class="sr-only">Email address</label>
        <input type="email" id="inputEmail" class="form-control" placeholder="Email address" required="" autofocus="">
        <label for="inputPassword" class="sr-only">Password</label>
        <input type="password" id="inputPassword" class="form-control" placeholder="Password" required="">
        <div class="checkbox">
          <label>
            <input type="checkbox" value="remember-me"> Remember me
          </label>
        </div>
        <button class="btn btn-lg btn-primary btn-block" type="submit">Sign in</button>
      </form>

    </div> <!-- /container -->

    <!-- IE10 viewport hack for Surface/desktop Windows 8 bug -->
    <script src="../../assets/js/ie10-viewport-bug-workaround.js"></script>

</body>
</html>
5、导入css文件:
{#    增加bootstrap样式:#}
    <link rel="stylesheet" href="/static/plugins/bootstrap-3.3.7-dist/css/bootstrap.min.css">
{#    导入css文件:#}
    <link rel="stylesheet" href="/static/css/signin.css">
6、models配置数据库表:
from django.db import models

# Create your models here.

#定义User表、username是具体的字段、CharField是可变长的数据类型:
class User(models.Model):
    username = models.CharField(max_length=32)
    password = models.CharField(max_length=32)
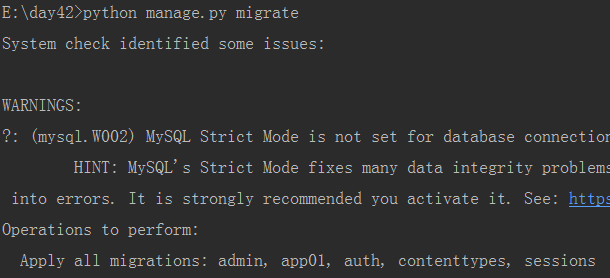
执行数据库迁移的命令:
python manage.py makemigrations(检测已经注册的app)

python manage.py migrate(真正的迁移命令:)
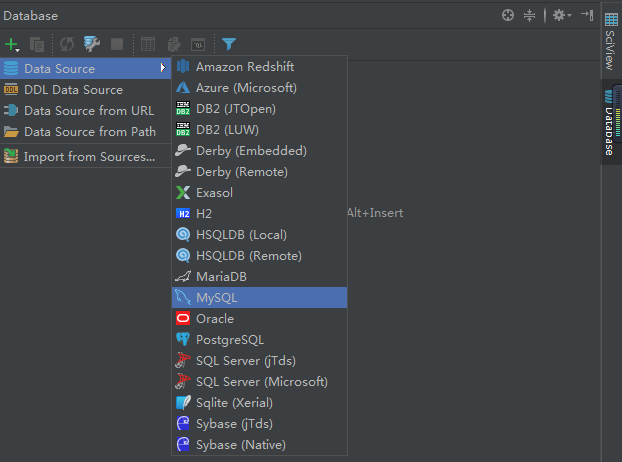
database-database source-MY SQL:
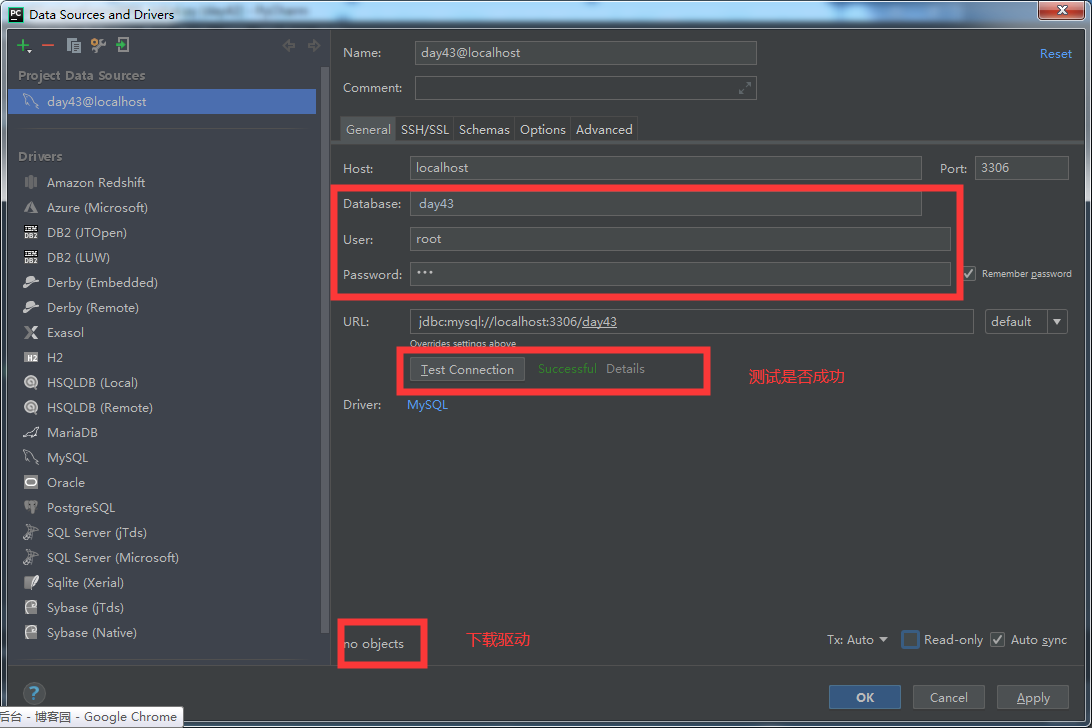
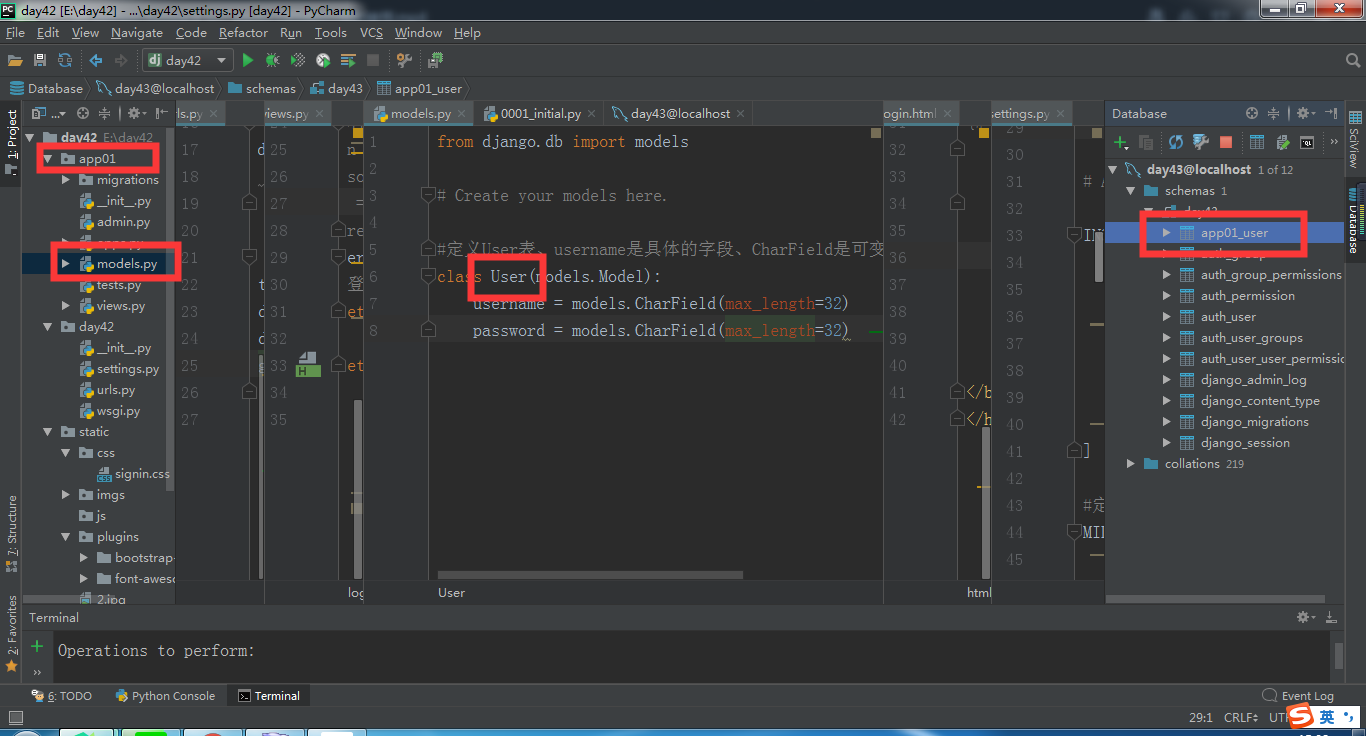
app01和表名组合:
双击表名增加数据并提交:
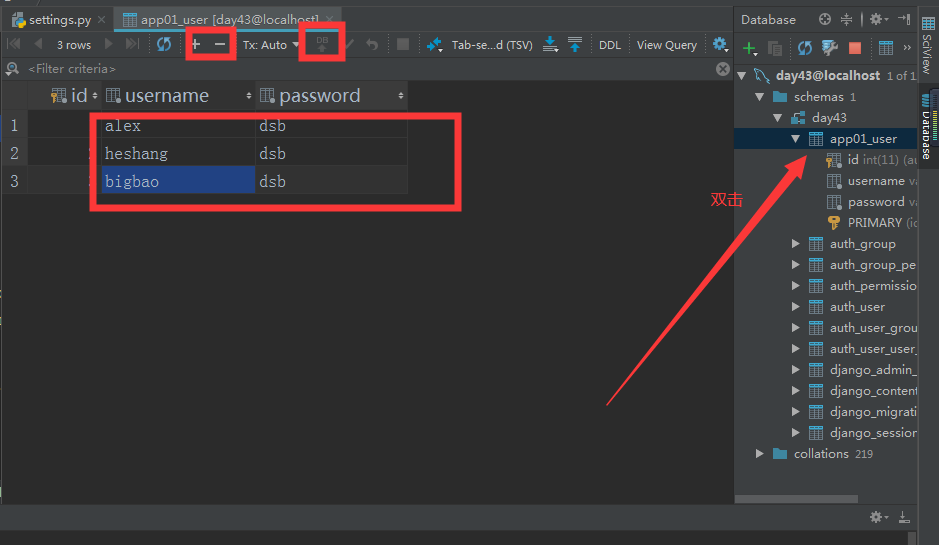
所有的功能通过类操作:
models.类名.objects.all()--获取表里面所有的数据、获取的是列表
结果:<QuerySet [<User: User object>, <User: User object>, <User: User object>]> <class 'django.db.models.query.QuerySet'>
models.User.objects.get(username="alex",)--获取一条数据、获取的是对象、查询不到报错、查询多条数据报错
结果:User object <class 'app01.models.User'>
models.User.objects.filter(username="alex",password="dsb")--过滤获取对象列表
结果:<QuerySet [<User: User object>]> <class 'django.db.models.query.QuerySet'>
obj = models.Publisher.objects.create(name=pub_name)-- 创建
models.Publisher.objects.filter(pk=pk).delete() # 对象列表-- 删除
models.Publisher.objects.get(pk=pk).delete() # 对象-- 删除
obj.name = pub_name # 内存中修改属性 修改
obj.save() # 提交保存
models.Publisher.objects.filter(pk=pk).update(name=pub_name) 修改
项目那几步走:先配置setting路径文件、创建数据库、执行数据库迁移命令、配置mysql数据库信息、注册app、注释中间件、pymysql替换mysqldb-配置urls路由-继续视图函数-然后HTML页面展示-HTML里面导入css文件、models配置数据库表、的更多相关文章
- MVC学习随笔----如何在页面中添加JS和CSS文件
http://blog.csdn.net/xxjoy_777/article/details/39050011 1.如何在页面中添加Js和CSS文件. 我们只需要在模板页中添加JS和CSS文件,然后子 ...
- link和@import导入css文件的区别
(二者的区别其实是基础问题,但由于本人经常会忽略掉使用@import导入css文件这种方式,所以记录下来增加印象^^) 首先二者的引入方式: link:<link rel="style ...
- java:HTML(table表格,ul列表)和CSS(导入.css文件,三种定义颜色方式,三种样式选择器,a标签属性顺序,)
1.重点掌握: html: 1.form表单:input,checkbox,seelct,radio,button,submit 2.table表格:thead-->tr-->th;tbo ...
- web应用/路由控制/视图函数/单表多表操作
一. 1.wen应用:BS架构的应用程序,B是浏览器,S:server(实现了wsgi协议)+ application https://www.cnblogs.com/liuqingzheng/art ...
- Django 导入css文件,样式不起作用。Resource interpreted as Stylesheet but transferred with MIME type application/x-css
笔者今天在模板中加载css文件时,发现 css样式能够下载再来却无法起作用,而且,图片.js都能够正常使用. 并且 浏览器提示: Resource interpreted as Stylesheet ...
- css 动态导入css文件 @import 动态js加载 都是静态的
@import "http://apps.bdimg.com/libs/bootstrap/3.3.4/css/bootstrap.css" /*-防止各大cdn公共库加载地址失效 ...
- linux下配置python环境 django创建helloworld项目
linux下配置python环境 1.linux下安装python3 a. 准备编译环境(环境如果不对的话,可能遇到各种问题,比如wget无法下载https链接的文件) yum groupinstal ...
- Django restframe 视图函数以及ModelSerializer的使用
建立model数据库 from django.db import models __all__ = ['Book', 'Publisher', 'Author'] # Create your mode ...
- URL 路由系统 + views 函数
一.URL URL配置(URLconf)就像Django 所支撑网站的目录.它的本质是URL模式以及要为该URL模式调用的视图函数之间的映射表:你就是以这种方式告诉Django,对于这个URL调用这段 ...
随机推荐
- new String(request.getParameter("userID").trim().getBytes("8859_1"))的含义是什么?
new String(request.getParameter("userID").trim().getBytes("8859_1")) request.get ...
- Linux下查看哪些进程占用的CPU、内存资源
1.CPU占用最多的前10个进程: ps auxw|head -1;ps auxw|sort -rn -k3|head -10 2.内存消耗最多的前10个进程 ps auxw|head -1;ps a ...
- CSRF介绍
对于常规的Web攻击手段,如XSS.CRSF.SQL注入.(常规的不包括文件上传漏洞.DDoS攻击)等,防范措施相对来说比较容易,对症下药即可,比如XSS的防范需要转义掉输入的尖括号,防止CRSF攻击 ...
- acwing 47. 二叉树中和为某一值的路径
地址 https://www.acwing.com/problem/content/description/45/ 输入一棵二叉树和一个整数,打印出二叉树中结点值的和为输入整数的所有路径. 从树的根结 ...
- WPF 精修篇 属性触发器
原文:WPF 精修篇 属性触发器 属性触发器是通过 某个条件触发改变属性 通过无代码实现功能 <Style TargetType="{x:Type Label}"> ...
- 【CodeForces】CodeForcesRound594 Div1 解题报告
点此进入比赛 \(A\):Ivan the Fool and the Probability Theory(点此看题面) 大致题意: 给一个\(n\times m\)的矩阵\(01\)染色,使得不存在 ...
- Codeforces Round #594 (Div. 1) D. Catowice City 图论
D. Catowice City In the Catowice city next weekend the cat contest will be held. However, the jury m ...
- Python进阶小结
目录 一.异常TODO 二.深浅拷贝 2.1 拷贝 2.2 浅拷贝 2.3 深拷贝 三.数据类型内置方法 3.1 数字类型内置方法 3.1.1 整型 3.1.2 浮点型 3.2 字符串类型内置方法 3 ...
- Azure Sphere Development Environment Setup
1. Visual Studio 目前,Visual Studio 2017/2019支持Azure Sphere开发,后续,微软会加入Visual Studio Code的支持.以Visual St ...
- 使用Runtime自定义KVO,原理浅析
一.介绍 什么是KVO?全称key-value-observer,键值观察,观察者设计模式的另一种实现.其作用是通过观察者监听属性值的变化而做出函数回调. 二.原理 KVO基于Runtime机制实现, ...
