SpringBoot 2.x 整合Lombok
Lombok的官方介绍
Project Lombok is a java library that automatically plugs into your editor and build tools, spicing up your java.
Lombok以简单的注解形式来简化java代码,提高开发人员的开发效率
lombok是一个编译级别的插件,它可以在项目编译的时候生成一些代码
1.为IntelliJ IDEA安装插件
file——>settings——>Plugins
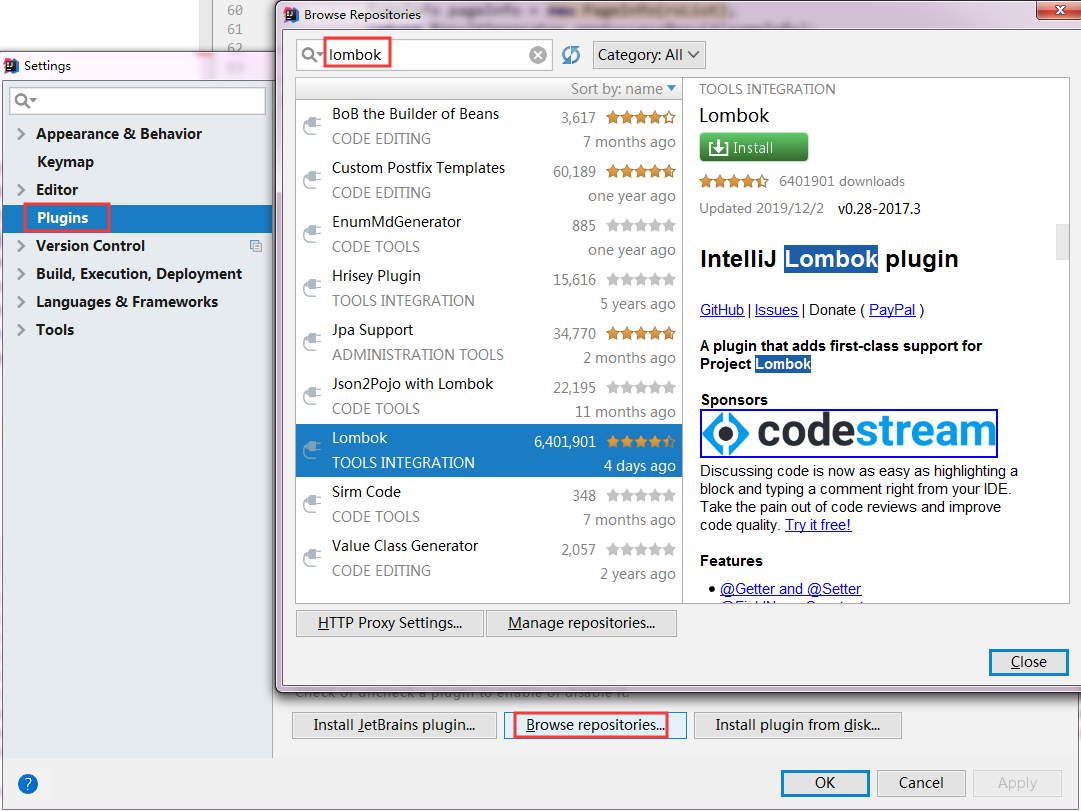
安装完后需要重启IntelliJ IDEA
2.添加依赖
    <dependencies>

        <dependency>

            <groupId>org.springframework.boot</groupId>

            <artifactId>spring-boot-starter-web</artifactId>

        </dependency>

        <dependency>

            <groupId>org.projectlombok</groupId>

            <artifactId>lombok</artifactId>

            <optional>true</optional>

        </dependency>

        <dependency>

            <groupId>com.alibaba</groupId>

            <artifactId>fastjson</artifactId>

            <version>1.2.61</version>

        </dependency>

    </dependencies>
3.使用
常用注解
@Data 注解在类上;提供类所有属性的 getting 和 setting 方法,此外还提供了equals、canEqual、hashCode、toString 方法

@Setter :注解在属性上;为属性提供 setting 方法

@Setter :注解在属性上;为属性提供 getting 方法

@Log4j :注解在类上;为类提供一个 属性名为log 的 log4j 日志对象

@NoArgsConstructor :注解在类上;为类提供一个无参的构造方法

@AllArgsConstructor :注解在类上;为类提供一个全参的构造方法

@Cleanup : 可以关闭流

@Builder : 被注解的类加个构造者模式

@Synchronized : 加个同步锁

@SneakyThrows : 等同于try/catch 捕获异常

@NonNull : 如果给参数加个这个注解 参数为null会抛出空指针异常

@Value : 注解和@Data类似,区别在于它会把所有成员变量默认定义为private final修饰,并且不会生成set方法
(1)@Data
@Data 自动生成set/get方法,toString方法,equals方法,hashCode方法,不带参数的构造方法
实体类
package com.abc.plus.entity;

import lombok.Data;

import java.util.Date;

@Data

public class ApiFiles {

    private Long id;

    private String name;

    private Integer size;

    private Integer status;

    private Date uploadTime;

    private String version;

}
测试
package com.abc.plus.controller;

import com.abc.plus.core.Result;

import com.abc.plus.core.SnowFlake;

import com.abc.plus.entity.ApiFiles;

import org.springframework.web.bind.annotation.RequestMapping;

import org.springframework.web.bind.annotation.RestController;

import java.util.Date;

@RestController

public class demoController {

    private SnowFlake sn;

    @RequestMapping("/test")

    public Result test(){

        sn = new SnowFlake(1,1);

        ApiFiles file = new ApiFiles();

        file.setId(sn.nextId());

        int r= (int) (Math.random() * 50 + 500);

        file.setName("file"+String.valueOf(r));

        file.setSize(r);

        file.setStatus(1);

        Date currentTime = new Date();

        file.setUploadTime(currentTime);

        return Result.success(200,file);

    }

}
SnowFlake
package com.abc.plus.core;

import com.alibaba.fastjson.JSON;

/**

 * Created by Beibei on 19/02/22

 * API响应结果

 */

public class Result<T> {

    private int code;

    private String message;

    private T data;

    public Result setCode(Integer code) {

        this.code = code;

        return this;

    }

    public int getCode() {

        return code;

    }

    public String getMessage() {

        return message;

    }

    public Result setMessage(String message) {

        this.message = message;

        return this;

    }

    public T getData() {

        return data;

    }

    public Result setData(T data) {

        this.data = data;

        return this;

    }

    @Override

    public String toString() {

        return JSON.toJSONString(this);

    }

    public static <T>  Result<T> fail(Integer code,T data) {

        Result<T> ret = new Result<T>();

        ret.setCode(code);

        ret.setData(data);

        return ret;

    }

    public static <T>  Result<T> failMessage(Integer code,String msg) {

        Result<T> ret = new Result<T>();

        ret.setCode(code);

        ret.setMessage(msg);

        return ret;

    }

    public static <T>  Result<T> successMessage(Integer code,String msg) {

        Result<T> ret = new Result<T>();

        ret.setCode(code);

        ret.setMessage(msg);

        return ret;

    }

    public static <T> Result<T> success(Integer code,T data) {

        Result<T> ret = new Result<T>();

        ret.setCode(code);

        ret.setData(data);

        return ret;

    }

    public static <T> Result<T> success(Integer code,T data,String msg) {

        Result<T> ret = new Result<T>();

        ret.setCode(code);

        ret.setData(data);

        ret.setMessage(msg);

        return ret;

    }

}
Result
package com.abc.plus.core;

public class SnowFlake {

    /**

     * 起始的时间戳

     */

    private final static long START_STMP = 1480166465631L;

    /**

     * 每一部分占用的位数

     */

    private final static long SEQUENCE_BIT = 12; //序列号占用的位数

    private final static long MACHINE_BIT = 5;   //机器标识占用的位数

    private final static long DATACENTER_BIT = 5;//数据中心占用的位数

    /**

     * 每一部分的最大值

     */

    private final static long MAX_DATACENTER_NUM = -1L ^ (-1L << DATACENTER_BIT);

    private final static long MAX_MACHINE_NUM = -1L ^ (-1L << MACHINE_BIT);

    private final static long MAX_SEQUENCE = -1L ^ (-1L << SEQUENCE_BIT);

    /**

     * 每一部分向左的位移

     */

    private final static long MACHINE_LEFT = SEQUENCE_BIT;

    private final static long DATACENTER_LEFT = SEQUENCE_BIT + MACHINE_BIT;

    private final static long TIMESTMP_LEFT = DATACENTER_LEFT + DATACENTER_BIT;

    private long datacenterId;  //数据中心

    private long machineId;     //机器标识

    private long sequence = 0L; //序列号

    private long lastStmp = -1L;//上一次时间戳

    public SnowFlake(long datacenterId, long machineId) {

        if (datacenterId > MAX_DATACENTER_NUM || datacenterId < 0) {

            throw new IllegalArgumentException("datacenterId can't be greater than MAX_DATACENTER_NUM or less than 0");

        }

        if (machineId > MAX_MACHINE_NUM || machineId < 0) {

            throw new IllegalArgumentException("machineId can't be greater than MAX_MACHINE_NUM or less than 0");

        }

        this.datacenterId = datacenterId;

        this.machineId = machineId;

    }

    /**

     * 产生下一个ID

     *

     * @return

     */

    public  long nextId() {

        long currStmp = getNewstmp();

        if (currStmp < lastStmp) {

            throw new RuntimeException("Clock moved backwards.  Refusing to generate id");

        }

        if (currStmp == lastStmp) {

            //相同毫秒内,序列号自增

            sequence = (sequence + 1) & MAX_SEQUENCE;

            //同一毫秒的序列数已经达到最大

            if (sequence == 0L) {

                currStmp = getNextMill();

            }

        } else {

            //不同毫秒内,序列号置为0

            sequence = 0L;

        }

        lastStmp = currStmp;

        return (currStmp - START_STMP) << TIMESTMP_LEFT //时间戳部分

                | datacenterId << DATACENTER_LEFT       //数据中心部分

                | machineId << MACHINE_LEFT             //机器标识部分

                | sequence;                             //序列号部分

    }

    private long getNextMill() {

        long mill = getNewstmp();

        while (mill <= lastStmp) {

            mill = getNewstmp();

        }

        return mill;

    }

    private long getNewstmp() {

        return System.currentTimeMillis();

    }

}
启动项目
http://localhost:8080/test
返回结果
package com.abc.plus.entity;

import lombok.Builder;

import lombok.Data;

import java.util.Date;

@Builder

@Data

public class ApiFiles {

    private Long id;

    private String name;

    private Integer size;

    private Integer status;

    private Date uploadTime;

    private String version;

}
测试
package com.abc.plus.controller;

import com.abc.plus.core.Result;

import com.abc.plus.core.SnowFlake;

import com.abc.plus.entity.ApiFiles;

import org.springframework.web.bind.annotation.RequestMapping;

import org.springframework.web.bind.annotation.RestController;

import java.util.Date;

@RestController

public class demoController {

    private SnowFlake sn;

    @RequestMapping("/test")

    public Result test(){

        sn = new SnowFlake(1,1);

        Long id= sn.nextId();

        int r= (int) (Math.random() * 50 + 500);

        Date currentTime = new Date();

        ApiFiles file = ApiFiles.builder()

                .id(id)

                .name("file"+String.valueOf(r))

                .size(r)

                .status(1)

                .uploadTime(currentTime)

                .build();

        return Result.success(200,file);

    }

}
(3)@NonNull
实体类
package com.abc.plus.entity;

import lombok.Builder;

import lombok.Data;

import lombok.NonNull;

import java.util.Date;

@Builder

@Data

public class ApiFiles {

    private Long id;

    private String name;

    private Integer size;

    private Integer status;

    private Date uploadTime;

    @NonNull

    private String version;

}
用上边的测试方法测试,没给version赋值,输出结果
  ApiFiles file = ApiFiles.builder()

          .id(id)

          .name("file"+String.valueOf(r))

          .size(r)

          .status(1)

          .uploadTime(currentTime)

          .version("11")

          .build();
结果
总结:
Lombok的优点:
能通过注解的形式自动生成代码,提高了一定的开发效率;
让代码变得简洁,简化了维护工作
不足:
eclipse或IntelliJ IDEA需要安装相应的插件;
不支持多种参数构造器的重载;
降低了源代码的可读性和完整性
SpringBoot 2.x 整合Lombok的更多相关文章
- 基于SpringBoot从零构建博客网站 - 整合lombok和mybatis-plus提高开发效率
在上一章节中<技术选型和整合开发环境>,确定了开发的技术,但是如果直接这样用的话,可能开发效率会不高,为了提高开发的效率,这里再整合lombok和mybatis-plus两个组件. 1.l ...
- springboot + mybatis + mycat整合
1.mycat服务 搭建mycat服务并启动,windows安装参照. 系列文章: [Mycat 简介] [Mycat 配置文件server.xml] [Mycat 配置文件schema.xml] [ ...
- SpringBoot+Mybatis+MybatisPlus整合实现基本的CRUD操作
SpringBoot+Mybatis+MybatisPlus整合实现基本的CRUD操作 1> 数据准备 -- 创建测试表 CREATE TABLE `tb_user` ( `id` ) NOT ...
- 从零开始的SpringBoot项目 ( 六 ) 整合 MybatisPlus 实现代码自动生成
1.添加依赖 <!-- MySQL数据库 --> <dependency> <groupId>mysql</groupId> <artifactI ...
- SpringBoot与Mybatis整合方式01(源码分析)
前言:入职新公司,SpringBoot和Mybatis都被封装了一次,光用而不知道原理实在受不了,于是开始恶补源码,由于刚开始比较浅,存属娱乐,大神勿喷. 就如网上的流传的SpringBoot与Myb ...
- Springboot security cas整合方案-实践篇
承接前文Springboot security cas整合方案-原理篇,请在理解原理的情况下再查看实践篇 maven环境 <dependency> <groupId>org.s ...
- Springboot security cas整合方案-原理篇
前言:网络中关于Spring security整合cas的方案有很多例,对于Springboot security整合cas方案则比较少,且有些仿制下来运行也有些错误,所以博主在此篇详细的分析cas原 ...
- 使用Springboot + Gradle快速整合Mybatis-Plus
使用Springboot + Gradle快速整合Mybatis-Plus 作者:Stanley 罗昊 [转载请注明出处和署名,谢谢!] MyBatis-Plus(简称 MP)是一个 MyBatis ...
- springboot 与 shiro 整合 (简洁版)
前言: 网上有很多springboot 与 shiro 整合的资料,有些确实写得很好, 对学习shiro和springboot 都有很大的帮助. 有些朋友比较省事, 直接转发或者复制粘贴.但是没有经过 ...
随机推荐
- Could not find resource——mybatis 找不到映射器xml文件
今天用IDEA写Mybatis的时候,测试报了如图所示的错,恶心死我了,后来解决了,总结一下,防止下回跳坑,当然,也是做一个分享,如果有朋友遇到这个错,希望有所帮助 Error parsing SQL ...
- yii2.0的学习之旅(二)
前言:上一次我们简单认识了一下yii2.0安装,模型基本(增,删,改,查)操作 一.前后台数据交互 *如果你觉得默认的top样式太丑,可以这样关掉* *底部也可以这样关掉* (1)mvc合作操作数据 ...
- XtraReport报表入库单数字转中文大写数字
先看看打印入库单的效果图,看如下: 客户要求合计一行,要求大写中文数字.XtraReport报表是如何做出以上图的效果呢?因为是要把数字转成大写中文数字,得先准备数字转大写中文数字的函数.因网上有很多 ...
- Postman 调试请求Asp.Net Core3.0 WebApi几种常见的Get/Post/Put/Delete请求
这里就直接截图了,如下(很简单的操作): 1:Get几种请求 2:Post 3:Put 4:Delete 最后,虽然简单,代码还是给放一下(这里只是抛砖引玉的作用,自己可以根据自身的业务需要来做进一 ...
- Hyper-V + CentOS7 安装教程(视频)
(双击全屏播放) 一.前言 为什么选择Hyper-V? windowns自带,免费 基础环境 二.虚拟机配置 下载CentOS7镜像 https://www.centos.org/download/ ...
- 微信小程序 自定义头部导航栏和导航栏背景图片 navigationStyle
这两天因为要做一个带背景的小程序头,哭了,小程序导航栏有背景也就算了,还得让导航栏上的背景顺下来,心态小崩.现在可以单独设置一个页面的小程序头了,但是前提是要微信7.0以上的版本,考虑到兼容性问题 ...
- animations与transition
transition过渡 和animation 动画 要知道 transition过渡和animation动画都是实现元素运动的一种方式.区别在于: transition过渡需要人为触发,例如点击触发 ...
- Objective-c 字面量
Objective-c早就支持字面量,但是IOS到XCODE 4.5,IOS6,LLVM4.0才开始较好的支持字面量. 以下是简要对比: 未使用字面量 使用字面量 NSString *greeting ...
- Java 打印HelloKitty
Java第一课 如何在控制台打印出"Hello Kitty" 如图所示,在IDE中使用 System.out.println(); 语句来实现打印 最后附上AIDE下载链接: Ja ...
- [TCP/IP] TCP第三次握手失败怎么办
三次握手 客户端 ==> SYN是1同步 ,ACK确认标志是0,seq序号是x ==> 服务器 客户端 <== SYN是1同步 ,ACK确认标志是1,seq序号是y,ack确认号是x ...