【SpringCloud构建微服务系列】使用Spring Cloud Config统一管理服务配置
一、为什么要统一管理微服务配置
对于传统的单体应用而言,常使用配置文件来管理所有配置,比如SpringBoot的application.yml文件,但是在微服务架构中全部手动修改的话很麻烦而且不易维护。
微服务的配置管理一般有以下需求:
1.集中配置管理,一个微服务架构中可能有成百上千个微服务,所以集中配置管理是很重要的。
2.不同环境不同配置,比如数据源配置在不同环境(开发,生产,测试)中是不同的。
3.运行期间可动态调整。
4.配置修改后可自动更新。
好在Spring Cloud Config已经全部实现了上面几点。
二、Spring Cloud Config简介和使用
2.1原理
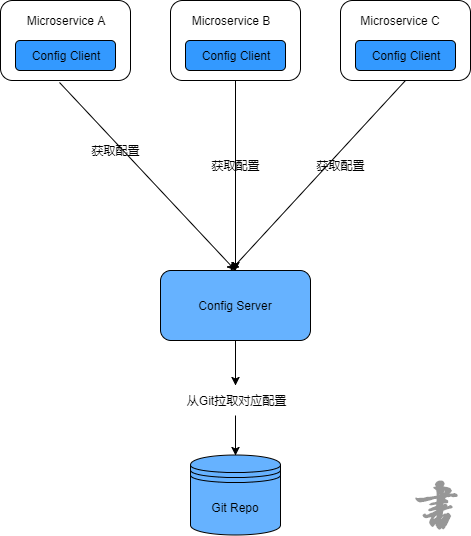
Spring Cloud Config为分布式系统外部化配置提供了服务器端和客户端的支持,它包括Config Client 和 Config Server两个部分。原理是所有的配置信息都存储在Config Server,所有的微服务都指向Config Server,
各个微服务启动时都会请求Config Server来获取配置信息,然后缓存到本地以提高性能。
2.2编写Config Server
1.在Git仓库https://github.com/2YSP/spring-cloud-config-repo(可以使用自己的仓库)新建几个配置文件,例如:

内容分别为:
profile=dev-1.0
profile=production-1.0
profile=test-1.0
profile=default-1.0
2.新建一个SpringBoot项目microservice-config-server,并添加以下依赖
<dependency>

            <groupId>org.springframework.cloud</groupId>

            <artifactId>spring-cloud-config-server</artifactId>

        </dependency>
3.在启动类添加 @EnableConfigServer注解
4.编写application.yml文件
server:

  port: 8080

spring:

  application:

    name: microservice-config-server

  cloud:

    config:

      server:

        git:

          # 配置Git仓库的地址

          uri: https://github.com/2YSP/spring-cloud-config-repo.git

          # 配置Git仓库的用户名

          username: 2YSP

          # 配置Git仓库的密码

          password: XX
这样就完成了,可以使用端点来获取配置文件,端点与配置文件的映射规则如下:
/{application}/{profile}[/{lable}]
/{application}-{profile}.yml
/{lable}/{application}-{profile}.yml
/{application}-{profile}.properties
/{lable}/{application}-{profile}.properties
{application}表示微服务的名称,{profile}代表环境,{lable}表示Git仓库的分支,默认是master。
本例如果要访问microservice-foo-dev.properties,则可以访问这些URL:
http://localhost:8080/microservice-foo/dev
http://localhost:8080/microservice-foo-dev.properties
http://localhost:8080/microservice-foo-dev.yml
2.3编写Config Client
1.创建一个SpringBoot工程,ArtifactId为microservice-config-client,并添加以下依赖
<dependency>

            <groupId>org.springframework.boot</groupId>

            <artifactId>spring-boot-starter-actuator</artifactId>

        </dependency>

        <dependency>

            <groupId>org.springframework.boot</groupId>

            <artifactId>spring-boot-starter-web</artifactId>

        </dependency>

        <dependency>

            <groupId>org.springframework.cloud</groupId>

            <artifactId>spring-cloud-starter-config</artifactId>

        </dependency>
2.编写配置文件application.yml
server:

  port: 8081
3.创建配置文件bootstrap.yml,并添加以下内容。
spring:

  application:

    # 对应Config Server所获取的配置文件的{application}

    name: microservice-foo

  cloud:

    config:

      uri: http://localhost:8080/

      #对应config server所获取配置文件的{profile}

      profile: dev

      # 指定Git仓库的分支,对应config server所获取配置文件的{label}

      label: master
需要注意的是,以上属性应配置在bootstrap.yml而不是application.yml文件中,否则部分配置就不能正常工作。
4.编写Controller
@RestController

public class ConfigClientController {

    @Value("${profile}")

    private String profile;

    @GetMapping("/profile")

    public String hello(){

        return this.profile;

    }

}
这里通过注解 @Value("${profile}") 来绑定Git仓库的profile属性。
5.测试
先启动microservice-config-server,再启动microservice-config-client,访问http://localhost:8081/profile即可获得以下结果。
dev-1.0
说明能够正常的获取Git仓库的配置信息。
三、配置文件的手动刷新和自动刷新
3.1通过/refresh端点手动刷新
1.复制项目microservice-config-client更改为microservice-config-client-refresh
2.为项目添加spring-boot-starter-actuator依赖,如果有了就不添加了。
3.在Controller类上添加@RefreshScope注解
@RestController

@RefreshScope

public class ConfigClientController {

    @Value("${profile}")

    private String profile;

    @GetMapping("/profile")

    public String hello(){

        return this.profile;

    }

}
4.修改Git仓库中microservice-foo-dev.properties文件的内容,然后先发送POST请求到http://localhost:8081/refresh,再访问http://localhost:8081/refresh即可获取最新的配置。
3.2使用Spring Cloud Bus 实现自动刷新配置
1.首先安装RabbitMQ,安装步骤这里不介绍我的博客里有。
2.为项目添加以下依赖
<dependency>

            <groupId>org.springframework.cloud</groupId>

            <artifactId>spring-cloud-starter-bus-amqp</artifactId>

        </dependency>
3.在bootstrap.yml中添加以下内容
spring:

  application:

    # 对应Config Server所获取的配置文件的{application}

    name: microservice-foo

  cloud:

    config:

      uri: http://localhost:8080/

      #对应config server所获取配置文件的{profile}

      profile: dev

      # 指定Git仓库的分支,对应config server所获取配置文件的{label}

      label: master

  rabbitmq:

    host: localhost

    port: 5672 #默认端口 5672

    username: guest

    password: guest
四、Config Server的高可用
【SpringCloud构建微服务系列】使用Spring Cloud Config统一管理服务配置的更多相关文章
- 9.Spring Cloud Config统一管理微服务配置
Spring Cloud Config统一管理微服务配置 9.1. 为什么要统一管理微服务配置 9.2. Spring Cloud Config简介 Spring Cloud Config为分布式系统 ...
- 使用Spring Cloud Config统一管理配置,别再到处放配置文件了
1 前言 欢迎访问南瓜慢说 www.pkslow.com获取更多精彩文章! 可配置是一个成熟软件系统应该提供的特性,而配置管理对于大型系统就显得十分重要,特别是对于拥有多个应用的微服务系统.可喜的是, ...
- .NET Core微服务之基于Steeltoe使用Spring Cloud Config统一管理配置
Tip: 此篇已加入.NET Core微服务基础系列文章索引 => Steeltoe目录快速导航: 1. 基于Steeltoe使用Spring Cloud Eureka 2. 基于Steelt ...
- SpringCloud学习笔记(7):使用Spring Cloud Config配置中心
简介 Spring Cloud Config为分布式系统中的外部化配置提供了服务器端和客户端支持,服务器端统一管理所有配置文件,客户端在启动时从服务端获取配置信息.服务器端有多种配置方式,如将配置文件 ...
- Spring Cloud(九)高可用的分布式配置中心 Spring Cloud Config 集成 Eureka 服务
上一篇文章,讲了SpringCloudConfig 集成Git仓库,这一篇我们讲一下SpringCloudConfig 配和 Eureka 注册中心一起使用 在分布式系统中,由于服务数量巨多,为了方便 ...
- Spring Cloud Config实现集群配置中心
Spring Cloud Config为分布式系统提供了配置服务器和配置客户端,可以管理集群中的配置文件.使用Git.SVN等版本管理系统存放配置文件,配置服务器会到版本管理系统获取配置,集群中的配置 ...
- Spring Cloud config之一:分布式配置中心入门介绍
Spring Cloud Config为服务端和客户端提供了分布式系统的外部化配置支持.配置服务器为各应用的所有环境提供了一个中心化的外部配置.它实现了对服务端和客户端对Spring Environm ...
- Spring Cloud Config 1 (分布式配置中心)
spring cloud config是spring cloud团队创建的一个全新的项目,用来为分布式系统中的基础设施和微服务应用提供集中化的外部配置支持,它分为服务端和客户端两部分. 服务端也被称为 ...
- Spring Cloud Config入门(本地配置)
spring cloud config 简介 Spring Cloud Config为分布式系统中的外部化配置提供服务器和客户端支持.使用Config Server,您可以在所有环境中管理应用程序的外 ...
随机推荐
- [Bzoj4260]Codechef REBXOR(trie树)
4260: Codechef REBXOR Time Limit: 10 Sec Memory Limit: 256 MBSubmit: 1534 Solved: 669[Submit][Stat ...
- [Bzoj1296][Scoi2009] 粉刷匠 [DP + 分组背包]
1296: [SCOI2009]粉刷匠 Time Limit: 10 Sec Memory Limit: 162 MBSubmit: 2184 Solved: 1259[Submit][Statu ...
- 操作redis有关的命令
)连接操作命令 quit:关闭连接(connection) auth:简单密码认证 help cmd: 查看cmd帮助,例如:help quit )持久化 save:将数据同步保存到磁盘 bgsave ...
- Java处理XSS漏洞的工具类代码
原文:http://www.open-open.com/code/view/1455809388308 public class AntiXSS { /** * 滤除content中的危险 HTML ...
- c++之函数对象、bind函数
函数对象实质上是一个实现了operator()--括号操作符--的类. class Add { public: int operator()(int a, int b) { return a + b; ...
- Linux如何更新软件源
Linux软件源的设置方法 1 打开数据源配置文件 vi /etc/apt/sources.list 添加相关的数据源,可以选择以下的数据源,不要写太多,否则会影响更新速度. 之后使用ap ...
- Python的字符串和列表和字典的方法/函数
字符串 S.find()#可指定范围查找字串,返回索引值,否则返回-1 S.index()#同find,只是找不到的之后返回异常 S.count()#返回找到字串的个数 S.lower()#转小写 S ...
- 【Mongodb教程 第八课 】MongoDB 更新文档
MongoDB的 update() 和 save() 方法用于更新文档的集合. update()方法更新现有的文档值,而替换现有的文档通过的文件中 save() 方法. MongoDB Update( ...
- Linux_C——动态库,静态库
/usr/lib /lib:标准系统库文件 库是一组预先编译好的函数的集合,这些函数都是按照可重用的原则编写的.它们通常有一组相互关联的函数组成以 执行某项常见的任 ...
- 嵌入式开发之davinci--- 8148/8168/8127 中的添加算饭scd 场景检测 文档简介
Osd Scd (1) Introduction over view a) scene change detection block diagram a) gr ...