【Android测试】Android截图的深水区
◆版权声明:本文出自胖喵~的博客,转载必须注明出处。
转载请注明出处:http://www.cnblogs.com/by-dream/p/6113059.html
需求
这两天遇到这样一个事情,因为某测试任务,需要在操作过程中连续的截图,最终分析截图。之前同事用的工具兼容性特别的不好,需要root,并且只适配固定几个版本的机型,因此我决定自己实现一个。首先最先想到的就是使用Uiautomator 1中自带的API来截图。
我们看下Uiautomator 1.0中提供的截图相关的API是什么样子的,在UiDevice中,我们找到了这个函数:

很明显,这个函数的调用就会截图一次,并且每一次截图图片质量肯定很大,会消耗很多的时间,因此不能达到快速连续的截图。不过我们又发现另外一个函数,貌似可以控制图片质量:
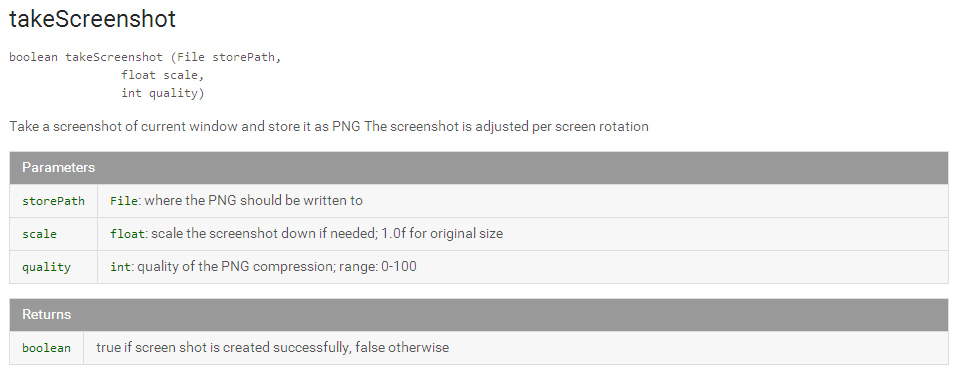
那我们就试试这两个截图的效果吧。
开始动手
这里我在Uiautomator(对Uiautomator还不熟悉的同学请参考我的Uiautomator系列的三篇文章)中实现了如下的代码:

我们去手机的目录下看看这两个图片:

我们可以看到图片的大小是一样大的,咦真是奇怪,打开图片看看图片的真实效果如何呢?

对比了下两张图片的清晰度,几乎没什么区别,那怎么回事呢?因此我决定看看这块的代码一探究竟。
源码剖析
这里给大家也提供一些源码(点击下载),拿到Uiautomator1.0版本的源码后,我们去找UiDevice。

这里可以看到不带参数的tackscreenshot就是调用了带参数的,只不过给了个默认值而已,那么两张图更应该一样啊,我们接着再往后看:
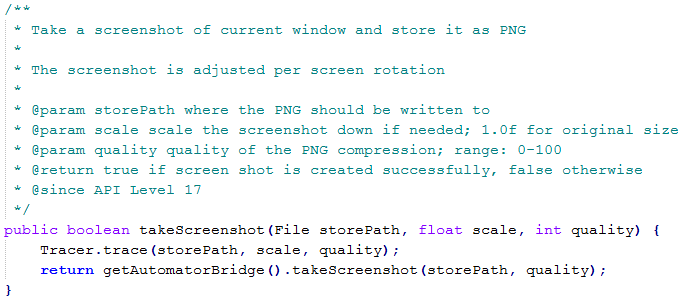
这里说一下 Tracer 是用来记录跟踪log的,可以忽略。因此我们继续跟进 getAutomatorBridge():

我们看看这个函数返回的变量是什么:

这里在源码中,我没看到这个类,不过看到了一个 abstract 的UiAutomatorBridge 一个抽象类,那么基本上就确定这二者是集成的关系了,于是打开UiAutomatorBridge,继续寻找 takeScreenshot 函数,果然就找到:
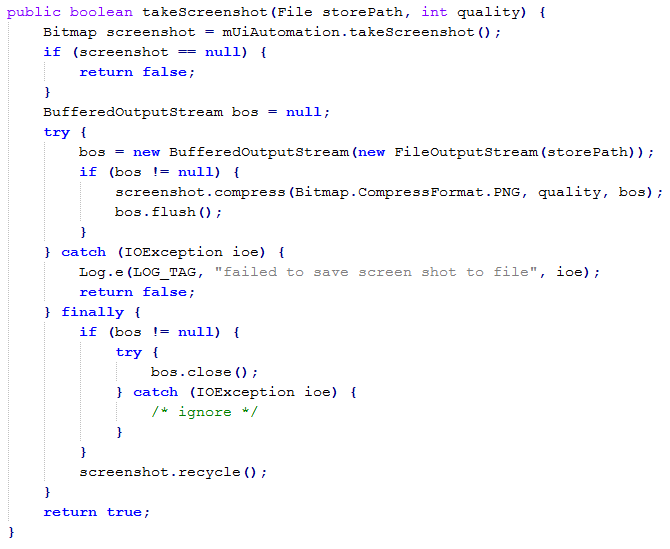
这里面第一步获得Bitmap对象是核心,而获取Bitmap的方法,又和下面这个变量有关系:
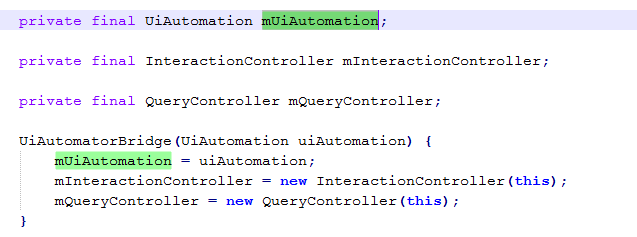
看它初始化的位置,那么我们自己构造就有点难了,因此我决定这里按照这个思路来进行反射。
反射获取
如果还不懂反射的话,建议先看看我的另一篇讲反射的文章《反射技术引入》。这里我的思路是这样的:
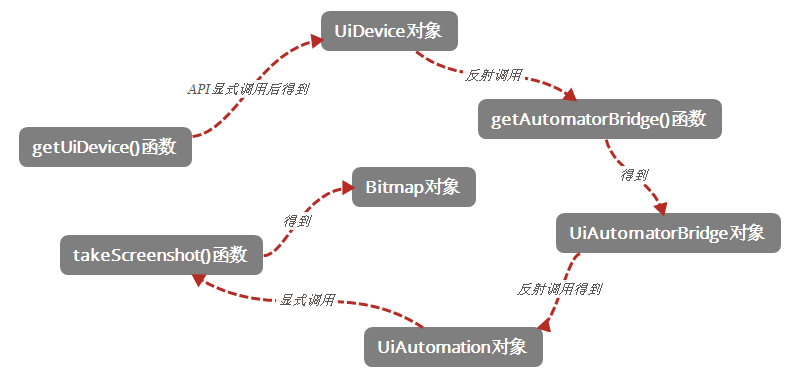
从提供的API getUiDevice()入手,直到拿到Bitmap对象。话不多说,直接看整个的代码实现的过程吧。
     void takeScreenShot()

     {

         File files1 = new File("/mnt/sdcard/xiaobo/pic1.png");

         File files2 = new File("/mnt/sdcard/xiaobo/pic2-ref.png");

         getUiDevice().takeScreenshot(files1);

         try

         {

             reflectTakeScreenshot(files2);

         } catch (NoSuchMethodException e)    {

             e.printStackTrace();

         } catch (SecurityException e)    {

             e.printStackTrace();

         } catch (IllegalAccessException e)    {

             e.printStackTrace();

         } catch (IllegalArgumentException e)    {

             e.printStackTrace();

         } catch (InvocationTargetException e)    {

             e.printStackTrace();

         } catch (ClassNotFoundException e)    {

             e.printStackTrace();

         } catch (NoSuchFieldException e)        {

             e.printStackTrace();

         }

     }

     /**

      * 反射方式拿到Bitmap截图

      * */

     void reflectTakeScreenshot(File files) throws NoSuchMethodException, SecurityException, IllegalAccessException, IllegalArgumentException, InvocationTargetException, ClassNotFoundException, NoSuchFieldException

     {

         // 得到UiDevice 对象

         UiDevice mdevice = getUiDevice();

         // 反射getAutomatorBridge()得到InstrumentationUiAutomatorBridge对象

         Method method = mdevice.getClass().getDeclaredMethod("getAutomatorBridge", new Class[] {});

         method.setAccessible(true);

         Object bridge = method.invoke(mdevice, new Object[] {});

         // 反射得到UiAutomation对象

         Class tmp = Class.forName("com.android.uiautomator.core.UiAutomatorBridge");

         Field fields = tmp.getDeclaredField("mUiAutomation");

         fields.setAccessible(true);

         UiAutomation mUiAutomation = (UiAutomation)fields.get(bridge);

         // 显式调用

         Bitmap screenshot = mUiAutomation.takeScreenshot();

         save(screenshot, files);

     }

     /**

      * 参考谷歌的源代码进行保存

      * */

     void save(Bitmap screenshot, File files)

     {

         if (screenshot == null) {

             return ;

        }

        BufferedOutputStream bos = null;

         try {

             bos = new BufferedOutputStream(new FileOutputStream(files));

             if (bos != null) {

                 screenshot.compress(Bitmap.CompressFormat.PNG, 5, bos);

                 bos.flush();

             }

         } catch (IOException ioe) {

             Log.e("bryan", "failed to save screen shot to file", ioe);

             return ;

         } finally {

             if (bos != null) {

                 try {

                     bos.close();

                 } catch (IOException ioe) {

                     /* ignore */

                 }

             }

             screenshot.recycle();

         }

     }
拿到Bitmap对象后,我们也参考谷歌的写法,保存到本地,这里可以看到(66行)quality的值我依然给传5。我们执行一下看看结果:
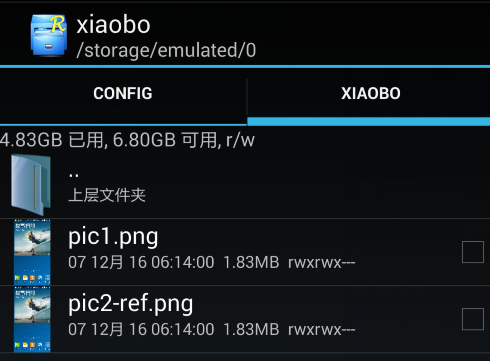
可以看到大小还是一样的,并且我自己打开后发现清晰度也是一样的。这就奇怪了,究竟是怎么回事呢?
Google工程师的bug
在图片压缩还不生效的情况下,我们就得仔细看看压缩的代码了。这里我们重点看下高亮的那句代码:
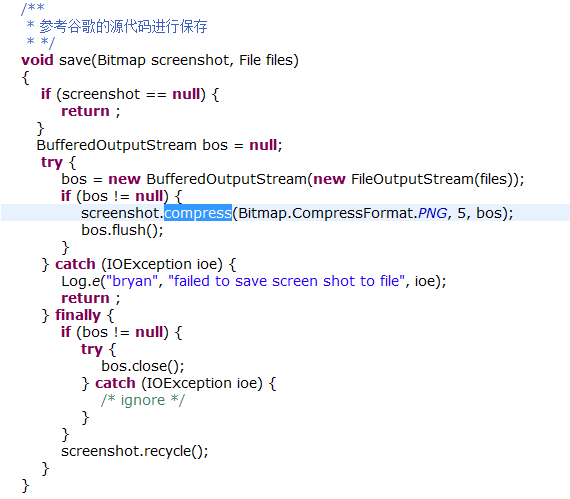
我勾选出的这一句话就是最核心的关键,我们先去查一下这个函数的API用法,不查不知道,一查全明白了:

图中我勾选中的这句话的意思是,对于一些无损的PNG的图片,会忽略quality这个属性的设置。但是我们在源码中却可以看到,谷歌的工程师对于PNG还是使用了压缩,看来得给他提个bug了,哈哈。知道了PNG不能压缩,那么我们把压缩的方式切换成JPEG试试:
screenshot.compress(Bitmap.CompressFormat.PNG, quality, bos);
这句替换为
screenshot.compress(Bitmap.CompressFormat.JPEG, quality, bos);
修改完后,我们运行看看结果:
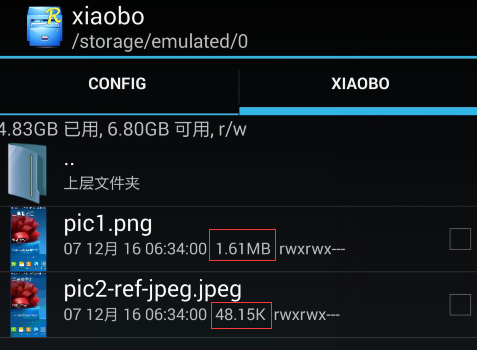
压缩终于生效了,我们看看真实两张图片的效果:
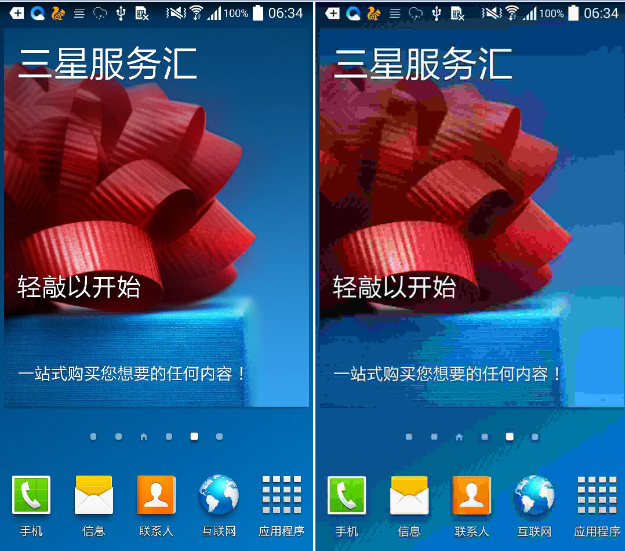
再次优化
这个时候我想,能否满足连续截图的需求呢?如果截一张保存一张,那么保存的过程肯定会很慢,那么能否先记录在内存中,最终结束的时候再写文件呢?于是我讲Bitmap对象压入一个List中,结果保存了大概几十张之后手机就卡死了。
后来在深入了解了Bitmap的原理之后才知道,Bitmap对象在内存中的占用非常的高,原因是图片按照长*宽存储,并且每个像素点上可能还有多个位元素,因此加在一起就多了。我们可以看看占内存的情况:

一张1920*1080的图,原始的Bitmap占用为 7.9MB,经过压缩后为225KB保存成为文件后,大小只剩下了5.6KB。所以对于读取来的图片只能压缩完之后,再保存了。最终实现的代码为:
 package QQ;

 import java.io.BufferedOutputStream;

 import java.io.File;

 import java.io.FileOutputStream;

 import java.io.IOException;

 import java.lang.reflect.Field;

 import java.lang.reflect.InvocationTargetException;

 import java.lang.reflect.Method;

 import java.util.Calendar;

 import android.R.integer;

 import android.app.UiAutomation;

 import android.graphics.Bitmap;

 import android.util.Log;

 import com.android.uiautomator.core.UiDevice;

 import com.android.uiautomator.core.UiObjectNotFoundException;

 import com.android.uiautomator.testrunner.UiAutomatorTestCase;

 public class Test_jietu extends UiAutomatorTestCase

 {

     public void testDemo() throws IOException, UiObjectNotFoundException {

         int i = 0;

         while (true)

         {

             System.out.println(++i);

             takeScreenShot();

         }

     }

     void takeScreenShot() {

         // File files1 = new File("/mnt/sdcard/xiaobo/pic1.png");

         // getUiDevice().takeScreenshot(files1);

         File files2 = new File("/mnt/sdcard/xiaobo/" + getTimeString() + ".jpeg");

         try

         {

             reflectTakeScreenshot(files2);

         } catch (NoSuchMethodException e)

         {

             e.printStackTrace();

         } catch (SecurityException e)

         {

             e.printStackTrace();

         } catch (IllegalAccessException e)

         {

             e.printStackTrace();

         } catch (IllegalArgumentException e)

         {

             e.printStackTrace();

         } catch (InvocationTargetException e)

         {

             e.printStackTrace();

         } catch (ClassNotFoundException e)

         {

             e.printStackTrace();

         } catch (NoSuchFieldException e)

         {

             e.printStackTrace();

         }

     }

     /**

      * 反射方式拿到Bitmap截图

      * */

     void reflectTakeScreenshot(File files) throws NoSuchMethodException, SecurityException, IllegalAccessException, IllegalArgumentException, InvocationTargetException, ClassNotFoundException,

             NoSuchFieldException {

         // 得到UiDevice 对象

         UiDevice mdevice = getUiDevice();

         // 反射getAutomatorBridge()得到InstrumentationUiAutomatorBridge对象

         Method method = mdevice.getClass().getDeclaredMethod("getAutomatorBridge", new Class[] {});

         method.setAccessible(true);

         Object bridge = method.invoke(mdevice, new Object[] {});

         // 反射得到UiAutomation对象

         Class tmp = Class.forName("com.android.uiautomator.core.UiAutomatorBridge");

         Field fields = tmp.getDeclaredField("mUiAutomation");

         fields.setAccessible(true);

         UiAutomation mUiAutomation = (UiAutomation) fields.get(bridge);

         // 显式调用

         Bitmap screenshot = mUiAutomation.takeScreenshot();

         // 压缩

         screenshot = compress(screenshot);

         save(screenshot, files);

     }

     /**

      * 参考谷歌的源代码进行保存

      * */

     void save(Bitmap screenshot, File files) {

         if (screenshot == null)

         {

             return;

         }

         BufferedOutputStream bos = null;

         try

         {

             bos = new BufferedOutputStream(new FileOutputStream(files));

             if (bos != null)

             {

                 screenshot.compress(Bitmap.CompressFormat.JPEG, 50, bos);

                 bos.flush();

             }

         } catch (IOException ioe)

         {

             Log.e("bryan", "failed to save screen shot to file", ioe);

             return;

         } finally

         {

             if (bos != null)

             {

                 try

                 {

                     bos.close();

                 } catch (IOException ioe)

                 { /* ignore */}

             }

             // 释放Bitmap在c层的内存

             screenshot.recycle();

         }

     }

     /**

      * 简单压缩一下图片

      * */

     Bitmap compress(Bitmap bitmap) {

         System.out.println("source bitmap :" + bitmap.getByteCount());

         if (bitmap != null)

         {

             bitmap = Bitmap.createScaledBitmap(bitmap, bitmap.getWidth() / 6, bitmap.getHeight() / 6, true);

             System.out.println("compress bitmap :" + bitmap.getByteCount());

             return bitmap;

         }

         return bitmap;

     }

     /*

      * 得到当前时间

      */

     public String getTimeString() {

         // 取得当前时间

         Calendar calendar = Calendar.getInstance();

         calendar.setTimeInMillis(System.currentTimeMillis());

         return calendar.get(Calendar.HOUR_OF_DAY) + "_" + calendar.get(Calendar.MINUTE) + "_" + calendar.get(Calendar.SECOND) + "_" + calendar.get(Calendar.MILLISECOND);

     }

 }
这里提供了完整的工程供大家下载。当然如果有愿意使用这个截图的工具的小伙伴,可以下载这个jar包,然后使用下面两条命令,就可以使用了。
命令1:adb push Screenshot.jar /data/local/tmp/
命令2:adb shell uiautomator runtest Screenshot.jar -c QQ.Test_jietu
【Android测试】Android截图的深水区的更多相关文章
- 【转】Android仿QQ截图应用测试
使用过QQ的同学应该都用过QQ截图,Ctrl+Alt+A进入截图操作,通过拉伸,移动高亮区域的框体可以快速截取我们需要的图片.在android应用中,我们也经常需要截图操作,以下实现了一个类似QQ截图 ...
- Android测试框架初步
一.实验目的 1.掌握android测试项目的建立 2.掌握android测试框架的基本内容 3.编写运行android测试 二.实验内容与步骤 建立android项目MyProject,运行截图如下 ...
- 【Android测试】【第十四节】Appium——简述
◆版权声明:本文出自胖喵~的博客,转载必须注明出处. 转载请注明出处:http://www.cnblogs.com/by-dream/p/5124340.html 前言 同样的,这一篇我要介绍的也是一 ...
- 【Android测试】【第九节】MonkeyRunner—— 初识
◆版权声明:本文出自胖喵~的博客,转载必须注明出处. 转载请注明出处:http://www.cnblogs.com/by-dream/p/4836815.html 不得不说两句,过了这么久才再次更新博 ...
- 【Android测试】【第一节】ADB——初识和用法
◆版权声明:本文出自胖喵~的博客,转载必须注明出处. 转载请注明出处:http://www.cnblogs.com/by-dream/p/4630046.html 写在前面的话 感觉自己进入Andr ...
- android 测试(转)
个人接触android的时间也不是很长,稍微总结下在做Android测试的过程中,初次接触的同学需要些什么准备,以及需要些什么知识?下面讲到的东西可能很多人会觉得很简单,但我确实碰到过有新同学对这些点 ...
- android测试参考,及CreateProcess failure, error问题解决
今天小伙伴问我问题,我给了这2个小命令,或许做android测试的同学可以用得着. 截图命令adb shell /system/bin/screencap -p /sdcard/screenshot. ...
- 2014 非常好用的开源 Android 测试工具
http://www.php100.com/html/it/mobile/2014/1015/7495.html 当前有很大的趋势是转向移动应用平台,Android 是最广泛使用的移动操作系统,201 ...
- 5个最佳的Android测试框架(带示例)
谷歌的Android生态系统正在不断地迅速扩张.有证据表明,新的移动OEM正在攻陷世界的每一个角落,不同的屏幕尺寸.ROM /固件.芯片组以及等等等等,层出不穷.于是乎,对于Android开发人员而言 ...
随机推荐
- vim 使用
vim有三种模式:输入模式,命令模式,底行模式,使用esc进入命令模式,在命令模式下按英文的冒号,进入底行模式:命令行模式下按i进入输入模式.vim编辑文件是将文件内容复制到缓冲区显示在屏幕上. vi ...
- VC++ 一个简单的Log类
在软件开发中,为程序建立Log日志是很必要的,它可以记录程序运行的状态以及出错信息,方便维护和调试. 下面实现了一个简单的Log类,使用非常简单,仅供参考. // CLogHelper.h : hea ...
- Git配置姓名和邮箱问题
今天在安装Git for windows完成后,配置姓名和邮箱.按照廖雪峰老师的步骤,在开始菜单里找到"Git"->"Git Bash",单击后并没有跳出 ...
- (分享) git详解
今天学了下git http://blog.jobbole.com/78960/ 他写的超级好的 之前也弄过,在eclipse上有个关于github的一个插件,可以通过github的仓库地址把ec ...
- Android开发之---Activity生命周期
Android开发中,有四大组件:Activity.Service.Content Provider.Broadcast Receiver,可以说,activity的使用是最频繁的了,这里来梳理一下与 ...
- [BI项目记]-搭建代码管理环境之创建团队项目
此篇主要介绍如何基于TFS环境创建团队项目来进行项目代码的版本管理工作,这一系列将侧重于BI项目,当然对于其它项目也同样适用. 在TFS里开始一个项目,我们首先需要创建一个团队项目. 在Team Ex ...
- 基于命令行编译打包phonegap for android应用 分类: Android Phonegap 2015-05-10 10:33 73人阅读 评论(0) 收藏
也许你习惯了使用Eclipse编译和打包Android应用.不过,对于使用html5+js开发的phonegap应用,本文建议你抛弃Eclipse,改为使用命令行模式,绝对的快速和方便. 一直以来,E ...
- Winform实现用多线程、百度地图API解析某公司的物理地址
前言 作为一个很挫的C#新手总喜欢自己写点儿不着边际的东西,本人是个新手加菜鸟,写B/S的,工作中,任务完成了,空闲下来,总想继续学点儿什么,由此触发了本篇文章了.个人一直认为,.NET中,C/S所要 ...
- 浅析python 中__name__ = '__main__' 的作用
引用http://www.jb51.net/article/51892.htm 很多新手刚开始学习python的时候经常会看到python 中__name__ = \'__main__\' 这样的代码 ...
- (iOS)项目总结-项目中遇到的各种的问题和解决方法
前言: 一到公司报道那时,便着手独立的去完成了一个项目,其中的辛酸泪也是不足为外人道也.这次算是一个新型的app,仍然是独立开发,但心境和想法却是完全的不同.下面说一次以前做开发时常常忽略的知识,也算 ...
