1 TCP/IP通信
重点参考长链接http://blog.csdn.net/fengyuzhengfan/article/details/38830115
http://blog.csdn.net/Jsagacity/article/details/78531819#
http://www.runoob.com/w3cnote/android-tutorial-socket1.html

1 电脑(或ESP8266)连接WIFI,建立服务 192.168.3.8 8080
1.1 查看电脑地址
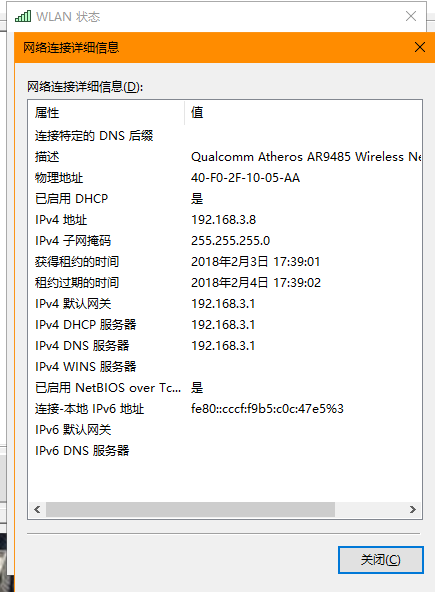
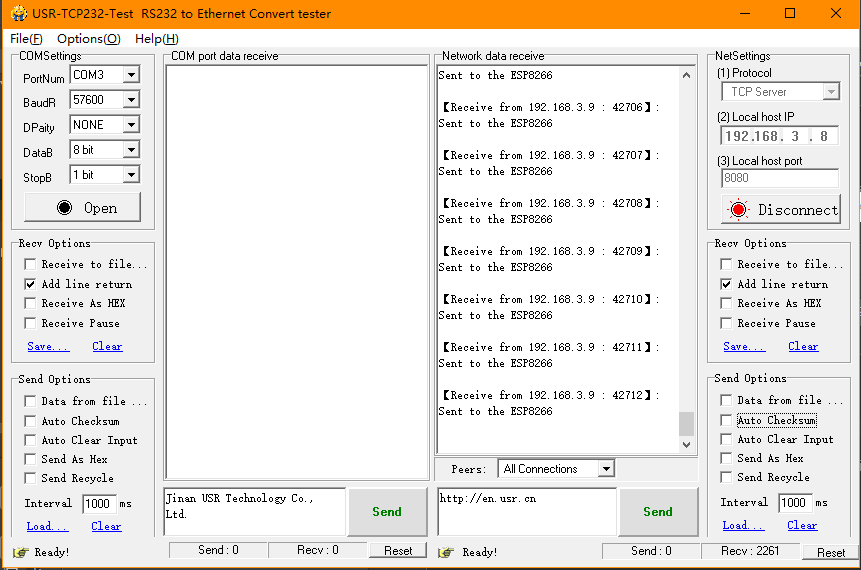
1.2 电脑建立服务 192.168.3.8 8080
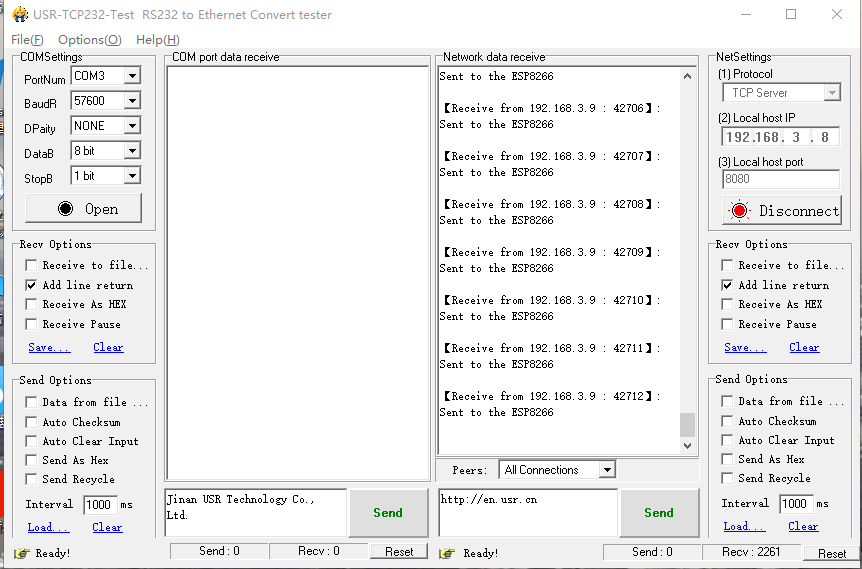
2 手机连接WIFI,创建客户申请服务
手机在wifi 下分配的地址是 192.168.3.9

2.1 手机打开软件

点击发送
电脑接收
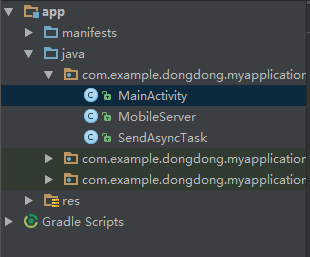
2手机端工程
手机端分为两个工程
1短链接。发送完消息就自动断开。不牵扯链接中断问题,但无法接收消息。
2长连接。发送完消息还可以接收消息。实现数据互传,但是还没有加入重链接功能。
2.1 AsyncTask建立的短链接
1 布局管理

<?xml version="1.0" encoding="utf-8"?>

<android.support.constraint.ConstraintLayout xmlns:android="http://schemas.android.com/apk/res/android"

    xmlns:app="http://schemas.android.com/apk/res-auto"

    xmlns:tools="http://schemas.android.com/tools"

    android:layout_width="match_parent"

    android:layout_height="match_parent"

    tools:context="com.example.dongdong.myapplication.MainActivity">

    <LinearLayout xmlns:android="http://schemas.android.com/apk/res/android"

        xmlns:tools="http://schemas.android.com/tools"

        android:id="@+id/LinearLayout1"

        android:layout_width="fill_parent"

        android:layout_height="fill_parent"

        android:orientation="vertical"

        tools:context=".MainActivity"

        android:weightSum="1">

        <LinearLayout

            android:layout_width="fill_parent"

            android:layout_height="wrap_content"

            android:orientation="horizontal"

            android:gravity="center"

            android:weightSum="1">

            <TextView

                android:layout_width="wrap_content"

                android:layout_height="wrap_content"

                android:text="IP:"

                android:layout_weight="0.04" />

            <EditText

                android:id="@+id/SIP"

                android:layout_width="wrap_content"

                android:layout_height="wrap_content"

                android:layout_weight="0.65" />

            <TextView

                android:layout_width="wrap_content"

                android:layout_height="wrap_content"

                android:text="端口:"/>

            <EditText

                android:id="@+id/IPort"

                android:layout_width="wrap_content"

                android:layout_height="wrap_content"

                android:layout_weight="0.17" />

        </LinearLayout>

    <LinearLayout

        android:layout_width="fill_parent"

        android:layout_height="wrap_content"

        android:orientation="horizontal"

        android:gravity="left"

        android:weightSum="1">

        <Button

            android:layout_width="wrap_content"

            android:layout_height="wrap_content"

            android:text="连接"/>

        <Button

            android:id="@+id/bt_send"

            android:layout_width="88dp"

            android:layout_height="wrap_content"

            android:text="发送"

            android:layout_below="@+id/tv_content"

            android:layout_alignParentStart="true"

            tools:layout_editor_absoluteY="0dp"

            tools:layout_editor_absoluteX="8dp" />

        <Button

            android:layout_width="wrap_content"

            android:layout_height="wrap_content"

            android:text="清空"/>

    </LinearLayout>

    <LinearLayout

        android:layout_width="fill_parent"

        android:layout_height="wrap_content"

        android:orientation="vertical"

        android:gravity="left"

        android:weightSum="1">

        <TextView

            android:layout_width="wrap_content"

            android:layout_height="wrap_content"

            android:text="发送区:"

            android:layout_weight="0.04" />

        <EditText

            android:id="@+id/sentText"

            android:layout_width="fill_parent"

            android:layout_height="wrap_content" />

        <TextView

            android:id="@+id/tv_send_text"

            android:layout_width="241dp"

            android:layout_height="43dp"

            android:text="发送的内容"

            android:layout_below="@+id/bt_send"

            tools:layout_editor_absoluteX="8dp"

            tools:layout_editor_absoluteY="8dp"

            android:layout_weight="0.03" />

    </LinearLayout>

    <LinearLayout

        android:layout_width="fill_parent"

        android:layout_height="wrap_content"

        android:orientation="vertical"

        android:gravity="left"

        android:weightSum="1"

        android:layout_weight="0.12">

        <TextView

            android:layout_width="wrap_content"

            android:layout_height="wrap_content"

            android:text="接收区:"

            />

        <Button

            android:layout_width="wrap_content"

            android:layout_height="wrap_content"

            android:text="清空"/>

        <TextView

            android:id="@+id/tv_content"

            android:layout_width="wrap_content"

            android:layout_height="wrap_content"

            android:gravity="left"

            android:text="接收的内容"

            android:layout_alignParentTop="true"

            android:layout_alignParentStart="true"

            tools:layout_editor_absoluteY="0dp"

            tools:layout_editor_absoluteX="8dp" />

    </LinearLayout>

    </LinearLayout>

</android.support.constraint.ConstraintLayout>
2 添加网络权限
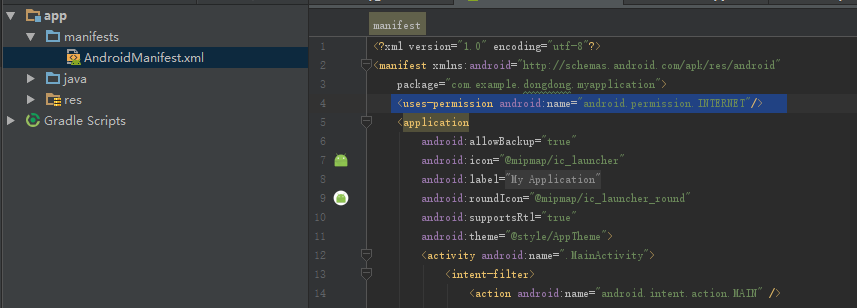
<uses-permission android:name="android.permission.INTERNET"/>
3 工程目录
1采用AsyncTask 异步模式
输入参数问题
2.1 函数输入参数1可以设置输入参数,可以是控件
SendAsyncTask myTask = new SendAsyncTask(SIP_target,IPort__target);
2.2
myTask.execute(str);
对应这个参数是
doInBackground(String... params)

package com.example.dongdong.myapplication;

import android.support.v7.app.AppCompatActivity;

import android.os.Bundle;

import android.os.Handler;

import android.os.Message;

import android.view.View;

import android.view.View.OnClickListener;

import android.widget.TextView;

import android.widget.EditText;

import android.widget.Button;

import android.widget.Toast;

public class MainActivity extends AppCompatActivity implements OnClickListener {

  //  1.1 定义

    private Button bt_send;

    private TextView tv_content;

    private TextView tv_send_text;

    private EditText SIP;

    private EditText IPort;

    private EditText sentText;

    @Override

    protected void onCreate(Bundle savedInstanceState) {

        super.onCreate(savedInstanceState);

        setContentView(R.layout.activity_main);

         // 1.2 控件初始化

        InitView();

        //  2 开启服务器

        MobileServer mobileServer = new MobileServer();

        mobileServer.setHandler(handler);

        new Thread(mobileServer).start();

    }

    private void InitView() {

        tv_content = (TextView) findViewById(R.id.tv_content);

        tv_send_text = (TextView) findViewById(R.id.tv_send_text);

        sentText=(EditText) findViewById(R.id.sentText);

        SIP=(EditText) findViewById(R.id.SIP);

        IPort=(EditText) findViewById(R.id.IPort);

        bt_send = (Button) findViewById(R.id.bt_send);

        bt_send.setOnClickListener(this);

    }

    @Override

    public void onClick(View v) {

        switch (v.getId()) {

            case R.id.bt_send:

               // String str = "Sent to the ESP8266";

                String str="请输入命令";

                int IPort__target=8080;

                String  SIP_target="192.168.1.1";

               if( sentText!=null)

               {

                   str=sentText.getText().toString().trim();

               }

                if (SIP!= null) {

                    SIP_target=SIP.getText().toString().trim();

                }

                if (IPort!= null) {

                    String msg = IPort.getText().toString().trim();

                    if (msg != null && msg.length() > 0) {

                        IPort__target = Integer.parseInt(msg);

                    }

                }

                // 链接IP

                SendAsyncTask myTask = new SendAsyncTask(SIP_target,IPort__target);

                //SendAsyncTask myTask = new SendAsyncTask();

                // 初始发送的消息

                myTask.execute(str);

                tv_send_text.setText(str);

                break;

        }

    }

    Handler handler = new Handler() {

        @Override

        public void handleMessage(Message msg) {

            switch (msg.what) {

                case 1:

                    tv_content.setText("WiFi模块发送的:" + msg.obj);

                    Toast.makeText(MainActivity.this, "接收到信息", Toast.LENGTH_LONG)

                            .show();

            }

        }

    };

}

package com.example.dongdong.myapplication;

import java.io.IOException;

import java.net.ServerSocket;

import java.net.Socket;

import java.io.DataInputStream;

import android.os.Handler;

import android.os.Message;

public class MobileServer implements Runnable {

    private ServerSocket server;

    private DataInputStream in;

    private byte[] receice;

    private Handler handler = new Handler();

    public MobileServer() {

    }

    public void setHandler(Handler handler) {

        this.handler = handler;

    }

    @Override

    public void run() {

        try {

            //5000是手机端开启的服务器的端口号,ESP8266进行TCP连接时使用的端口,而IP也是通过指令查询的联入设备的IP

            server = new ServerSocket(5000);

            while (true) {

                Socket client = server.accept();

                in = new DataInputStream(client.getInputStream());

                receice = new byte[50];

                in.read(receice);

                in.close();

                Message message = new Message();

                message.what = 1;

                message.obj = new String(receice);

                handler.sendMessage(message);

            }

        } catch (IOException e) {

            e.printStackTrace();

        }

        try {

            server.close();

        } catch (IOException e) {

            e.printStackTrace();

        }

    }

}

package com.example.dongdong.myapplication;

import java.io.IOException;

import java.io.PrintStream;

import java.net.Socket;

import android.os.AsyncTask;

public class SendAsyncTask extends AsyncTask<String, Void, Void> {

   // public class SendAsyncTask extends AsyncTask<String, Void, Void> {

    //这里是连接ESP8266的IP和端口号,IP是通过指令在单片机开发板查询到,而端口号可以自行设置,也可以使用默认的,333就是默认的

    private  static String IP ;

    private  static int PORT ;

    private Socket client = null;

    private PrintStream out = null;

   public SendAsyncTask(String ip,int port)

   {

      super();

       this.IP = ip;

       this.PORT = port;    }

    @Override

    protected Void doInBackground(String... params) {

        String str = params[0];

        try {

            client = new Socket(IP, PORT);

            client.setSoTimeout(5000);

            // 获取Socket的输出流,用来发送数据到服务端

            out = new PrintStream(client.getOutputStream());

            out.print(str);

            out.flush();

            if (client == null) {

                return null;

            } else {

                out.close();

                client.close();

            }

        } catch (IOException e) {

            e.printStackTrace();

        }

        return null;

    }

}
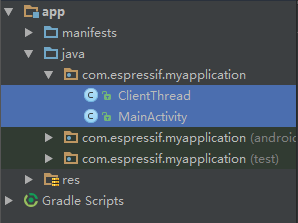
2 Handler 建立的长连接
功能描述
- 建立长链接,链接按钮建立链接 ,发射按钮发射信号,停止按钮结束。也可以改成短链接,生成类的时候把信号加进去。
- 界面和通信线程各自有访问彼此的Handler,从而实现数据线程互传互传。
- 主界面之外,建立通信线程发送消息。通信线程里又新建一个线程,用于专门接收服务器的数据。
现有问题
- 若连超时异常处理
- 若连接上但之后中断,连接重检测问题。
工程代码
如果自己新建工程要加入这些代码,注意修改工程名字。一般每个文件的第一行,只一句根据实际建立的工程确定。

2.1 网路权限

<uses-permission android:name="android.permission.INTERNET"/>
添加后完成整的代码
<?xml version="1.0" encoding="utf-8"?>

<manifest xmlns:android="http://schemas.android.com/apk/res/android"

    package="com.espressif.myapplication">

    <uses-permission android:name="android.permission.INTERNET"/>

    <application

        android:allowBackup="true"

        android:icon="@mipmap/ic_launcher"

        android:label="@string/app_name"

        android:roundIcon="@mipmap/ic_launcher_round"

        android:supportsRtl="true"

        android:theme="@style/AppTheme">

        <activity android:name=".MainActivity">

            <intent-filter>

                <action android:name="android.intent.action.MAIN" />

                <category android:name="android.intent.category.LAUNCHER" />

            </intent-filter>

        </activity>

    </application>

</manifest>
2 布局文件


<?xml version="1.0" encoding="utf-8"?>

<android.support.constraint.ConstraintLayout xmlns:android="http://schemas.android.com/apk/res/android"

    xmlns:app="http://schemas.android.com/apk/res-auto"

    xmlns:tools="http://schemas.android.com/tools"

    android:layout_width="match_parent"

    android:layout_height="match_parent"

   >

    <LinearLayout xmlns:android="http://schemas.android.com/apk/res/android"

        xmlns:tools="http://schemas.android.com/tools"

        android:id="@+id/LinearLayout1"

        android:layout_width="fill_parent"

        android:layout_height="fill_parent"

        android:orientation="vertical"

        tools:context=".MainActivity"

        android:weightSum="1">

        <LinearLayout

            android:layout_width="fill_parent"

            android:layout_height="wrap_content"

            android:orientation="horizontal"

            android:gravity="center"

            android:weightSum="1">

            <TextView

                android:layout_width="wrap_content"

                android:layout_height="wrap_content"

                android:text="IP:"

                android:layout_weight="0.04" />

            <EditText

                android:id="@+id/SIP"

                android:layout_width="wrap_content"

                android:layout_height="wrap_content"

                android:layout_weight="0.65"

                android:text="192.168.1.102"

                />

            <TextView

                android:layout_width="wrap_content"

                android:layout_height="wrap_content"

                android:text="端口:"/>

            <EditText

                android:id="@+id/IPort"

                android:layout_width="wrap_content"

                android:layout_height="wrap_content"

                android:layout_weight="0.17"

                android:text="8080"

                />

        </LinearLayout>

        <LinearLayout

            android:layout_width="fill_parent"

            android:layout_height="wrap_content"

            android:orientation="horizontal"

            android:gravity="left"

            android:weightSum="1">

            <Button

                android:id="@+id/bt_connect"

                android:layout_width="wrap_content"

                android:layout_height="wrap_content"

                android:text="连接"/>

            <Button

                android:id="@+id/bt_send"

                android:layout_width="88dp"

                android:layout_height="wrap_content"

                android:text="发送"

                android:layout_below="@+id/tv_content"

                android:layout_alignParentStart="true"

                tools:layout_editor_absoluteY="0dp"

                tools:layout_editor_absoluteX="8dp" />

            <Button

                android:id="@+id/bt_stop"

                android:layout_width="wrap_content"

                android:layout_height="wrap_content"

                android:text=""/>

        </LinearLayout>

        <LinearLayout

            android:layout_width="fill_parent"

            android:layout_height="wrap_content"

            android:orientation="vertical"

            android:gravity="left"

            android:weightSum="1">

            <TextView

                android:layout_width="wrap_content"

                android:layout_height="wrap_content"

                android:text="发送区:"

                android:layout_weight="0.04" />

            <EditText

                android:id="@+id/sentText"

                android:layout_width="fill_parent"

                android:layout_height="wrap_content" />

            <TextView

                android:id="@+id/tv_send_text"

                android:layout_width="241dp"

                android:layout_height="43dp"

                android:text="发送的内容"

                android:layout_below="@+id/bt_send"

                tools:layout_editor_absoluteX="8dp"

                tools:layout_editor_absoluteY="8dp"

                android:layout_weight="0.03" />

        </LinearLayout>

        <LinearLayout

            android:layout_width="fill_parent"

            android:layout_height="wrap_content"

            android:orientation="vertical"

            android:gravity="left"

            android:weightSum="1"

            android:layout_weight="0.12">

            <TextView

                android:layout_width="wrap_content"

                android:layout_height="wrap_content"

                android:text="接收区:"

                />

            <Button

                android:layout_width="wrap_content"

                android:layout_height="wrap_content"

                android:text="清空"/>

            <TextView

                android:id="@+id/tv_content"

                android:layout_width="wrap_content"

                android:layout_height="wrap_content"

                android:gravity="left"

                android:text="接收的内容"

                android:layout_alignParentTop="true"

                android:layout_alignParentStart="true"

                tools:layout_editor_absoluteY="0dp"

                tools:layout_editor_absoluteX="8dp" />

        </LinearLayout>

    </LinearLayout>

</android.support.constraint.ConstraintLayout>
3 工程文件

package com.espressif.myapplication;

import android.support.v7.app.AppCompatActivity;

import android.os.Bundle;

import android.os.Handler;

import android.os.Message;

import android.view.View;

import android.view.View.OnClickListener;

import android.widget.TextView;

import android.widget.EditText;

import android.widget.Button;

import android.widget.Toast;

public class MainActivity extends AppCompatActivity  implements OnClickListener  {

    //  1.1 定义

    private Button bt_connect;// 链接

    private Button send;// 发送

    private Button bt_stop; //停止

    public TextView tv_content; // 显示接收的命令

    private TextView tv_send_text;  // 显示发送的命令

    private EditText SIP; //IP地址

    private EditText IPort; //端口

    private EditText sentText; // 发送内容

    // 1.2 定义与服务器通信的子线程

    boolean isConnect=true;//连接还是断开

    ClientThread clientThread;

    Handler handler;

    // 2 主函数

    @Override

    protected void onCreate(Bundle savedInstanceState) {

        super.onCreate(savedInstanceState);

        setContentView(R.layout.activity_main);

        // 2.1 控件初始化

        InitView();

    }

// 1 界面控件初始化

    private void InitView() {

        tv_content = (TextView) findViewById(R.id.tv_content);

        tv_send_text = (TextView) findViewById(R.id.tv_send_text);

        sentText=(EditText) findViewById(R.id.sentText);

        SIP=(EditText) findViewById(R.id.SIP);

        IPort=(EditText) findViewById(R.id.IPort);

        send = (Button) findViewById(R.id.bt_send);

        send.setOnClickListener(this);

        bt_connect=(Button) findViewById(R.id.bt_connect);

        bt_connect.setOnClickListener(this);

        bt_stop = (Button) findViewById(R.id.bt_stop);

        bt_stop.setOnClickListener(this);

        // 2.2 用于和主界面通信

        handler = new Handler() {

            @Override

            public void handleMessage(Message msg) {

                switch (msg.what) {

                    case 0x123:

                        tv_content.setText("WiFi模块发送的:" + msg.obj.toString());

                        //  tv_content.append("\n" + msg.obj.toString());

                        break;

                }

            }

        };

    }

// 2 链接TCP/IP 链接目标服务

    public void connectIP(){

        int IPort__target=8080;

        String  SIP_target="192.168.1.1";

        if (SIP!= null) {

            SIP_target=SIP.getText().toString().trim();

        }

        if (IPort!= null) {

            String msg = IPort.getText().toString().trim();

            if (msg != null && msg.length() > 0) {

                IPort__target = Integer.parseInt(msg);

            }

        }

        //  2 开启服务器

        if (isConnect == true) //标志位 = true表示连接

        {

            // 链接IP

            clientThread = new ClientThread(handler);

            clientThread.setip_port(SIP_target, IPort__target);

            new Thread(clientThread).start();

            if(clientThread.isConnect==false){

          //  if(clientThread.s.isConnected()&& !clientThread.s.isClosed()){

                isConnect = true;//置为true

                bt_connect.setText("连接");//按钮上显示连接

            }

            else{

                isConnect = false;//置为false

                bt_connect.setText("断开");//按钮上显示--断开

            }

        }

        else //标志位 = false表示退出连接

        {

            isConnect = true;//置为true

            bt_connect.setText("连接");//按钮上显示连接

            clientThread.stop_connect();

            }

    }

// 3 发送信息

    public void Sendmsg(){

        String msg="1123";

        if( sentText!=null)

        {

            msg=sentText.getText().toString();

        }

        //更新文本框

        tv_send_text.setText(msg);

        // 发送函数

        try {

            Message msga = new Message();

            msga.what = 0x345;

            msga.obj = sentText.getText().toString();

            clientThread.revHandler.sendMessage(msga);

        }

        catch (Exception e)

        {

            e.printStackTrace();

            tv_send_text.setText("发送失败!");

        }

    }

 // 4 按键点击触发器

    @Override

    public void onClick(View v) {

        switch (v.getId()) {

            //1链接函数

            case R.id.bt_connect:

                connectIP();

                break;

            //2 发送信息

            case R.id.bt_send:

                Sendmsg();

                break;

            // 停止

            case R.id.bt_stop:

             // 停止函数

                break;

        }

    }

    }

package com.espressif.myapplication;

import java.io.BufferedReader;

import java.io.DataInputStream;

import java.io.OutputStream;

import java.io.IOException;

import java.io.InputStreamReader;

import java.net.Socket;

import android.os.Handler;

import android.os.Looper;

import android.os.Message;

import android.text.TextUtils;

import java.net.SocketTimeoutException;

public class ClientThread implements Runnable

{

    private  static  int Port_target;

    private  static  String IP_target;

    boolean isConnect=true;//连接还是断开

    public Socket s;

    // 该线程所处理的Socket所对应的输入流

    BufferedReader br =null;

    // 输出

    OutputStream os =null;

    // 定义向UI线程发送消息的Handler对象

    private Handler handler;

    // 定义接收UI线程的消息的Handler对象

    public Handler revHandler;

 // 2.1设置通线程向主界面通信对象

public ClientThread(Handler handler) {

        this.handler = handler;   // 定义向UI线程发送消息的Handler对象

}

// 2.2设置链接地址

public void setip_port(String IP,int port){

       IP_target=IP;

      Port_target=port;

 }

 // 2.3从服务器接收信息线程

public void connectthread(){

    // 启动一条子线程来读取服务器响应的数据

    new Thread()

    {  String content =null;

        @Override

        public void run()

        {

            // 不断读取Socket输入流中的内容。

            try

            {

                while ((content = br.readLine())!=null)

                {

                    // 每当读到来自服务器的数据之后,发送消息通知程序界面显示该数据

                    Message msg =new Message();

                    msg.what = 0x123;

                    msg.obj = content;

                    handler.sendMessage(msg);

                }

            }

            catch (IOException e)

            {

                e.printStackTrace();

            }

        }

    }.start();

}

//  2.4将接收命令更新主界面显示框

    public void fruh_UI(){

        // 为当前线程初始化Looper

        Looper.prepare();

        // 创建revHandler对象

        revHandler =new Handler()

        {

            @Override

            public void handleMessage(Message msg)

            {

                // 接收到UI线程中用户输入的数据

                if (msg.what == 0x345)

                {

                    // 将用户在文本框内输入的内容写入网络

                    try

                    {

                        os.write((msg.obj.toString() + "\r\n")

                                .getBytes("utf-8"));

                    }

                    catch (Exception e)

                    {

                        e.printStackTrace();

                    }

                }

            }

        };

        // 启动Looper

        Looper.loop();

    }

 // 2.4终止链接

public void stop_connect(){

        try

        {

                isConnect = false;

                s.close();//关闭连接

                s = null;

        }

        catch (IOException e)

        {

            e.printStackTrace();

        }

    }

 public void run()

    {byte[] acceptdata1=null;

        try

        {

            s =new Socket(IP_target, Port_target);

            if(s.isConnected()&& !s.isClosed()){isConnect=true;}

            // 接收数据

            br =new BufferedReader(new InputStreamReader( s.getInputStream()));

            //存放数据

            os =s.getOutputStream();

            // 新线程 接收数据

            connectthread();

            // 更新主界面显示框

            fruh_UI();

       }

       catch (SocketTimeoutException e1)

       {  isConnect=false;

         System.out.println("网络连接超时!!");

       }

       catch (Exception e)

       {

          e.printStackTrace();

       }

    }

}
1 TCP/IP通信的更多相关文章
- 使用Boost asio实现同步的TCP/IP通信
可以先了解一下Boost asio基本概念,以下是Boost asio实现的同步TCP/IP通信: 服务器程序部分,如果想保留套接字之后继续通信,可以动态申请socket_type,保存指针,因为so ...
- 使用Boost asio实现异步的TCP/IP通信
可以先了解一下Boost asio基本概念,以下是Boost asio实现的异步TCP/IP通信: 服务器: #include "stdafx.h" #include <io ...
- TCP/IP 通信
TCP/IP 通信又叫socket 通信,是基于TCP/IP协调面向连接的一个数据传输技术.是属于OSI国际标准的传输层,三次握手 提供数据,有序,安全,端到端的传输和接收.它有三个主要协议:传输控制 ...
- tcp/ip通信第5期之服务器端程序
/* 此程序是tcp/ip通信服务器端程序,测试运行在redhat5上 重构readline函数,解决粘包问题——利用“\n”识别一个消息边界 */ #include<stdio.h> # ...
- tcp/ip通信第5期之客户机端程序
/*此程序是tcp/ip通信的客户机端程序, 测试运行在redhat6系统上 重构readline函数,解决粘包问题——利用“\n”识别一个消息边界 */ #include<stdio.h> ...
- 第4章 TCP/IP通信案例:访问Internet上的Web服务器
第4章 TCP/IP通信案例:访问Internet上的Web服务器 4.2 部署代理服务器 书中为了演示访问Internet上的Web服务器的全过程,使用了squid代理服务器程序模拟了一个代理服务器 ...
- TCP/IP通信过程(以发送电子邮件为例)(转)
1.应用程序处理 (1)A用户启动邮件应用程序,填写收件人邮箱和发送内容,点击“发送”,开始TCP/IP通信: (2)应用程序对发送的内容进行编码处理,这一过程相当于OSI的表示层功能: (3)由A用 ...
- linux高性能服务器编程 (四) --TCP/IP通信案例
第四章 TCP/IP通信案例 HTTP代理服务器的大致工作原理 在HTTP通信链上,客户端和服务器之间通常存在某些中转代理服务器.它们提供对目标资源的中转访问.一个HTTP请求可能被多个 ...
- TCP/IP通信网络基础
TCP/IP是互联网相关的各类协议族的总称. TCP/IP的分层管理 分层的优点:如果只有一个协议在互联网上统筹,某个地方修改就要把所有的部分整体换掉,采用分层则只需要改变相应的层.把各个接口部分规划 ...
- tcp/ip通信传输流
利用TCP/IP协议族进行网络通信时,会通过分层顺序与对方进行通信,发送端从应用层往下走,接收端则往应用层方向走. 我们用HTTP进行举例 客户端在应用层发出想要看到某个web页面的http请求.HT ...
随机推荐
- oracle 恢复错误修改数据 寒冬冒冷汗!!
今天,由于一时疏忽,造成了对正式数据库修改了用户密码的情况.寒冬冒冷汗!!! 立即上网找修改方法,万幸找到,也修改回来,特此在此留个记忆!! create table t_table_new----这 ...
- elasticsearch6.7 04.API规范
API Conventions elasticsearch的REST的API是使用HTTP的JSON格式暴露的. 除非另有说明,本章中列出的约定可以在整个REST API中应用. 多索引 索引名称支持 ...
- apache2.4.33伪静态配置入门教程(1)
伪静态: 把动态网页的请求方式伪装成静态网页 要使用伪静态技术,要在httpd.conf中启用伪静态模块: LoadModule rewrite_module modules/mod_rewrite. ...
- 01-MySql的前戏
[转]01-MySql的前戏 MySql的前戏 在学习Mysql之前,我们先来想一下一开始做的登录注册案例,当时我们把用户的信息保存到一个文件中: #用户名 |密码root|123321 alex|1 ...
- vue.js关于路由的跳转
1.路由demo示例 <div id="app"> <h1>Hello App!</h1> <p> <!-- 使用 route ...
- vue 子组件和父组件
作者QQ:1095737364 QQ群:123300273 欢迎加入! 1.添加子组件 1.父组件修改 <template> <!-- v-for 表情表示循环输出数据 ...
- element-ui 中的table的列隐藏问题
element-ui 中的table和bootstrap中的table的某些设置还是有一定的差别的.之前用bootstrap做的表格,想要实现简短列和详细列的切换.因为详细列实在有太多列了,拉动滚动条 ...
- 前端开发笔记(3)css基础(中)
上一篇中我们学习了html的标准文档流,下面我们先来看看如何脱离标准流. 脱离标准流 css中一共有三种方法脱离标准流 浮动 绝对定位 固定定位 浮动 我们要搞清楚什么是浮动,先来看一个标准文档流的例 ...
- bootstrap和ajax相结合
<!DOCTYPE html PUBLIC "-//W3C//DTD XHTML 1.0 Transitional//EN" "http://www.w3.org/ ...
- JMeter4.0的界面汉化
1.安装好之后 2.界面汉化 options->choose language->chinese(simplified) 3.汉化完成