深度学习主机环境配置: Ubuntu16.04+GeForce GTX 1080+TensorFlow
接上文《深度学习主机环境配置: Ubuntu16.04+Nvidia GTX 1080+CUDA8.0》,我们继续来安装 TensorFlow,使其支持GeForce GTX 1080显卡。
1 下载和安装cuDNN
cuDNN全称 CUDA Deep Neural Network library,是NVIDIA专门针对深度神经网络设计的一套GPU计算加速库,被广泛用于各种深度学习框架,例如Caffe, TensorFlow, Theano, Torch, CNTK等。
The NVIDIA CUDA® Deep Neural Network library (cuDNN) is a GPU-accelerated library of primitives for deep neural networks. cuDNN provides highly tuned implementations for standard routines such as forward and backward convolution, pooling, normalization, and activation layers. cuDNN is part of the NVIDIA Deep Learning SDK.
Deep learning researchers and framework developers worldwide rely on cuDNN for high-performance GPU acceleration. It allows them to focus on training neural networks and developing software applications rather than spending time on low-level GPU performance tuning. cuDNN accelerates widely used deep learning frameworks, including Caffe, TensorFlow, Theano, Torch, and CNTK. See supported frameworks for more details.
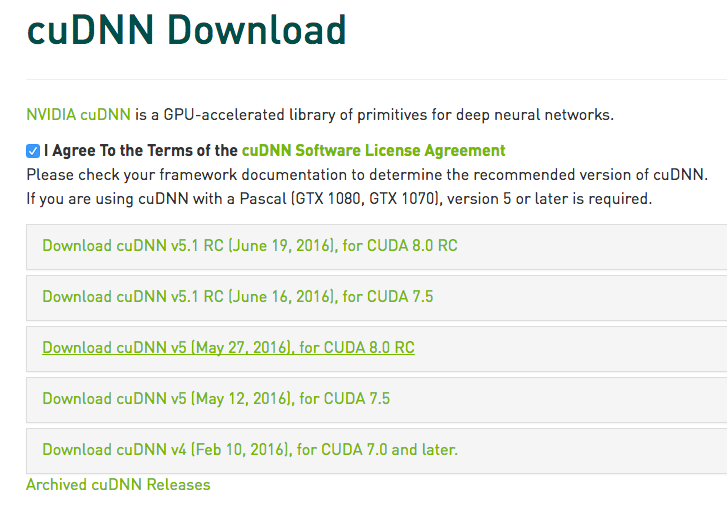
首先需要下载cuDNN,直接从Nvidia官方下载链接选择一个版本,不过下载cuDNN前同样需要登录甚至填写一个简单的调查问卷: https://developer.nvidia.com/rdp/cudnn-download,这里选择的是支持CUDA8.0的cuDNN v5版本,而支持CUDA8的5.1版本虽然显示在下载选择项里,但是提示:cuDNN 5.1 RC for CUDA 8RC will be available soon - please check back again.
安装cuDNN比较简单,解压后把相应的文件拷贝到对应的CUDA目录下即可:
cuda/include/cudnn.h
cuda/lib64/libcudnn.so
cuda/lib64/libcudnn.so.5
cuda/lib64/libcudnn.so.5.0.5
cuda/lib64/libcudnn_static.a
sudo cp cuda/lib64/libcudnn* /usr/local/cuda/lib64/
sudo chmod a+r /usr/local/cuda/include/cudnn.h
sudo chmod a+r /usr/local/cuda/lib64/libcudnn*
2 通过源代码方式编译安装TensorFlow GPU版本
TensorFlow的CPU版本安装比较简单,在Ubuntu 环境下通过PIP方式安装即可,具体请参考TensorFlow官方安装文档。这里通过源代码编译安装TensorFlow 0.9版本,使其支持相应的GPU:GTX1080。
1) Python相关环境准备
这里使用的是Python2.7版本,在Ubuntu16.04下安装相关依赖:
sudo apt-get install python-pip
sudo apt-get install python-numpy swig python-dev python-wheel
2)安装Google构建工具Bazel
Bazel是Google官方开源的一个构建工具,用来配合Google的软件开发模式,有以下几个特点:
多语言支持:Bazel支持Java,Objective-C和C++,可以扩展来支持任意的编程语言
高级别的构建语言:工程是通过BUILD语言来描述的。BUILD语言以简洁的文本格式,描述了由多个小的互相关联的库、二进制程序和测试程序来组成的一个项目。而与之相比,Make这类的工具需要描述各个单独的文件和编译的命令
多平台支持:同一套工具和同样的BUILD文件可以用来构建不同架构和不同平台的软件。在Google,我们使用Bazel来构建在我们数据中心系统中运行的服务器端程序和在手机上运行的客户端应用程序。
重现性[Reproducibility]:在BUILD文件中,每个库,测试程序,二进制文件必须明确完整地指定直接依赖。当修改源代码文件后,Bazel使用这个依赖信息就可以知道哪些必须重新构建,哪些任务可以并行执行。这意味者所有的构建都是增量形式的并能够每次都生成相同的结果。
伸缩性[Scalability]:Bazel可以处理巨大的构建;在Google,一个服务器端程序超过100k的源码是常有的事情,如果没有文件被改动,构建过程需要大约200ms
从Bazel github上最新的Linux relase版本:
下载完毕后执行:
./bazel-0.3.0-installer-linux-x86_64.sh --user
提示错误:
Java not found, please install the corresponding package
See http://bazel.io/docs/install.html for more information on
应该是没有安装Java环境的问题,bazel需要Java JDK 8,在ubuntu16.04直接apt-get安装即可:
sudo apt-get install default-jre
sudo apt-get install default-jdk
安装完毕后,再次执行Bazel安装脚本:
Bazel installer
---------------# Release 0.3.0 (2016-06-10)
Baseline: a9301fa
Cherry picks:
+ ff30a73: Turn --legacy_external_runfiles back on by default
+ aeee3b8: Fix delete[] warning on fsevents.ccIncompatible changes:
- The --cwarn command line option is not supported anymore. Use
--copt instead.New features:
- On OSX, --watchfs now uses FsEvents to be notified of changes
from the filesystem (previously, this flag had no effect on OS X).
- add support for the '-=', '*=', '/=', and'%=' operators to
skylark. Notably, we do not support '|=' because the semantics
of skylark sets are sufficiently different from python sets.Important changes:
- Use singular form when appropriate in blaze's test result summary
message.
- Added supported for Android NDK revision 11
- --objc_generate_debug_symbols is now deprecated.
- swift_library now generates an Objective-C header for its @objc
interfaces.
- new_objc_provider can now set the USES_SWIFT flag.
- objc_framework now supports dynamic frameworks.
- Symlinks in zip files are now unzipped correctly by http_archive,
download_and_extract, etc.
- swift_library is now able to import framework rules such as
objc_framework.
- Adds "jre_deps" attribute to j2objc_library.
- Release apple_binary rule, for creating multi-architecture
("fat") objc/cc binaries and libraries, targeting ios platforms.
- Aspects documentation added.
- The --ues_isystem_for_includes command line option is not
supported anymore.
- global function 'provider' is removed from .bzl files. Providers
can only be accessed through fields in a 'target' object.## Build informations
- [Build log](http://ci.bazel.io/job/Bazel/JAVA_VERSION=1.8,PLATFORM_NAME=linux-x86_64/595/)
- [Commit](https://github.com/bazelbuild/bazel/commit/e671d29)
Uncompressing......Extracting Bazel installation...
.Bazel is now installed!
Make sure you have "/home/textminer/bin" in your path. You can also activate bash
completion by adding the following line to your ~/.bashrc:
source /home/textminer/.bazel/bin/bazel-complete.bashSee http://bazel.io/docs/getting-started.html to start a new project!
然后在 ~/.bashrc中追加:
source /home/textminer/.bazel/bin/bazel-complete.bash
export PATH=$PATH:/home/textminer/.bazel/bin
追加的第一行的原因在这里:
Bazel comes with a bash completion script. To install it:
Build it with Bazel: bazel build //scripts:bazel-complete.bash.
Copy the script bazel-bin/scripts/bazel-complete.bash to your completion folder (/etc/bash_completion.d directory under Ubuntu). If you don't have a completion folder, you can copy it wherever suits you and simply insert source /path/to/bazel-complete.bash in your ~/.bashrc file (under OS X, put it in your ~/.bash_profile file).
最后执行
至此,Bazel安装完毕。
3) 编译安装TensorFlow:
首先从github上克隆TensorFlow最新的代码:
代码下载完毕之后,进入tensorflow主目录,执行:
会有一系列提示:
Please specify the location of python. [Default is /usr/bin/python]:
Do you wish to build TensorFlow with Google Cloud Platform support? [y/N] y
Google Cloud Platform support will be enabled for TensorFlow
ERROR: It appears that the development version of libcurl is not available. Please install the libcurl3-dev package.
第二项"是否选择Google云平台的支持"选择y之后出现了一个错误,需要libcurl,用apt-get安装,当然,基于国内的网络现状,这一项也可以选择no:
安装完毕之后重新执行
除了两处选择yes or no 的地方外,其他地方一路回车:
Please specify the location of python. [Default is /usr/bin/python]:
Do you wish to build TensorFlow with Google Cloud Platform support? [y/N] y
Google Cloud Platform support will be enabled for TensorFlow
Do you wish to build TensorFlow with GPU support? [y/N] y
GPU support will be enabled for TensorFlow
Please specify which gcc nvcc should use as the host compiler. [Default is /usr/bin/gcc]:
Please specify the Cuda SDK version you want to use, e.g. 7.0. [Leave empty to use system default]:
Please specify the location where CUDA toolkit is installed. Refer to README.md for more details. [Default is /usr/local/cuda]:
Please specify the Cudnn version you want to use. [Leave empty to use system default]:
Please specify the location where cuDNN library is installed. Refer to README.md for more details. [Default is /usr/local/cuda]:
Please specify a list of comma-separated Cuda compute capabilities you want to build with.
You can find the compute capability of your device at: https://developer.nvidia.com/cuda-gpus.
Please note that each additional compute capability significantly increases your build time and binary size.
[Default is: "3.5,5.2"]:
Setting up Cuda include
Setting up Cuda lib64
Setting up Cuda bin
Setting up Cuda nvvm
Setting up CUPTI include
Setting up CUPTI lib64
Configuration finished
最后就是通过Bazel进行编译安装了:
这个过程中需要通过git下载和编译google protobuf 和 boringssl:
INFO: Cloning https://github.com/google/protobuf: Receiving objects
INFO: Cloning https://github.com/google/boringssl.git: Receiving objects
....
不过第一次安装的时候遇到报错:
configure: error: zlib not installed
Target //tensorflow/cc:tutorials_example_trainer failed to build
google了一下,需要安装zlib1g-dev:
之后重新编译安装TensorFlow就没有问题了,不过需要等待一段时间:
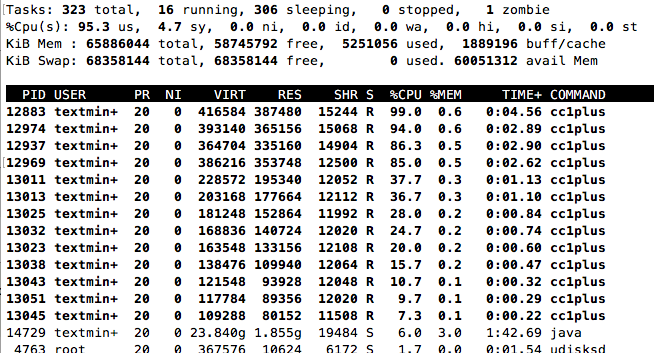
编译TensorFlow成功结束的时候,提示如下:
......
Target //tensorflow/cc:tutorials_example_trainer up-to-date:
bazel-bin/tensorflow/cc/tutorials_example_trainer
INFO: Elapsed time: 897.845s, Critical Path: 533.72s
执行一下TensorFlow官方文档里的例子,看看能否成功调用GTX 1080:
I tensorflow/stream_executor/dso_loader.cc:108] successfully opened CUDA library libcublas.so locally
I tensorflow/stream_executor/dso_loader.cc:108] successfully opened CUDA library libcudnn.so locally
I tensorflow/stream_executor/dso_loader.cc:108] successfully opened CUDA library libcufft.so locally
I tensorflow/stream_executor/dso_loader.cc:108] successfully opened CUDA library libcuda.so.1 locally
I tensorflow/stream_executor/dso_loader.cc:108] successfully opened CUDA library libcurand.so locally
I tensorflow/core/common_runtime/gpu/gpu_init.cc:102] Found device 0 with properties:
name: GeForce GTX 1080
major: 6 minor: 1 memoryClockRate (GHz) 1.835
pciBusID 0000:01:00.0
Total memory: 7.92GiB
Free memory: 7.65GiB
I tensorflow/core/common_runtime/gpu/gpu_init.cc:126] DMA: 0
I tensorflow/core/common_runtime/gpu/gpu_init.cc:136] 0: Y
I tensorflow/core/common_runtime/gpu/gpu_device.cc:838] Creating TensorFlow device (/gpu:0) -> (device: 0, name: GeForce GTX 1080, pci bus id: 0000:01:00.0)
I tensorflow/core/common_runtime/gpu/gpu_device.cc:838] Creating TensorFlow device (/gpu:0) -> (device: 0, name: GeForce GTX 1080, pci bus id: 0000:01:00.0)
I tensorflow/core/common_runtime/gpu/gpu_device.cc:838] Creating TensorFlow device (/gpu:0) -> (device: 0, name: GeForce GTX 1080, pci bus id: 0000:01:00.0)
I tensorflow/core/common_runtime/gpu/gpu_device.cc:838] Creating TensorFlow device (/gpu:0) -> (device: 0, name: GeForce GTX 1080, pci bus id: 0000:01:00.0)
I tensorflow/core/common_runtime/gpu/gpu_device.cc:838] Creating TensorFlow device (/gpu:0) -> (device: 0, name: GeForce GTX 1080, pci bus id: 0000:01:00.0)
I tensorflow/core/common_runtime/gpu/gpu_device.cc:838] Creating TensorFlow device (/gpu:0) -> (device: 0, name: GeForce GTX 1080, pci bus id: 0000:01:00.0)
I tensorflow/core/common_runtime/gpu/gpu_device.cc:838] Creating TensorFlow device (/gpu:0) -> (device: 0, name: GeForce GTX 1080, pci bus id: 0000:01:00.0)
I tensorflow/core/common_runtime/gpu/gpu_device.cc:838] Creating TensorFlow device (/gpu:0) -> (device: 0, name: GeForce GTX 1080, pci bus id: 0000:01:00.0)
I tensorflow/core/common_runtime/gpu/gpu_device.cc:838] Creating TensorFlow device (/gpu:0) -> (device: 0, name: GeForce GTX 1080, pci bus id: 0000:01:00.0)
I tensorflow/core/common_runtime/gpu/gpu_device.cc:838] Creating TensorFlow device (/gpu:0) -> (device: 0, name: GeForce GTX 1080, pci bus id: 0000:01:00.0)
000003/000006 lambda = 1.841570 x = [0.669396 0.742906] y = [3.493999 -0.669396]
000006/000007 lambda = 1.841570 x = [0.669396 0.742906] y = [3.493999 -0.669396]
000009/000006 lambda = 1.841570 x = [0.669396 0.742906] y = [3.493999 -0.669396]
000009/000004 lambda = 1.841570 x = [0.669396 0.742906] y = [3.493999 -0.669396]
000000/000005 lambda = 1.841570 x = [0.669396 0.742906] y = [3.493999 -0.669396]
000000/000004 lambda = 1.841570 x = [0.669396 0.742906] y = [3.493999 -0.669396]
......
没有问题,说明这种通过源代码编译TensorFlow使其支持GPU的方式已经成功了。再在Python中调用一下TensorFlow:
提示错误:
ImportError: cannot import name pywrap_tensorflow
虽然我们通过源代码安装编译的TensorFlow可用,但是Python版本并没有ready,所以继续:
bazel-bin/tensorflow/tools/pip_package/build_pip_package /tmp/tensorflow_pkg
sudo pip install /tmp/tensorflow_pkg/tensorflow-0.9.0-py2-none-any.whl
Requirement already satisfied (use --upgrade to upgrade): setuptools in /usr/lib/python2.7/dist-packages (from protobuf==3.0.0b2->tensorflow==0.9.0)
Installing collected packages: six, funcsigs, pbr, mock, protobuf, tensorflow
Successfully installed funcsigs-1.0.2 mock-2.0.0 pbr-1.10.0 protobuf-3.0.0b2 six-1.10.0 tensorflow-0.9.0
我们再次打开ipython,试一下tensorflow官方样例:
Type "copyright", "credits" or "license" for more information.
IPython 2.4.1 -- An enhanced Interactive Python.
? -> Introduction and overview of IPython's features.
%quickref -> Quick reference.
help -> Python's own help system.
object? -> Details about 'object', use 'object??' for extra details.
In [1]: import tensorflow as tf
I tensorflow/stream_executor/dso_loader.cc:108] successfully opened CUDA library libcublas.so locally
I tensorflow/stream_executor/dso_loader.cc:108] successfully opened CUDA library libcudnn.so locally
I tensorflow/stream_executor/dso_loader.cc:108] successfully opened CUDA library libcufft.so locally
I tensorflow/stream_executor/dso_loader.cc:108] successfully opened CUDA library libcuda.so.1 locally
I tensorflow/stream_executor/dso_loader.cc:108] successfully opened CUDA library libcurand.so locally
In [2]: import numpy as np
In [3]: x_data = np.random.rand(100).astype(np.float32)
In [4]: y_data = x_data * 0.1 + 0.3
In [5]: W = tf.Variable(tf.random_uniform([1], -1.0, 1.0))
In [6]: b = tf.Variable(tf.zeros([1]))
In [7]: y = W * x_data + b
In [8]: loss = tf.reduce_mean(tf.square(y - y_data))
In [9]: optimizer = tf.train.GradientDescentOptimizer(0.5)
In [10]: train = optimizer.minimize(loss)
In [11]: init = tf.initialize_all_variables()
In [12]: sess = tf.Session()
I tensorflow/core/common_runtime/gpu/gpu_init.cc:102] Found device 0 with properties:
name: GeForce GTX 1080
major: 6 minor: 1 memoryClockRate (GHz) 1.835
pciBusID 0000:01:00.0
Total memory: 7.92GiB
Free memory: 7.65GiB
I tensorflow/core/common_runtime/gpu/gpu_init.cc:126] DMA: 0
I tensorflow/core/common_runtime/gpu/gpu_init.cc:136] 0: Y
I tensorflow/core/common_runtime/gpu/gpu_device.cc:838] Creating TensorFlow device (/gpu:0) -> (device: 0, name: GeForce GTX 1080, pci bus id: 0000:01:00.0)
In [13]: sess.run(init)
In [14]: for step in range(201):
....: sess.run(train)
....: if step % 20 == 0:
....: print(step, sess.run(W), sess.run(b))
....:
(0, array([-0.10331395], dtype=float32), array([ 0.62236434], dtype=float32))
(20, array([ 0.03067014], dtype=float32), array([ 0.3403711], dtype=float32))
(40, array([ 0.08353967], dtype=float32), array([ 0.30958495], dtype=float32))
(60, array([ 0.09609199], dtype=float32), array([ 0.30227566], dtype=float32))
(80, array([ 0.09907217], dtype=float32), array([ 0.3005403], dtype=float32))
(100, array([ 0.09977971], dtype=float32), array([ 0.30012828], dtype=float32))
(120, array([ 0.0999477], dtype=float32), array([ 0.30003047], dtype=float32))
(140, array([ 0.0999876], dtype=float32), array([ 0.30000722], dtype=float32))
(160, array([ 0.09999706], dtype=float32), array([ 0.30000171], dtype=float32))
(180, array([ 0.09999929], dtype=float32), array([ 0.30000043], dtype=float32))
(200, array([ 0.09999985], dtype=float32), array([ 0.3000001], dtype=float32))
终于OK了,之后就可以尽情享用基于GTX 1080 GPU版的TensorFlow了。
深度学习主机环境配置: Ubuntu16.04+GeForce GTX 1080+TensorFlow的更多相关文章
- (转)深度学习主机环境配置: Ubuntu16.04+Nvidia GTX 1080+CUDA8.0
深度学习主机环境配置: Ubuntu16.04+Nvidia GTX 1080+CUDA8.0 发表于2016年07月15号由52nlp 接上文<深度学习主机攒机小记>,这台GTX10 ...
- 深度学习主机环境配置: Ubuntu16.04 + GeForce GTX 1070 + CUDA8.0 + cuDNN5.1 + TensorFlow
深度学习主机环境配置: Ubuntu16.04 + GeForce GTX 1070 + CUDA8.0 + cuDNN5.1 + TensorFlow 最近在公司做深度学习相关的学习和实验,原来一直 ...
- 深度学习主机环境配置: Ubuntu16.04+Nvidia GTX 1080+CUDA8.0
不多说,直接上干货! 深度学习主机环境配置: Ubuntu16.04+Nvidia GTX 1080+CUDA8.0
- 深度学习 GPU环境 Ubuntu 16.04 + Nvidia GTX 1080 + Python 3.6 + CUDA 9.0 + cuDNN 7.1 + TensorFlow 1.6 环境配置
本节详细说明一下深度学习环境配置,Ubuntu 16.04 + Nvidia GTX 1080 + Python 3.6 + CUDA 9.0 + cuDNN 7.1 + TensorFlow 1.6 ...
- 深度学习环境配置:Ubuntu16.04安装GTX1080Ti+CUDA9.0+cuDNN7.0完整安装教程(多链接多参考文章)
本来就对Linux不熟悉,经过几天惨痛的教训,参考了不知道多少篇文章,终于把环境装好了,每篇文章或多或少都有一些用,但没有一篇完整的能解决我安装过程碰到的问题,所以决定还是自己写一篇我安装过程的教程, ...
- 深度学习环境配置:Ubuntu16.04下安装GTX1080Ti+CUDA9.0+cuDNN7.0完整安装教程(多链接多参考文章)
本来就对Linux不熟悉,经过几天惨痛的教训,参考了不知道多少篇文章,终于把环境装好了,每篇文章或多或少都有一些用,但没有一篇完整的能解决我安装过程碰到的问题,所以决定还是自己写一篇我安装过程的教程, ...
- 深度学习环境配置Ubuntu16.04+CUDA8.0+CUDNN5
深度学习从12年开始打响,配置深度学习环境软件一直是一个头疼的问题,如何安装显卡驱动,如何安装CUDA,如何安装CUDNN:Ubuntu官方一直吐槽Nvidia显卡驱动有问题,网上大神也给出了关闭li ...
- 深度学习中环境配置的一些经验总结(conda 常用命令)
前两个月参加了学校的国创项目,和一个外院的同学组队.课题是基于深度学习的新闻图片中网络暴力元素的检查. 6月末最后一门试考完,正式开始暑假,便有了大把时间搞这个国创项目(反正没有其他事干).两个组凑钱 ...
- [环境配置]Ubuntu16.04下编译安装gcc6.3.0
上一篇的SVS要用gcc6.3编译,否则结果不正确,本来以为gcc很好装,结果发现用apt-get安装gcc6只能安装6.5版本,代码作者奇特的要求只能用gcc6.3,没办法只能用源码装了,期间碰见了 ...
随机推荐
- POJ1659 Frogs' Neighborhood(青蛙的邻居) Havel-Hakimi定理
Frogs' Neighborhood Time Limit: 5000MS Memory Limit: 10000K Total Submissions: 8729 Accepted: 36 ...
- samtools
samtools 用法 samtools <command> [options] command 见以下列表, 每个 command 的 options 也不同 dict faidx in ...
- sqli-labs:17,增删改
增 insert into users values(','lcamry','lcamry'); 删 delete from users where id=16 删数据库:drop database ...
- Linux修改/etc/profile配置错误command is not found自救方法
export PATH=/usr/local/sbin:/usr/local/bin:/sbin:/bin:/usr/sbin:/usr/bin:/root/bin
- m序列生成电路
m序列
- Anaconda 3中配置OpenCV
平台:win10 x64+Anaconda 3(64-bit)+opencv_python-3.4.5+contrib-cp37-cp37m-win_amd64 一.OpenCV下载 Python环境 ...
- 824. Goat Latin
class Solution { public: string toGoatLatin(string S) { S.push_back(' '); //add a space that the loo ...
- mysql字符串类型数据
字符串类型是在数据库中存储字符串的数据类型,字符串类型包括char,varchar,text,enum和set. OK,我们来一个一个的看下上面提到的几种类型. char类型和varchar类型 ch ...
- 2019.02.09 bzoj2839: 集合计数(容斥原理)
传送门 题意简述:对于一个有N个元素的集合在其2^N个子集中取出若干集合(至少一个),使得它们的交集的元素个数为K,求取法的方案数. 思路:考虑枚举相交的是哪kkk个,有CnkC_n^kCnk种方案 ...
- openstack 租户、用户管理
创建domain [root@cc01 ~]# openstack domain create --description "Default Domain" default +-- ...