基于vue现有项目的服务器端渲染SSR改造
前面的话
不论是官网教程,还是官方DEMO,都是从0开始的服务端渲染配置。对于现有项目的服务器端渲染SSR改造,特别是基于vue cli生成的项目,没有特别提及。本文就小火柴的前端小站这个前台项目进行SSR改造
效果
下面是经过SSR改造后的前端小站xiaohuochai.cc的网站效果,github源码地址
概述
【定义】
服务器渲染的Vue应用程序被认为是"同构"或"通用",因为应用程序的大部分代码都可以在服务器和客户端上运行
【优点】
与传统SPA相比,服务器端渲染(SSR)的优势主要在于:
1、更好的 SEO,搜索引擎爬虫抓取工具可以直接查看完全渲染的页面
截至目前,Google 和 Bing 可以很好对同步 JavaScript 应用程序进行索引。但如果应用程序初始展示 loading 菊花图,然后通过 Ajax 获取内容,抓取工具并不会等待异步完成后再行抓取页面内容
2、更快的内容到达时间,特别是对于缓慢的网络情况或运行缓慢的设备
无需等待所有的 JavaScript 都完成下载并执行,才显示服务器渲染的标记,所以用户将会更快速地看到完整渲染的页面,通常可以产生更好的用户体验
思路
下面以官方的SSR服务器端渲染流程图为例,进行概要说明
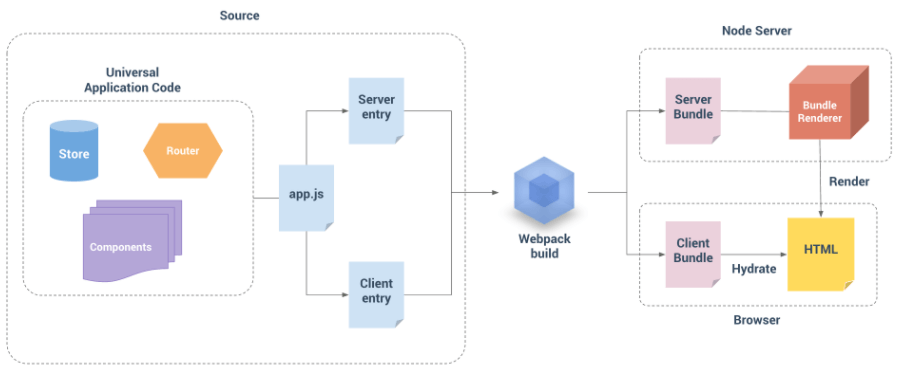
1、universal Application Code是服务器端和浏览器端通用的代码
2、app.js是应用程序的入口entry,对应vue cli生成的项目的main.js文件
3、entry-client.js是客户端入口,仅运行于浏览器,entry-server.js是服务器端入口,仅运行于服务器
4、entry-client和entry-server这两个文件都需要通过webpack构建,其中entry-client需要通过webpack.server.config.js文件打包,entry-server需要通过webpack.server.config.js文件打包
5、entry-client构建后的client Bundle打包文件是vue-ssr-client-manifest.json,entry-server构建后的server Bundle打包文件是vue-ssr-server-bundle.json
6、server.js文件将客户端打包文件vue-ssr-client-manifest.json、服务器端打包文件vue-ssr-server-bundle.json和HTML模板混合,渲染成HTML
webpack配置
基于vue-cli生成的项目的build目录结构如下
build
    - build.js
    - check-versions.js
    - utils.js
    - vue-loader.conf.js
    - webpack.base.conf.js
    - webpack.dev.conf.js
    - webpack.prod.conf.js
前面3个文件无需修改,只需修改*.*.conf.js文件
1、修改vue-loader.conf.js,将extract的值设置为false,因为服务器端渲染会自动将CSS内置。如果使用该extract,则会引入link标签载入CSS,从而导致相同的CSS资源重复加载
-    extract: isProduction
+    extract: false
2、修改webpack.base.conf.js
只需修改entry入门配置即可
...
module.exports = {
  context: path.resolve(__dirname, '../'),
  entry: {
    - app: './src/main.js'
    + app: './src/entry-client.js'
  },
...
3、修改webpack.prod.conf.js
包括应用vue-server-renderer、去除HtmlWebpackPlugin、增加client环境变量
'use strict'
...
+ const VueSSRClientPlugin = require('vue-server-renderer/client-plugin')
const webpackConfig = merge(baseWebpackConfig, {
  ...
  plugins: [
    // http://vuejs.github.io/vue-loader/en/workflow/production.html
    new webpack.DefinePlugin({
      'process.env': env,
+     'process.env.VUE_ENV': '"client"'
    }),
    ...// generate dist index.html with correct asset hash for caching.
    // you can customize output by editing /index.html
    // see https://github.com/ampedandwired/html-webpack-plugin
-    new HtmlWebpackPlugin({
-      filename: config.build.index,
-      template: 'index.html',
-      inject: true,
-      minify: {
-        removeComments: true,
-        collapseWhitespace: true,
-        removeAttributeQuotes: true
-        // more options:
-        // https://github.com/kangax/html-minifier#options-quick-reference
-      },
-      // necessary to consistently work with multiple chunks via CommonsChunkPlugin
-      chunksSortMode: 'dependency'
-    }),
   ...// copy custom static assets
    new CopyWebpackPlugin([
      {
        from: path.resolve(__dirname, '../static'),
        to: config.build.assetsSubDirectory,
        ignore: ['.*']
      }
    ]),
+    new VueSSRClientPlugin()
  ]
})
...
module.exports = webpackConfig
4、新增webpack.server.conf.js
const webpack = require('webpack')
const merge = require('webpack-merge')
const nodeExternals = require('webpack-node-externals')
const baseConfig = require('./webpack.base.conf.js')
const VueSSRServerPlugin = require('vue-server-renderer/server-plugin')

module.exports = merge(baseConfig, {
  entry: './src/entry-server.js',
  target: 'node',
  devtool: 'source-map',
  output: {
    libraryTarget: 'commonjs2'
  },
  externals: nodeExternals({
    whitelist: /\.css$/
  }),
  plugins: [
    new webpack.DefinePlugin({
      'process.env.NODE_ENV': JSON.stringify(process.env.NODE_ENV || 'development'),
      'process.env.VUE_ENV': '"server"'
    }),
    new VueSSRServerPlugin()
  ]
})
入口配置
在浏览器端渲染中,入口文件是main.js,而到了服务器端渲染,除了基础的main.js,还需要配置entry-client.js和entry-server.js
1、修改main.js
import Vue from 'vue'
import Vuex from 'vuex'
-  import '@/assets/style.css'
import App from './App'
-  import router from './router'
+ import createRouter from './router'
-  import store from './store'
+ import createStore from './store'
import async from './utils/async'
Vue.use(async)
- new Vue({
+ export default function createApp() {
+  const router = createRouter()
+  const store = createStore()
+  const app = new Vue({
-   el: '#app',
    router,
    store,
-   components: { App },
-   template: '<App/>'
+   render: h => h(App)
  })+ return { app, router, store }
+}
2、新增entry-client.js
后面会介绍到asyncData方法,但是asyncData方法只能用于路由绑定的组件,如果是初始数据则可以直接在entry-client.js中获取
/* eslint-disable */
import Vue from 'vue'
import createApp from './main'

Vue.mixin({
  beforeRouteUpdate (to, from, next) {
    const { asyncData } = this.$options
    if (asyncData) {
      asyncData({
        store: this.$store,
        route: to
      }).then(next).catch(next)
    } else {
      next()
    }
  }
})

const { app, router, store } = createApp()

/* 获得初始数据 */
import { LOAD_CATEGORIES_ASYNC } from '@/components/Category/module'
import { LOAD_POSTS_ASYNC } from '@/components/Post/module'
import { LOAD_LIKES_ASYNC } from '@/components/Like/module'
import { LOAD_COMMENTS_ASYNC } from '@/components/Comment/module'
import { LOAD_USERS_ASYNC } from '@/components/User/module'
(function getInitialData() {
  const { postCount, categoryCount, userCount, likeCount, commentCount } = store.getters
  const { dispatch } = store
  // 获取类别信息
  !categoryCount && dispatch(LOAD_CATEGORIES_ASYNC),
  // 获取文章信息
  !postCount && dispatch(LOAD_POSTS_ASYNC),
  // 获取点赞信息
  !likeCount && dispatch(LOAD_LIKES_ASYNC),
  // 获取评论信息
  !commentCount && dispatch(LOAD_COMMENTS_ASYNC),
  // 获取用户信息
  !userCount && dispatch(LOAD_USERS_ASYNC)
})()

if (window.__INITIAL_STATE__) {
  store.replaceState(window.__INITIAL_STATE__)
}

router.onReady(() => {
  router.beforeResolve((to, from, next) => {
    const matched = router.getMatchedComponents(to)
    const prevMatched = router.getMatchedComponents(from)
    let diffed = false
    const activated = matched.filter((c, i) => {
      return diffed || (diffed = (prevMatched[i] !== c))
    })
    if (!activated.length) {
      return next()
    }
    Promise.all(activated.map(c => {
      if (c.asyncData) {
        return c.asyncData({ store, route: to })
      }
    })).then(() => {
      next()
    }).catch(next)
  })
  app.$mount('#root')
})
3、新增entry-sever.js
/* eslint-disable */
import createApp from './main'

export default context => new Promise((resolve, reject) => {
  const { app, router, store } = createApp()
  router.push(context.url)
  router.onReady(() => {
    const matchedComponents = router.getMatchedComponents()
    if (!matchedComponents.length) {
       })
    }
    Promise.all(matchedComponents.map(Component => {
      if (Component.asyncData) {
        return Component.asyncData({
          store,
          route: router.currentRoute
        })
      }
    })).then(() => {
      context.state = store.state
      resolve(app)
    }).catch(reject)
  }, reject)
})
组件修改
由于代码需要在服务器端和浏览器端共用,所以需要修改组件,使之在服务器端运行时不会报错
1、修改router路由文件,给每个请求一个新的路由router实例
import Vue from 'vue'
import Router from 'vue-router'

Vue.use(Router)
+ export default function createRouter() {
- export default new Router({+   return new Router({
     mode: 'history',
     routes: [
       {
         path: '/',
         component: () => import(/* webpackChunkName:'home' */ '@/components/Home/Home'),
         name: 'home',
         meta: { index:  }
       },
    ...
     ]
  })+}
2、修改状态管理vuex文件,给每个请求一个新的vuex实例
import Vue from 'vue'
import Vuex from 'vuex'
import auth from '@/components/User/module'
...

Vue.use(Vuex)
+ export default function createStore() {
- export default new Vuex.Store({+   return new Vuex.Store({
    modules: {
      auth,
     ...
    }
  })+}
3、使用asyncData方法来获取异步数据
要特别注意的是,由于asyncData只能通过路由发生作用,使用是非路由组件的异步数据获取最好移动到路由组件中
如果要通过asyncData获取多个数据,可以使用Promise.all()方法
asyncData({ store }) {
    const { dispatch } = store
    return Promise.all([
      dispatch(LOAD_CATEGORIES_ASYNC),
      dispatch(LOAD_POSTS_ASYNC)
    ])
}
如果该异步数据是全局通用的,可以在entry-client.js方法中直接获取
将TheHeader.vue通用头部组件获取异步数据的代码移动到entry-client.js方法中进行获取
// TheHeader.vue
  computed: {
    ...
-    ...mapGetters([
-      'postCount',
-      'categoryCount',
-      'likeCount',
-      'commentCount',
-      'userCount'
-    ])
  },
-  mounted() {
    // 获取异步信息
-    this.loadAsync()
  ...
-  },
...
  methods: {
-    loadAsync() {
-      const { postCount, categoryCount, userCount, likeCount, commentCount } = this
-      const { dispatch } = this.$store
-      // 获取类别信息
-      !categoryCount && dispatch(LOAD_CATEGORIES_ASYNC)
-      // 获取文章信息
-      !postCount && dispatch(LOAD_POSTS_ASYNC)
-      // 获取点赞信息
-      !likeCount && dispatch(LOAD_LIKES_ASYNC)
-      // 获取评论信息
-      !commentCount && dispatch(LOAD_COMMENTS_ASYNC)
-     // 获取用户信息
-      !userCount && dispatch(LOAD_USERS_ASYNC)
-    },
将Post.vue中的异步数据通过asyncData进行获取
// post.vue
...
export default {
+  asyncData({ store, route }) {
+    return store.dispatch(LOAD_POST_ASYNC, { id: route.params.postid })
+  },
...
-  mounted() {
-    this.$store.dispatch(LOAD_POST_ASYNC, { id: this.postId })
-  },
...
4、将全局css从main.js移动到App.vue中的内联style样式中,因为main.js中未设置css文件解析
// main.js
- import '@/assets/style.css'
// App.vue
...
<style module lang="postcss">
...
</style>
5、由于post组件的模块module.js中需要对数据通过window.atob()方法进行base64解析,而nodeJS环境下无window对象,会报错。于是,代码修改如下
// components/Post/module
- text: decodeURIComponent(escape(window.atob(doc.content)))
+ text: typeof window === 'object' ? decodeURIComponent(escape(window.atob(doc.content))) : ''
服务器配置
1、在根目录下,新建server.js文件
由于在webpack中去掉了HTMLWebpackPlugin插件,而是通过nodejs来处理模板,同时也就缺少了该插件设置的HTML文件压缩功能
需要在server.js文件中安装html-minifier来实现HTML文件压缩
const express = require('express')
const fs = require('fs')
const path = require('path')
const { createBundleRenderer } = require('vue-server-renderer')
const { minify } = require('html-minifier')
const app = express()
const resolve = file => path.resolve(__dirname, file)

const renderer = createBundleRenderer(require('./dist/vue-ssr-server-bundle.json'), {
  runInNewContext: false,
  template: fs.readFileSync(resolve('./index.html'), 'utf-8'),
  clientManifest: require('./dist/vue-ssr-client-manifest.json'),
  basedir: resolve('./dist')
})
app.use(express.static(path.join(__dirname, 'dist')))
app.get('*', (req, res) => {
  res.setHeader('Content-Type', 'text/html')
  const handleError = err => {
    if (err.url) {
      res.redirect(err.url)
    } ) {
      res.status().send('404 | Page Not Found')
    } else {
      res.status().send('500 | Internal Server Error')
      console.error(`error during render : ${req.url}`)
      console.error(err.stack)
    }
  }

  const context = {
    title: '小火柴的前端小站',
    url: req.url
  }
  renderer.renderToString(context, (err, html) => {
    console.log(err)
    if (err) {
      return handleError(err)
    }
    res.send(minify(html, { collapseWhitespace: true, minifyCSS: true}))
  })
})

app.on('error', err => console.log(err))
app.listen(, () => {
  console.log(`vue ssr started at localhost: `)
})
2、修改package.json文件
-     "build": "node build/build.js",
+    "build:client": "node build/build.js",
+    "build:server": "cross-env NODE_ENV=production webpack --config build/webpack.server.conf.js --progress --hide-modules",
+    "build": "rimraf dist && npm run build:client && npm run build:server",
3、修改index.html文件
<!DOCTYPE html>
<html>
  <head>
    <meta charset="utf-8">
    <meta name="viewport" content="width=device-width,initial-scale=1.0,user-scalable=no">
    <link rel="shortcut icon" href="/static/favicon.ico">
    <title>小火柴的蓝色理想</title>
  </head>
  <body>
     <!--vue-ssr-outlet-->
  </body>
</html>
4、取消代理
如果继续使用代理如/api代理到后端接口,则可能会报如下错误
error:connect ECONNREFUSED
直接写带有http的后端接口地址即可
const API_HOSTNAME = 'http://192.168.1.103:4000'
测试
1、安装依赖包
cnpm install --save-dev vue-server-renderer
2、构建
npm run build
3、运行
node server.js
点击右键,查看网页源代码。结果如下,说明网站已经实现了服务器端渲染

部署
【pm2】
由于该网站需要守护nodejs程序,使用pm2部署较为合适
在项目根目录下,新建一个ecosystem.json文件,内容如下
{
  "apps" : [{
    "name"      : "blog-www",
    "script"    : "./index.js",
    "env": {
      "COMMON_VARIABLE": "true"
    },
    "env_production" : {
      "NODE_ENV": "production"
    }
  }],
  "deploy" : {
    "production" : {
      "user" : "xxx",
      "host" : ["1.2.3.4"],
      ",
      "ref"  : "origin/master",
      "repo" : "git@github.com:littlematch0123/blog-client.git",
      "path" : "/home/xxx/www/mall",
      "post-deploy" : "source ~/.nvm/nvm.sh && cnpm install && pm2 startOrRestart ecosystem.json --env production",
      "ssh_options": "StrictHostKeyChecking=no",
      "env"  : {
        "NODE_ENV": "production"
      }
    }
  }
}
【CDN】
由于项目实际上既有静态资源,也有nodeJS程序。因此,最好把静态资源上传到七牛CDN上
自行选择服务器的一个目录,新建upload.js文件
var fs = require('fs');
var qiniu = require('qiniu');
var accessKey = 'xxx';
var secretKey = 'xxx';
var mac = new qiniu.auth.digest.Mac(accessKey, secretKey);
var staticPath = '/home/www/blog/client/source/';
var prefix = 'client/static';
var bucket = 'static';

var config = new qiniu.conf.Config();
config.zone = qiniu.zone.Zone_z1;
var formUploader = new qiniu.form_up.FormUploader(config);
var putExtra = new qiniu.form_up.PutExtra();
putExtra = null; // 一定要将putExtra设置为null,否则会出现所有文件类别都被识别为第一个文件的类型的情况
// 文件上传方法
function uploadFile (localFile) {
  // 配置上传到七牛云的完整路径
  const key = localFile.replace(staticPath, prefix)
  const options = {
     scope: bucket + ":" + key,
 }
  const putPolicy = new qiniu.rs.PutPolicy(options)
  // 生成上传凭证
  const uploadToken = putPolicy.uploadToken(mac)
  // 上传文件
  formUploader.putFile(uploadToken, key, localFile, putExtra, function(respErr, respBody, respInfo) {
    if (respErr) throw respErr
  ) {
    console.log(respBody);
  } else {
    console.log(respInfo.statusCode);
    console.log(respBody);
  }
})
}
// 目录上传方法
function uploadDirectory (dirPath) {
  fs.readdir(dirPath, function (err, files) {
    if (err) throw err
    // 遍历目录下的内容
    files.forEach(item => {
      let path = `${dirPath}/${item}`
      fs.stat(path, function (err, stats) {
        if (err) throw err
        // 是目录就接着遍历 否则上传
         if (stats.isDirectory())  uploadDirectory(path)
         else  uploadFile(path, item)
      })
    })
  })
}
fs.exists(staticPath, function (exists) {
  if (!exists) {
    console.log('目录不存在!')
  }
  else {
    console.log('开始上传...')
    uploadDirectory(staticPath)
  }
})
【post-deploy】
然后,修改ecosystem.json文件中的post-deploy项
"source ~/.nvm/nvm.sh && cnpm install && npm run build && node /home/xiaohuochai/blog/client/upload.js&& pm2 startOrRestart ecosystem.json --env production",
但是,经过实际测试,在服务器端进行构建build,极其容易造成服务器死机。于是,还是在本地构建完成后,上传dist文件到服务器再进行相关操作
"source ~/.nvm/nvm.sh && cnpm install && node /home/xiaohuochai/blog/client/upload.js&& pm2 startOrRestart ecosystem.json --env production"
修改项目的静态资源地址为CDN地址,API地址为服务器API地址
// config/index.js
assetsPublicPath: 'https://static.xiaohuochai.site/client/'

// src/constants/API.js
const API_HOSTNAME = 'https://api.xiaohuochai.cc'
【nginx】
如果要使用域名对项目进行访问,还需要进行nginx配置
upstream client {
        server ;
}
server{
        listen ;
        server_name www.xiaohuochai.cc xiaohuochai.cc;
     https://www.xiaohuochai.cc$request_uri;
}
server{
        listen  http2;
        server_name www.xiaohuochai.cc xiaohuochai.cc;
        ssl on;
        ssl_certificate /home/blog/client/crt/www.xiaohuochai.cc.crt;
        ssl_certificate_key /home/blog/client/crt/www.xiaohuochai.cc.key;
        ssl_session_timeout 5m;
        ssl_ciphers ECDHE-RSA-AES128-GCM-SHA256:ECDHE:ECDH:AES:HIGH:!NULL:!aNULL:!MD5:!ADH:!RC4;
        ssl_protocols TLSv1 TLSv1. TLSv1.;
        ssl_prefer_server_ciphers on;
    if ($host = 'xiaohuochai.cc'){
        rewrite ^/(.*)$ http://www.xiaohuochai.cc/$1 permanent;
    }
    location / {
        expires 7d;
        add_header Content-Security-Policy "default-src 'self' https://static.xiaohuochai.site; connect-src https://api.xiaohuochai.cc; script-src 'self' 'unsafe-inline' 'unsafe-eval' https://static.xiaohuochai.site ; img-src 'self' data: https://pic.xiaohuochai.site https://static.xiaohuochai.site; style-src 'self' 'unsafe-inline' https://static.xiaohuochai.site; frame-src https://demo.xiaohuochai.site https://xiaohuochai.site https://www.xiaohuochai.site;";
        proxy_set_header X-Real-IP $remote_addr;
                proxy_set_header X-Forward-For $proxy_add_x_forwarded_for;
                proxy_set_header Host $http_host;
                proxy_set_header X-Nginx-Proxy true;
                proxy_pass http://client;
                proxy_redirect off;

    }
}
浏览器渲染
官网的代码中,如果使用开发环境development,则需要进行相当复杂的配置
能否应用当前的webpack.dev.conf.js来进行开发呢?完全可以,开发环境中使用浏览器端渲染,生产环境中使用服务器端渲染
需要做出如下三点更改:
1、更改API地址,开发环境使用webpack代理,生产环境使用上线地址
// src/constants/API
let API_HOSTNAME
if (process.env.NODE_ENV === 'production') {
  API_HOSTNAME = 'https://api.xiaohuochai.cc'
} else {
  API_HOSTNAME = '/api'
}
2、在index.html同级目录下,新建一个index.template.html文件,index.html是开发环境的模板文件,index.template.html是生产环境的模板文件
// index.html
  <body>
    <div id="root"></div>
  </body>

// index.template.html
  <body>
     <!--vue-ssr-outlet-->
  </body>
3、更改服务器端入口文件server.js的模板文件为index.template.html
// server.js
const renderer = createBundleRenderer(require('./dist/vue-ssr-server-bundle.json'), {
  runInNewContext: false,
  template: fs.readFileSync(resolve('./index.template.html'), 'utf-8'),
  clientManifest: require('./dist/vue-ssr-client-manifest.json'),
  basedir: resolve('./dist')
})
经过简单的更改,即可实现开发环境使用浏览器端渲染,生产环境使用服务器端渲染的效果
基于vue现有项目的服务器端渲染SSR改造的更多相关文章
- 基于VUE开发项目
前言 最近由于公司需要,需要写一个相对来说比较大型的后台管理系统.为了保证管理系统操作体验较为舒适并且项目后期益于维护,最后决定基于VUE全家桶来开发一个高度组件化的单页SPA应用. 技术选型 vue ...
- react 服务器端渲染 ssr 中 localstorage/history/window is not defined 解决方案
1.原因 ssr 会在后端执行组件的 componentWillMount 以及在它这个生命周期之前的生命周期 也就是说 ssr 阶段是不会执行 componentDidMount 方法的 当你在 c ...
- 基于Vue/React项目的移动端适配方案
本文的目标是通过下文介绍的适配方案,使用vue或react开发移动端及H5的时候,不需要再关心移动设备的大小,只需要按照固定设计稿的px值布局,提升开发效率. 下文给出了本人分别使用create-re ...
- 基于vue框架项目开发过程中遇到的问题总结(三)
这次遇到的一个问题困扰了我很久很久,大致就是vue路由的addRoutes方法的使用,每次在调用了这个之后router对象中并没有将路由添加进去,接下来,我一步一步的分析原因及解决方法(个人见解,仅供 ...
- 基于vue框架项目开发过程中遇到的问题总结(一)
(一)关于computed修改data里变量的值 问题:computed里是不能直接修改data里变量的值,否则在git commit 时会报错 解决:在computed里使用get和set来进行获取 ...
- 前端 go.js 流程图基于vue开发项目案例
一.流程图效果 最近一段时间在研究go.js,它是一款前端开发画流程图的一个插件,也是一个难点,要说为什么是难点,首先,它是依赖画布canvas知识开发.其次,要依赖于内部API开发需求,开发项目需求 ...
- 基于vue框架项目开发过程中遇到的问题总结(二)
1.mouseup事件丢失 查看了网上资料,造成mouseup事件丢失有两种原因: (1)触发了浏览器的drag事件 (2)由于鼠标离开了操作的区域,触发了mouseleave事件导致mouseup丢 ...
- 入职第一天:前端leader手把手教我入门Vue服务器端渲染(SSR)
继前段时间西安电面之后顺利拿到了OFFER,今天(5月2号)是我入职第一天,在简短的内部培训了一上午后,前端leader让我先了解下什么是vue的服务器端渲染(SSR). SSR,英文全称叫 Serv ...
- Vue 爬坑之路(十一)—— 基于 Nuxt.js 实现服务端渲染(SSR)
直接使用 Vue 构建前端单页面应用,页面源码时只有简单的几行 html,这并不利于网站的 SEO,这时候就需要服务端渲染 2016 年 10 月 25 日,zeit.co 背后的团队对外发布了一个 ...
随机推荐
- 4-4 Redis 的常用配置
2016-12-22 15:30:43 本篇文章属于Redis 系列第四篇文章:Redis 配置文件介绍 该系列文章链接 NoSQL 数据库简介 Redis的安装及及一些杂项基础知识 Redis 的常 ...
- JavaWeb - 模仿SpringMVC抽取 BaseServlet + 封装表单参数
模仿SpringMVC抽取一个BaseServlet,接收所有请求,然后自动封装表单参数和分发到对应的servlet执行,下面用一个页面表单提交,转发显示的项目做示例. 1)首先准备一个Entity, ...
- Go开发之路 -- 指针类型
1. 普通类型,变量存的就是值,也叫值类型 2. 获取变量的地址,用&,比如: var a int, 获取a的地址:&a 3. 指针类型,变量存的是一个地址,这个地址存的才是值 4. ...
- Zookeeper 分布式机器部署
ZooKeeper是一个分布式的,开放源码的分布式应用程序协调服务,是Google的Chubby一个开源的实现,是Hadoop和Hbase的重要组件.它是一个为分布式应用提供一致性服务的软件,提供的功 ...
- Dynamics 365权限变化大部署后需要注意什么?
本人微信公众号:微软动态CRM专家罗勇 ,回复292或者20190110可方便获取本文,同时可以在第一间得到我发布的最新博文信息,follow me!我的网站是 www.luoyong.me . 如果 ...
- 广州.NET微软技术俱乐部微信群各位技术大牛的blog
1. .net core和微服务领域的张善友张队长和马洪喜,证明了.net core和微服务已经在各方面都不比java差2. Xamarin的卢建晖,证明了.net在移动开发领域也是很牛的.3. wi ...
- ASP.NET C# 连接 Oracle数据库增删改查,事务
一.知识介绍 ①ASP.NET 使用的是MVC模式,开发工具Visual studio ,语言C# ②Oracle是比较重型的数据库,这里主要介绍连接数据库,对数据进行具体的使用 ③Visual St ...
- 腾讯云服务器 ubuntu 设置允许root用户登录
背景:最近购买了腾讯云服务器,使用了Ubuntu Server 14.04.1 LTS 64位操作系统,腾讯云主机ubuntu系统默认用户名为ubuntu,登录服务器时每一次都是以默认账号ubuntu ...
- C#实现完整的防盗自制监控系统
在您的手机中通知您家中的入侵者,并拍摄他们的照片 介绍 在本文中,我将展示一些DIY东西,用于安装监控系统,检测家中的入侵者,拍摄照片并通过手机通知您,必要时可以打电话给警察并提供照片以便快速识别 ...
- Hadoop Yarn框架详细解析
在说Hadoop Yarn之前,我们先来看看Yarn是怎样出现的.在古老的Hadoop1.0中,MapReduce的JobTracker负责了太多的工作,包括资源调度,管理众多的TaskTracker ...