hibernate框架搭建
hibernate框架的搭建步骤:
1.导包
2.创建数据库准备表
3.书写orm元数据(对象与表的映射配置文件)
4.书写配置文件
5.书写代码测试
一、导包:
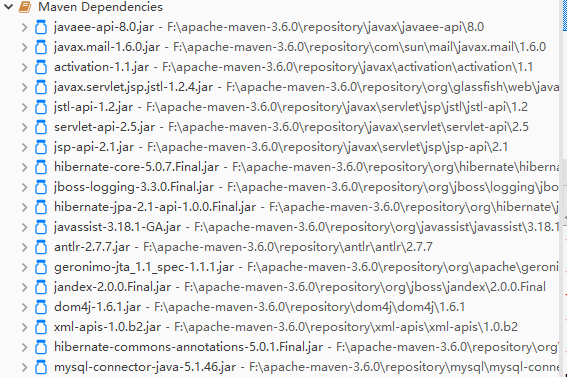
创建web-maven工程添加hibernate核心包以及mysql驱动包
	     <dependency>

			<groupId>org.hibernate</groupId>

			<artifactId>hibernate-core</artifactId>

			<version>5.0.7.Final</version>

		</dependency>

		<dependency>

			<groupId>mysql</groupId>

			<artifactId>mysql-connector-java</artifactId>

			<version>5.1.46</version>

		</dependency>
导包完成后会显示
二、创建数据库准备表
 CREATE TABLE `cst_customer` (

	  `cust_id` BIGINT(32) NOT NULL AUTO_INCREMENT COMMENT '客户编号(主键)',

	  `cust_name` VARCHAR(32) NOT NULL COMMENT '客户名称(公司名称)',

	  `cust_source` VARCHAR(32) DEFAULT NULL COMMENT '客户信息来源',

	  `cust_industry` VARCHAR(32) DEFAULT NULL COMMENT '客户所属行业',

	  `cust_level` VARCHAR(32) DEFAULT NULL COMMENT '客户级别',

	  `cust_linkman` VARCHAR(64) DEFAULT NULL COMMENT '联系人',

	  `cust_phone` VARCHAR(64) DEFAULT NULL COMMENT '固定电话',

	  `cust_mobile` VARCHAR(16) DEFAULT NULL COMMENT '移动电话',

	  PRIMARY KEY (`cust_id`)

	) ENGINE=INNODB AUTO_INCREMENT=1 DEFAULT CHARSET=utf8;
三、书写orm数据元对象
实体类 Customer
public class Customer {

	/*

	 * CREATE TABLE `cst_customer` (

	  `cust_id` BIGINT(32) NOT NULL AUTO_INCREMENT COMMENT '客户编号(主键)',

	  `cust_name` VARCHAR(32) NOT NULL COMMENT '客户名称(公司名称)',

	  `cust_source` VARCHAR(32) DEFAULT NULL COMMENT '客户信息来源',

	  `cust_industry` VARCHAR(32) DEFAULT NULL COMMENT '客户所属行业',

	  `cust_level` VARCHAR(32) DEFAULT NULL COMMENT '客户级别',

	  `cust_linkman` VARCHAR(64) DEFAULT NULL COMMENT '联系人',

	  `cust_phone` VARCHAR(64) DEFAULT NULL COMMENT '固定电话',

	  `cust_mobile` VARCHAR(16) DEFAULT NULL COMMENT '移动电话',

	  PRIMARY KEY (`cust_id`)

	) ENGINE=INNODB AUTO_INCREMENT=1 DEFAULT CHARSET=utf8;

	 */

	private Long cust_id;

	private String cust_name;

	private String cust_source;

	private String cust_industry;

	private String cust_level;

	private String cust_linkman;

	private String cust_phone;

	private String cust_mobile;

	public Long getCust_id() {

		return cust_id;

	}

	public void setCust_id(Long cust_id) {

		this.cust_id = cust_id;

	}

	public String getCust_name() {

		return cust_name;

	}

	public void setCust_name(String cust_name) {

		this.cust_name = cust_name;

	}

	public String getCust_source() {

		return cust_source;

	}

	public void setCust_source(String cust_source) {

		this.cust_source = cust_source;

	}

	public String getCust_industry() {

		return cust_industry;

	}

	public void setCust_industry(String cust_industry) {

		this.cust_industry = cust_industry;

	}

	public String getCust_level() {

		return cust_level;

	}

	public void setCust_level(String cust_level) {

		this.cust_level = cust_level;

	}

	public String getCust_linkman() {

		return cust_linkman;

	}

	public void setCust_linkman(String cust_linkman) {

		this.cust_linkman = cust_linkman;

	}

	public String getCust_phone() {

		return cust_phone;

	}

	public void setCust_phone(String cust_phone) {

		this.cust_phone = cust_phone;

	}

	public String getCust_mobile() {

		return cust_mobile;

	}

	public void setCust_mobile(String cust_mobile) {

		this.cust_mobile = cust_mobile;

	}

	@Override

	public String toString() {

		return "Customer [cust_id=" + cust_id + ", cust_name=" + cust_name + "]";

	}

}
实体类hibernate映射文件 Customer.hbm.xml
<?xml version="1.0" encoding="UTF-8"?>

<!DOCTYPE hibernate-mapping PUBLIC

    "-//Hibernate/Hibernate Mapping DTD 3.0//EN"

    "http://www.hibernate.org/dtd/hibernate-mapping-3.0.dtd">

    <hibernate-mapping package="com.hibernate.entity">

    	<class name="Customer" table="cst_customer">

    		<id name="cust_id">

    			<generator class="native"></generator>

    		</id>

    		<!-- id元素:配置主键映射的属性

				name: 填写主键对应属性名

				column(可选): 填写表中的主键列名.默认值:列名会默认使用属性名

				type(可选):填写列(属性)的类型.hibernate会自动检测实体的属性类型.

						每个类型有三种填法: java类型|hibernate类型|数据库类型

				not-null(可选):配置该属性(列)是否不能为空. 默认值:false

				length(可选):配置数据库中列的长度. 默认值:使用数据库类型的最大长度

		 -->

    		<property name="cust_name" column="cust_name"/>

    		<!-- property元素:除id之外的普通属性映射

				name: 填写属性名

				column(可选): 填写列名

				type(可选):填写列(属性)的类型.hibernate会自动检测实体的属性类型.

						每个类型有三种填法: java类型|hibernate类型|数据库类型

				not-null(可选):配置该属性(列)是否不能为空. 默认值:false

				length(可选):配置数据库中列的长度. 默认值:使用数据库类型的最大长度

		 -->

    		<property name="cust_source" column="cust_source"/>

    		<property name="cust_industry" column="cust_industry"/>

    		<property name="cust_level" column="cust_level"/>

    		<property name="cust_linkman" column="cust_linkman"/>

    		<property name="cust_phone" column="cust_phone"/>

    		<property name="cust_mobile" column="cust_mobile"/>

    	</class>

    </hibernate-mapping>
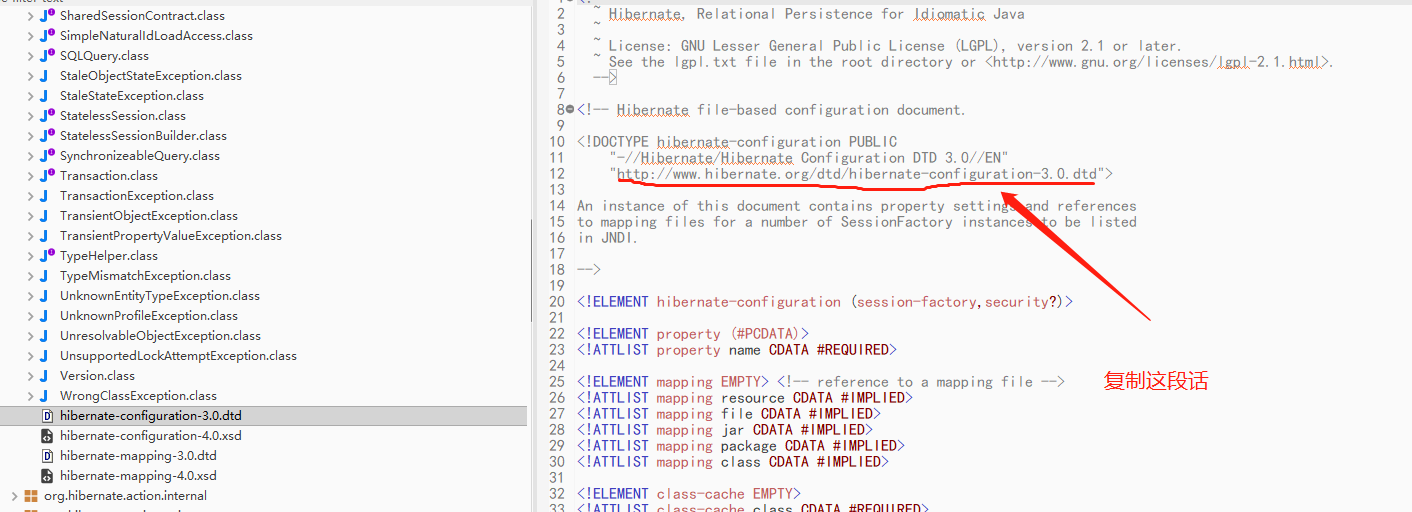
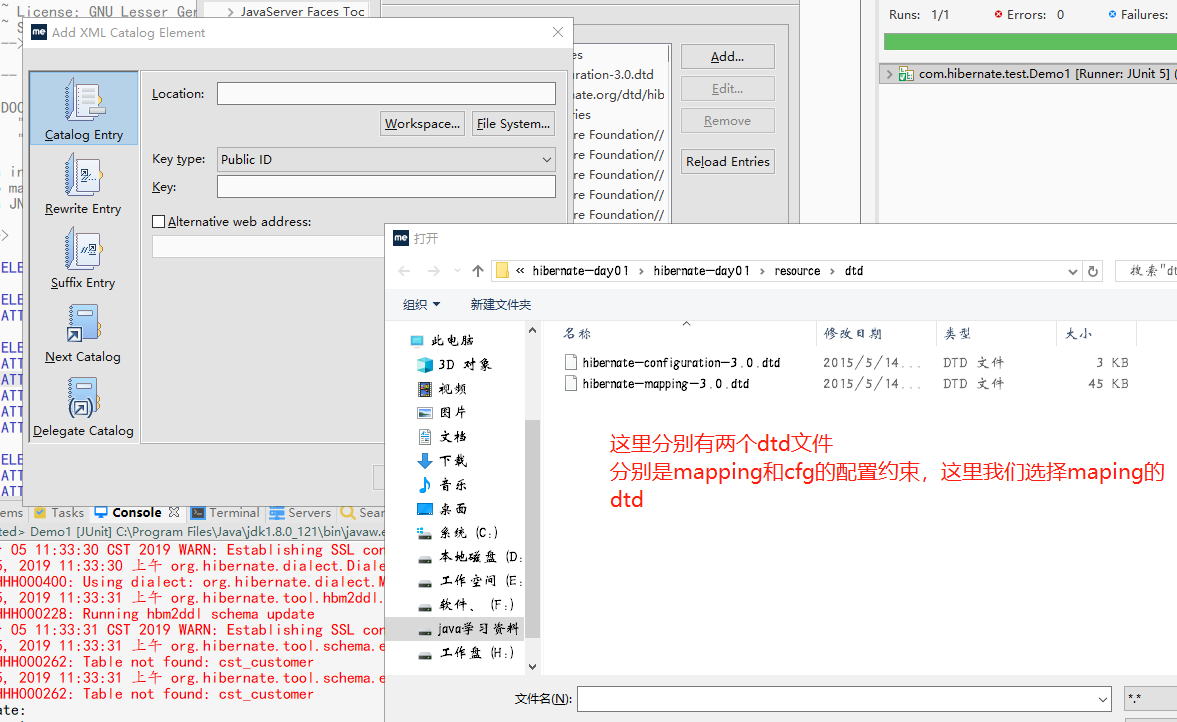
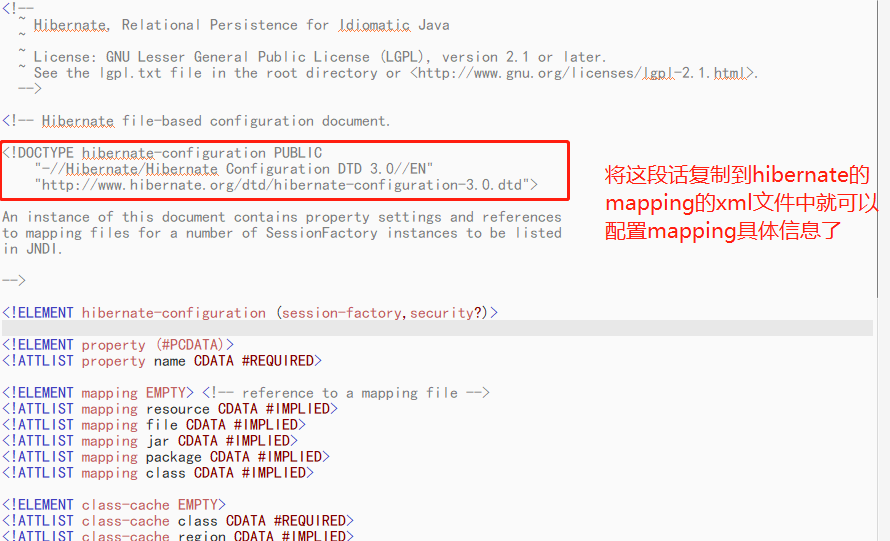
PS:hibernate的xml配置文件记得导入约束,否则会报错 导入约束所在的文件流程:
找到包名hibernate-core-........jar

此包目录下的两个dtd文件
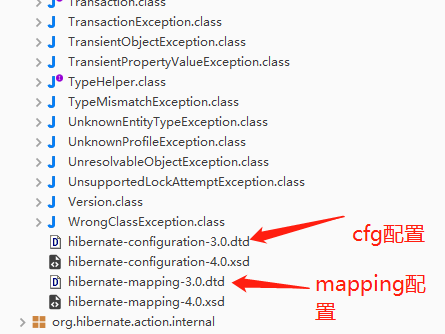
这里导入mappIng约束和configuration约束相同
window-perferences-收索xml-xml catalog中添加约束:具体如下图:
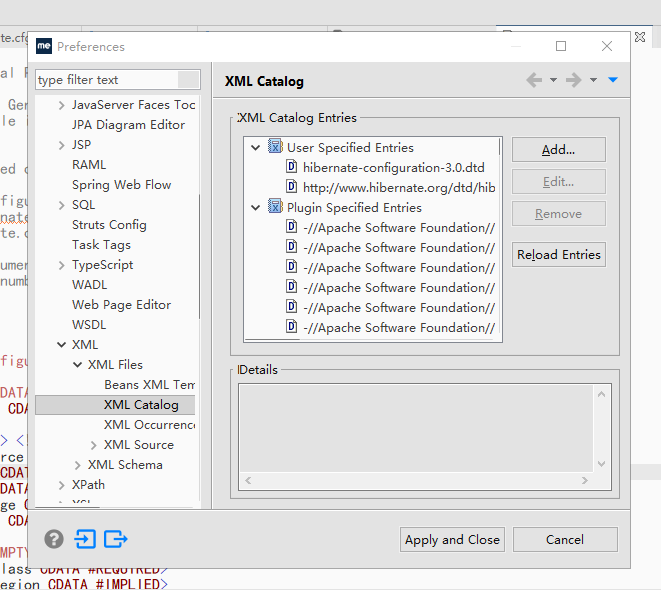
点击add添加约束

四、书写配置文件
配置hibernate cfg配置文件,格式以hibernate.cfg.xml命名
<?xml version="1.0" encoding="UTF-8"?>

<!DOCTYPE hibernate-configuration PUBLIC

	"-//Hibernate/Hibernate Configuration DTD 3.0//EN"

	"http://www.hibernate.org/dtd/hibernate-configuration-3.0.dtd">

	<hibernate-configuration>

	<session-factory>

	<!--

	#hibernate.dialect org.hibernate.dialect.MySQLDialect

	#hibernate.dialect org.hibernate.dialect.MySQLInnoDBDialect

	#hibernate.dialect org.hibernate.dialect.MySQLMyISAMDialect

	#hibernate.connection.driver_class com.mysql.jdbc.Driver

	#hibernate.connection.url jdbc:mysql:///test

	#hibernate.connection.username gavin

	#hibernate.connection.password

	 -->

	 <property name="hibernate.connection.driver_class">com.mysql.jdbc.Driver</property>

	 <property name="hibernate.connection.url">jdbc:mysql:///test</property>

	 <property name="hibernate.connection.username">root</property>

	 <property name="hibernate.connection.password">root</property>

	 <property name="hibernate.dialect">org.hibernate.dialect.MySQLDialect</property>

	 <!--

	 #hibernate.show_sql true

	 #hibernate.format_sql true

	  -->

	  <property name="hibernate.show_sql">true</property>

	  <property name="hibernate.format_sql">true</property>

	  <!--

	  #hibernate.hbm2ddl.auto create-drop

	  #hibernate.hbm2ddl.auto create

	  #hibernate.hbm2ddl.auto update

	  #hibernate.hbm2ddl.auto validate

	   -->

	  <property name="hibernate.hbm2ddl.auto">update</property>

	  <mapping resource="com/hibernate/entity/Customer.hbm.xml"/>

	</session-factory>

	</hibernate-configuration>
五、书写代码测试
package com.hibernate.test; import org.hibernate.Session;
import org.hibernate.SessionFactory;
import org.hibernate.Transaction;
import org.hibernate.cfg.Configuration;
import org.junit.Test; import com.hibernate.entity.Customer; public class Demo1 { @Test
public void test(){
//加载配置文件hibernate.cfg.xml
Configuration cfg=new Configuration().configure();
//构建session工厂
SessionFactory sessionfaction = cfg.buildSessionFactory();
//打开session
Session session = sessionfaction.openSession();
//创建事务
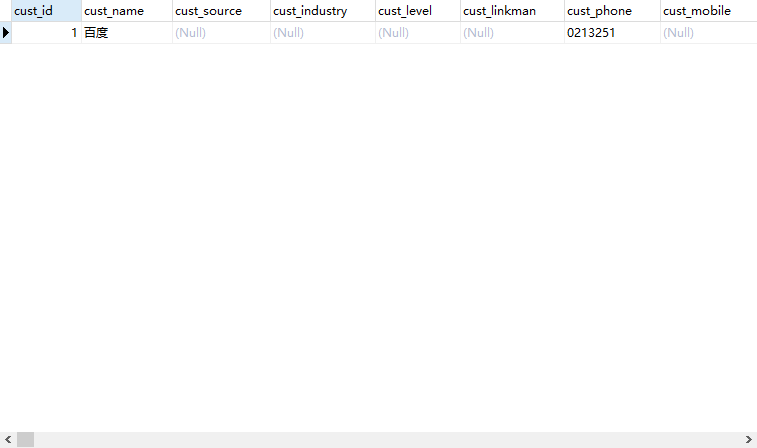
Transaction tx = session.beginTransaction(); Customer c = new Customer();
c.setCust_name("百度");
c.setCust_phone("0213251"); //保存c
session.save(c);
//执行事务
tx.commit();
//关闭事务
session.close();
}
}
输出结果:

数据库显示:
hibernate框架搭建的更多相关文章
- SSH(Struts2+Spring+Hibernate)框架搭建流程<注解的方式创建Bean>
此篇讲的是MyEclipse9工具提供的支持搭建自加包有代码也是相同:用户登录与注册的例子,表字段只有name,password. SSH,xml方式搭建文章链接地址:http://www.cnblo ...
- Hibernate框架搭建实例
一,Hibernate是一个持久层,是一个专门负责管理数据库连接的框架: 二,Hibernate的搭建实例: 1.在Hibernate的官方网站(http://www.hibernate.org)可以 ...
- javaWeb项目(SSH框架+AJAX+百度地图API+Oracle数据库+MyEclipse+Tomcat)之二 基础Hibernate框架搭建篇
我们在搭建完Struts框架之后,从前台想后端传送数据就显得非常简单了.Struts的功能不仅仅是一个拦截器,这只是它的核心功能,此外我们也可以自定义拦截器,和通过注解的方式来更加的简化代码. 接下来 ...
- 基于Maven的S2SH(Struts2+Spring+Hibernate)框架搭建
1. 前言 基于Maven的开发方式开发项目已经成为主流.Maven能很好的对项目的层次及依赖关系进行管理.方便的解决大型项目中复杂的依赖关系.S2SH(Struts2+Spring+Hibernat ...
- 在Eclipse中使用Struts和Hibernate框架搭建Maven Web项目
前言 学习使用Java还是2012年的事情,刚开始学习的Java的时候,使用的是MyEclipse工具和SSH框架.初学者适合使用MyEclipse,因为他将struts.Spring和Hiberna ...
- ORM进阶:Hibernate框架搭建及开发
本节将開始.使用hibernate搭建持久层.当然在决定用不用之前,还请斟酌一下是否使用.了解一下Hibernate的优缺点. Hibernate优劣对照 Hibernate是一个持久的ORM框架.首 ...
- SSH(Struts2+Spring+Hibernate)框架搭建流程
添加支持 我先介绍的是MyEclipse9的自带框架支持搭建过程:(完全的步骤 傻瓜式的学习..~) 首先我们来搭建一个Web项目: 一.Hibernate(数据层)的搭建: 相关描述 Ⅰ.服务器与数 ...
- hibernate 框架搭建
Hibernate是一个开放源代码的对象关系映射框架,它对JDBC进行了非常轻量级的对象封装,它将POJO与数据库表建立映射关系,是一个全自动的orm框架,hibernate可以自动生成SQL语句,自 ...
- Spring+Spring MVC+Hibernate框架搭建实例
前言:这里只是说明整个搭建流程,并不进行原理性的讲解 一 下面所需要用到的数据库配置: 数据库方面,使用mysql创建一个users表,具体代码如下: 1 2 3 4 5 6 7 8 9 10 11 ...
随机推荐
- XPath Helper使用教程
下载地址 百度网盘下载密码:yuuv下载完成后选择保留 安装 在导航栏中输入chrome://extensions:将.crx文件拖拽到扩展程序页面中,勾选已启用按钮. 使用 重启浏览器,快捷键CTR ...
- C++入门篇十一
单例对象:为了让类只有一个实例,实例不需要自己释放掉 不管创建多少个实例对象进行访问,访问的都是同一个值 #include "pch.h" #include <iostrea ...
- Lesson 1-2
1.5 模块 模块可视为扩展,通过将其导入可以扩展python的功能.python中自带有一组模块,也称为“标准库”. 1.5.1 模块的导入:import + 模块名称 • 使用关键字import导 ...
- Mac上重置mysql 5.7密码
Mac上重置mysql 5.7密码 >我的mac系统是osx 10.12 装完mysql5.7之前根本登录不上,网上说用DMG方式装完后,后弹出一个框,上面会有临时密码,但是我安装的时候却手一抖 ...
- 一个二维码-->网址-->iOS/Android跳转
view-source:https://dpx.shopo.com.cn/down.html lmxmn117:~ will.wei$ curl https://dpx.shopo.com.cn/do ...
- Topologies on product spaces of $\mathbb{R}$ and their relationships
In this post, I will summarise several topologies established on the product spaces of \(\mathbb{R}\ ...
- Future模式衍生出来的更高级的应用
再上一个场景:我们自己写一个简单的数据库连接池,能够复用数据库连接,并且能在高并发情况下正常工作. 实现代码1: package test; import java.util.concurrent.C ...
- Go之十大经典排序算法
1.冒泡排序 func bubble_sort(li []int) { for i := 0; i < len(li)-1; i++ { exchange := false for j := 0 ...
- UOJ#24. 【IOI2014】Rail 交互题
原文链接www.cnblogs.com/zhouzhendong/p/UOJ24.html 题解 我们将 C 型车站称为 左括号 '(', D 型车站称为右括号 ')' ,设括号 i 的位置为 p[i ...
- 浅谈Java语言中ArrayList和HashSet的区别
Java语言中ArrayList和HashSet的区别 2019-04-10 13:22:49 一.基本区别 首先一起看个实例,其代码如下: package com.MrZ_baby.com; i ...