RabbitMQ消息队列(八)-通过Topic主题模式分发消息(.Net Core版)
前两章我们讲了RabbitMQ的direct模式和fanout模式,本章介绍topic主题模式的应用。如果对direct模式下通过routingkey来匹配消息的模式已经有一定了解那fanout也很好理解。简单的可以理解成direct是通过routingkey精准匹配的,而topic是通过routingkey来模糊匹配。
在topic模式下支持两个特殊字符的匹配。
* (星号) 代表任意 一个单词

# (井号) 0个或者多个单词
注意:上面说的是单词不是字符。
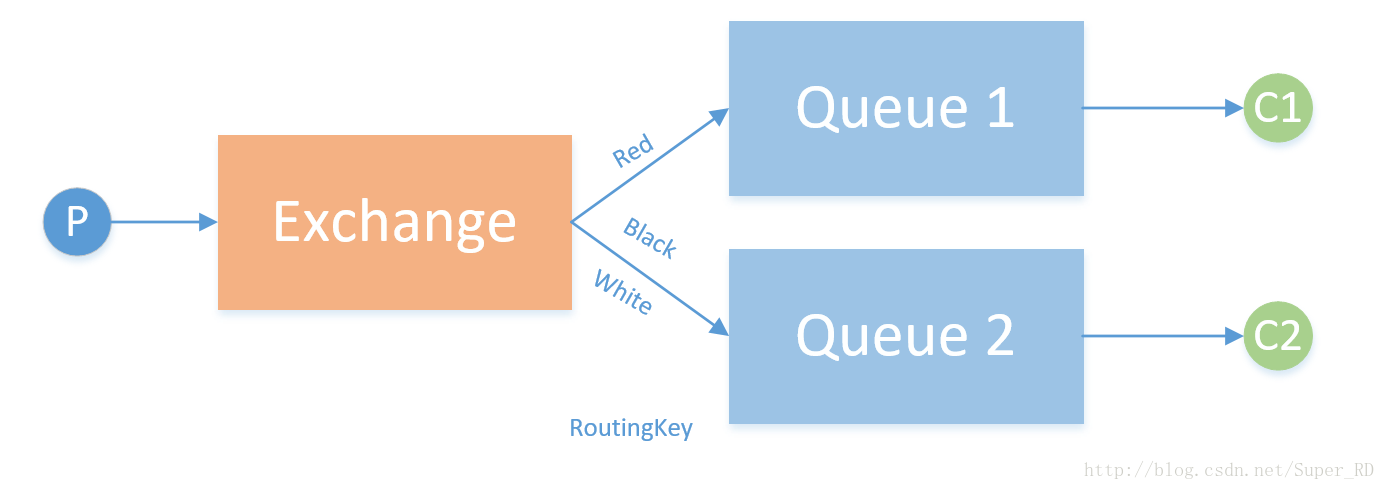
如下图所示,RabbitMQ direct模式通过RoutingKey来精准匹配,RoutingKey为red的投递到Queue1,RoutingKey为black和white的投递到Queue2。
我们可以假设一个场景,我们要做一个日志模块来收集处理不同的日志,日志区分包含三个维度的标准:模块、日志紧急程度、日志重要程度。模块分为:red、black、white;紧急程度分为:critical、normal;把重要程度分为:medium、low、high在RoutingKey字段中我们把这三个维度通过两个“.“连接起来。
现在我们需要对black模块,紧急程度为critical,重要程度为high的日志分配到队列1打印到屏幕;对所以模块重要程度为high的日志和white紧急程度为critical的日志发送到队列2持久化到硬盘。如下示例:
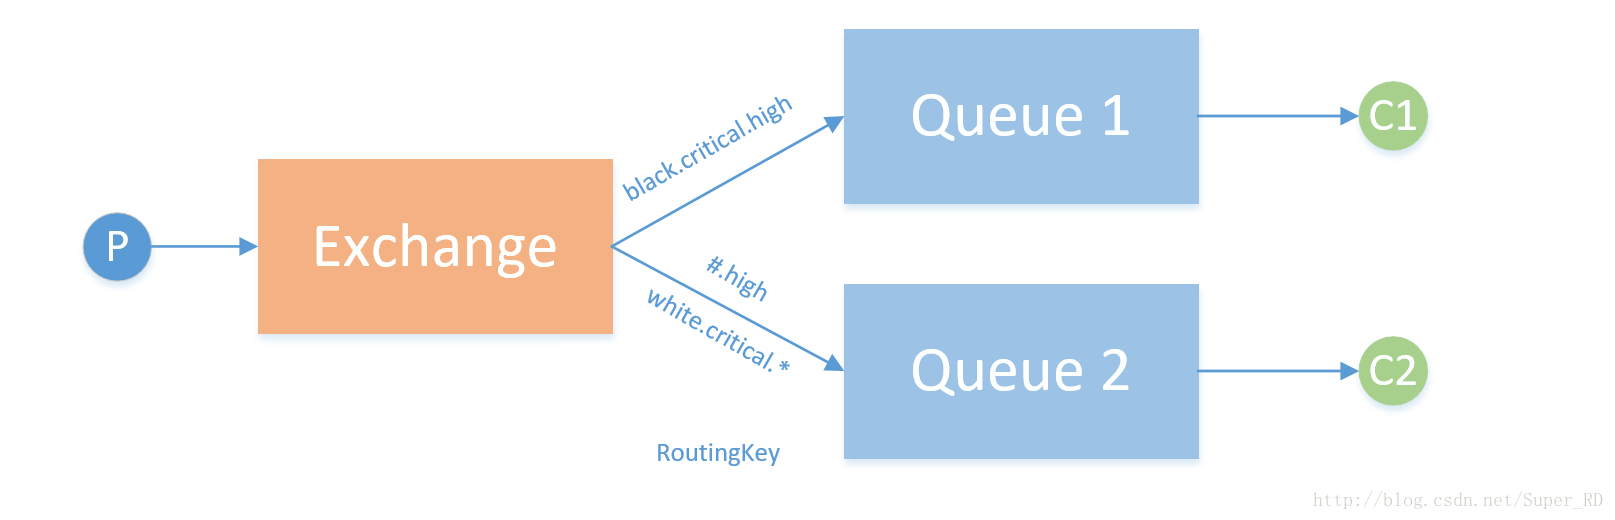
RoutingKey为“black.critical.high”的日志会投递到queue1和queue2,。
RoutingKey为“red.critical.high”的日志会只投递到queue2。
RoutingKey为“white.critical.high”的日志会投递到queue2,并且虽然queue2的两个匹配规则都符合但只会向queue2投递一份。
新建TopicProduct用来发布三种routingkey的消息。
using System;

using System.Text;

using RabbitMQ.Client;

using RabbitMQ.Client.Events;

namespace TopicProduct

{

    class Program

    {

        static void Main(string[] args)

        {

            String exchangeName = "wytExchangeTopic";

            String routeKeyName1 = "black.critical.high";

            String routeKeyName2 = "red.critical.high";

            String routeKeyName3 = "white.critical.high";

            String message1 = "black-critical-high!";

            String message2 = "red-critical-high!";

            String message3 = "white-critical-high!";

            ConnectionFactory factory = new ConnectionFactory();

            factory.HostName = "192.168.63.129";

            factory.Port = ;

            factory.VirtualHost = "/wyt";

            factory.UserName = "wyt";

            factory.Password = "wyt";

            using (IConnection connection=factory.CreateConnection())

            {

                using (IModel channel=connection.CreateModel())

                {

                    channel.ExchangeDeclare(exchange: exchangeName, type: "topic", durable: true, autoDelete: false, arguments: null);

                    IBasicProperties properties = channel.CreateBasicProperties();

                    properties.Persistent = true;

                    Byte[] body1 = Encoding.UTF8.GetBytes(message1);

                    Byte[] body2 = Encoding.UTF8.GetBytes(message2);

                    Byte[] body3 = Encoding.UTF8.GetBytes(message3);

                    //消息推送

                    channel.BasicPublish(exchange: exchangeName, routingKey:routeKeyName1,basicProperties: properties, body: body1);

                    channel.BasicPublish(exchange: exchangeName, routingKey: routeKeyName2, basicProperties: properties, body: body2);

                    channel.BasicPublish(exchange: exchangeName, routingKey: routeKeyName3, basicProperties: properties, body: body3);

                    Console.WriteLine(" [x] Sent {0}", message1);

                    Console.WriteLine(" [x] Sent {0}", message2);

                    Console.WriteLine(" [x] Sent {0}", message3);

                }

            }

            Console.WriteLine(" Press [enter] to exit.");

            Console.ReadLine();

        }

    }

}
新建TopicCustomerA接收一种消息
using System;

using System.Text;

using RabbitMQ.Client;

using RabbitMQ.Client.Events;

namespace TopicCustomerA

{

    class Program

    {

        static void Main(string[] args)

        {

            String exchangeName = "wytExchangeTopic";

            String routeKeyName1 = "black.critical.high";

            ConnectionFactory factory = new ConnectionFactory();

            factory.HostName = "192.168.63.129";

            factory.Port = ;

            factory.VirtualHost = "/wyt";

            factory.UserName = "wyt";

            factory.Password = "wyt";

            using (IConnection connection=factory.CreateConnection())

            {

                using (IModel channel=connection.CreateModel())

                {

                    channel.ExchangeDeclare(exchange: exchangeName, type: "topic", durable: true, autoDelete: false, arguments: null);

                    String queueName = channel.QueueDeclare().QueueName;

                    channel.QueueBind(queue: queueName, exchange: exchangeName, routingKey: routeKeyName1, arguments: null);

                    EventingBasicConsumer consumer = new EventingBasicConsumer(channel);

                    consumer.Received += (model, ea) =>

                    {

                        var body = ea.Body;

                        var message = Encoding.UTF8.GetString(body);

                        var routingKey = ea.RoutingKey;

                        Console.WriteLine(" [x] Received '{0}':'{1}'", routingKey, message);

                        channel.BasicAck(deliveryTag: ea.DeliveryTag, multiple: false);

                    };

                    channel.BasicConsume(queue: queueName, autoAck: false, consumer: consumer);

                    Console.WriteLine(" Press [enter] to exit.");

                    Console.ReadLine();

                }

            }

        }

    }

}
新建TopicCustomerB接收两种消息
using System;

using System.Text;

using RabbitMQ.Client;

using RabbitMQ.Client.Events;

namespace TopicCustomerB

{

    class Program

    {

        static void Main(string[] args)

        {

            String exchangeName = "wytExchangeTopic";

            String routeKeyName1 = "red.critical.*";

            String routeKeyName2 = "white.critical.*";

            ConnectionFactory factory = new ConnectionFactory();

            factory.HostName = "192.168.63.129";

            factory.Port = ;

            factory.VirtualHost = "/wyt";

            factory.UserName = "wyt";

            factory.Password = "wyt";

            using (IConnection connection = factory.CreateConnection())

            {

                using (IModel channel = connection.CreateModel())

                {

                    channel.ExchangeDeclare(exchange: exchangeName, type: "topic", durable: true, autoDelete: false, arguments: null);

                    String queueName = channel.QueueDeclare().QueueName;

                    channel.QueueBind(queue: queueName, exchange: exchangeName, routingKey: routeKeyName1, arguments: null);

                    channel.QueueBind(queue: queueName, exchange: exchangeName, routingKey: routeKeyName2, arguments: null);

                    EventingBasicConsumer consumer = new EventingBasicConsumer(channel);

                    consumer.Received += (model, ea) =>

                    {

                        var body = ea.Body;

                        var message = Encoding.UTF8.GetString(body);

                        var routingKey = ea.RoutingKey;

                        Console.WriteLine(" [x] Received '{0}':'{1}'", routingKey, message);

                        channel.BasicAck(deliveryTag: ea.DeliveryTag, multiple: false);

                    };

                    channel.BasicConsume(queue: queueName, autoAck: false, consumer: consumer);

                    Console.WriteLine(" Press [enter] to exit.");

                    Console.ReadLine();

                }

            }

        }

    }

}
先运行TopicCustomerA和TopicCustomerB保持订阅状态。然后执行TopicProduct发布消息。TopicCustomerA和TopicCustomerB收到的消息如下:
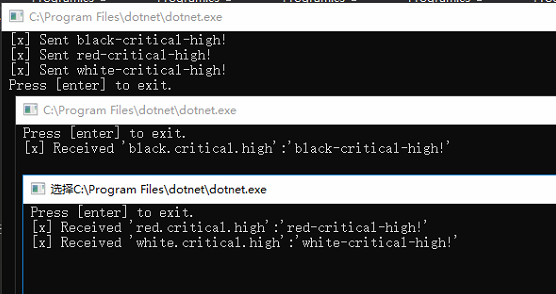
如上截图,验证了我们之前的结论。
另外还有一些特殊情况例如:
如果binding_key 是 “#” - 它会接收所有的Message,不管routing_key是什么,就像是fanout

exchange。

如果 “*” and “#” 没有被使用,那么topic exchange就变成了direct exchange。
RabbitMQ消息队列(八)-通过Topic主题模式分发消息(.Net Core版)的更多相关文章
- (八)RabbitMQ消息队列-通过Topic主题模式分发消息
原文:(八)RabbitMQ消息队列-通过Topic主题模式分发消息 前两章我们讲了RabbitMQ的direct模式和fanout模式,本章介绍topic主题模式的应用.如果对direct模式下通过 ...
- Spring Boot 之 RabbitMQ 消息队列中间件的三种模式
开门见山(文末附有消息队列的几个基本概念) 1.直接模式( Direct)模式 直白的说就是一对一,生产者对应唯一的消费者(当然同一个消费者可以开启多个服务). 虽然使用了自带的交换器(Exchang ...
- (九)RabbitMQ消息队列-通过Headers模式分发消息
原文:(九)RabbitMQ消息队列-通过Headers模式分发消息 Headers类型的exchange使用的比较少,以至于官方文档貌似都没提到,它是忽略routingKey的一种路由方式.是使用H ...
- RabbitMQ入门教程(十七):消息队列的应用场景和常见的消息队列之间的比较
原文:RabbitMQ入门教程(十七):消息队列的应用场景和常见的消息队列之间的比较 分享一个朋友的人工智能教程.比较通俗易懂,风趣幽默,感兴趣的朋友可以去看看. 这是网上的一篇教程写的很好,不知原作 ...
- (转)RabbitMQ消息队列(九):Publisher的消息确认机制
在前面的文章中提到了queue和consumer之间的消息确认机制:通过设置ack.那么Publisher能不到知道他post的Message有没有到达queue,甚至更近一步,是否被某个Consum ...
- RabbitMQ消息队列(九):Publisher的消息确认机制
在前面的文章中提到了queue和consumer之间的消息确认机制:通过设置ack.那么Publisher能不到知道他post的Message有没有到达queue,甚至更近一步,是否被某个Consum ...
- (五)RabbitMQ消息队列-安装amqp扩展并订阅/发布Demo(PHP版)
原文:(五)RabbitMQ消息队列-安装amqp扩展并订阅/发布Demo(PHP版) 本文将介绍在PHP中如何使用RabbitMQ来实现消息的订阅和发布.我使用的系统依然是Centos7,为了方便, ...
- RabbitMQ消息队列(七)-通过fanout模式将消息推送到多个Queue中(.Net Core版)
前面第六章我们使用的是direct直连模式来进行消息投递和分发.本章将介绍如何使用fanout模式将消息推送到多个队列. 有时我们会遇到这样的情况,多个功能模块都希望得到完整的消息数据.例如一个log ...
- Rabbitmq消息队列(六) 主题交换机
1.简介 前面学习了有选择性的接收消息,但是却没有办法基于多个标准来接收消息.为了实现这个目的,接下来我们学习如何使用另一种更复杂的交换机 —— 主题交换机. 2.主题交换机 发送到主题交换机(top ...
随机推荐
- 【C语言编程练习】5.7填数字游戏求解
之前的东西就不上传了,大致就跟现在的一样 1. 题目要求 计算 ABCD * E DCBA 这个算式中每个字母代表什么数字? 2. 题目分析 如果是我们人去做这道题会怎么办,一定是这样想把,一个四位 ...
- nsqadmin
nsqadmin 结构体定义 type Options struct { LogLevel string `flag:"log-level"` LogPrefix string ` ...
- JS的常用属性
JS-------定义:基于事件和对象驱动,并具有安全性能的脚本语言. 引入:<script type=”text/javascript”>具体js代码</script> ...
- msxfs.dll函数加载代码
msxfs.dll函数加载代码 #include "stdafx.h" #include "WSXFSLoader.h" NS_AWP_DEVICE_WOSA_ ...
- Matlab调用遗传工具箱复现论文模型求解部分
原文转载自:https://blog.csdn.net/robert_chen1988/article/details/52431594 论文来源: https://www.sciencedirect ...
- RF经验~~
在用RF进行web自动化脚本编写时,经常会用到对日期控件进行操作.目前认为比较好用的方法是:直接对日期控件进行赋值. Assign Id To Element //*[@id="update ...
- Prometheus — Process-exporter进程监控
由于我们常用的node_exporter并不能覆盖所有监控项,这里我们使用Process-exporter 对进程进行监控. 安装process-exporter wget https://githu ...
- Idea集成maven插件
学习目标 1.正确在idea上安装maven 2.安装后使用的基本操作 3.回顾安装步骤 安装过程 设置安装后自动下载功能 maven一键构建概念 我们的项目,往往都要经历编译. 测试. 运行. 打包 ...
- unix的发展
转载http://blog.51cto.com/1193432/1671058
- python获取函数注释 __doc__
使用 help 函数 可以查看 函数的注释内容 但是它也有点"添油加醋" 其实函数的注释被保存在 __doc__属性里面 PS 双下划线 def f(): "&quo ...