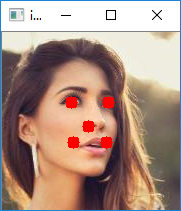
用keras实现人脸关键点检测(2)
上一个代码只能实现小数据的读取与训练,在大数据训练的情况下。会造内存紧张,于是我根据keras的官方文档,对上一个代码进行了改进。
用keras实现人脸关键点检测
数据集:https://pan.baidu.com/s/1cnAxJJmN9nQUVYj8w0WocA
第一步:准备好需要的库
- tensorflow 1.4.0
- h5py 2.7.0
- hdf5 1.8.15.1
- Keras 2.0.8
- opencv-python 3.3.0
- numpy 1.13.3+mkl
第二步:准备数据集:
我对每一张图像进行了剪裁,使图像的大小为178*178的正方形。

并且对于原有的lable进行了优化
第三步:将图片和标签转成numpy array格式:
参数
 trainpath = 'E:/pycode/facial-keypoints-master/data/50000train/'
 testpath = 'E:/pycode/facial-keypoints-master/data/50000test/'
 imgsize = 178
 train_samples =40000
 test_samples = 200
 batch_size = 32
 def __data_label__(path):
     f = open(path + "lable-40.txt", "r")
     j = 0
     i = -1
     datalist = []
     labellist = []
     while True:

         for line in f.readlines():
             i += 1
             j += 1
             a = line.replace("\n", "")
             b = a.split(",")
             lable = b[1:]
             # print(b[1:])
             #对标签进行归一化(不归一化也行)
             # for num in b[1:]:
             #     lab = int(num) / 255.0
             #     labellist.append(lab)
             # lab = labellist[i * 10:j * 10]
             imgname = path + b[0]
             images = load_img(imgname)
             images = img_to_array(images).astype('float32')
             # 对图片进行归一化(不归一化也行)
             # images /= 255.0
             image = np.expand_dims(images, axis=0)
             lables = np.array(lable)

             # lable =keras.utils.np_utils.to_categorical(lable)
             # lable = np.expand_dims(lable, axis=0)
             lable = lables.reshape(1, 10)
        #这里使用了生成器
             yield (image,lable)
第四步:搭建网络:
这里使用非常简单的网络
     def __CNN__(self):
         model = Sequential()#178*178*3
         model.add(Conv2D(32, (3, 3), input_shape=(imgsize, imgsize, 3)))
         model.add(Activation('relu'))
         model.add(MaxPooling2D(pool_size=(2, 2)))

         model.add(Conv2D(32, (3, 3)))
         model.add(Activation('relu'))
         model.add(MaxPooling2D(pool_size=(2, 2)))

         model.add(Conv2D(64, (3, 3)))
         model.add(Activation('relu'))
         model.add(MaxPooling2D(pool_size=(2, 2)))

         model.add(Flatten())
         model.add(Dense(64))
         model.add(Activation('relu'))
         model.add(Dropout(0.5))
         model.add(Dense(10))
         return model
 #因为是回归问题,抛弃了softmax
_________________________________________________________________
Layer (type) Output Shape Param #
=================================================================
conv2d_1 (Conv2D) (None, 176, 176, 32) 896
_________________________________________________________________
activation_1 (Activation) (None, 176, 176, 32) 0
_________________________________________________________________
max_pooling2d_1 (MaxPooling2 (None, 88, 88, 32) 0
_________________________________________________________________
conv2d_2 (Conv2D) (None, 86, 86, 32) 9248
_________________________________________________________________
activation_2 (Activation) (None, 86, 86, 32) 0
_________________________________________________________________
max_pooling2d_2 (MaxPooling2 (None, 43, 43, 32) 0
_________________________________________________________________
conv2d_3 (Conv2D) (None, 41, 41, 64) 18496
_________________________________________________________________
activation_3 (Activation) (None, 41, 41, 64) 0
_________________________________________________________________
max_pooling2d_3 (MaxPooling2 (None, 20, 20, 64) 0
_________________________________________________________________
flatten_1 (Flatten) (None, 25600) 0
_________________________________________________________________
dense_1 (Dense) (None, 64) 1638464
_________________________________________________________________
activation_4 (Activation) (None, 64) 0
_________________________________________________________________
dropout_1 (Dropout) (None, 64) 0
_________________________________________________________________
dense_2 (Dense) (None, 10) 650
=================================================================
Total params: 1,667,754
Trainable params: 1,667,754
Non-trainable params: 0
_________________________________________________________________
第五步:训练网络:
 def train(model):
     # print(lable.shape)
     model.compile(loss='mse', optimizer='adam')
     # optimizer = SGD(lr=0.03, momentum=0.9, nesterov=True)
     # model.compile(loss='mse', optimizer=optimizer, metrics=['accuracy'])
     epoch_num = 14
     learning_rate = np.linspace(0.03, 0.01, epoch_num)
     change_lr = LearningRateScheduler(lambda epoch: float(learning_rate[epoch]))
     early_stop = EarlyStopping(monitor='val_loss', patience=20, verbose=1, mode='auto')
     check_point = ModelCheckpoint('CNN_model_final.h5', monitor='val_loss', verbose=0, save_best_only=True,
                                   save_weights_only=False, mode='auto', period=1)

     model.fit_generator(__data_label__(trainpath),callbacks=[check_point,early_stop,change_lr],samples_per_epoch=int(train_samples // batch_size),
                         epochs=epoch_num,validation_steps = int(test_samples // batch_size),validation_data=__data_label__(testpath))

     # model.fit(traindata, trainlabel, batch_size=32, epochs=50,
     #           validation_data=(testdata, testlabel))
     model.evaluate_generator(__data_label__(testpath),steps=10)

 def save(model, file_path=FILE_PATH):
     print('Model Saved.')
     model.save_weights(file_path)

 def predict(model,image):
     # 预测样本分类
     image = cv2.resize(image, (imgsize, imgsize))
     image.astype('float32')
     image /= 255

     #归一化
     result = model.predict(image)
     result = result*1000+20

     print(result)
     return result
使用了fit_generator这一方法,加入了learning_rate,LearningRateScheduler,early_stop等参数。
第六步:图像验证
 import tes_main
 from keras.preprocessing.image import load_img, img_to_array
 import numpy as np
 import cv2
 FILE_PATH = 'E:\\pycode\\facial-keypoints-master\\code\\CNN_model_final.h5'
 imgsize =178
 def point(img,x, y):
     cv2.circle(img, (x, y), 1, (0, 0, 255), 10)

 Model = tes_main.Model()
 model = Model.__CNN__()
 Model.load(model,FILE_PATH)
 img = []
 # path = "D:\\Users\\a\\Pictures\\face_landmark_data\data\\test\\000803.jpg"
 path = "E:\pycode\\facial-keypoints-master\data\\50000test\\049971.jpg"
 # image = load_img(path)
 # img.append(img_to_array(image))
 # img_data = np.array(img)
 imgs = cv2.imread(path)
 # img_datas = np.reshape(imgs,(imgsize, imgsize,3))
 image = cv2.resize(imgs, (imgsize, imgsize))
 rects = Model.predict(model,imgs)

 for x, y, w, h, a,b,c,d,e,f in rects:
     point(image,x,y)
     point(image,w, h)
     point(image,a,b)
     point(image,c,d)
     point(image,e,f)

 cv2.imshow('img', image)
 cv2.waitKey(0)
 cv2.destroyAllWindows()


完整代码如下
 from tensorflow.contrib.keras.api.keras.preprocessing.image import ImageDataGenerator,img_to_array
 from keras.models import Sequential
 from keras.layers.core import Dense, Dropout, Activation, Flatten
 from keras.layers.advanced_activations import PReLU
 from keras.layers.convolutional import Conv2D, MaxPooling2D,ZeroPadding2D
 from keras.preprocessing.image import load_img, img_to_array
 from keras.optimizers import  SGD
 import numpy as np
 import cv2
 from keras.callbacks import *
 import keras

 FILE_PATH = 'E:\\pycode\\facial-keypoints-master\\code\\CNN_model_final.h5'
 trainpath = 'E:/pycode/facial-keypoints-master/data/50000train/'
 testpath = 'E:/pycode/facial-keypoints-master/data/50000test/'
 imgsize = 178
 train_samples =40000
 test_samples = 200
 batch_size = 32
 def __data_label__(path):
     f = open(path + "lable-40.txt", "r")
     j = 0
     i = -1
     datalist = []
     labellist = []
     while True:

         for line in f.readlines():
             i += 1
             j += 1
             a = line.replace("\n", "")
             b = a.split(",")
             lable = b[1:]
             # print(b[1:])
             #对标签进行归一化(不归一化也行)
             # for num in b[1:]:
             #     lab = int(num) / 255.0
             #     labellist.append(lab)
             # lab = labellist[i * 10:j * 10]
             imgname = path + b[0]
             images = load_img(imgname)
             images = img_to_array(images).astype('float32')
             # 对图片进行归一化(不归一化也行)
             # images /= 255.0
             image = np.expand_dims(images, axis=0)
             lables = np.array(lable)

             # lable =keras.utils.np_utils.to_categorical(lable)
             # lable = np.expand_dims(lable, axis=0)
             lable = lables.reshape(1, 10)

             yield (image,lable)

 ###############:

 # 开始建立CNN模型
 ###############

 # 生成一个model
 class Model(object):
     def __CNN__(self):
         model = Sequential()#218*178*3
         model.add(Conv2D(32, (3, 3), input_shape=(imgsize, imgsize, 3)))
         model.add(Activation('relu'))
         model.add(MaxPooling2D(pool_size=(2, 2)))

         model.add(Conv2D(32, (3, 3)))
         model.add(Activation('relu'))
         model.add(MaxPooling2D(pool_size=(2, 2)))

         model.add(Conv2D(64, (3, 3)))
         model.add(Activation('relu'))
         model.add(MaxPooling2D(pool_size=(2, 2)))

         model.add(Flatten())
         model.add(Dense(64))
         model.add(Activation('relu'))
         model.add(Dropout(0.5))
         model.add(Dense(10))
         model.summary()
         return model

     def train(self,model):
         # print(lable.shape)
         model.compile(loss='mse', optimizer='adam', metrics=['accuracy'])
         # optimizer = SGD(lr=0.03, momentum=0.9, nesterov=True)
         # model.compile(loss='mse', optimizer=optimizer, metrics=['accuracy'])
         epoch_num = 10
         learning_rate = np.linspace(0.03, 0.01, epoch_num)
         change_lr = LearningRateScheduler(lambda epoch: float(learning_rate[epoch]))
         early_stop = EarlyStopping(monitor='val_loss', patience=20, verbose=1, mode='auto')
         check_point = ModelCheckpoint('CNN_model_final.h5', monitor='val_loss', verbose=0, save_best_only=True,
                                       save_weights_only=False, mode='auto', period=1)

         model.fit_generator(__data_label__(trainpath),callbacks=[check_point,early_stop,change_lr],samples_per_epoch=int(train_samples // batch_size),
                             epochs=epoch_num,validation_steps = int(test_samples // batch_size),validation_data=__data_label__(testpath))

         # model.fit(traindata, trainlabel, batch_size=32, epochs=50,
         #           validation_data=(testdata, testlabel))
         model.evaluate_generator(__data_label__(testpath))

     def save(self,model, file_path=FILE_PATH):
         print('Model Saved.')
         model.save_weights(file_path)

     def load(self,model, file_path=FILE_PATH):
         print('Model Loaded.')
         model.load_weights(file_path)

     def predict(self,model,image):
         # 预测样本分类
         print(image.shape)
         image = cv2.resize(image, (imgsize, imgsize))
         image.astype('float32')
         image = np.expand_dims(image, axis=0)

         #归一化
         result = model.predict(image)

         print(result)
         return result
用keras实现人脸关键点检测(2)的更多相关文章
- keras实现简单CNN人脸关键点检测
用keras实现人脸关键点检测 改良版:http://www.cnblogs.com/ansang/p/8583122.html 第一步:准备好需要的库 tensorflow 1.4.0 h5py ...
- dlib人脸关键点检测的模型分析与压缩
本文系原创,转载请注明出处~ 小喵的博客:https://www.miaoerduo.com 博客原文(排版更精美):https://www.miaoerduo.com/c/dlib人脸关键点检测的模 ...
- 机器学习进阶-人脸关键点检测 1.dlib.get_frontal_face_detector(构建人脸框位置检测器) 2.dlib.shape_predictor(绘制人脸关键点检测器) 3.cv2.convexHull(获得凸包位置信息)
1.dlib.get_frontal_face_detector() # 获得人脸框位置的检测器, detector(gray, 1) gray表示灰度图, 2.dlib.shape_predict ...
- OpenCV实战:人脸关键点检测(FaceMark)
Summary:利用OpenCV中的LBF算法进行人脸关键点检测(Facial Landmark Detection) Author: Amusi Date: 2018-03-20 ...
- OpenCV Facial Landmark Detection 人脸关键点检测
Opencv-Facial-Landmark-Detection 利用OpenCV中的LBF算法进行人脸关键点检测(Facial Landmark Detection) Note: OpenCV3.4 ...
- Opencv与dlib联合进行人脸关键点检测与识别
前言 依赖库:opencv 2.4.9 /dlib 19.0/libfacedetection 本篇不记录如何配置,重点在实现上.使用libfacedetection实现人脸区域检测,联合dlib标记 ...
- opencv+python+dlib人脸关键点检测、实时检测
安装的是anaconde3.python3.7.3,3.7环境安装dlib太麻烦, 在anaconde3中新建环境python3.6.8, 在3.6环境下安装dlib-19.6.1-cp36-cp36 ...
- Facial landmark detection - 人脸关键点检测
Facial landmark detection (Facial keypoints detection) OpenSourceLibrary: DLib Project Home: http: ...
- 级联MobileNet-V2实现CelebA人脸关键点检测(转)
https://blog.csdn.net/u011995719/article/details/79435615
随机推荐
- 网易面经(Java开发岗)
网易面经(Java岗) 网易两面面经整理 岗位:我投递的是杭研所的Java开发岗位.行程:半天的时间南京=杭州之间穿行,单程2个小时,从杭州东站=网易大厦,单程1个小时(如果能买到城站高铁动车票可以从 ...
- Kali Linux信息收集工具
http://www.freebuf.com/column/150118.html 可能大部分渗透测试者都想成为网络空间的007,而我个人的目标却是成为Q先生! 看过007系列电影的朋友,应该都还记得 ...
- Kali Linux 工具使用中文说明书
From: https://www.hackfun.org/kali-tools/kali-tools-zh.html 英文版地址:http://tools.kali.org/ 信息收集 accche ...
- 当今商业中使用的三种十分重要的IT应用系统
本文为读书笔记,其中内容摘自<信息时代的管理信息系统>第八版第二章 当今商业中使用的三种十分重要的IT应用系统: 供应链管理(SCM) 客户关系管理(CRM) 电子协同(e-collabo ...
- nginx flv点播服务器搭建
首先选用Nginx+Nginx-rtmp-module作为点播服务器,安装文章:https://www.atlantic.NET/community/howto/install-rtmp-ubuntu ...
- 怎样看Mac的日志
Mac自带的日志查看工具Console,注意Console和Terminal不是一码事,后者是CLI环境,前者是GUI日志查看工具.在应用里面搜索Console即可找到,里面的界面和Windows的日 ...
- Java虚拟机-类加载
虚拟机把描述类的数据从Class文件加载到内存,并对数据进行检验.转换解析和初始化,最终形成了可以被虚拟机直接使用的Java类型,这就是虚拟机的类加载机制.在Java语言里,类型的加载.连接和初始化过 ...
- HTML学习笔记6:列表标签
列表标签 什么是列表标签呢? 以平台区分有什么游戏? 手游 pc游戏 家用机游戏 掌机游戏 以游戏类型区分有什么游戏? RPG ARPG MMORPG ACT FPS 以上两种就是一种列表标签 ...
- js中几种实用的跨域方法原理详解【转】
源地址:http://www.cnblogs.com/2050/p/3191744.html 这里说的js跨域是指通过js在不同的域之间进行数据传输或通信,比如用ajax向一个不同的域请求数据,或者通 ...
- SSM博客 前端页面样式不显示
<!-- 由于在web.xml中定义的url拦截形式为“/”表示拦截所有的url请求, 包括静态资源例如css.js等.所以需要在springmvc.xml中添加资源映射标 --> < ...
