IDEA整合SSM框架:简易图书操作模块
这个SSM整合文章,以图书的增删改查为例
本篇文章源码已上传:
Github:https://github.com/RivTian/University-coursework/tree/master/SSM-Template
搭建数据库
创建一个存放书籍数据的数据库表ssmbook:
CREATE DATABASE `ssmbook`;

USE `ssmbook`;

DROP TABLE IF EXISTS `books`;

CREATE TABLE `books` (

`bookID` INT(10) NOT NULL AUTO_INCREMENT COMMENT '书id',

`bookName` VARCHAR(100) NOT NULL COMMENT '书名',

`bookCounts` INT(11) NOT NULL COMMENT '数量',

`detail` VARCHAR(200) NOT NULL COMMENT '描述',

KEY `bookID` (`bookID`)

) ENGINE=INNODB DEFAULT CHARSET=utf8;

INSERT  INTO `books`(`bookID`,`bookName`,`bookCounts`,`detail`)VALUES

(1,'Java',1,'这是一个JAVA'),

(2,'MySQL',10,'我是Mysql'),

(3,'SSM',5,'SSM整合啦');
基本环境搭建
1、新建一Maven项目 , 添加web的支持
2、导入相关的pom依赖
<dependencies>

    <!--Junit-->

    <dependency>

        <groupId>junit</groupId>

        <artifactId>junit</artifactId>

        <version>4.13</version>

        <scope>test</scope>

    </dependency>

    <!--数据库驱动-->

    <dependency>

        <groupId>mysql</groupId>

        <artifactId>mysql-connector-java</artifactId>

        <version>5.1.46</version>

    </dependency>

    <!-- 数据库连接池 -->

    <dependency>

        <!--

			必须使用 com.mchange 不然会出现 C3P0 连接池错误

		-->

        <groupId>com.mchange</groupId>

        <artifactId>c3p0</artifactId>

        <version>0.9.1.2</version>

    </dependency>

    <!--Servlet - JSP -->

    <dependency>

        <groupId>javax.servlet</groupId>

        <artifactId>servlet-api</artifactId>

        <version>2.5</version>

        <scope>provided</scope>

    </dependency>

    <dependency>

        <groupId>javax.servlet.jsp</groupId>

        <artifactId>jsp-api</artifactId>

        <version>2.2</version>

        <scope>provided</scope>

    </dependency>

    <dependency>

        <groupId>javax.servlet</groupId>

        <artifactId>jstl</artifactId>

        <version>1.2</version>

    </dependency>

    <!--Mybatis-->

    <dependency>

        <groupId>org.mybatis</groupId>

        <artifactId>mybatis</artifactId>

        <version>3.5.6</version>

    </dependency>

    <dependency>

        <groupId>org.mybatis</groupId>

        <artifactId>mybatis-spring</artifactId>

        <version>2.0.6</version>

    </dependency>

    <!--Spring-->

    <dependency>

        <groupId>org.springframework</groupId>

        <artifactId>spring-webmvc</artifactId>

        <version>5.2.5.RELEASE</version>

    </dependency>

    <dependency>

        <groupId>org.springframework</groupId>

        <artifactId>spring-jdbc</artifactId>

        <version>5.2.5.RELEASE</version>

    </dependency>

</dependencies>
3、Maven资源过滤设置
<build>

    <resources>

        <resource>

            <directory>src/main/java</directory>

            <includes>

                <include>**/*.properties</include>

                <include>**/*.xml</include>

            </includes>

            <filtering>false</filtering>

        </resource>

        <resource>

            <directory>src/main/resources</directory>

            <includes>

                <include>**/*.properties</include>

                <include>**/*.xml</include>

            </includes>

            <filtering>false</filtering>

        </resource>

    </resources>

    <plugins>

        <plugin>

            <groupId>org.apache.tomcat.maven</groupId>

            <artifactId>tomcat7-maven-plugin</artifactId>

            <version>2.2</version>

            <configuration>

                <!-- 设置编码格式 -->

                <uriEncoding>UTF-8</uriEncoding>

                <!-- 控制 tomcat 端口号 -->

                <port>8080</port>

                <!-- 项目发布到 tomcat 后的名称 -->

                <!-- 如果写 /,相当于项目发布后的名称为 ROOT -->

                <!-- 如果写 /abc,相当于项目发布后的名称为 abc -->

                <path>/ssm</path>

            </configuration>

        </plugin>

    </plugins>

</build>
4、建立基本结构和配置框架
com.riotian.domain
com.riotian.mapper
com.riotian.service
com.riotian.controller
mybatis-config.xml
<?xml version="1.0" encoding="UTF-8" ?>

<!DOCTYPE configuration

        PUBLIC "-//mybatis.org//DTD Config 3.0//EN"

        "http://mybatis.org/dtd/mybatis-3-config.dtd">

<configuration>

</configuration>
applicationContext.xml
<?xml version="1.0" encoding="UTF-8"?>

<beans xmlns="http://www.springframework.org/schema/beans"

       xmlns:xsi="http://www.w3.org/2001/XMLSchema-instance"

       xsi:schemaLocation="http://www.springframework.org/schema/beans http://www.springframework.org/schema/beans/spring-beans.xsd">

</beans>
Mybatis层编写
1、数据库配置文件
数据库配置文件 jdbc.properties
jdbc.driver=com.mysql.jdbc.Driver

jdbc.url=jdbc:mysql://localhost:3306/ssmbook?useSSL=false

jdbc.username=root

jdbc.password=kokoro
2、关联数据库
IDEA关联数据库,用idea登陆上自己的数据库
3、编写MyBatis的核心配置文件
<?xml version="1.0" encoding="UTF-8" ?>

<!DOCTYPE configuration

        PUBLIC "-//mybatis.org//DTD Config 3.0//EN"

        "http://mybatis.org/dtd/mybatis-3-config.dtd">

<configuration>

    <!--加载properties文件-->

    <properties resource="jdbc.properties"></properties>

    <!--定义别名-->

    <typeAliases>

        <package name="com.riotian.domain"/>

    </typeAliases>

    <!--环境-->

    <environments default="developement">

        <environment id="developement">

            <transactionManager type="JDBC"></transactionManager>

            <dataSource type="POOLED">

                <property name="driver" value="${jdbc.driver}"></property>

                <property name="url" value="${jdbc.url}"></property>

                <property name="username" value="${jdbc.username}"></property>

                <property name="password" value="${jdbc.password}"></property>

            </dataSource>

        </environment>

    </environments>

    <!--加载映射-->

    <mappers>

        <!--<mapper resource="com/riotian/mapper/BookMapper.xml"></mapper>-->

        <package name="com.riotian.mapper"/>

    </mappers>

</configuration>
4、实体类
编写数据库对应的实体类 Books(两种方法)
一、使用lombok插件,记得导入Lombok依赖,idea要下载lombok插件
如何在 IDEA 中使用 LomBok 插件:Click Here
@Data

@AllArgsConstructor

@NoArgsConstructor

public class Books {

    private int bookID;

    private String bookName;

    private int bookCounts;

    private String detail;

}
二、手动添加方法
public class Books {

    private int bookID;

    private String bookName;

    private int bookCounts;

    private String detail;

    public int getBookID() {

        return bookID;

    }

    public void setBookID(int bookID) {

        this.bookID = bookID;

    }

    public String getBookName() {

        return bookName;

    }

    public void setBookName(String bookName) {

        this.bookName = bookName;

    }

    public int getBookCounts() {

        return bookCounts;

    }

    public void setBookCounts(int bookCounts) {

        this.bookCounts = bookCounts;

    }

    public String getDetail() {

        return detail;

    }

    public void setDetail(String detail) {

        this.detail = detail;

    }

    public Books() {

    }

    @Override

    public String toString() {

        return "Books{" +

                "bookID=" + bookID +

                ", bookName='" + bookName + '\'' +

                ", bookCounts=" + bookCounts +

                ", detail='" + detail + '\'' +

                '}';

    }

    public Books(int bookID, String bookName, int bookCounts, String detail) {

        this.bookID = bookID;

        this.bookName = bookName;

        this.bookCounts = bookCounts;

        this.detail = detail;

    }

}
5、编写Mapper层的 Mapper接口以及其注解
public interface BookMapper {

    //增加一个Book

    @Insert("insert into ssmbook.books(bookName,bookCounts,detail) values (#{bookName}, #{bookCounts}, #{detail})")

    public int addBook(Books book);

    //根据id删除一个Book

    @Delete("delete from ssmbook.books where bookID=#{bookID}")

    public int deleteBookById(int id);

    //更新Book

    @Update("update ssmbook.books set bookName = #{bookName},bookCounts = #{bookCounts},detail = #{detail} where bookID = #{bookID}")

    public int updateBook(Books books);

    //根据id查询,返回一个Book

    @Select("select * from ssmbook.books where bookID = #{bookID}")

    public Books queryBookById(int id);

    //查询全部Book,返回list集合

    @Select("select * from ssmbook.books")

    public List<Books> queryAllBook();

}
6、编写Service层
接口:
public interface BookService {

    //增加一个Book

    int addBook(Books book);

    //根据id删除一个Book

    int deleteBookById(int id);

    //更新Book

    int updateBook(Books books);

    //根据id查询,返回一个Book

    Books queryBookById(int id);

    //查询全部Book,返回list集合

    List<Books> queryAllBook();

}
实现类:
public class BookServiceImpl implements BookService{

    private BookMapper bookMapper;

    public void setBookMapper(BookMapper bookMapper) {

        this.bookMapper = bookMapper;

    }

    public int addBook(Books book) {

        return bookMapper.addBook(book);

    }

    public int deleteBookById(int id) {

        return bookMapper.deleteBookById(id);

    }

    public int updateBook(Books books) {

        return bookMapper.updateBook(books);

    }

    public Books queryBookById(int id) {

        return bookMapper.queryBookById(id);

    }

    public List<Books> queryAllBook() {

        return bookMapper.queryAllBook();

    }

}
到此,底层需求操作编写完毕
Spring层
1、配置Spring整合MyBatis,我们这里数据源使用c3p0连接池;
2、我们去编写Spring整合Mybatis的相关的配置文件:spring-dao.xml
<?xml version="1.0" encoding="UTF-8"?>

<beans xmlns="http://www.springframework.org/schema/beans"

       xmlns:xsi="http://www.w3.org/2001/XMLSchema-instance"

       xmlns:context="http://www.springframework.org/schema/context"

       xsi:schemaLocation="http://www.springframework.org/schema/beans

       http://www.springframework.org/schema/beans/spring-beans.xsd

       http://www.springframework.org/schema/context

       https://www.springframework.org/schema/context/spring-context.xsd">

    <!-- 配置整合mybatis -->

    <!-- 1.关联数据库文件 -->

    <context:property-placeholder location="classpath:jdbc.properties"/>

    <!-- 2.数据库连接池 -->

    <!--数据库连接池

        dbcp 半自动化操作 不能自动连接

        c3p0 自动化操作(自动的加载配置文件 并且设置到对象里面)

    -->

    <bean id="dataSource" class="com.mchange.v2.c3p0.ComboPooledDataSource">

        <!-- 配置连接池属性 -->

        <property name="driverClass" value="${jdbc.driver}"/>

        <property name="jdbcUrl" value="${jdbc.url}"/>

        <property name="user" value="${jdbc.username}"/>

        <property name="password" value="${jdbc.password}"/>

        <!-- c3p0连接池的私有属性 -->

        <property name="maxPoolSize" value="30"/>

        <property name="minPoolSize" value="10"/>

        <!-- 关闭连接后不自动commit -->

        <property name="autoCommitOnClose" value="false"/>

        <!-- 获取连接超时时间 -->

        <property name="checkoutTimeout" value="10000"/>

        <!-- 当获取连接失败重试次数 -->

        <property name="acquireRetryAttempts" value="2"/>

    </bean>

    <!-- 3.配置SqlSessionFactory对象 -->

    <bean id="sqlSessionFactory" class="org.mybatis.spring.SqlSessionFactoryBean">

        <!-- 注入数据库连接池 -->

        <property name="dataSource" ref="dataSource"/>

        <!-- 配置MyBaties全局配置文件:mybatis-config.xml -->

        <property name="configLocation" value="classpath:mybatis-config.xml"/>

    </bean>

    <!-- 4.配置扫描Dao接口包,动态实现Dao接口注入到spring容器中 -->

    <bean class="org.mybatis.spring.mapper.MapperScannerConfigurer">

        <!-- 注入sqlSessionFactory -->

        <property name="sqlSessionFactoryBeanName" value="sqlSessionFactory"/>

        <!-- 给出需要扫描Dao/mapper接口包 -->

        <property name="basePackage" value="com.riotian.mapper"/>

    </bean>

</beans>
3、Spring整合service层:spring-service.xml
<?xml version="1.0" encoding="UTF-8"?>

<beans xmlns="http://www.springframework.org/schema/beans"

       xmlns:xsi="http://www.w3.org/2001/XMLSchema-instance"

       xmlns:context="http://www.springframework.org/schema/context"

       xsi:schemaLocation="http://www.springframework.org/schema/beans http://www.springframework.org/schema/beans/spring-beans.xsd http://www.springframework.org/schema/context https://www.springframework.org/schema/context/spring-context.xsd">

    <!-- 扫描service相关的bean -->

    <context:component-scan base-package="com.riotian.service" />

    <!--BookServiceImpl注入到IOC容器中-->

    <bean id="BookServiceImpl" class="com.riotian.service.impl.BookServiceImpl">

        <property name="bookMapper" ref="bookMapper"/>

    </bean>

    <!-- 配置事务管理器 -->

    <bean id="transactionManager" class="org.springframework.jdbc.datasource.DataSourceTransactionManager">

        <!-- 注入数据库连接池 -->

        <property name="dataSource" ref="dataSource" />

    </bean>

</beans>
如果这个文件出错,是因为Spring的几个配置文件没有整合在一起,有两个方法:
一、手动关联
File—Project Structure中:
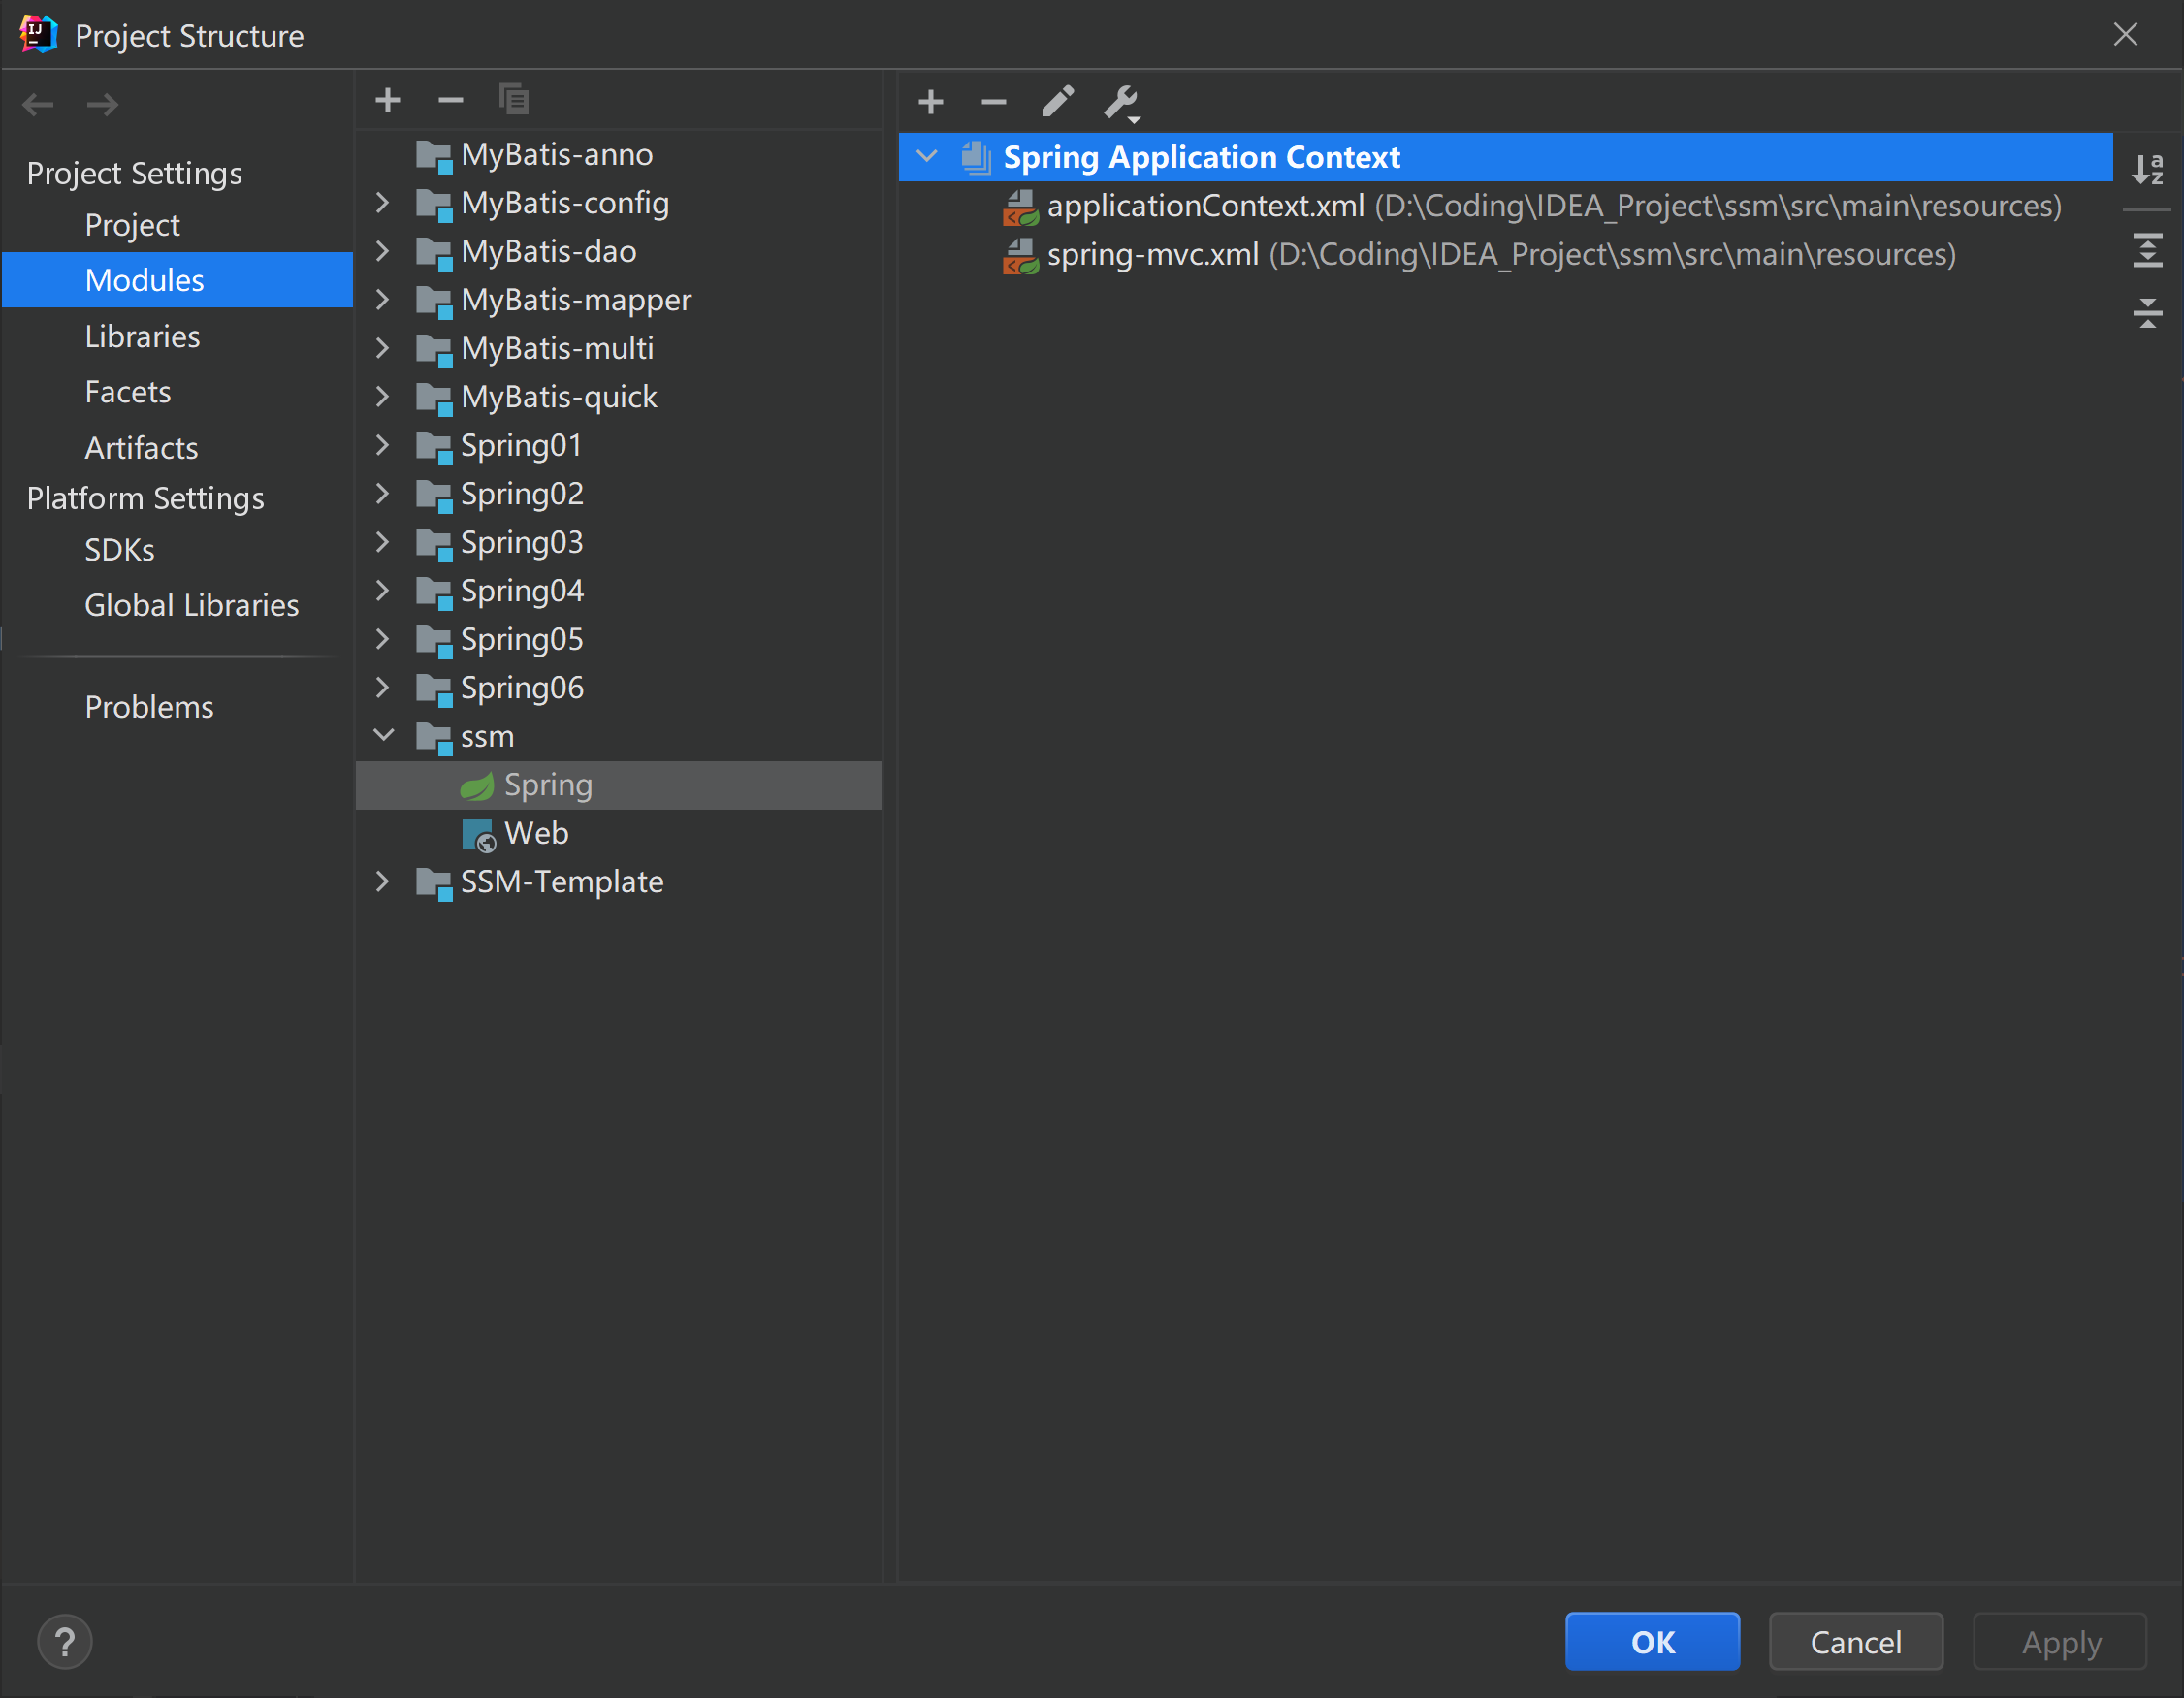
如果不在同一个里面,点 “+” 添加文件。
二、语句引用
在配置文件applicationContext.xml中加入引用语句:
<?xml version="1.0" encoding="UTF-8"?>

<beans xmlns="http://www.springframework.org/schema/beans"

	   xmlns:xsi="http://www.w3.org/2001/XMLSchema-instance"

	   xsi:schemaLocation="http://www.springframework.org/schema/beans

       http://www.springframework.org/schema/beans/spring-beans.xsd">

    <import resource="classpath:spring-service.xml"/>

	<import resource="classpath:spring-dao.xml"/>

</beans>
这样这三个xml文件就关联起来了。
SpringMVC层
1、web.xml
<?xml version="1.0" encoding="UTF-8"?>

<web-app xmlns="http://xmlns.jcp.org/xml/ns/javaee"

         xmlns:xsi="http://www.w3.org/2001/XMLSchema-instance"

         xsi:schemaLocation="http://xmlns.jcp.org/xml/ns/javaee http://xmlns.jcp.org/xml/ns/javaee/web-app_4_0.xsd"

         version="4.0">

    <!--DispatcherServlet-->

    <servlet>

        <servlet-name>DispatcherServlet</servlet-name>

        <servlet-class>org.springframework.web.servlet.DispatcherServlet</servlet-class>

        <init-param>

            <param-name>contextConfigLocation</param-name>

            <!--一定要注意:我们这里加载的是总的配置文件,之前被这里坑了!-->

            <param-value>classpath:applicationContext.xml</param-value>

        </init-param>

        <load-on-startup>1</load-on-startup>

    </servlet>

    <servlet-mapping>

        <servlet-name>DispatcherServlet</servlet-name>

        <url-pattern>/</url-pattern>

    </servlet-mapping>

    <!--encodingFilter-->

    <filter>

        <filter-name>encodingFilter</filter-name>

        <filter-class>

            org.springframework.web.filter.CharacterEncodingFilter

        </filter-class>

        <init-param>

            <param-name>encoding</param-name>

            <param-value>utf-8</param-value>

        </init-param>

    </filter>

    <filter-mapping>

        <filter-name>encodingFilter</filter-name>

        <url-pattern>/*</url-pattern>

    </filter-mapping>

    <!--Session过期时间-->

    <session-config>

        <session-timeout>15</session-timeout>

    </session-config>

</web-app>
2、springmvc.xml
<?xml version="1.0" encoding="UTF-8"?>

<beans xmlns="http://www.springframework.org/schema/beans"

       xmlns:xsi="http://www.w3.org/2001/XMLSchema-instance"

       xmlns:context="http://www.springframework.org/schema/context"

       xmlns:mvc="http://www.springframework.org/schema/mvc"

       xsi:schemaLocation="http://www.springframework.org/schema/beans

   http://www.springframework.org/schema/beans/spring-beans.xsd

   http://www.springframework.org/schema/context

   http://www.springframework.org/schema/context/spring-context.xsd

   http://www.springframework.org/schema/mvc

   https://www.springframework.org/schema/mvc/spring-mvc.xsd">

    <!-- 配置SpringMVC -->

    <!-- 1.开启SpringMVC注解驱动 -->

    <mvc:annotation-driven />

    <!-- 2.静态资源默认servlet配置-->

    <mvc:default-servlet-handler/>

    <!-- 3.配置jsp 显示ViewResolver视图解析器 -->

    <bean class="org.springframework.web.servlet.view.InternalResourceViewResolver">

        <property name="viewClass" value="org.springframework.web.servlet.view.JstlView" />

        <property name="prefix" value="/WEB-INF/pages/" />

        <property name="suffix" value=".jsp" />

    </bean>

    <!-- 4.扫描web相关的bean -->

    <context:component-scan base-package="com.riotian.controller" />

</beans>
3、applicationContext.xml
<?xml version="1.0" encoding="UTF-8"?>

<beans xmlns="http://www.springframework.org/schema/beans"

      xmlns:xsi="http://www.w3.org/2001/XMLSchema-instance"

      xsi:schemaLocation="http://www.springframework.org/schema/beans

       http://www.springframework.org/schema/beans/spring-beans.xsd">

   <import resource="spring-dao.xml"/>

   <import resource="spring-service.xml"/>

   <import resource="spring-mvc.xml"/>

</beans>
4.BookController类
@Controller

public class BookController {

    @Autowired

    @Qualifier("BookServiceImpl")

    private BookService bookService;

    // 方法一:查询全部书籍

    @RequestMapping("/allBook")

    public String list(Model model) {

        List<Books> list = bookService.queryAllBook();

        model.addAttribute("list", list);

        return "allBook";

    }

    // 方法二:添加书籍

    @RequestMapping("/toAddBook")

    public String toAddPaper() {

        return "addBook";

    }

    @RequestMapping("/addBook")

    public String addPaper(Books books) {

        System.out.println(books);

        bookService.addBook(books);

        return "allBook";

    }

    // 方法三:修改书籍

    @RequestMapping("/toUpdateBook")

    public String toUpdateBook(Model model, int id) {

        Books books = bookService.queryBookById(id);

        System.out.println(books);

        model.addAttribute("book",books );

        return "updateBook";

    }

    @RequestMapping("/updateBook")

    public String updateBook(Model model, Books book) {

        System.out.println(book);

        bookService.updateBook(book);

        Books books = bookService.queryBookById(book.getBookID());

        model.addAttribute("books", books);

        return "allBook";

    }

    // 方法四:删除书籍

    @RequestMapping("/del/{bookId}")

    public String deleteBook(@PathVariable("bookId") int id) {

        bookService.deleteBookById(id);

        return "allBook";

    }

}
5.编写jsp文件
首页 index.jsp
<%@ page language="java" contentType="text/html; charset=UTF-8" pageEncoding="UTF-8" %>

<!DOCTYPE HTML>

<html>

    <head>

        <title>首页</title>

        <style type="text/css">

            a {

                text-decoration: none;

                color: black;

                font-size: 18px;

            }

            h3 {

                width: 180px;

                height: 38px;

                margin: 100px auto;

                text-align: center;

                line-height: 38px;

                background: deepskyblue;

                border-radius: 4px;

            }

        </style>

    </head>

    <body>

    <h3>

        <a href="${pageContext.request.contextPath}/allBook">点击进入列表页</a>

    </h3>

    </body>

</html>
以下 JSP 页面建在 WEB-INF/pages/ 下
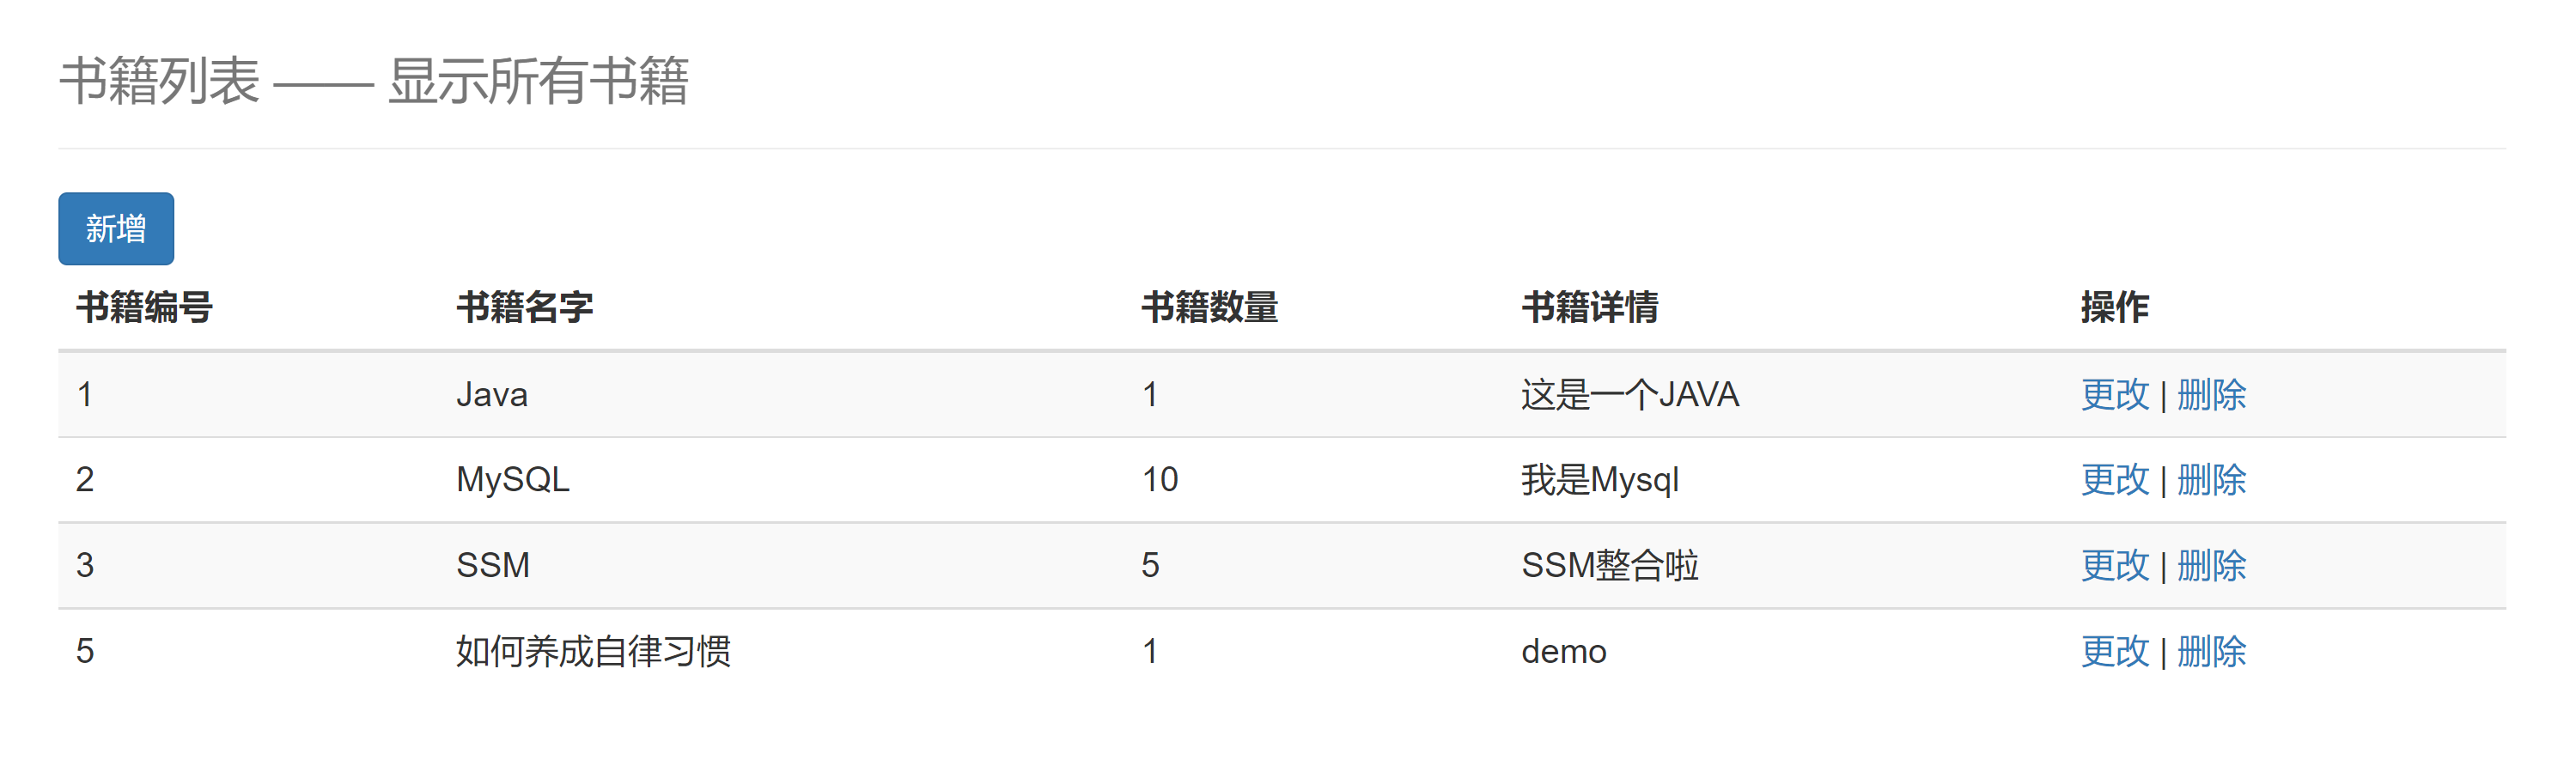
书籍列表页面 allBook.jsp
<%@ taglib prefix="c" uri="http://java.sun.com/jsp/jstl/core" %>

<%@ page contentType="text/html;charset=UTF-8" language="java" %>

<html>

<head>

    <title>书籍列表</title>

    <meta name="viewport" content="width=device-width, initial-scale=1.0">

    <!-- 引入 Bootstrap -->

    <link rel="stylesheet" href="http://cdn.static.runoob.com/libs/bootstrap/3.3.7/css/bootstrap.min.css">

    <script src="http://cdn.static.runoob.com/libs/jquery/2.1.1/jquery.min.js"></script>

    <script src="http://cdn.static.runoob.com/libs/bootstrap/3.3.7/js/bootstrap.min.js"></script>

</head>

<body>

<div class="container">

    <div class="row clearfix">

        <div class="col-md-12 column">

            <div class="page-header">

                <h1>

                    <small>书籍列表 —— 显示所有书籍</small>

                </h1>

            </div>

        </div>

    </div>

    <div class="row">

        <div class="col-md-4 column">

            <a class="btn btn-primary" href="${pageContext.request.contextPath}/toAddBook">新增</a>

        </div>

    </div>

    <div class="row clearfix">

        <div class="col-md-12 column">

            <table class="table table-hover table-striped">

                <thead>

                <tr>

                    <th>书籍编号</th>

                    <th>书籍名字</th>

                    <th>书籍数量</th>

                    <th>书籍详情</th>

                    <th>操作</th>

                </tr>

                </thead>

                <tbody>

                <c:forEach var="book" items="${requestScope.get('list')}">

                    <tr>

                        <td>${book.getBookID()}</td>

                        <td>${book.getBookName()}</td>

                        <td>${book.getBookCounts()}</td>

                        <td>${book.getDetail()}</td>

                        <td>

                            <a href="${pageContext.request.contextPath}/toUpdateBook?id=${book.getBookID()}">更改</a> |

                            <a href="${pageContext.request.contextPath}/del/${book.getBookID()}">删除</a>

                        </td>

                    </tr>

                </c:forEach>

                </tbody>

            </table>

        </div>

    </div>

</div>
添加书籍页面:addBook.jsp
<%@ taglib prefix="c" uri="http://java.sun.com/jsp/jstl/core" %>

<%@ page contentType="text/html;charset=UTF-8" language="java" %>

<html>

<head>

    <title>新增书籍</title>

    <meta name="viewport" content="width=device-width, initial-scale=1.0">

    <!-- 引入 Bootstrap -->

    <link rel="stylesheet" href="http://cdn.static.runoob.com/libs/bootstrap/3.3.7/css/bootstrap.min.css">

    <script src="http://cdn.static.runoob.com/libs/jquery/2.1.1/jquery.min.js"></script>

    <script src="http://cdn.static.runoob.com/libs/bootstrap/3.3.7/js/bootstrap.min.js"></script>

</head>

<body>

<div class="container">

    <div class="row clearfix">

        <div class="col-md-12 column">

            <div class="page-header">

                <h1>

                    <small>新增书籍</small>

                </h1>

            </div>

        </div>

    </div>

    <form action="${pageContext.request.contextPath}/addBook" method="post">

        书籍名称:<input type="text" name="bookName"><br><br><br>

        书籍数量:<input type="text" name="bookCounts"><br><br><br>

        书籍详情:<input type="text" name="detail"><br><br><br>

        <input type="submit" value="添加">

    </form>

</div>
修改书籍页面 updateBook.jsp
<%@ taglib prefix="c" uri="http://java.sun.com/jsp/jstl/core" %>

<%@ page contentType="text/html;charset=UTF-8" language="java" %>

<html>

<head>

    <title>修改信息</title>

    <meta name="viewport" content="width=device-width, initial-scale=1.0">

    <!-- 引入 Bootstrap -->

    <link rel="stylesheet" href="http://cdn.static.runoob.com/libs/bootstrap/3.3.7/css/bootstrap.min.css">

    <script src="http://cdn.static.runoob.com/libs/jquery/2.1.1/jquery.min.js"></script>

    <script src="http://cdn.static.runoob.com/libs/bootstrap/3.3.7/js/bootstrap.min.js"></script>

</head>

<body>

<div class="container">

    <div class="row clearfix">

        <div class="col-md-12 column">

            <div class="page-header">

                <h1>

                    <small>修改信息</small>

                </h1>

            </div>

        </div>

    </div>

    <form action="${pageContext.request.contextPath}/updateBook" method="post">

        <input type="hidden" name="bookID" value="${book.getBookID()}"/>

        书籍名称:<input type="text" name="bookName" value="${book.getBookName()}"/>

        书籍数量:<input type="text" name="bookCounts" value="${book.getBookCounts()}"/>

        书籍详情:<input type="text" name="detail" value="${book.getDetail() }"/>

        <input type="submit" value="提交"/>

    </form>

</div>
因为在 Maven 已经配置好 Tomcat 了,所以直接部署即可
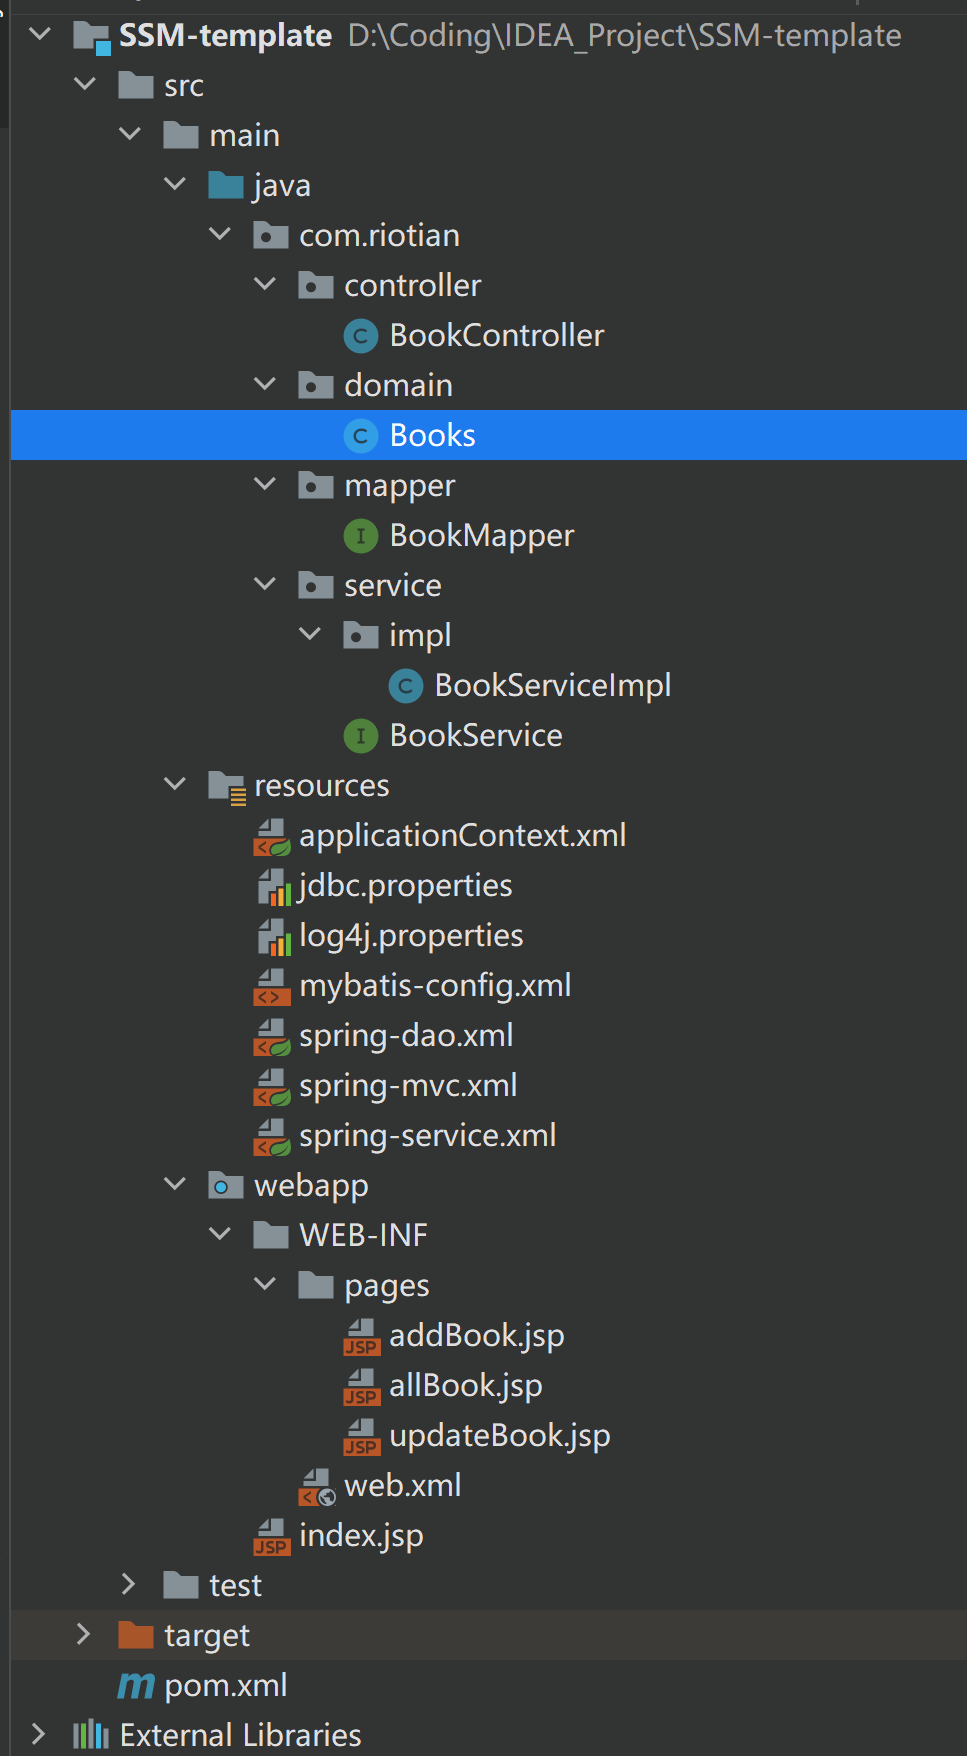
项目架构展示
项目结构图
项目页面展示


总结
遇到的错误
Receiver class com.mchange.v2.c3p0.impl.NewProxyResultSet does not define or inherit an implementati
这个错误是 maven 导包时导错了
dependency>

    <groupId>com.mchange</groupId>

    <artifactId>c3p0</artifactId>

    <version>0.9.5.2</version>

    <type>jar</type>

    <scope>compile</scope>

</dependency>
A child container failed during start
使用 maven 配置 tomcat7 运行一直报这个错误,还没有找到好的解决方法
解决方法:pom.xml文件中servlet-api和jsp-api的坐标中缺少了scope,加载 <scrop>就可以了
<!--Servlet - JSP -->

<dependency>

    <groupId>javax.servlet</groupId>

    <artifactId>servlet-api</artifactId>

    <version>2.5</version>

    <scope>provided</scope>

</dependency>

<dependency>

    <groupId>javax.servlet.jsp</groupId>

    <artifactId>jsp-api</artifactId>

    <version>2.2</version>

    <scope>provided</scope>

</dependency>
还有意识到,idea的maven工程,代码有错调试,重新部署tomcat服务器时间好长。
这个问题一定要解决,不然每次改代码,重新部署,刷新,调试,时间太长。
IDEA整合SSM框架:简易图书操作模块的更多相关文章
- 用Maven整合SSM框架
前述 Maven 是专门用于构建和管理Java相关项目的工具,利用 Maven 的主要目的是统一维护 jar 包.关于 Maven 的安装在这篇里面就不说了. SSM(Spring+SpringMVC ...
- IDEA+Maven 整合SSM框架实现简单的增删改查(新手入门,傻瓜操作)
原博客地址:https://blog.csdn.net/khxu666/article/details/79851070 选用SSM框架的原因在目前的企业级Java应用中,Spring框架是必须的.S ...
- 整合SSM框架必备基础—SpringMVC(下)
在上一篇文章<整合SSM框架必备基础-SpringMVC(上)>中,胖达介绍了关于SpringMVC的诞生.优势以及执行流程等理论知识点,这篇文章打算在实操中加深一下对SpringMVC的 ...
- shiro权限控制(一):shiro介绍以及整合SSM框架
shiro安全框架是目前为止作为登录注册最常用的框架,因为它十分的强大简单,提供了认证.授权.加密和会话管理等功能 . shiro能做什么? 认证:验证用户的身份 授权:对用户执行访问控制:判断用户是 ...
- shiro框架整合ssm框架
下面我通过一个web的maven项目来讲解如何将shiro整合ssm框架,具体结构如下图 一.引入依赖的jar包 <?xml version="1.0" encoding=& ...
- 一步步教你整合SSM框架(Spring MVC+Spring+MyBatis)详细教程重要
前言 SSM(Spring+SpringMVC+Mybatis)是目前较为主流的企业级架构方案,不知道大家有没有留意,在我们看招聘信息的时候,经常会看到这一点,需要具备SSH框架的技能:而且在大部分教 ...
- 手把手整合SSM框架
前言 如果看过前几篇文章,对 Spring 和 MyBatis 有了一定了解,一定想上手试试.这篇文章从 0 到 1,手把手整合 SSM (Spring.Spring MVC.MyBatis). 本篇 ...
- IDEA 整合 SSM 框架学习
认识 Spring 框架 更多详情请点击这里:这里 Spring 框架是 Java 应用最广的框架,它的成功来源于理念,而不是技术本身,它的理念包括 IoC (Inversion of Control ...
- maven整合ssm框架
1.创建maven web工程 创建完成后,项目结构如下 2.项目配置文件 在pom.xml中添加SSM框架相关jar包的依赖关系,pom.xml代码如下 <?xml version=" ...
- 整合SSM框架
整合SSM 基本环境搭建 导入相关的pom依赖! <dependencies> <!--Junit--> <dependency> <groupId>j ...
随机推荐
- C语言二进制转换成八,十,十六进制
代码目前只支持整数转换,小数转换后续更新呀 #include <stdio.h> #include <math.h> void B_O(int n); void B_H(int ...
- 深入理解 BigBird 的块稀疏注意力
引言 基于 transformer 的模型已被证明对很多 NLP 任务都非常有用.然而,\(O(n^2)\) 的时间和内存复杂度 (其中 \(n\) 是序列长度) 使得在长序列 (\(n > 5 ...
- 《最新出炉》系列初窥篇-Python+Playwright自动化测试-33-处理https 安全问题或者非信任站点-上篇
1.简介 这一篇宏哥主要介绍playwright如何在IE.Chrome和Firefox三个浏览器上处理不信任证书的情况,我们知道,有些网站打开是弹窗,SSL证书不可信任,但是你可以点击高级选项,继续 ...
- 如何自学 PS、PR 等软件?
学习Photoshop(PS)和Premiere Pro(PR)等软件需要一定的时间和耐心,以下是非常详细的自学指南. 第一部分:规划学习路线 1. 确定学习目标 在自学PS和PR之前,首先要明确自己 ...
- Redis入门实践
安装Redis 下载:官网:https://redis.io/download/,选择稳定版下载. 上传至linux 解压Redis:tar -zxvf redis-6.2.7.tar.gz,得到: ...
- Java 21 虚拟线程:使用指南(一)
虚拟线程是由 Java 21 版本中实现的一种轻量级线程.它由 JVM 进行创建以及管理.虚拟线程和传统线程(我们称之为平台线程)之间的主要区别在于,我们可以轻松地在一个 Java 程序中运行大量.甚 ...
- Python——第五章:csv模块
未来我们会使用爬虫获取到一些json文件,例如去英雄联盟官方爬取英雄的数据库 查看代码 {"hero":[{"heroId":"1",&qu ...
- 用Roslyn玩转代码之一: 解析与执行字符串表达式
最近框架中的可视化界面设计需要使用到表达式引擎(解析代码字符串并动态执行),之前旧框架的实现是将表达式字符串解析为语法树后解释执行该表达式,本文介绍如何使用Roslyn解析表达式字符串,并直接转换 ...
- JavaFx之播放MP4(二十七)
JavaFx之播放MP4(二十七) JavaFX 视频和音频支持,由 JavaFX 媒体类 Media.MediaPlayer.MediaView 和 AudioClip 提供. import jav ...
- Unity3d_Rewired官方文档翻译:概念(一):InputManager、Players、Actions
仅翻译了官方文档中的Essentials(要点).Concepts(概念)两部分,这是文档中最重要的部分,理解了这两部分的内容应该足以让你将Rewired运用到你的项目中,之后再去阅读文档的其他部分也 ...