50 ubuntu下pcl编译以及用 VSCode配置pcl / opencv开发环境
0 引言
最近在VSCode下搞开发,于是将pcl库迁移到这个环境下,用来跑一些依赖pcl的开源的代码以及自己做一些快速开发等。
1 pcl编译
主要参考了这篇博客,链接如下。
https://blog.csdn.net/e_small/article/details/79581484
我编译时遇到的主要问题也是在这篇博客的留言下解决的。我安装了Anaconda,结果编译出错,我还一直找不着错哪儿了。。。解决方式记录如下。
$ sudo gedit ~/.bashrc   # 打开环境变量文件 将Anaconda的环境变量给注销掉

$ source /etc/profile       # 使环境变量生效

$ python                         # 测试目前系统默认的python是不是改正了
然后再重新编译。
另外,在编译时,我改变了CMakeList.txt中的配置,采用的方式是
$ mkdir build

$ cd  build

$ cmake-gui ..     # 打开cmake界面,把一些不需要编译的东西去掉(比如我为了提高编译成功率,去掉了cuda选项),客户端点击configuration-》 generation 即可完成cmake,再回到终端继续make

$ make -j8         # 采用8个线程同时进行编译,有时候可以极大提高编译速度

$ sudo make install   # 安装,该命令将pcl库的头文件、动态链接库文件、静态链接库文件和其他文件拷贝到/usr 的各个子目录下
2 opencv 编译
参考如下链接。
https://www.cnblogs.com/darkknightzh/p/5638117.html
3 VSCode下pcl配置文件编写
直接把自己的配置文件贴出来给大家看好了。
lauch.json
{

    // 使用 IntelliSense 了解相关属性。

    // 悬停以查看现有属性的描述。

    // 欲了解更多信息,请访问: https://go.microsoft.com/fwlink/?linkid=830387

    "version": "0.2.0",

    "configurations": [

        {

            "name": "(gdb) Launch",

            "type": "cppdbg",

            "request": "launch",

            "program": "${workspaceFolder}/${fileBasenameNoExtension}.out",

            "miDebuggerPath": "/usr/bin/gdb",

            "preLaunchTask":"build",

            "args": [],

            "stopAtEntry": false,

            "cwd": "${workspaceFolder}",

            "environment": [],

            "externalConsole": true,

            "MIMode": "gdb",

            "setupCommands": [

                {

                    "description": "Enable pretty-printing for gdb",

                    "text": "-enable-pretty-printing",

                    "ignoreFailures": true

                }

            ]

        }

    ]

}
tasks.json
{

    // See https://go.microsoft.com/fwlink/?LinkId=733558

    // for the documentation about the tasks.json format

    "version": "2.0.0",

    "tasks":[  // 可以有多个参数

        {

            "label": "build",       // 编译任务名

            "type": "shell",        // 编译任务的类型,通常为shell/process类型

            "command": "g++",       // 编译命令

            "args":[

                "-g",

                "${workspaceFolder}/${fileBasename}",   // include path指令

                "-I", "/usr/local/include/pcl-1.8",

                "-I", "/usr/include/eigen3",

                "-I", "/usr/include/vtk-5.10",

                "-I", "/usr/include/qhull",

                "-I", "/usr/include/flann",

                "-I", "/usr/include/boost",

                // lib 库文件地址

                "-L", "/usr/local/lib",

                "-l", "pcl_io",

                "-l", "pcl_visualization",

                "-l", "pcl_common",

                "-l", "vtkFiltering",

                "-l", "vtkCommon",

                "-l", "vtkRendering",

                "-l", "vtkGraphics",

                "-L", "/usr/include/x86_64-linux-gnu",

                "-l", "boost_system",

                "-o",                                    // 生成指定名称的可执行文件

                "${workspaceFolder}/${fileBasenameNoExtension}.out"

            ],

            "group": {

                "kind": "build",

                "isDefault": true

            }

        },

        {

            "label": "cmakebuild",

            "type": "shell",

            "command": "cd build && cmake ../ && make",

            "args": []

        }

    ]

}
其中,采用cmake方式进行编译时的CMakeLists.txt文件是这样写的。
cmake_minimum_required(VERSION 2.8 FATAL_ERROR)

project(myPCLProject)

find_package(PCL 1.2 REQUIRED)

include_directories(${PCL_INCLUDE_DIRS})

link_directories(${PCL_LIBRARY_DIRS})

add_definitions(${PCL_DEFINITIONS})

add_executable (cloud_viewer cloud_viewer.cpp)

target_link_libraries (cloud_viewer ${PCL_LIBRARIES})
c_cpp_properties.json,主要是给intelliSense看的,避免写代码时,intelliSense瞎比划红线报错。
{

    "configurations": [

        {

            "name": "Linux",

            "includePath": [

                "${workspaceFolder}/**",

                "${workspaceFolder}",

                "/usr/local/include/pcl-1.8",

                "/usr/include",

                "/usr/include/vtk-5.10",

                "/usr/include/qhull",

                "/usr/include/flann",

                "/usr/include/boost",

                "/usr/include/eigen3",

                "/usr/include/eigen3/Eigen/",

                "/usr/include/x86_64-linux-gnu/sys"

            ],

            "defines": [],

            "browse":{

                "path":[

                    "/usr/include",

                    "/usr/local/include/pcl-1.8"

                ]

            },

            "compilerPath": "/usr/bin/gcc",

            "cStandard": "c11",

            "cppStandard": "c++17",

            "intelliSenseMode": "gcc-x64"

        }

    ],

    "version":

}
3 测试代码
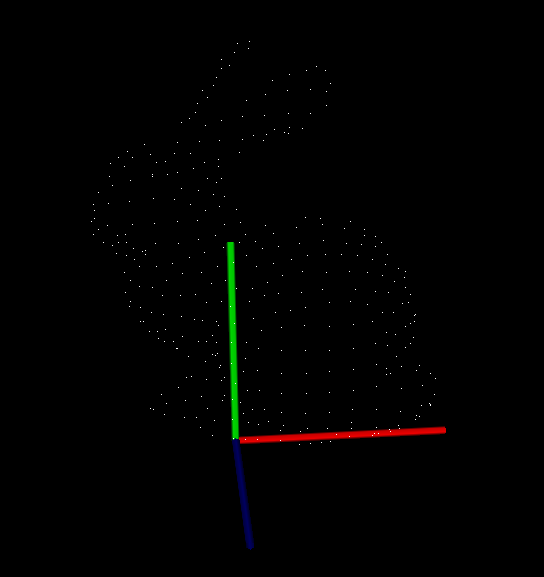
是官网的一段可视化代码,展示如下。
#include <iostream>

#include <pcl/io/io.h>

#include <pcl/io/pcd_io.h>

#include <pcl/visualization/cloud_viewer.h>

int user_data;

void

viewerOneOff (pcl::visualization::PCLVisualizer& viewer)

{

    viewer.setBackgroundColor (0.0, 0.0, 0.0);

    pcl::PointXYZ o;

    o.x = 1.0;

    o.y = ;

    o.z = ;

    viewer.addSphere (o, 0.25, "sphere", );

    std::cout << "i only run once" << std::endl;

}

void

viewerPsycho (pcl::visualization::PCLVisualizer& viewer)

{

    static unsigned count = ;

    std::stringstream ss;

    ss << "Once per viewer loop: " << count++;

    viewer.removeShape ("text", );

    viewer.addText (ss.str(), , , "text", );

    //FIXME: possible race condition here:

    user_data++;

}

int

main ()

{

    //pcl::PointCloud<pcl::PointXYZRGBA>::Ptr cloud (new pcl::PointCloud<pcl::PointXYZRGBA>);

    pcl::PointCloud<pcl::PointXYZ>::Ptr cloud (new pcl::PointCloud<pcl::PointXYZ>);

    pcl::io::loadPCDFile ("bun4.pcd", *cloud);

    pcl::visualization::CloudViewer viewer("Cloud Viewer");

    //blocks until the cloud is actually rendered

    viewer.showCloud(cloud);

    //use the following functions to get access to the underlying more advanced/powerful

    //PCLVisualizer

    //This will only get called once

    viewer.runOnVisualizationThreadOnce (viewerOneOff);

    //This will get called once per visualization iteration

    viewer.runOnVisualizationThread (viewerPsycho);

    while (!viewer.wasStopped ())

    {

    //you can also do cool processing here

    //FIXME: Note that this is running in a separate thread from viewerPsycho

    //and you should guard against race conditions yourself...

    user_data++;

    }

    return ;

}
4 效果图

50 ubuntu下pcl编译以及用 VSCode配置pcl / opencv开发环境的更多相关文章
- Mac上利用VScode配置c/c++开发环境
Mac上利用VScode配置c/c++开发环境 哭辽,Typora里面最好不要插入表情,不然保存会闪退 首先你要有一个vscode 在扩展里面下载c/c++ 第一步 ⬆+com+p 打开命令模式:选择 ...
- 在windows下用eclipse + pydev插件来配置python的开发环境
在windows下用eclipse + pydev插件来配置python的开发环境 一.安装 python 可以到网上下个Windows版的python,官网为:https://www.python. ...
- VsCode配置C/C++开发环境
Visual Studio Code(VS Code)是基于 Electron 开发,支持 Windows.Linux 和 macOS 操作系统.内置了对JavaScript,TypeScript和N ...
- Mac OS中使用VScode配置C语言开发环境
个人博客 chinazt.cc 闲话少叙,直奔主题 下载VSCode https://code.visualstudio.com/download 安装C/C++插件 需要两个插件: 1. cppto ...
- vscode配置java+gradle开发环境
1.安装扩展包Java Extension Pack,里面包含java开发所必须的扩展 2.安装java jdk,8版本就是1.8版本,根据需要安装不同的版本 3.下载gradle,将bin文件夹添加 ...
- ubuntu下boost编译安装
ubuntu下boost编译安装 boost 安装 1.依赖安装 apt-get install mpi-default-dev libicu-dev python-dev python3-dev l ...
- ubuntu下如何编译C语言
ubuntu下如何编译C语言 如果没有gcc编译器的话,使用以下命令获取 ~# sudo apt-get install gcc同时要下载辅助工具 ~# sudo apt-get instal ...
- Ubuntu下配置C/C++开发环境
在 Ubuntu 下配置 C/C++ 开发环境 转自:白巴的临时空间 Submitted by 白巴 on 2009-04-27 19:52:12. 学习笔记 虽然 Ubuntu 的版本已经是9.04 ...
- ubuntu下整合eclipse和javah生成jni头文件开发android的native程序
0:前言: 这两天一直在研究用android的jni调用第三方库,上网搜方法,但是都是泛泛而谈,没有demo,经过我几番折磨,写了n多的helloword工程,总是不成功,工程名字也就由helloow ...
随机推荐
- elasticsearch启动问题
ES安装完一直启动不了,问题解决. 报错: ERROR: bootstrap checks failed system call filters failed to install; check th ...
- 文件上传绕过WAF
文件上传 文件上传实质上还是客户端的POST请求,消息主体是一些上传信息.前端上传页面需要指定 enctype为multipart/from-data才能正常上传文件. 此处不讲各种中间件解析漏洞只列 ...
- php操作redis--字典(hash)篇
常用函数:hSet,hGet,hGetAll等. 应用场景:存储用户信息对象数据,包括id,姓名,年龄和生日,通过用户id来获取姓名,年龄等信息. 连接 $redis = new Redis(); $ ...
- vue 运行项目时,Uncaught (in promise) DOMException: Failed to execute 'open' on 'XMLHttpRequest': Invalid URL
npm run dev 运行项目后 验证码显示不出来 并报错 Uncaught (in promise) DOMException: Failed to execute 'open' on 'XML ...
- 【在线工具】java开发常用在线工具
转自:常用工具页面 Java源代码搜索 Grepcode是一个面向于Java开发人员的网站,在这里你可以通过Java的projects.classes等各种关键字在线查看它对应的源码,知道对应的pro ...
- 【代码工具】Orika JavaBean映射工具探秘
转自:https://www.cnblogs.com/albert1024/articles/8434741.html Orika是一个简单.快速的JavaBean拷贝框架,Orika使用字节代码生成 ...
- JAVA导出excel如何设置表头跨行或者跨列,跪求各位大神了
sheet.addMergedRegion(new CellRangeAddress(0, 0, 0, 0));// 开始行,结束行,开始列,结束列.只能是POI了吧?java还有其他方法吗?
- JAVA常用集合解析
ArrayList : 底层基于数组实现,在使用add方法添加元素时,首先校验集合容量,将新添加的值放入集合尾部并进行长度加一,进行自动扩容,扩容的操作时将数据中的所有元素复制到新的集合中. 在指定位 ...
- 架构-软件系统体系结构-C/S架构:C/S架构
ylbtech-架构-软件系统体系结构-C/S架构:C/S架构 Client/Server架构,即客户端/服务器架构.是大家熟知的软件系统体系结构,通过将任务合理分配到Client端和Server端, ...
- HTTP协议的消息头:Content-Type和Accept的作用 转载https://www.cnblogs.com/lexiaofei/p/7289436.html
一.背景知识 1.概述 Http报头分为通用报头,请求报头,响应报头和实体报头. 请求方的http报头结构:通用报头|请求报头|实体报头 响应方的http报头结构:通用报头|响应报头|实体报头 Acc ...
