okhttp拦截器之RetryAndFollowUpInterceptor&BridgeInterceptor分析
在上一次【https://www.cnblogs.com/webor2006/p/9096412.html】对okhttp的拦截器有了一个初步的认识,接下来则对具体的拦截器一个个进行了解。
RetryAndFollowUpInterceptor:
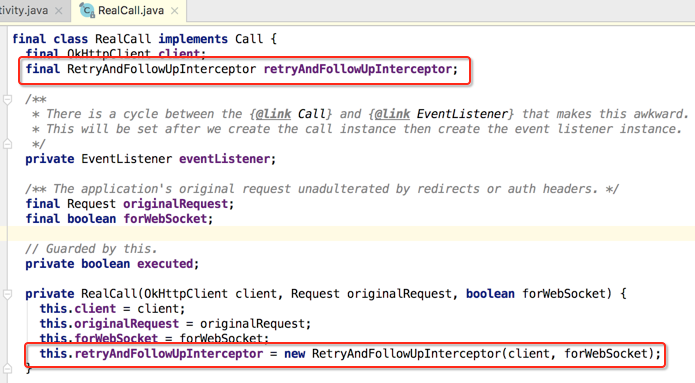
按照添加拦截器的顺序来分析,首当其冲的就是这个重试拦截器啦,如下:

而它是在RealCall构造时所创建的:
从这个类的名字来看应该它就是用来网络异常重连用的,那具体实现细节还得从源码上来进行观察,我们知道对于拦截器中最核心的方法是intercept()方法,所以直接将焦点定位到该方法:
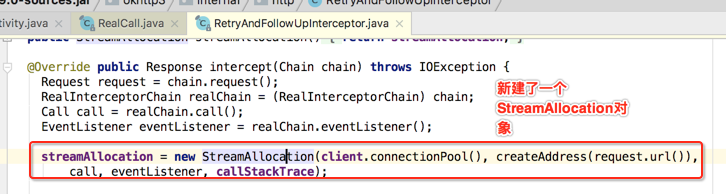
那它是干嘛的呢?从名字来看貌似是分配流的,下面还是看一下官方对它的说明:

虽说它是定义在RetryAndFollowUpInterceptor中,但是并没在为之所用,而真正用到的是在之后要分析的ConnectInterceptor中,如下:


主要是用于连接服务端的connection和用于服务器进行数据传输的输入输出流,这个在未来ConnectionInterceptor中进行进一步分析。
那对于okHttp的拦截器都是通过RealInterceptorChain这个对象来进行链接起来,直到所有的拦截器都走完才会返回response对象,那假如期间出现了异常那咱们的这个重试拦截器是如何发挥作用的呢?

然后其它的一些重试逻辑这里先不细看,看一个跟重试特别相关的代码,如下:
- @Override public Response intercept(Chain chain) throws IOException {
- Request request = chain.request();
- RealInterceptorChain realChain = (RealInterceptorChain) chain;
- Call call = realChain.call();
- EventListener eventListener = realChain.eventListener();
- streamAllocation = new StreamAllocation(client.connectionPool(), createAddress(request.url()),
- call, eventListener, callStackTrace);
- int followUpCount = 0;
- Response priorResponse = null;
- while (true) {
- if (canceled) {
- streamAllocation.release();
- throw new IOException("Canceled");
- }
- Response response;
- boolean releaseConnection = true;
- try {
- response = realChain.proceed(request, streamAllocation, null, null);
- releaseConnection = false;
- } catch (RouteException e) {
- // The attempt to connect via a route failed. The request will not have been sent.
- if (!recover(e.getLastConnectException(), false, request)) {
- throw e.getLastConnectException();
- }
- releaseConnection = false;
- continue;
- } catch (IOException e) {
- // An attempt to communicate with a server failed. The request may have been sent.
- boolean requestSendStarted = !(e instanceof ConnectionShutdownException);
- if (!recover(e, requestSendStarted, request)) throw e;
- releaseConnection = false;
- continue;
- } finally {
- // We're throwing an unchecked exception. Release any resources.
- if (releaseConnection) {
- streamAllocation.streamFailed(null);
- streamAllocation.release();
- }
- }
- // Attach the prior response if it exists. Such responses never have a body.
- if (priorResponse != null) {
- response = response.newBuilder()
- .priorResponse(priorResponse.newBuilder()
- .body(null)
- .build())
- .build();
- }
- Request followUp = followUpRequest(response);
- if (followUp == null) {
- if (!forWebSocket) {
- streamAllocation.release();
- }
- return response;
- }
- closeQuietly(response.body());
- if (++followUpCount > MAX_FOLLOW_UPS) {
- streamAllocation.release();
- throw new ProtocolException("Too many follow-up requests: " + followUpCount);
- }
- if (followUp.body() instanceof UnrepeatableRequestBody) {
- streamAllocation.release();
- throw new HttpRetryException("Cannot retry streamed HTTP body", response.code());
- }
- if (!sameConnection(response, followUp.url())) {
- streamAllocation.release();
- streamAllocation = new StreamAllocation(client.connectionPool(),
- createAddress(followUp.url()), call, eventListener, callStackTrace);
- } else if (streamAllocation.codec() != null) {
- throw new IllegalStateException("Closing the body of " + response
- + " didn't close its backing stream. Bad interceptor?");
- }
- request = followUp;
- priorResponse = response;
- }
- }
也就是有一个最大重试次数,可以看一下定义的是多少次:
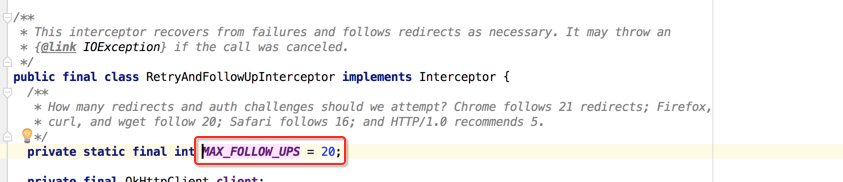
所以可以总结一下该拦截的一个核心流程:
1、创建StreamAllocation对象。
2、调用RealInterceptChain.proceed(...)进行网络请求。
3、根据异常结果或者响应结果判断是否要进行重新请求。
4、调用下一个拦截器,对response进行处理,返回给上一个拦截器。
BridgeInterceptor:
接着按着顺序来分析第二个拦截器:

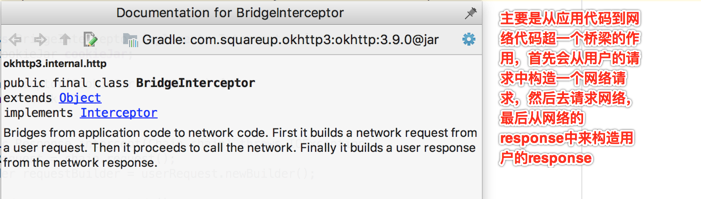
那它主要是用来干嘛的呢?先看一下官方的注释说明:
有了一个大概认识之后下面来看一下它的源码,当然焦点还是定位到intercept()方法啦:
- @Override public Response intercept(Chain chain) throws IOException {
- Request userRequest = chain.request();
- Request.Builder requestBuilder = userRequest.newBuilder();
- RequestBody body = userRequest.body();
- if (body != null) {
- MediaType contentType = body.contentType();
- if (contentType != null) {
- requestBuilder.header("Content-Type", contentType.toString());
- }
- long contentLength = body.contentLength();
- if (contentLength != -1) {
- requestBuilder.header("Content-Length", Long.toString(contentLength));
- requestBuilder.removeHeader("Transfer-Encoding");
- } else {
- requestBuilder.header("Transfer-Encoding", "chunked");
- requestBuilder.removeHeader("Content-Length");
- }
- }
- if (userRequest.header("Host") == null) {
- requestBuilder.header("Host", hostHeader(userRequest.url(), false));
- }
- if (userRequest.header("Connection") == null) {
- requestBuilder.header("Connection", "Keep-Alive");
- }
- // If we add an "Accept-Encoding: gzip" header field we're responsible for also decompressing
- // the transfer stream.
- boolean transparentGzip = false;
- if (userRequest.header("Accept-Encoding") == null && userRequest.header("Range") == null) {
- transparentGzip = true;
- requestBuilder.header("Accept-Encoding", "gzip");
- }
- List<Cookie> cookies = cookieJar.loadForRequest(userRequest.url());
- if (!cookies.isEmpty()) {
- requestBuilder.header("Cookie", cookieHeader(cookies));
- }
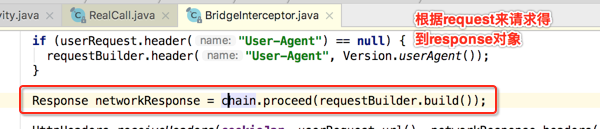
- if (userRequest.header("User-Agent") == null) {
- requestBuilder.header("User-Agent", Version.userAgent());
- }
- Response networkResponse = chain.proceed(requestBuilder.build());
- HttpHeaders.receiveHeaders(cookieJar, userRequest.url(), networkResponse.headers());
- Response.Builder responseBuilder = networkResponse.newBuilder()
- .request(userRequest);
- if (transparentGzip
- && "gzip".equalsIgnoreCase(networkResponse.header("Content-Encoding"))
- && HttpHeaders.hasBody(networkResponse)) {
- GzipSource responseBody = new GzipSource(networkResponse.body().source());
- Headers strippedHeaders = networkResponse.headers().newBuilder()
- .removeAll("Content-Encoding")
- .removeAll("Content-Length")
- .build();
- responseBuilder.headers(strippedHeaders);
- String contentType = networkResponse.header("Content-Type");
- responseBuilder.body(new RealResponseBody(contentType, -1L, Okio.buffer(responseBody)));
- }
- return responseBuilder.build();
- }
首先是给咱们的request添加各种请求头用于接下来的http请求,其中可以看到一个很熟悉的头:

接下来则请求获取response对象:


所以这里再将其进行总结一下:
1、是负责将用户构建的一个Request请求转化为能够进行网络访问的请求。
2、将这个符合网络请求的Request进行网络请求。
3、将网络请求回来的响应Response转化为用户可用的Response。
okhttp拦截器之RetryAndFollowUpInterceptor&BridgeInterceptor分析的更多相关文章
- okhttp拦截器之CallServerInterceptor解析
今天来学习OkHttp的最后一个拦截器,如下: 看一下它的javadoc说明: 其作用有两个:发起网络请求和接收服务器响应,下面具体来看一下它的intercept(): 下面具体来看一下: 接着就是读 ...
- okhttp拦截器之ConnectInterceptor解析
主流程分析: 继续分析okhttp的拦截器,继上次分析了CacheInterceptor缓存拦截器之后,接下来到连接拦截器啦,如下: 打开看一下它的javadoc: 而整个它的实现不长,如下: 也就是 ...
- okhttp拦截器之CacheInterceptor解析
在上一次[https://www.cnblogs.com/webor2006/p/9150658.html]了解了缓存的存与取的细节之后,接下来就可以分析一下OkHttp的缓存拦截器啦: OkHttp ...
- OkHttp3 拦截器源码分析
OkHttp 拦截器流程源码分析 在这篇博客 OkHttp3 拦截器(Interceptor) ,我们已经介绍了拦截器的作用,拦截器是 OkHttp 提供的对 Http 请求和响应进行统一处理的强大机 ...
- 从网络请求过程看OkHttp拦截器
前言 之前我们结合设计模式简单说了下OkHttp的大体流程,今天就继续说说它的核心部分--拦截器. 因为拦截器组成的链其实是完成了网络通信的整个流程,所以我们今天就从这个角度说说各拦截器的功能. 首先 ...
- Okhttp同步请求源码分析
进阶android,OKhttp源码分析——同步请求的源码分析 OKhttp是我们经常用到的框架,作为开发者们,我们不单单要学会灵活使用,还要知道他的源码是如何设计的. 今天我们来分析一下OKhttp ...
- Okhttp3源码解析(5)-拦截器RetryAndFollowUpInterceptor
### 前言 回顾: [Okhttp的基本用法](https://www.jianshu.com/p/8e404d9c160f) [Okhttp3源码解析(1)-OkHttpClient分析](htt ...
- ABP中的拦截器之ValidationInterceptor(上)
从今天这一节起就要深入到ABP中的每一个重要的知识点来一步步进行分析,在进行介绍ABP中的拦截器之前我们先要有个概念,到底什么是拦截器,在介绍这些之前,我们必须要了解AOP编程思想,这个一般翻译是面向 ...
- Okhttp拦截器统一异常处理并多次读取response.body().string()
参考:https://blog.csdn.net/a624806998/article/details/73863606 引言: 写这篇文章,因为在自己编写实现Http日志拦截器的时候,在拦截器中使用 ...
随机推荐
- CMake速记
目录 CMake速记 我的demo 外部构建 基础语法 常用指令 环境变量 一些变量 参考文档 title: CMake速记 date: 2019/11/18 19:17:40 toc: true - ...
- mysql 触发器检测表数据添加,进而调用存储过程检测数据,进而调用存储过程添加数据
触发器: beginDECLARE user_mes INT(64);SELECT user_id into user_mes FROM order_orderlist where id = new. ...
- Java编程思想(三)控制程序流程
3.1.10逗号运算符 我们可以使用一系列由逗号分隔的语句,而且哪些语句均会独立执行. 3.1.15复习计算顺序
- 2017 ICPC西安区域赛 A - XOR (线段树并线性基)
链接:https://nanti.jisuanke.com/t/A1607 题面: Consider an array AA with n elements . Each of its eleme ...
- CentOS7.0 测试环境准备过程
1. 公司最近开始走向国产化和开源路线,因为绝大多数国产化都是采取的linux路线, 所以为了保证兼容性, 测试环境大部分从windows迁移到了linux环境. 测试采取逐步推进的模式, 先测试兼容 ...
- 使用dockerfile 搭建django系统(nginx+redis+mongodb+celery)
背景 有需求需要对django系统进行docker化,以达到灵活部署和容灾.该系统基于django 2.2版本开发,数据库采用mongodb,服务器使用nginx,因系统有部分异步任务,异步任务则采用 ...
- 1.3.1 Lock接口及其实现
1.锁的本质 2.Lock接口使用ReentrenLock 3.读写锁使用 4.读写锁实现 Lock接口方法 有点意思的是lockInterruptibly(), 只要没有获取到锁就会一直等待,直到某 ...
- 盒模型中padding、border、margin的区别
在CSS中,规定了一种基本设计模型——盒模型(也叫框模型),如图所示: 其中包含了四部分内容:element/元素(即图中文字).padding/内边框(图中两个红色边框之间白色部分).border/ ...
- java如何读写json文件
在实际项目开发中,有时会遇到一些全局的配置缓存,最好的做法是配置redis数据库作为数据缓存,而当未有配置redis服务器时,读取静态资源文件(如xml.json等)也是一种实现方式,但是这有一个弊端 ...
- PHP后台开发小经验
js页面传参数 js的参数传输是关键,尤其是当一个页面的数据需要分步骤上传时. 同样的删除功能,不会操作批量删除时可以尝试单个删除,功能差不多,实现功能的方法也千千万,先做成它是第一位. 主页面很多条 ...