python笔记- 发送邮件
依赖:
Python代码实现发送邮件,使用的模块是smtplib、MIMEText,实现代码之前需要导入包:
import smtplib

from email.mime.text import MIMEText
使用163邮件发送邮件,具体代码实现如下:
import smtplib

from email.mime.text import MIMEText

'''

发送邮件函数,默认使用163smtp

:param mail_host: 邮箱服务器,16邮箱host: smtp.163.com

:param port: 端口号,163邮箱的默认端口是 25

:param username: 邮箱账号 xx@163.com

:param passwd: 邮箱密码(不是邮箱的登录密码,是邮箱的授权码)

:param recv: 邮箱接收人地址,多个账号以逗号隔开

:param title: 邮件标题

:param content: 邮件内容

:return:

'''

def send_mail(username, passwd, recv, title, content, mail_host='smtp.163.com', port=25):

    msg = MIMEText(content)    # 邮件内容

    msg['Subject'] = title     # 邮件主题

    msg['From'] = username     # 发送者账号

    msg['To'] = recv           # 接收者账号列表

    smtp = smtplib.SMTP(mail_host, port=port)      # 连接邮箱,传入邮箱地址,和端口号,smtp的端口号是25

    smtp.login(username, passwd)                   # 登录发送者的邮箱账号,密码

    # 参数分别是 发送者,接收者,第三个是把上面的发送邮件的 内容变成字符串

    smtp.sendmail(username, recv, msg.as_string())

    smtp.quit()  # 发送完毕后退出smtp

    print('email send success.')

if __name__ == '__main__':

    email_user = 'xxxx@163.com'  # 发送者账号

    email_pwd = 'xxxxx'  # 发送者密码,授权码

    maillist = 'xxxx@qq.com'

    title = '测试邮件标题'

    content = '这里是邮件内容'

    send_mail(email_user, email_pwd, maillist, title, content)
163邮箱的授权码获取方法如下:
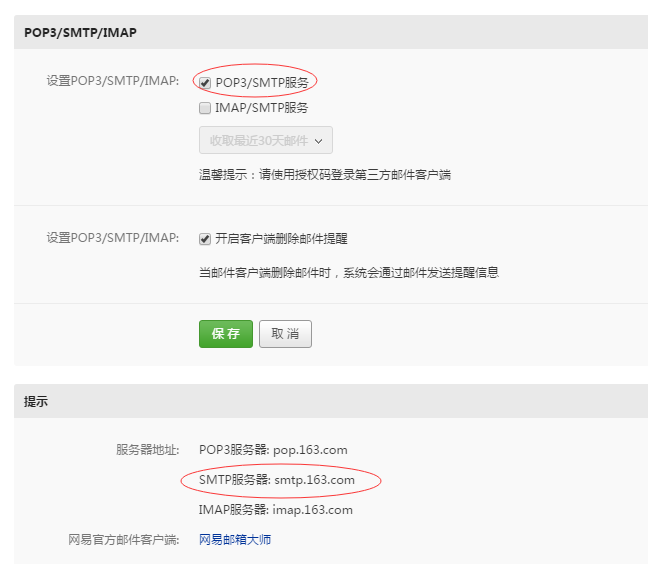
1. 登录163邮箱,点击设置-POP3/SMTP/IMAP,如下:

2. 开启SMTP服务且可以查询SMTP的host地址:
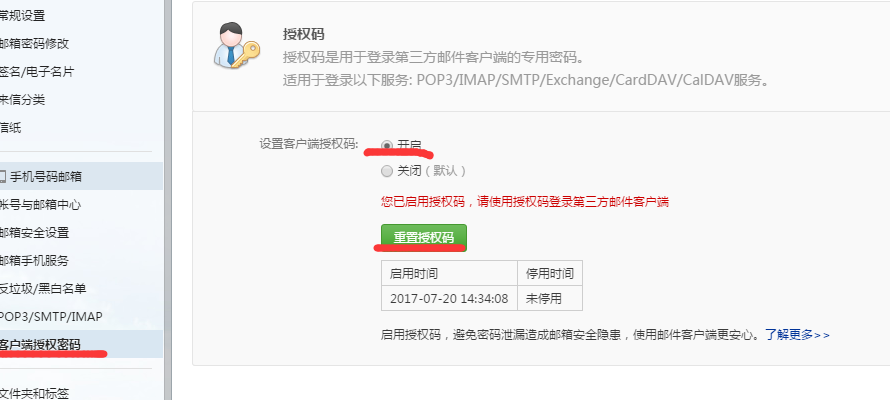
3. 点击客户端授权密码,可以重置授权码:
使用QQ邮件发送邮件,具体代码实现如下:
import smtplib

from email.mime.text import MIMEText

'''

发送邮件函数,默认使用163smtp

:param mail_host: 邮箱服务器,qq邮箱host:  smtp.qq.com

:param port: 端口号,qq邮箱的默认端口是: 456

:param username: 邮箱账号 xx@163.com

:param passwd: 邮箱密码(不是邮箱的登录密码,是邮箱的授权码)

:param recv: 邮箱接收人地址,多个账号以逗号隔开

:param title: 邮件标题

:param content: 邮件内容

:return:

'''

#qq邮箱发送邮件

def send_mail(username, passwd, recv, title, content, mail_host='smtp.qq.com', port=456):

    msg = MIMEText(content)    # 邮件内容

    msg['Subject'] = title     # 邮件主题

    msg['From'] = username     # 发送者账号

    msg['To'] = recv           # 接收者账号列表

    smtp = smtplib.SMTP_SSL(mail_host, port=port)      # 连接邮箱,传入邮箱地址,和端口号,smtp的端口号是25

    smtp.login(username, passwd)                   # 登录发送者的邮箱账号,密码

    # 参数分别是 发送者,接收者,第三个是把上面的发送邮件的 内容变成字符串

    smtp.sendmail(username, recv, msg.as_string())

    smtp.quit()  # 发送完毕后退出smtp

    print('email send success.')

if __name__ == '__main__':

    email_user = 'xxx@qq.com'  # 发送者账号

    email_pwd = 'WOSHINIGE123'  # 发送者密码,授权码

    maillist = 'xxxx@qq.com'

    title = '测试邮件标题'

    content = '这里是邮件内容'

    send_mail(email_user, email_pwd, maillist, title, content)
多个 收件人且带附件:
# import smtplib

# from email.mime.text import MIMEText

# '''

# 发送邮件函数,默认使用163smtp

# :param mail_host: 邮箱服务器,qq邮箱host:  smtp.163.com

# :param port: 端口号,qq邮箱的默认端口是: 25

# :param username: 邮箱账号 xx@163.com

# :param passwd: 邮箱密码(不是邮箱的登录密码,是邮箱的授权码)

# :param recv: 邮箱接收人地址,多个账号以逗号隔开

# :param title: 邮件标题

# :param content: 邮件内容

# :return:

# '''

import smtplib

from email.mime.text import MIMEText

from email.mime.multipart import MIMEMultipart

#邮箱服务器地址

email_host = 'smtp.163.com'

#发送者

email_user = 'xxxx@163.com'

#授权码

email_pwd = 'WOSHINIGE123'

#多个收件人,使用分号分隔

maillist ='xxxx@qq.com;aaaa@qq.com'

#对多个收件人进行分割,以;为标准,返回结果是list['xxxx@qq.com','aaaa@qq.com']

email_info = maillist.split(';')

#构造一个发附件的邮件内容对象

new_msg = MIMEMultipart()

#邮件正文内容

new_msg.attach(MIMEText('test email.....'))

#邮件主题

new_msg['Subject'] = 'test email'

#邮件发送者

new_msg['From'] = email_user

#邮件接收者,多个收件人的账号使用,连接,传入类型是str

new_msg['To'] = ','.join(email_info)

#打开a.txt读取文本内容

att = MIMEText(open('a.txt').read())

att["Content-Type"] = 'application/octet-stream'

# 发送附件就得这么写,固定格式,filename指定附件的名字

att["Content-Disposition"] = 'attachment; filename="haha.txt"'

new_msg.attach(att)

# 连接邮箱,传入邮箱地址,和端口号,smtp的端口号是25

smtp = smtplib.SMTP(email_host, port=25)

# 发送者的邮箱账号,密码,先登录

smtp.login(email_user, email_pwd)

smtp.sendmail(email_user, email_info, new_msg.as_string())

smtp.quit()

print('email send success.')
多个收件人时账号之间使用分号;分割,进行smtp.sendmail(传入的多个收件人类型是list);new_msg['TO'] = recv,接收的类型是str
使用类实现邮件的发送,即可发送多人也可发送附件:
import smtplib

from email.mime.text import MIMEText

from email.mime.multipart import MIMEMultipart

class SendMail(object):

    def __init__(self, username, passwd, recv, title, content, file=None, email_host='smtp.163.com', port=25):

        self.username = username

        self.passwd = passwd

        self.recv = recv

        self.title = title

        self.content = content

        self.file = file

        self.email_host = email_host

        self.port = port

    def send_mail(self):

        msg = MIMEMultipart()

        #发送内容的对象

        if self.file:#处理附件的

            att = MIMEText(open(self.file, encoding='utf-8').read())

            att["Content-Type"] = 'application/octet-stream'

            att["Content-Disposition"] = 'attachment; filename="%s"'%self.file

            msg.attach(att)

        msg.attach(MIMEText(self.content))#邮件正文的内容

        msg['Subject'] = self.title  # 邮件主题

        msg['From'] = self.username  # 发送者账号

        #将多个账号'aaa.@qq.com;bbbb@163.com' 以分号分割,分割为list

        self.recv = self.recv.split(';')

        if isinstance(self.recv, list):

            msg['To'] = ','.join(self.recv)

        else:

            msg['To'] = self.recv  # 接收者账号列表

        if self.username.endswith('qq.com'):  #如果发送者是qq邮箱

            self.smtp = smtplib.SMTP_SSL(self.email_host, port=self.port)

        else:

            self.smtp = smtplib.SMTP(self.email_host, port=self.port)

        #发送邮件服务器的对象

        self.smtp.login(self.username, self.passwd)

        try:

            self.smtp.sendmail(self.username, self.recv, msg.as_string())

        except Exception as e:

            print('出错了。。', e)

        else:

            print('发送成功!')

        self.smtp.quit()

if __name__ == '__main__':

    m = SendMail(

        username='zzzzz@163.com', passwd='xxxxxxx',file='a.txt', recv='xxxxxx@qq.com;xxxxxx@qq.com',

        title='多个收件人', content='哈哈哈啊哈哈哈哈', email_host='smtp.163.com', port=25

    )

    m.send_ma
欢迎多多评论~~~~
python笔记- 发送邮件的更多相关文章
- Python笔记之不可不练
如果您已经有了一定的Python编程基础,那么本文就是为您的编程能力锦上添花,如果您刚刚开始对Python有一点点兴趣,不怕,Python的重点基础知识已经总结在博文<Python笔记之不可不知 ...
- python笔记 - day3
python笔记 - day3 参考:http://www.cnblogs.com/wupeiqi/articles/5453708.html set特性: 1.无序 2.不重复 3.可嵌套 函数: ...
- boost.python笔记
boost.python笔记 标签: boost.python,python, C++ 简介 Boost.python是什么? 它是boost库的一部分,随boost一起安装,用来实现C++和Pyth ...
- 20.Python笔记之SqlAlchemy使用
Date:2016-03-27 Title:20.Python笔记之SqlAlchemy使用 Tags:python Category:Python 作者:刘耀 博客:www.liuyao.me 一. ...
- Python笔记——类定义
Python笔记——类定义 一.类定义: class <类名>: <语句> 类实例化后,可以使用其属性,实际上,创建一个类之后,可以通过类名访问其属性 如果直接使用类名修改其属 ...
- 13.python笔记之pyyaml模块
Date:2016-03-25 Title:13.Python笔记之Pyymal模块使用 Tags:Python Category:Python 博客地址:www.liuyao.me 作者:刘耀 YA ...
- 8.python笔记之面向对象基础
title: 8.Python笔记之面向对象基础 date: 2016-02-21 15:10:35 tags: Python categories: Python --- 面向对象思维导图 (来自1 ...
- python笔记 - day8
python笔记 - day8 参考: http://www.cnblogs.com/wupeiqi/p/4766801.html http://www.cnblogs.com/wupeiqi/art ...
- python笔记 - day7-1 之面向对象编程
python笔记 - day7-1 之面向对象编程 什么时候用面向对象: 多个函数的参数相同: 当某一些函数具有相同参数时,可以使用面向对象的方式,将参数值一次性的封装到对象,以后去对象中取值即可: ...
随机推荐
- git 批量删除文件夹和文件
git 批量删除文件夹和文件 硬盘删除文件后,执行$ git status 会提示你仍然需要$ git rm <文件> 此时如果是要删除大批量文件,这么一个一个命令下去不得累死人啊 ...
- linux中mysql主从备份
在centos中安装mysql详细步骤说明 条件:需要两个虚拟机,一台为主服务器master,一台为从服务器slave 1 在master主服务中,创建用于同步的用户 mysql> gr ...
- Solidworks如何隐藏零件细节,如何让零件变成一个输入
先把东西另存为IGS格式 再次打开这个IGS文件,凡是看到这个对话框都选择取消,然后确定 打开之后,还是可以看到文件结构,但是再打开每个零件都变成了输入,所以就相当于隐藏了文件细节,不知道怎么 ...
- ppm图像格式
http://blog.csdn.net/r91987/article/details/5435328 PPM文件格式分三种: 1. PPM灰度文件 文件头由3行文本组成,可由fgets读出 ...
- Python多线程问题的资料查找与汇总
Python多线程问题的资料查找与汇总 声明: 1)本报告由博客园bitpeach撰写,版权所有,免费转载,请注明出处,并请勿作商业用途. 2)若本文档内有侵权文字或图片等内容,请联系作者bitpea ...
- 使用python进行图像处理-调整图片大小
python有一个图像处理库——PIL,可以处理图像文件.PIL提供了功能丰富的方法,比如格式转换.旋转.裁剪.改变尺寸.像素处理.图片合并等等等等,非常强大. 举个简单的例子,调整图片的大小: im ...
- SQL数据库有阻塞就自动发邮件警报
1.建查询是否有阻塞的视图 create view [dbo].[VW_WaitingCount] as SELECT s.session_id, r.blocking_session_id, s.h ...
- python打包exe文件-ImportError: No module named 'queue'
我之前遇到的一个错误就是 File "site-packages\urllib3\packages\six.py", line 92, in __get__ File " ...
- 实现Windows Server 2003多用户远程登录(转载)
Windows Server 2003默认情况下允许远程终端连接的数量是2个用户,我们可以根据需要适当增加远程连接同时在线的用户数. 单击“开始→运行”,输入“gpedit.msc”打开组策略编辑器窗 ...
- PHP REST架构简单设计
REST是什么? REST(Representational State Transfer表述性状态转移)是一种针对网络应用的设计和开发方式,可以降低开发的复杂性,提高系统的可伸缩性. REST的特点 ...