Sketch网页截屏插件设计开发
1、需求
在Sketch的Artboard中插入网页截图:
1.1、输入网址,自动截图到Artboard中,并居中显示;
1.2、可截取网页局部图片
2、技术选型
技术的选型主要是针对截图功能的选型,插件技术选用sketch-webview-kit。
截图技术主要有phantomjs、puppeteer、html2canvas等技术可以实现截图功能。
phantomjs、puppeteer是 headless 浏览器技术,puppeteer依赖于node,它们的主要区别如下:

html2canvas可以通过获取HTML的某个元素,然后生成Canvas,能让用户保存为图片。
通过需求分析,puppeteer更适合需求,headless + 部分截图,且node的环境更符合前端技术。
确定使用puppeteer构建一个截图的node服务。
node服务框架采用eggjs。egg.js是阿里推出的基于koa的node开发框架,可为截图提供提供稳定的node服务。
3、设计
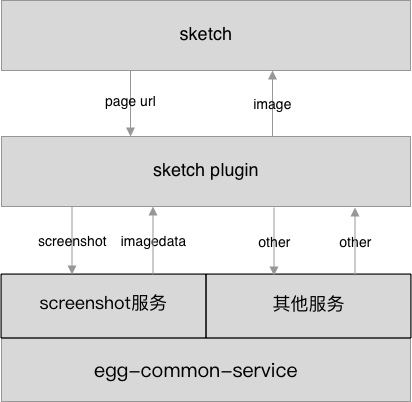
3.1 架构
构建node基础的框架egg-common-service,在egg-common-service的基础上提供Screenshot截图服务。
Sketch Plugin调取Screenshot截图服务,将web page的截图插入到sketch中。
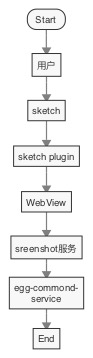
3.2 流程
用户在Sketch中发起Screenshot指令;
在Sketch WebView界面中输入截图需要的信息,向egg-common-service 发起Screenshot截图服务请求;
egg-common-service Screenshot服务返回截图的base64信息给Sketch WebView;
Sketch WebView将图片base64信息传递给Sketch Plugin;
Sketch Plugin将base64图片绘制在Sketch Artboard中。
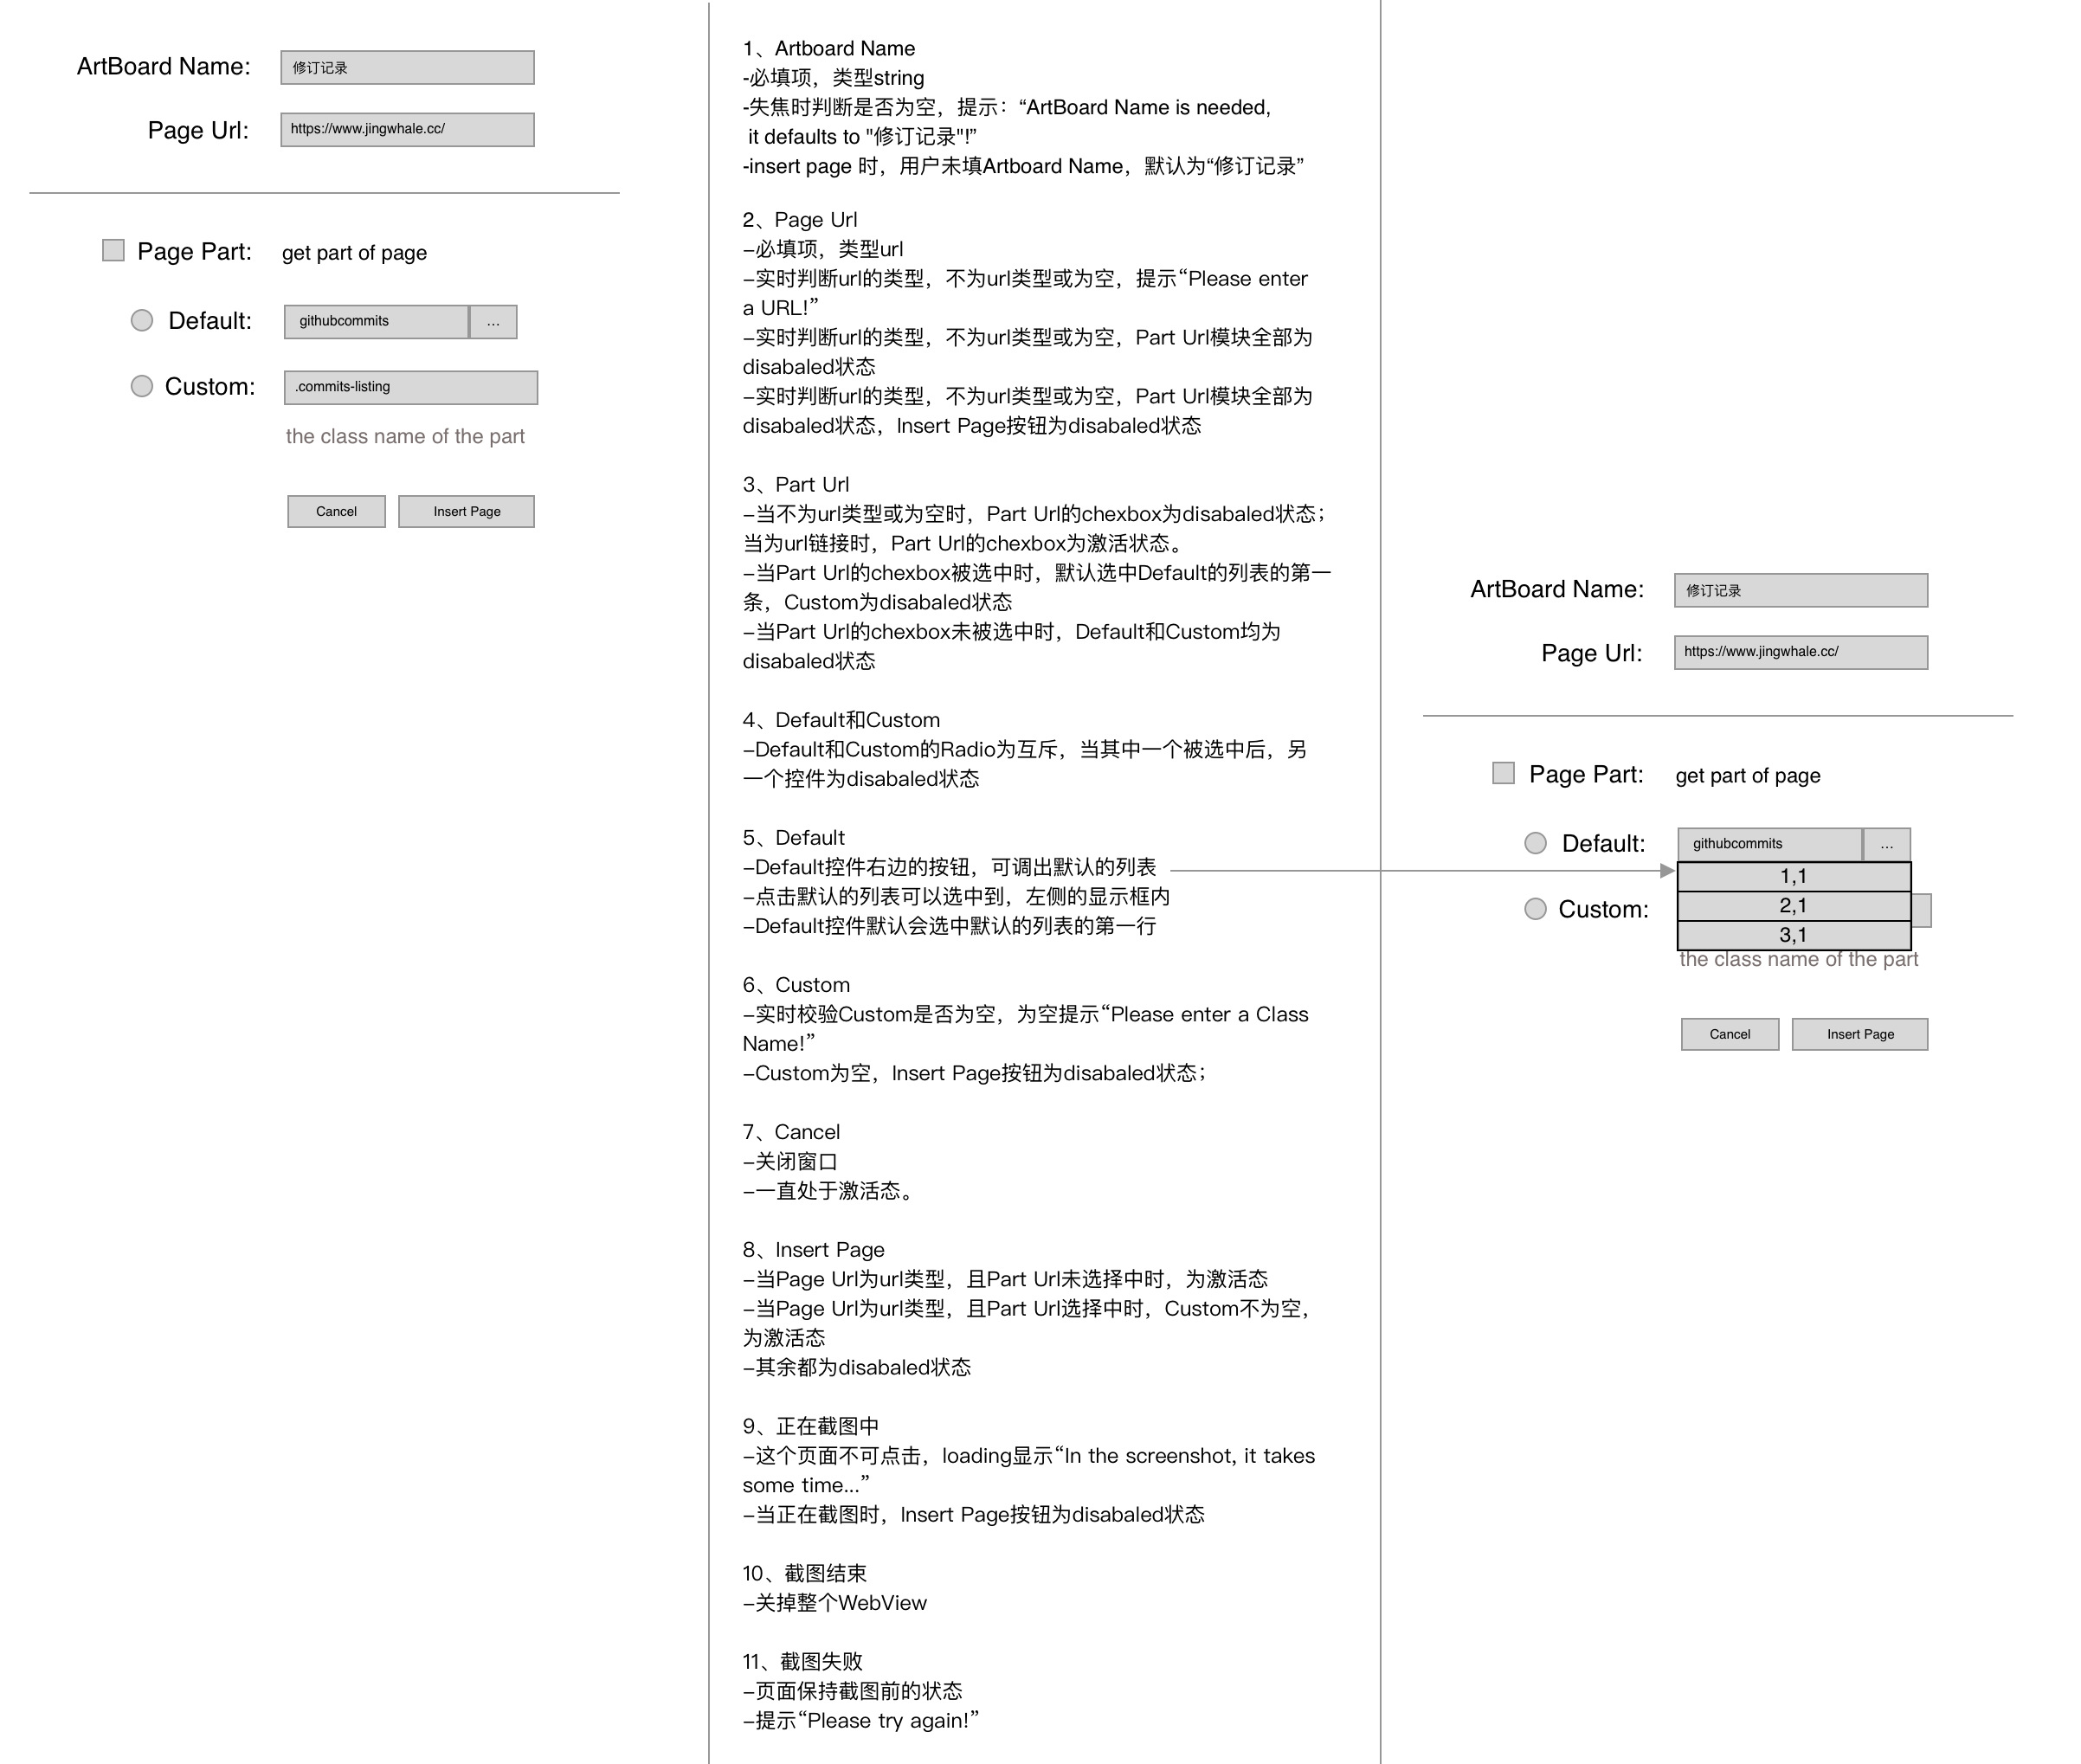
3.3 交互设计
交互设计的主要在WebView部分,详细的设计如下:
4、开发
4.1、Sketch Plugin
4.1.1、主要功能代码:
let win = new BrowserWindow({

        width: 408,

        height: 356,

        title:"Web Screen Shot",

        resizable:false,

        minimizable:false,

        maximizable:false,

        closable:true

    });

    win.on('closed', () => {

        win = null

    });

    const Panel = `http://localhost:8000/screenshot.html#${Math.random()}`;

    win.loadURL(Panel);

    const closeWin = () =>{

        win.destroy();

        win.close();

    };

    var contents = win.webContents;

    //监听webview的事件:webview->plugin

    contents.on('fromwebview', function(data) {

        getImageFrame(data);//在ArtBoard中返回回来的base64图片

        sketch.UI.message("Successfully screenshot and insert into Artboard!");

        closeWin();

    });

    contents.on('closed', function(s) {

        closeWin();

    });
4.1.2、请求处理
使用axios进行数据处理:
安装axios:
$ npm install axios
使用:
const axios = require('axios');

axios.get('/user', {

    params: {

      ID:

    }

  })

  .then(function (response) {

    console.log(response);

  })

  .catch(function (error) {

    console.log(error);

  })

  .then(function () {

    // always executed

  });

  axios.post('/user', {

    firstName: 'Fred',

    lastName: 'Flintstone'

  })

  .then(function (response) {

    console.log(response);

  })

  .catch(function (error) {

    console.log(error);

  });
主要功能代码:
<Spin spinning={spinning} tip="In the screenshot, it takes some time...">

      <div className={styles.body}>

          <div className={styles.url}>

            <span className={styles.itemName}>ArtBoard Name:</span><Input size={size} className={styles.urlInputCss} value={artBoardName} onChange={this.artBoardNameChange} placeholder={artBoardNamePlaceholder} onBlur={this.artBoardNameOnBulr}/>

          </div>

          <div className={styles.url}>

              <span className={styles.itemName}>Page Url:</span><Input size={size} className={styles.urlInputCss} value={url} onChange={this.urlChange} placeholder={urlPlaceholder}/>

          </div>

          <div className={styles.line}></div>

          <div className={styles.part}>

            <span className={styles.itemName}><Checkbox size={size} className={styles.checkbox} defaultChecked={false} checked={isPart} onChange={this.partChange} disabled={checkboxDisabled}></Checkbox>Page Part:</span>

            <span className={styles.partTips}>get part of page</span>

            <div className={styles.partPannel}>

              <RadioGroup onChange={this.onRadioChange} value={this.state.radioType} disabled={radioDisabled}>

                <Radio className={styles.radioStyle} value={1} defaultChecked={true}>

                  <span className={styles.radioName}>Default:</span>

                 <Dropdown.Button overlay={menu} size={size} disabled={dropdownDisabled}>

                   {partTypeDefalt.githubcommits.name}

                </Dropdown.Button></Radio>

                <Radio className={styles.radioStyle} value={2}>

                  <span className={styles.radioName}>Custom:</span>

                  <Input addonBefore="." size={size} className={styles.urlInputCss} value={partId} onChange={this.partIdChange} placeholder={partIdPlaceholder} disabled={partIdDisabled}/></Radio>

                  <div className={partIdDisabled?styles.partIdTips:styles.partIdTipsLight}>the class name of the part</div>

              </RadioGroup>

            </div>

            <div className={styles.line1}></div>

            <div className={styles.buttons}>

              <Button size={size} onClick={this.onCancel} className={styles.button}>{cancel}</Button>

              <Button size={size} onClick={this.insertPage} type="primary" disabled={buttonDisabled}>{button}</Button>

            </div>

          </div>

      </div>

      </Spin>
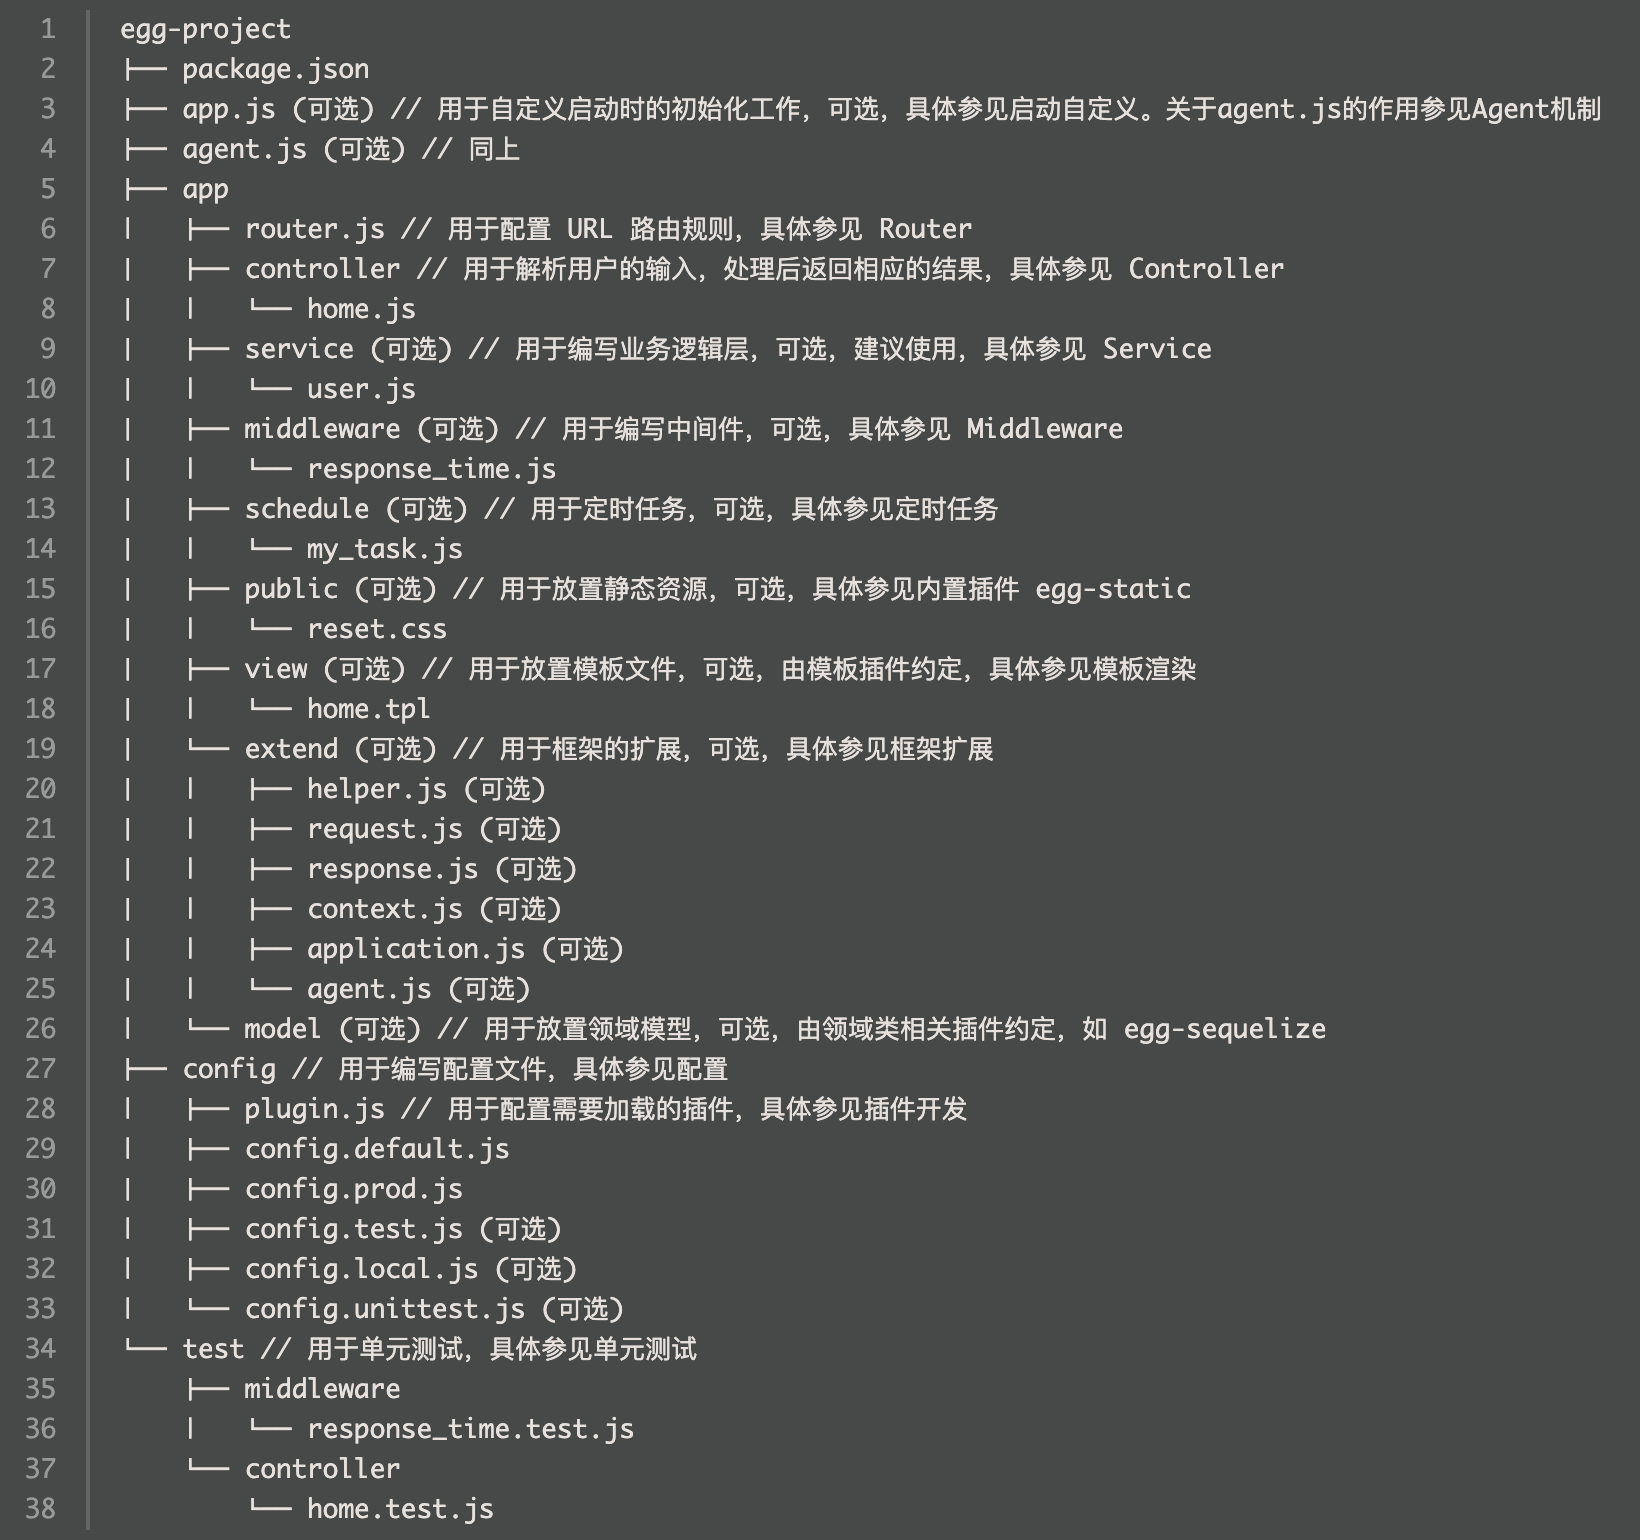
4.3.1、参考文档
1)、目录结构
2)、跨配置
使用egg-cors插件,配置如下:
config/plugin.js
exports.cors = {

    enable: true,

    package: 'egg-cors'

};
'use strict';

module.exports = appInfo => {

  const config = exports = {}

  // use for cookie sign key, should change to your own and keep security

  config.keys = appInfo.name + '_1513779989145_1674'

  // add your config here

  // 加载 errorHandler 中间件

  config.middleware = [ 'errorHandler' ]

  // 只对 /api 前缀的 url 路径生效

  // config.errorHandler = {

  //   match: '/api',

  // }

  config.rpc = {

    // registry: {

    //   address: '127.0.0.1:2181',

    // },

    // client: {},

    // server: {},

  };

  config.security = {

    csrf: {

      enable: false,

    },

    domainWhiteList: [ 'http://localhost:8000' ],

  }

  config.cors = {

    origin: '*',

    allowMethods: 'GET,HEAD,PUT,POST,DELETE,PATCH'

  };

  config.multipart = {

    fileExtensions: [ '.apk', '.pptx', '.docx', '.csv', '.doc', '.ppt', '.pdf', '.pages', '.wav', '.mov' ], // 增加对 .apk 扩展名的支持

  }

  return config

}
-get请求
let query = this.ctx.query;

let name = query.name;

let id = query.id;
let query = this.ctx.request.body;

let name = query.name;

let id = query.id;
this.ctx.body = {

    code: 0,

    data: '返回的数据',

    msg: '错误数据'

}
4.3.2、创建egg-common-service
1)、快速生成项目
$ npm i egg-init -g

$ egg-init egg-common-service --type=simple

$ cd egg-common-service

$ npm i
$ npm run dev

$ open localhost:700
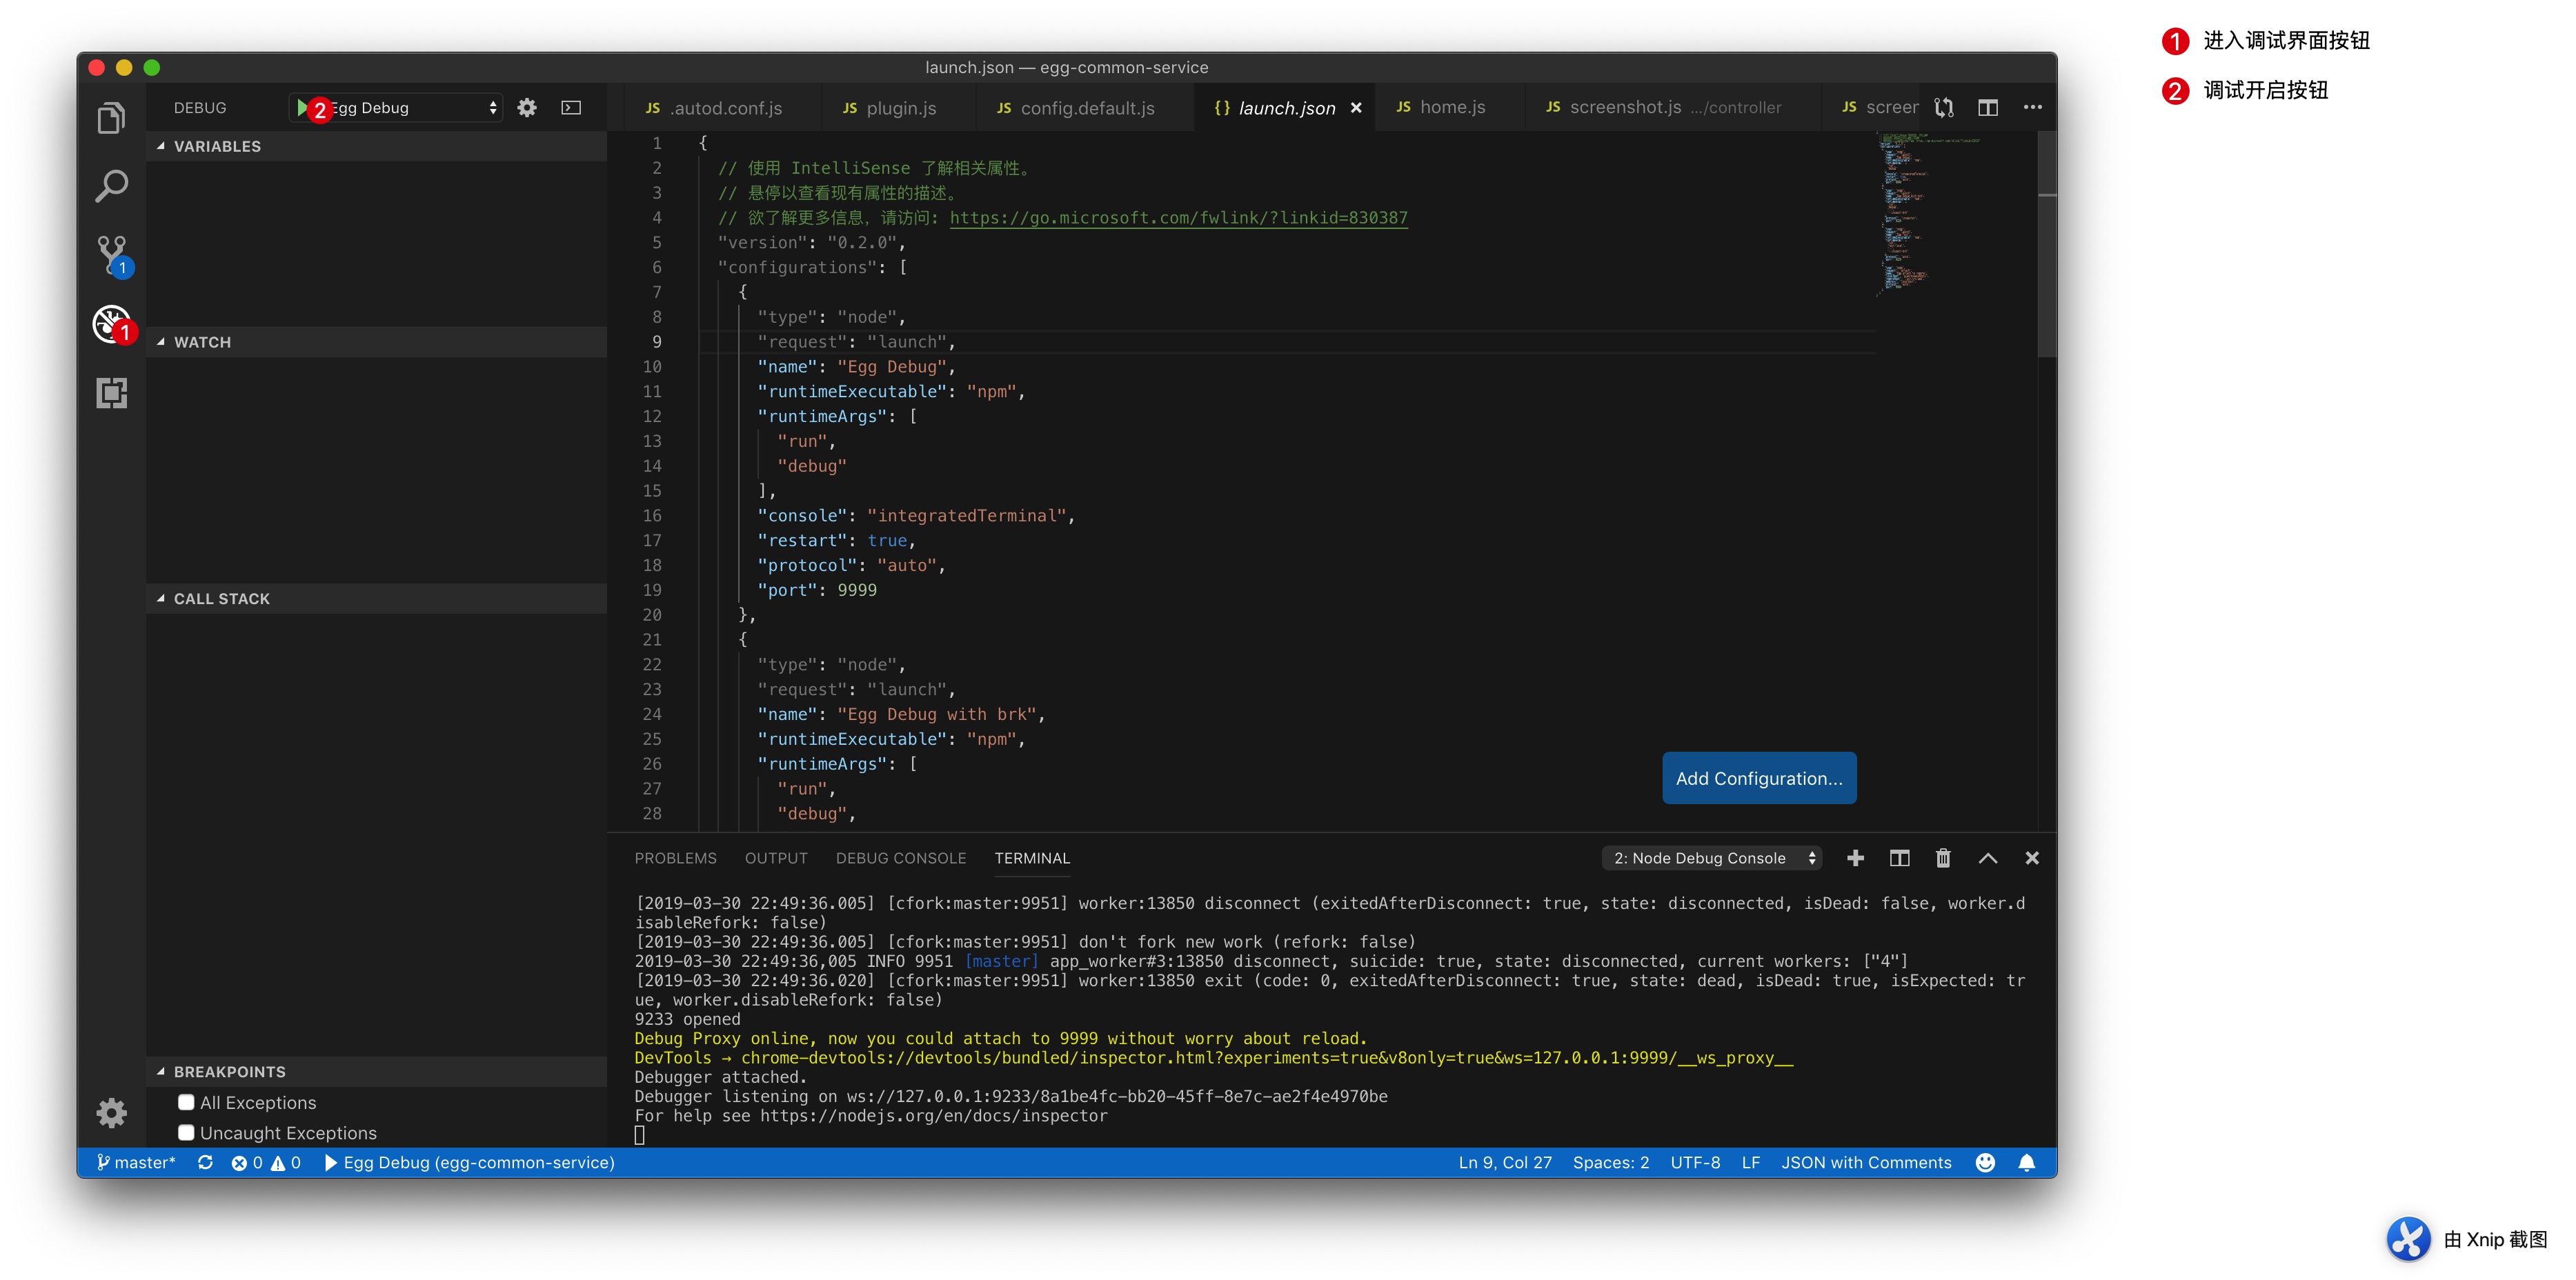
使用VS Code开发和调试。
1)、调试配置,在egg-common-service根目录下添加.vscode文件夹,向.vscode中添加launch.json,launch.json内容如下:
{

  // 使用 IntelliSense 了解相关属性。

  // 悬停以查看现有属性的描述。

  // 欲了解更多信息,请访问: https://go.microsoft.com/fwlink/?linkid=830387

  "version": "0.2.0",

  "configurations": [

    {

      "type": "node",

      "request": "launch",

      "name": "Egg Debug",

      "runtimeExecutable": "npm",

      "runtimeArgs": [

        "run",

        "debug"

      ],

      "console": "integratedTerminal",

      "restart": true,

      "protocol": "auto",

      "port": 9999

    },

    {

      "type": "node",

      "request": "launch",

      "name": "Egg Debug with brk",

      "runtimeExecutable": "npm",

      "runtimeArgs": [

        "run",

        "debug",

        "--",

        "--inspect-brk"

      ],

      "protocol": "inspector",

      "port": 9229

    },

    {

      "type": "node",

      "request": "launch",

      "name": "Egg Test",

      "runtimeExecutable": "npm",

      "runtimeArgs": [

        "run",

        "test-local",

        "--",

        "--inspect-brk"

      ],

      "protocol": "auto",

      "port": 9229

    },

    {

      "type": "node",

      "request": "attach",

      "name": "Egg Attach to remote",

      "localRoot": "${workspaceRoot}",

      "remoteRoot": "/usr/src/app",

      "address": "localhost",

      "protocol": "auto",

      "port": 9999

    }

  ]

}
2)、依次点击,进入调试状态
4.4、Puppeter
4.4.1、Puppeter能做什么?
Puppeteer 是一个通过 DevTools Protocol 控制 headless chrome 的 high-level Node 库,也可以通过设置使用 非 headless Chrome。
我们手工可以在浏览器上做的事情 Puppeteer 都能胜任:
1)、生成网页截图或者 PDF
2)、爬取大量异步渲染内容的网页,基本就是人肉爬虫
3)、模拟键盘输入、表单自动提交、UI 自动化测试
官方提供了一个 playground,可以快速体验一下。关于其具体使用不在赘述,官网的 demo 足矣让完全不了解的同学入门:
const puppeteer = require('puppeteer');

(async () => {

  const browser = await puppeteer.launch();

  const page = await browser.newPage();

  await page.goto('https://example.com');

  await page.screenshot({path: 'example.png'});

  await browser.close();

})();
4.4.2、安装
Puppeteer有Puppeteer与Puppeteer-Core二个版本,二者区别:
1).Puppeteer-Core在安装时不会自动下载 Chromium
2).Puppeteer-Core忽略所有的PUPPETEER_* env 变量.
使用npm安装:
npm i puppeteer or puppeteer-core
4.4.3、使用
https://www.cnblogs.com/dolphinX/p/7715268.html
http://www.mamicode.com/info-detail-2302923.html
https://blog.csdn.net/asas1314/article/details/81633423
https://www.jianshu.com/p/8e65fdcb6d85
4.4.4、linux下puppeteer使用要点
1)、pupper下载了一个Chromium,但并没有把依赖都装好。于是要自己把so都装好。
官方给的是Ubuntu版本的各个so包的apt-get安装方式,centos版本居然没有放!但是还是有人给出了centos的库名:
#依赖库

yum install pango.x86_64 libXcomposite.x86_64 libXcursor.x86_64 libXdamage.x86_64 libXext.x86_64 libXi.x86_64 libXtst.x86_64 cups-libs.x86_64 libXScrnSaver.x86_64 libXrandr.x86_64 GConf2.x86_64 alsa-lib.x86_64 atk.x86_64 gtk3.x86_64 -y

#字体

yum install ipa-gothic-fonts xorg-x11-fonts-100dpi xorg-x11-fonts-75dpi xorg-x11-utils xorg-x11-fonts-cyrillic xorg-x11-fonts-Type1 xorg-x11-fonts-misc -y
修改启动浏览器的代码,加上args:
const puppeteer = require('puppeteer');

(async () => {

  const browser = await puppeteer.launch({args: ['--no-sandbox', '--disable-setuid-sandbox']});

  const page = await browser.newPage();

  await page.goto('https://example.com');

  await page.screenshot({path: 'example.png'});

  await browser.close();

})();
3)、Macaca-puppeteer
阿里的Macaca也顺势写了Macaca-puppeteer,可以在Macaca上直接写通用的测试用例,在开发机上用图形界面看效果,上服务器走生产。
Macaca顺便还提供了一个基于Ubuntu的Macaca-puppeteer的Docker。
4)、使用await page.waitFor('div.Card');来等待页面的指定元素加载完成
4.5、Screenshot 功能代码
4.5.1、router.js
'use strict';

module.exports = app => {

  const { router, controller } = app;

  router.get('/', controller.home.index);

  router.post('/service/screenshot', controller.screenshot.screenshot);

};
4.5.2、新建controller screenshot.js
'use strict';

const Controller = require('egg').Controller;

class ScreentshotController extends Controller {

  constructor(ctx) {

      super(ctx)

      this.dataValidate = {

        appkey: { type: 'string', required: true, allowEmpty: false },

        url: { type: 'string', required: true, allowEmpty: false },

        isPart: { type: 'boolean', required: true, allowEmpty: false }

      }

  }

  async screenshot() {

      const { ctx, service } = this

      // 校验参数

      ctx.validate(this.dataValidate)

      // 组装参数

      const payload = ctx.request.body || {}

      // 调用 Service 进行业务处理

      const res = await service.screenshot.screenshot(payload)

      // ctx.body = res;

       // 设置响应内容和响应状态码

    ctx.helper.success({ctx, res})

  }

}

module.exports = ScreentshotController;
4.5.3、新建service screenshot.js
'use strict'

const Service = require('egg').Service

const puppeteer = require('puppeteer')

const fs = require('fs');

const path = require('path');

const images = require("images");

const mineType = require('mime-types');

const APPKEY = "jingwhale";

const partTypeDefalt = {

    githubcommits:".commits-listing"

};

var part = "";

class ScreenshotService extends Service {

    async base64img(file){//生成base64

        let filePath = path.resolve(file);

        let data = fs.readFileSync( path.resolve(filePath));

        let imageData = images(filePath);

        var backData = {

            base64: data,

            width: imageData.width(),

            height: imageData.height()

        }

        backData.base64 = new Buffer(data).toString('base64');

        return backData;

    }

    async screenshot(payload) {

        const { ctx, service } = this

        if(payload.appkey!=APPKEY){

            ctx.throw(404, 'appkey不正确!');

        }

        const browser = await puppeteer.launch();

        const page = await browser.newPage();

        var path = 'screenshot.png'

        var backData = {};

        var id = payload.id

        await page.goto(payload.url);

        part = page;

        var partId = payload.partId;

        if(payload.isPart){

            if(payload.partType===1){//自定义

                console.log(payload.partType)

            }else{//默认

                partId = partTypeDefalt[payload.partType];

            }

            var partArr = await page.$$(partId);

            part = partArr[0];

        }

        // //调用页面内Dom对象的screenshot 方法进行截图

        try { // 截图

            await part.screenshot({path: path, type: 'png'}).catch(err => {

                console.log('截图失败');

                console.log(err);

            });

        }catch (e) {

            console.log('执行异常');

            ctx.throw(404, '执行异常')

        } finally {

            await page.close();

            await browser.close();

        }

        var base64imgData = this.base64img(path)

        return base64imgData

    }

}

module.exports = ScreenshotService
6、总结
技术给我更多的受益是解决问题的方式与思路。
很多重复单一的任务,都可以使用技术解决。
提高效率,留出更多的时间去设计。
Work Smart,Think more,Do Less,Get More.
Sketch网页截屏插件设计开发的更多相关文章
- 用Javascript开发网页截屏插件
实现思路用html2canvas.js将元素转换成canvas,在将canvas转成图片. html2canvas(document.body, { onrendered: function(canv ...
- Java实现网页截屏功能(基于phantomJs)
公司最近有个需求:把用户第一次的测量身体信息和最近一次测量信息进行对比,并且需要把对比的数据截成图片可以发给用户(需要在不打开网页的情况下实时对网页进行截图然后保存到服务器上,返回图片地址),通过网上 ...
- Web截屏插件
官方网站:http://www.ncmem.com 官方博客:http://www.cnblogs.com/xproer 产品首页:http://www.ncmem.com/webplug/scppr ...
- 利用PhantomJS进行网页截屏,完美解决截取高度的问题
关于PhantomJS PhantomJS 是一个基于WebKit的服务器端 JavaScript API.它全面支持web而不需浏览器支持,其快速,原生支持各种Web标准: DOM 处理, CSS ...
- PhantomJS linux系统下安装步骤及使用方法(网页截屏功能)
PhantomJS 是一个基于 WebKit 的服务器端 JavaScript API.它全面支持web而不需浏览器支持,其快速,原生支持各种Web标准: DOM 处理, CSS 选择器, JSON, ...
- WLW 截屏插件
转载:http://www.xtit.net/post/1030/ 一直以来用WLW更新博客,刚刚在DailyApps看到一个关于Windows Live Writer的截屏插件,相当不错. 是由MS ...
- 利用PhantomJS进行网页截屏
利用PhantomJS进行网页截屏 关于PhantomJS PhantomJS 是一个基于WebKit的服务器端 JavaScript API.它全面支持web而不需浏览器支持,其快速,原生支持各种W ...
- Python 实现网页截屏、查库、发邮件
本文介绍了使用 Python(2.7版本)实现网页截屏.查库.发邮件的 demo.用到了 selenium.phantomjs.mailer.jinja2.mysqldb 还有 image,都是比较典 ...
- php结合phantomjs实现网页截屏、抓取js渲染的页面
首先PhantomJS快速入门 PhantomJS是一个基于 WebKit 的服务器端 JavaScript API.它全面支持web而不需浏览器支持,其快速,原生支持各种Web标准: DOM 处理, ...
随机推荐
- linux有名管道fifo,进程间通信
命名管道(FIFO)不同于无名管道之处在于它提供了一个路径名与之关联,以 FIFO 的文件形式存在于文件系统中,这样,即使与 FIFO 的创建进程不存在亲缘关系的进程,只要可以访问该路径,就能够彼此通 ...
- Kafka命令清单
一.队列常用命令 #创建topics $ ./kafka-topics.sh --create --zookeeper chenx02:2181 --replication-factor 1 --pa ...
- 二、Windows下TortoiseGit的安装与配置
TortoiseGit 简称 tgit, 中文名海龟Git. 海龟Git只支持神器 Windows 系统, 有一个前辈海龟SVN, TortoiseSVN和TortoiseGit都是非常优秀的开源的版 ...
- xmldocument内嵌入另一个xmldocument,xmlnode的方法
string xmlstr1 = @"<root><head>myHead</head><body></body></roo ...
- 5分钟开发一个简单的基于HTML5的移动应用
首先写一个config.xml 代码如下: <?xml version="1.0" encoding="UTF-8"?> <widget xm ...
- SpringBoot学习(一)—— web项目基础搭建
首先我们在浏览器打开这个网站 https://start.spring.io/ 打开后可以看到以下页面 在这里我们可以快速搭建一个SpringBoot基础项目,填写和选择完相应的信息后,我们点击那个绿 ...
- [Luogu1365] WJMZBMR打osu! / Easy
Description 某一天WJMZBMR在打osu~~~但是他太弱逼了,有些地方完全靠运气:( 我们来简化一下这个游戏的规则 有 \(n\) 次点击要做,成功了就是o,失败了就是x,分数是按com ...
- 详解promise、async和await的执行顺序
1.题目和答案 一道题题目:下面这段promise.async和await代码,请问控制台打印的顺序? async function async1(){ console.log('async1 sta ...
- jquery之商城菜单
实现效果:悬浮总菜单,显示分类菜单,移走隐藏总菜单,悬浮分类菜单,显示商品种类,移走隐藏商品种类和分类菜单,悬浮商品种类,显示商品种类和分类菜单,移走隐藏商品菜单和分类菜单. 代码如下: <!D ...
- nginx 匹配规则小总结
nginx location 等号类型(=)的优先级最高,需要精确匹配.一旦匹配成功,则不再查找其他匹配项. ^~类型表达式.一旦匹配成功,则不再查找其他匹配项. 正则表达式类型(~ ~*)的优先级次 ...